1. Query Resolvers
-
지금까지 했던 것은 GraphQL Schema 정의 언어이다.
-
Apollo가 누군가의 tweet을 요청하는 것을 본다면 Apollo는 resolvers의 query로 갈거고 tweet function을 실행 시킨다.
-
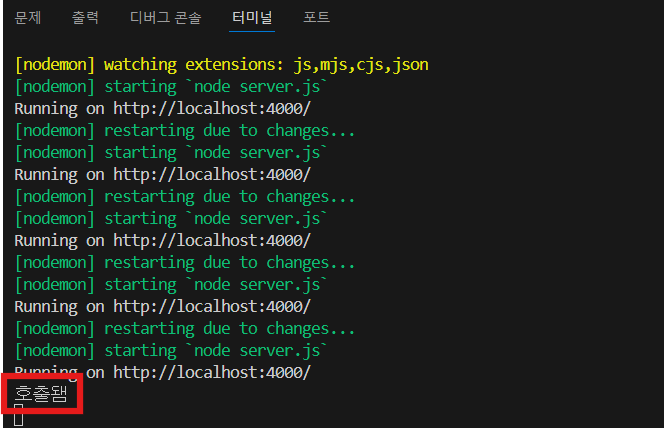
Query 타입 tweet에서 아무 에러도 나서는 안된다. 왜냐하면 이 경우 Tweet은 nullable이기 때문이다.
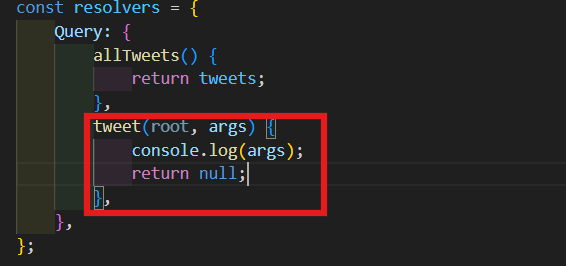
const resolvers = {
    Query: {
        tweet() {
            console.log("호출됌");
            return null;
        },
    },
};

const server = new ApolloServer({ typeDefs, resolvers });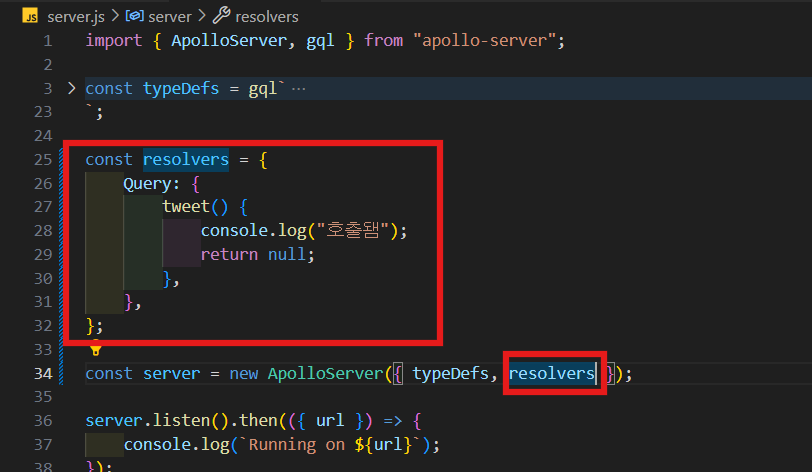
-
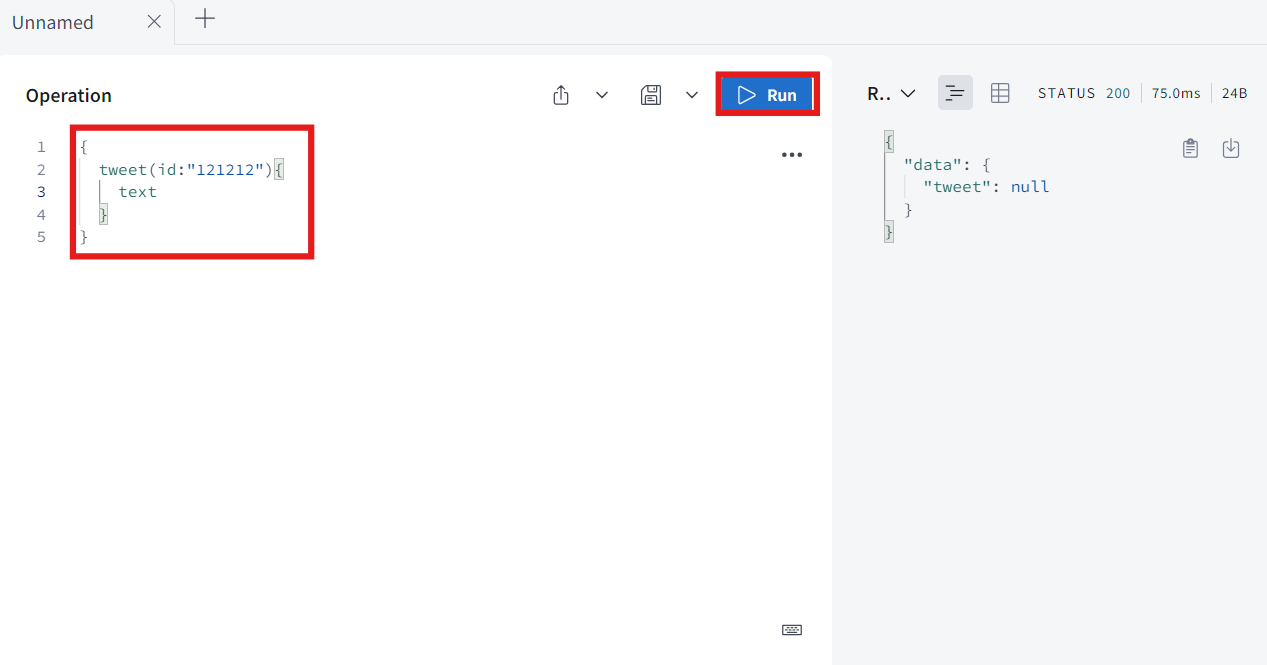
tweet이라고 하고 id는 required이기 때문에 아무거나 써주고 text를 받을 것이다.
-
그럼 null값이 나오고 console에는 "호출됌"이 나온다.
-
누군가 field를 요청했을 때 실제로 호출될 함수인 것이다.
-
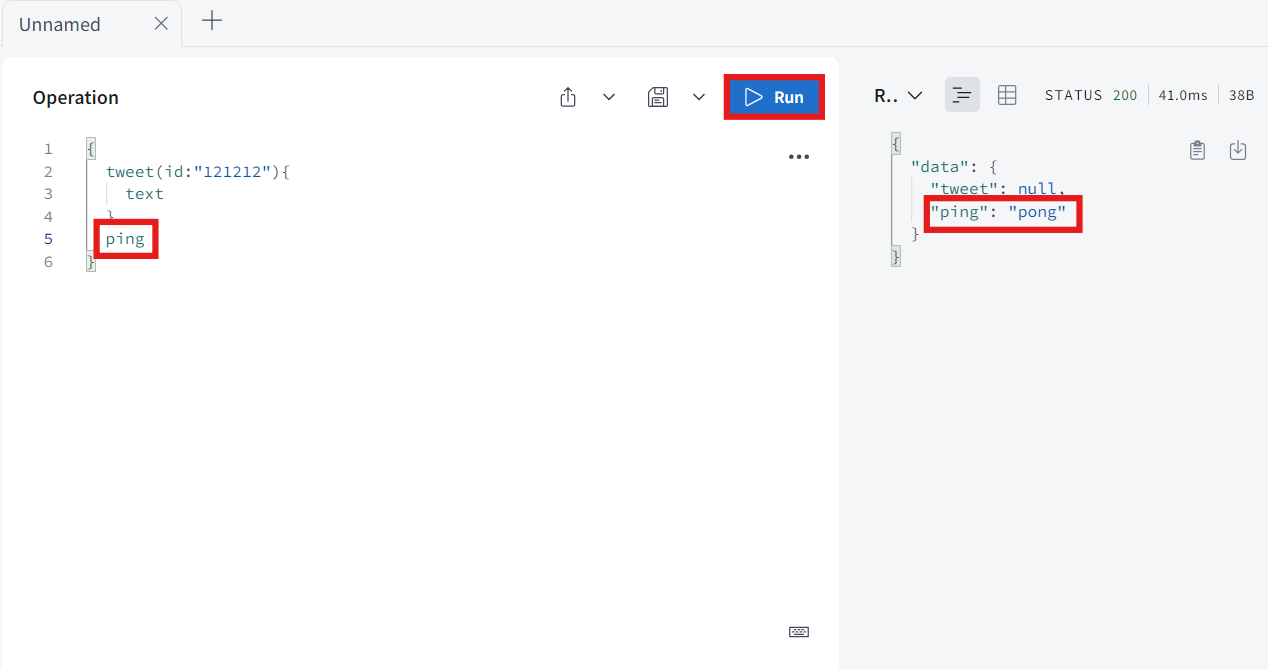
ping이라고 불리는 field를 만들고 String을 return 한다고 하고 resolvers에 ping function이고 여기서 'pong'을 return을 할 것이다.

-
ping이라고 쿼리하면 ping은 pong이 나온다.
-
Query 타입에서 ping은 지워 줄 것이다.
-
이제 이 작업들을 시행할 가짜 데이터베이스를 만들 차례이다.
-
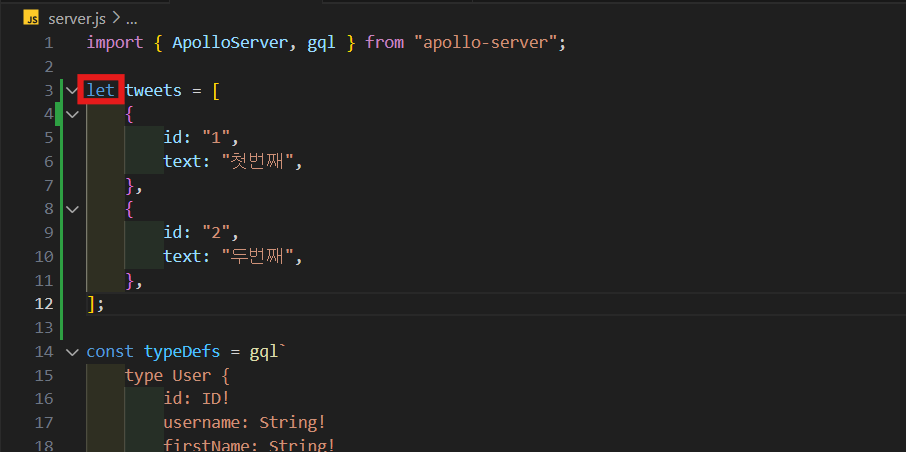
allTweets filed의 resolver를 만드는 것부터 시작할 것이다. 그리고 이걸 위해서 tweet의 list가 필요하다.
-
Tweet 타입 author에서 required 없애줄 것이다.
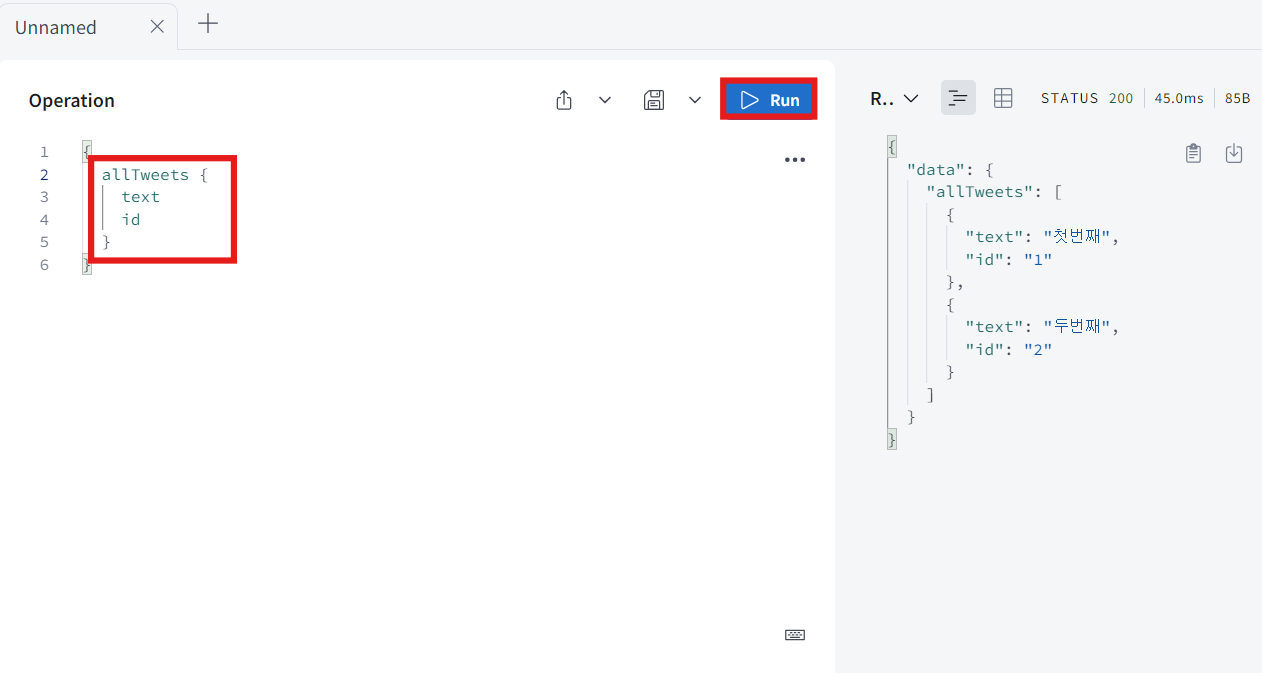
const tweets = [
{
id: "1",
text: "첫번째",
},
{
id: "2",
text: "두번째",
},
];
const typeDefs = gql`
type User {
id: ID!
username: String!
firstName: String!
lastName: String!
}
type Tweet {
id: ID!
text: String!
author: User
}
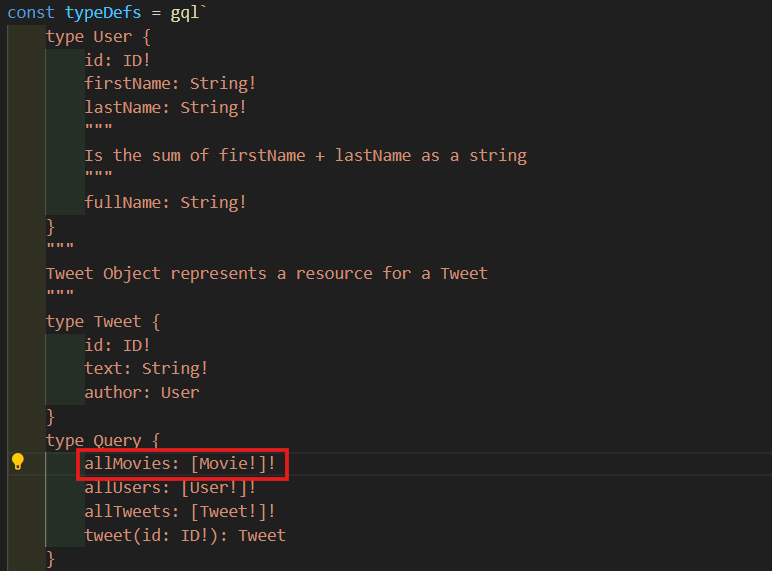
type Query {
allTweets: [Tweet!]!
tweet(id: ID!): Tweet
ping: String!
}
type Mutation {
postTweet(text: String!, userId: ID!): Tweet!
deleteTweet(id: ID!): Boolean!
}
`;
const resolvers = {
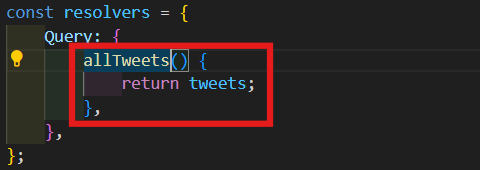
Query: {
allTweets() {
return tweets;
},
},
};
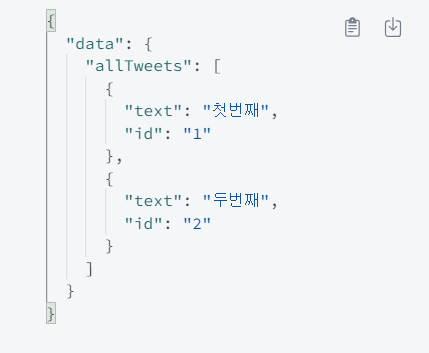
- query allTweet를 실행해서 모든 id와 text를 가져와 볼 것이다.
-
여기서 arguments에 대해 알아볼 것이다. 왜냐하면 user에게 그들이 요청한 id의 tweet을 return해야 하기 때문이다.
-
Apollo 서버가 resolver function을 부를 때 function에게 어떤 argument를 준다.
-
첫번째 건 root argument라고 하고, 두번째 건 네가 원하는 바로 이 argument이다.
-
일단 지금은 root는 무시할거고 이 args(arguments)만 console.log할 것이다.
-
tweet resolver는 non-nullable이 아니기 때문에 null을 return을 return해도 괜찮다.
-
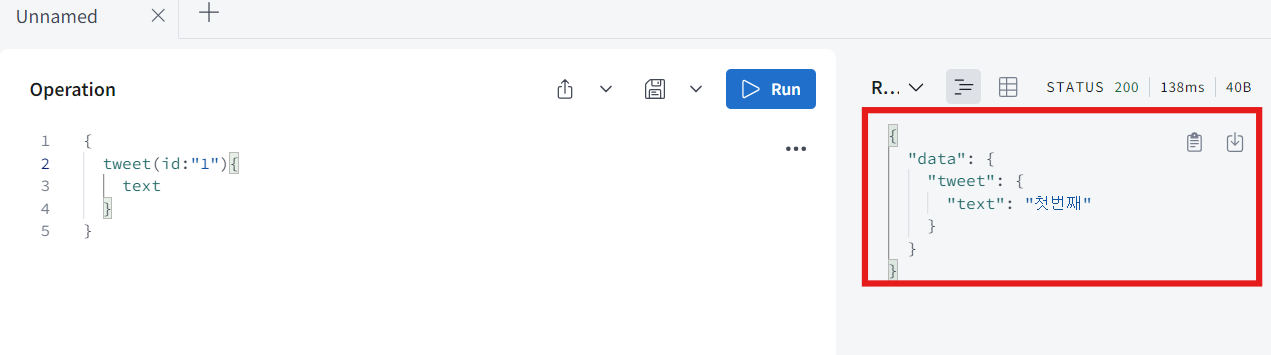
tweet을 id는 1이라 적고 text를 받아와 볼 것이다.
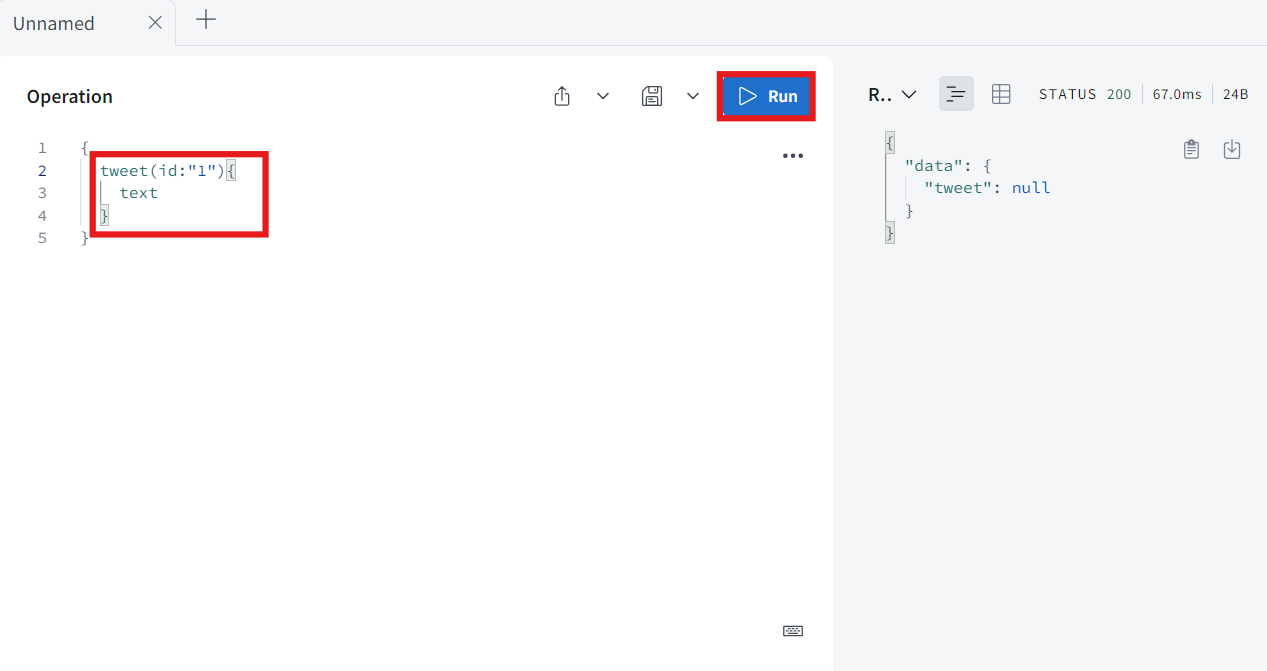
-
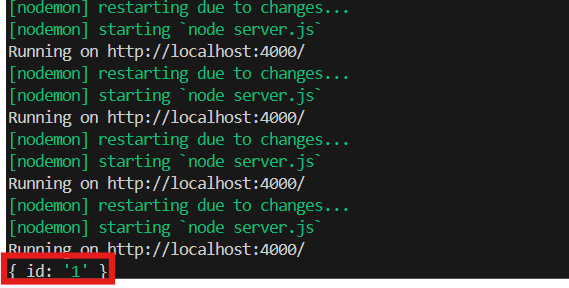
resolver 했던 것와 같이 null이지만 console을 보면 { id: '1' }이 출력된다.
-
user가 arguments를 보낼 때 그 arguments들은 항상 너의 resolver function의 두번째 argument가 된다.
-
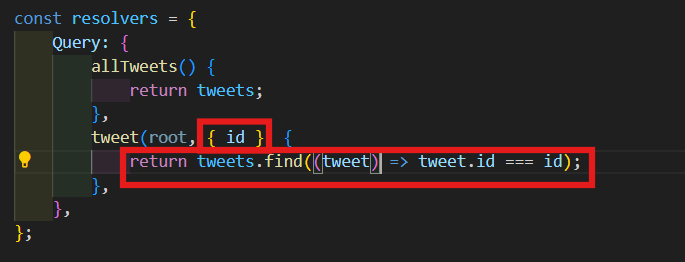
그럼 이걸 풀어서 id를 가져 올 것이다. 이제 javascript로 Tweets 배열 안에 있는 Tweet을 찾아 볼 것이다.
tweet(root, { id }) {
	return tweets.find((tweet) => tweet.id === id);
},
-
이것은 우리가 할 진짜 작업은 아니다. 아마 나중엔 여기서 데이터베이스에 접근해서 어떤 SQL 코드를 실행시킬 것이다.
-
이제 다시 tweet을 id는 1이라 적고 text를 받아와 보면 아까 적은 tweet이 나올 것이다.
2. Mutation Resolvers
-
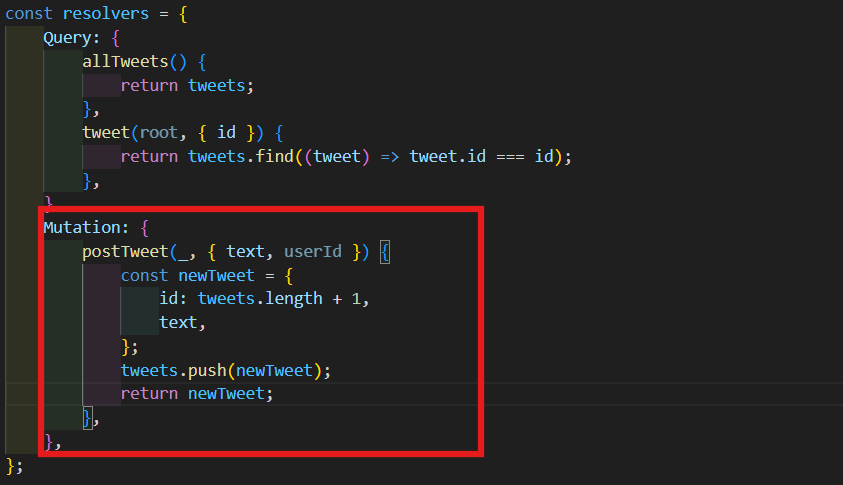
mutation type에 대한 resolver를 만들고 싶다면 resolvers에 와서 Mutation이라고 쓰면 된다. 그리고 올바른 field를 가져와야 한다는 걸 잊지말아야 한다.
-
즉, 이 상황에서 postTweet mutation의 resolver를 실행할려고 한다.
-
첫번째 argument로 root를 받아올 건데 일단은 무시해준다. 그리고 우리가 원하는 두가지를 받아오기 위해 중괄호를 열어준다.
-
이 mutation에서 할려고 하는건 새 tweet을 만드는 일이다.
-
id는 현재 tweets의 길이에 1을 더한 값이 될 것이다.
-
text는 그냥 넣어주면 된다.
-
이제 우리의 database인 tweets에 newTweet을 push 시킬 것이다.
-
postTweet mutation은 항상 우리가 만든 새 tweet을 줘야한다. 그래서 newTweet을 return 해 줄 것이다.
Mutation: {
	postTweet(_, { text, userId }) {
		const newTweet = {
			id: tweets.length + 1,
			text,
		};
		tweets.push(newTweet);
		return newTweet;
	},
},
- postTweet을 호출해 볼 것이다. text는 아무말이나 적어주고, userId는 일단 1로 적어준다.
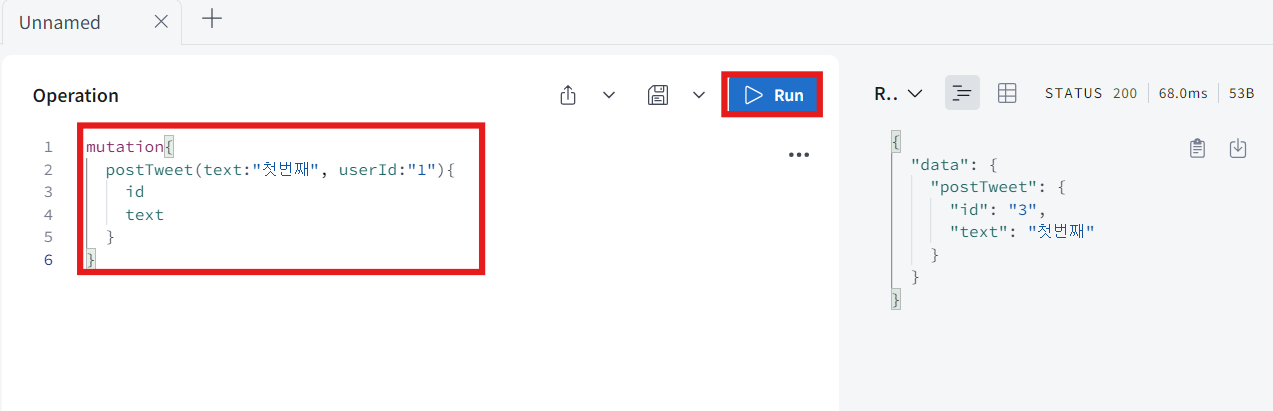
-
보이는 것처럼 새 tweet을 받아냈다. 그리고 allTweet에 대한 query를 만들어서 id와 text를 받아 올 것이다.
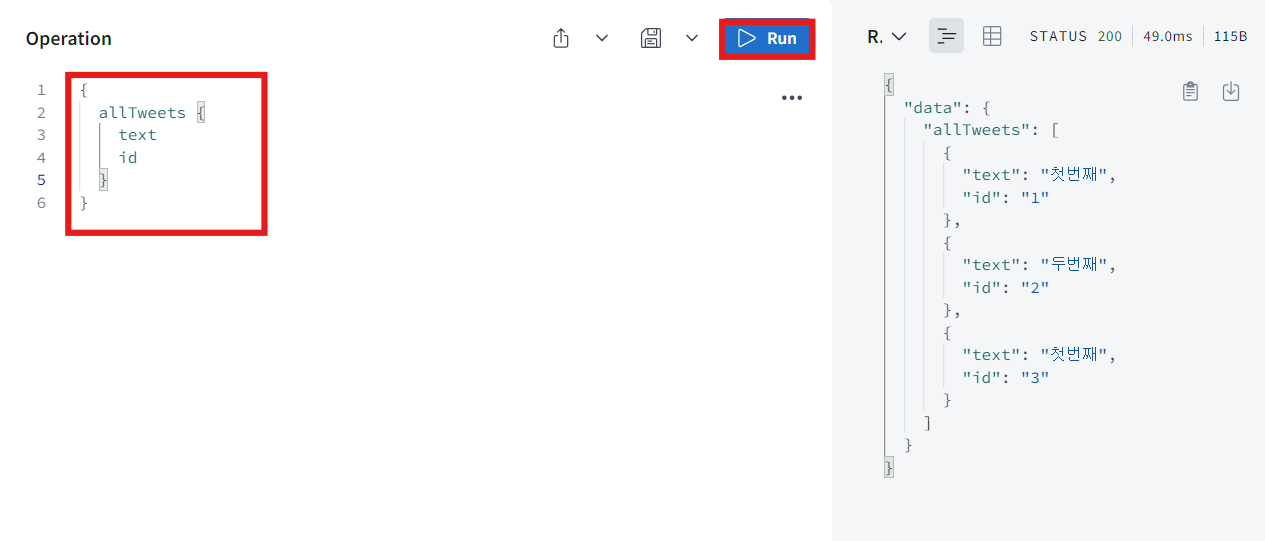
-
보다시피 새로 만든 tweet이 추가 됐다. 하지만 지금 이 database는 메모리에 있는 것이기 때문에 계속 유지되지 않는다.
-
코드 저장하고 재실행 하면 처음 상태로 돌아온다.
-
postTweet 한 것처럼 deleteTweet도 만들어 볼 것이다.
-
첫번째 argument는 무시해주고 mutation의 argument가 될 두번째 argument는 괄호 열고 id를 받아 올 것이다.
-
id로 내가 지우려고 하는 tweet을 찾는 작업을 우선으로 해야 한다.
-
tweets에서 id가 mutation의 argument에서 받은 id와 같은 tweet을 찾으면 된다. 만약 tweet을 찾지 못했다면 false를 return해 줄 것이고 찾았다면 그것을 삭제해 줄 것이다.
-
tweets database array를 정리하고 tweet의 id가 삭제할려는 id와 같지 않은 tweet들로 filter를 거치게 할 것이다.
-
tweets.filter는 array를 줄 것이기 때문에 tweets를 const에서 let으로 바꿔 줄 것이다.
-
filter 된 tweets으로 tweets을 바꿔주고 ture를 return해주면 된다.
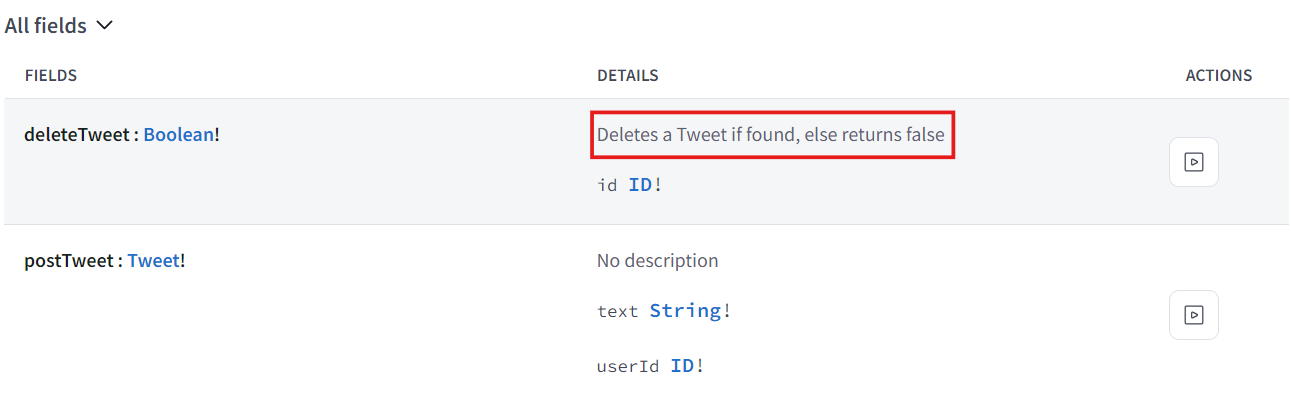
deleteTweet(_, { id }) {
	const tweet = tweets.find((tweet) => tweet.id === id);
	if (!tweet) return false;
	tweets = tweets.filter((tweet) => tweet.id !== id);
	return true;
},
-
이제 테스트를 해보면 만약 존재하지 않는 id로 테스트하면 false를 받을 것이고, 존재하는 id라면 ture를 받고 또한 실제로 tweets는 정리 될 것이다.
-
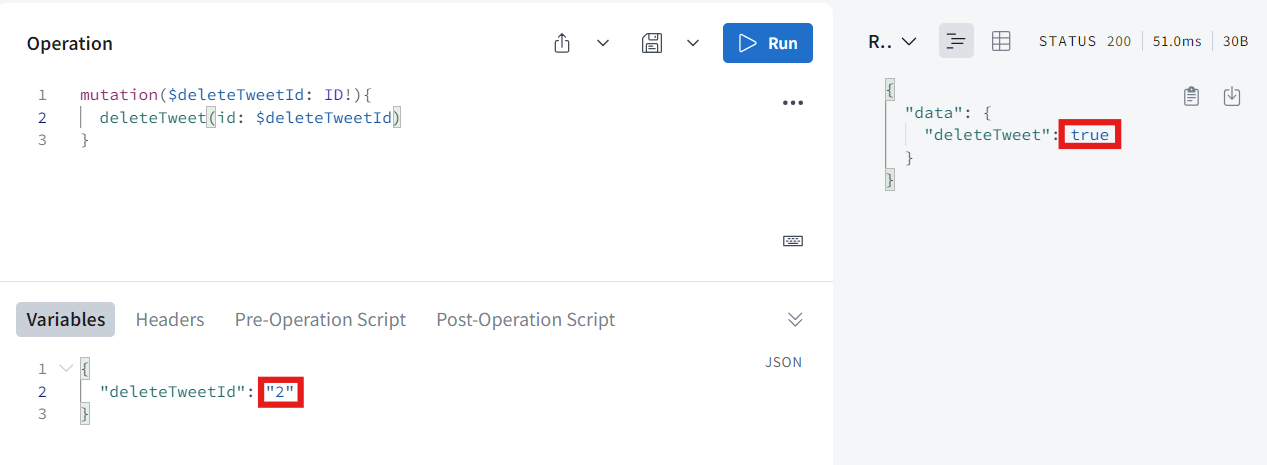
우선 allTweets부터 id와 text를 받아와 보면 id가 1하고 2가 나온다.

-
이제 id가 3인 tweet을 지워보면 false라고 나온다.
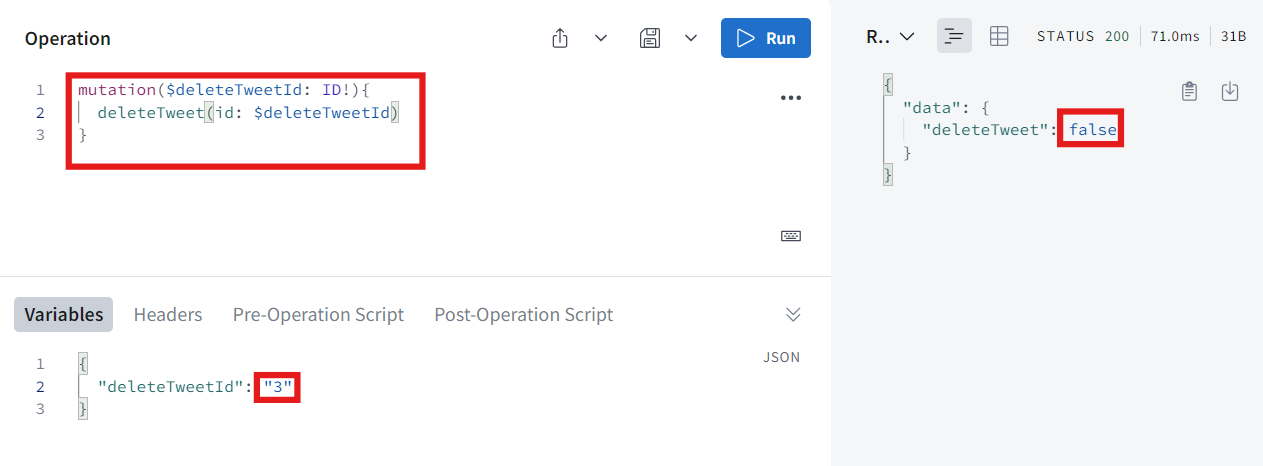
-
하지만 id가 2인 tweet을 지우려하면 ture라고 나온다.
3. Type Resolvers
-
Query나 Mutation 안에 있는 field만 얘기 하는게 아닌 어떤 type 내부의 어떤 field든 resolver function을 만들 수 있다.
-
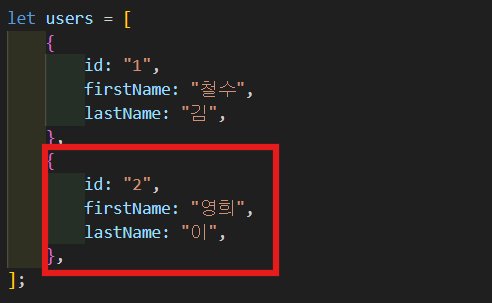
일단 user database를 만들어 볼 것이다.
let users = [
    {
        id: "1",
        firstName: "철수",
        lastName: "김",
    },
];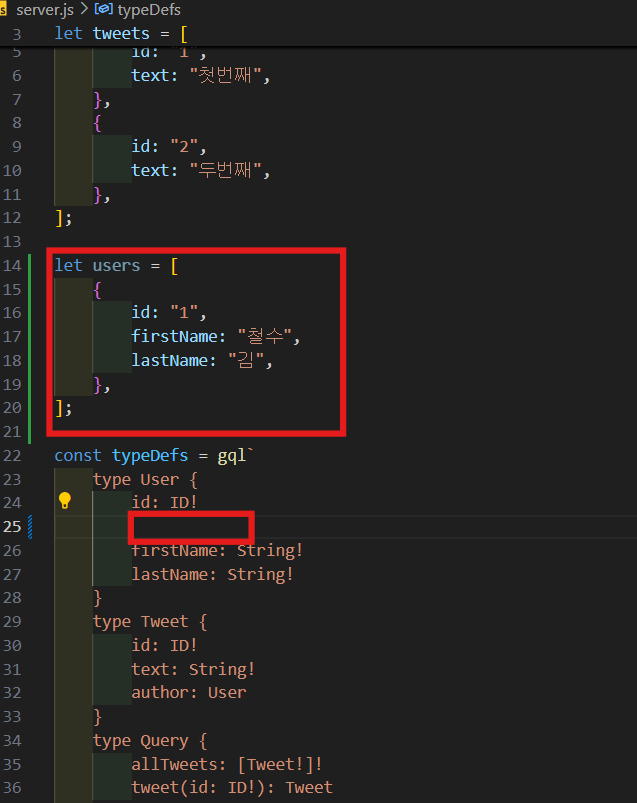
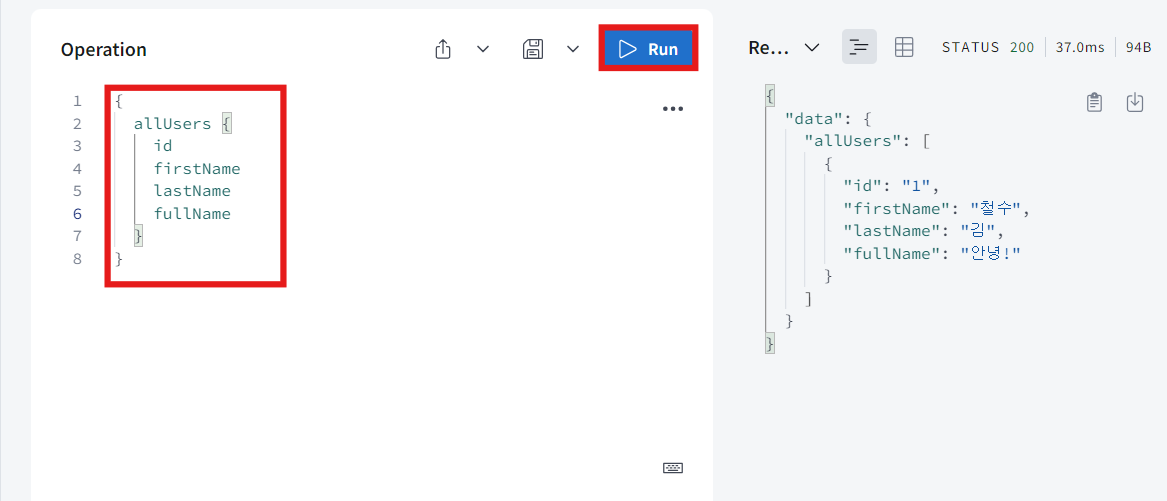
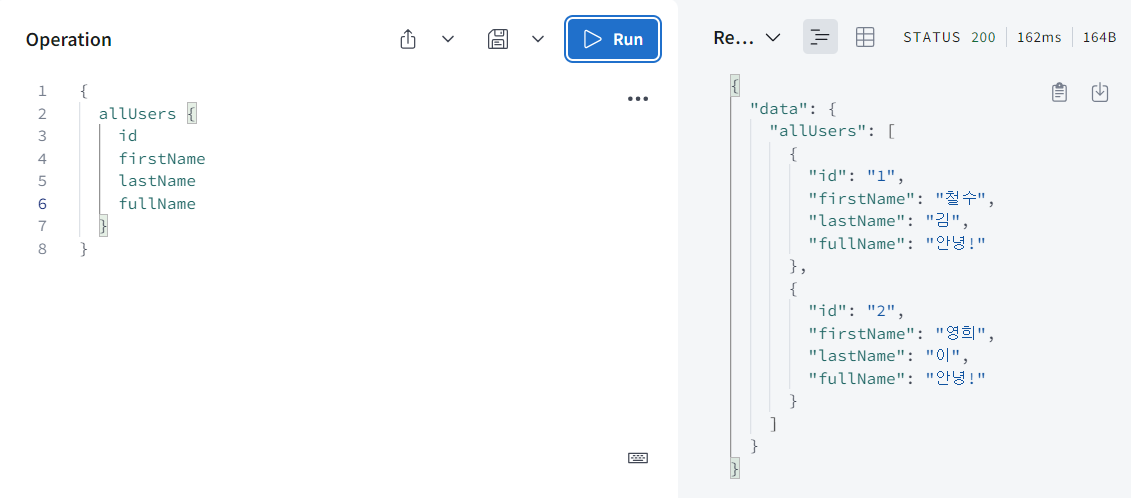
- 이제 새로운 Query를 하나 만들어 볼 것이다.
allUsers: [User!]!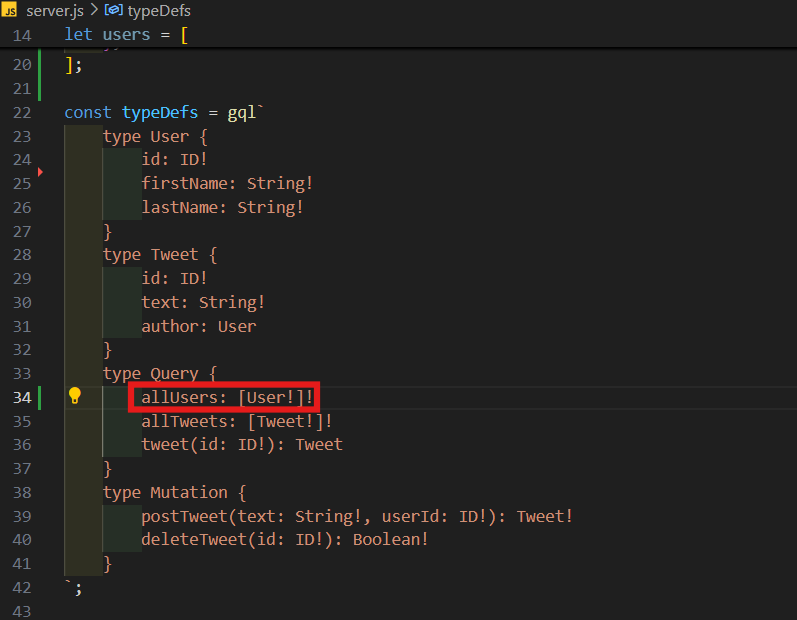
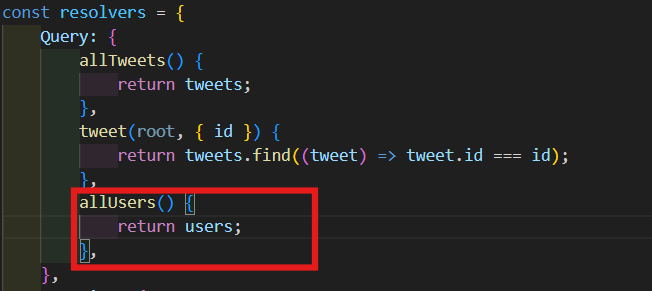
- Query Resolvers에 allUsers는 그냥 users를 return 하도록 한다.
allUsers() {
	return users;
},
-
지금 id, firstName, lastName은 database로 부터 오는 것이다. 그러니까 기본적으로 Apollo sever와 graphql은 return하는 object안에 id, firstName, lastName이 있을 거란 걸 알고 있다.
-
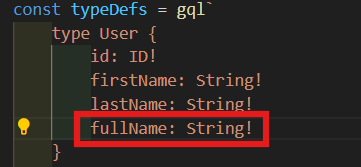
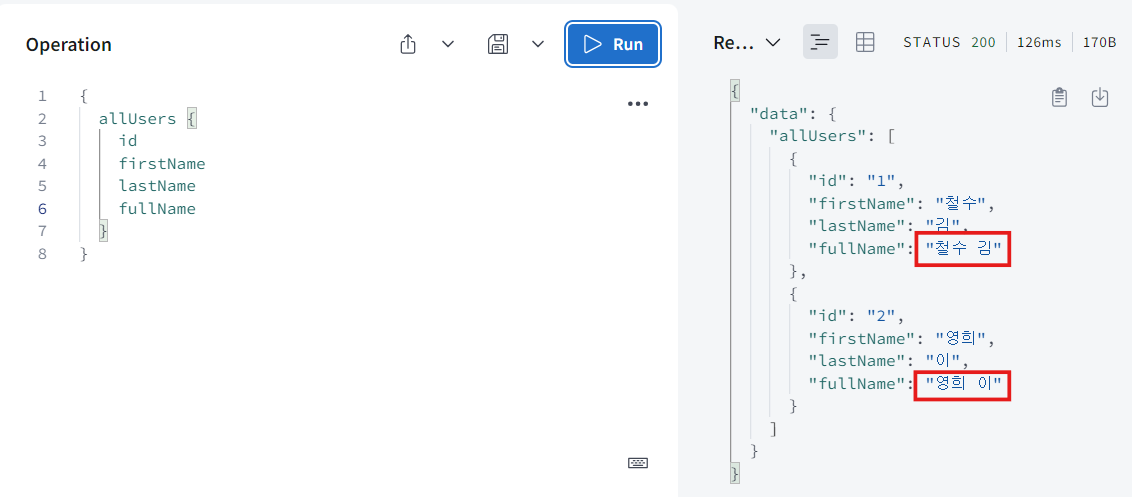
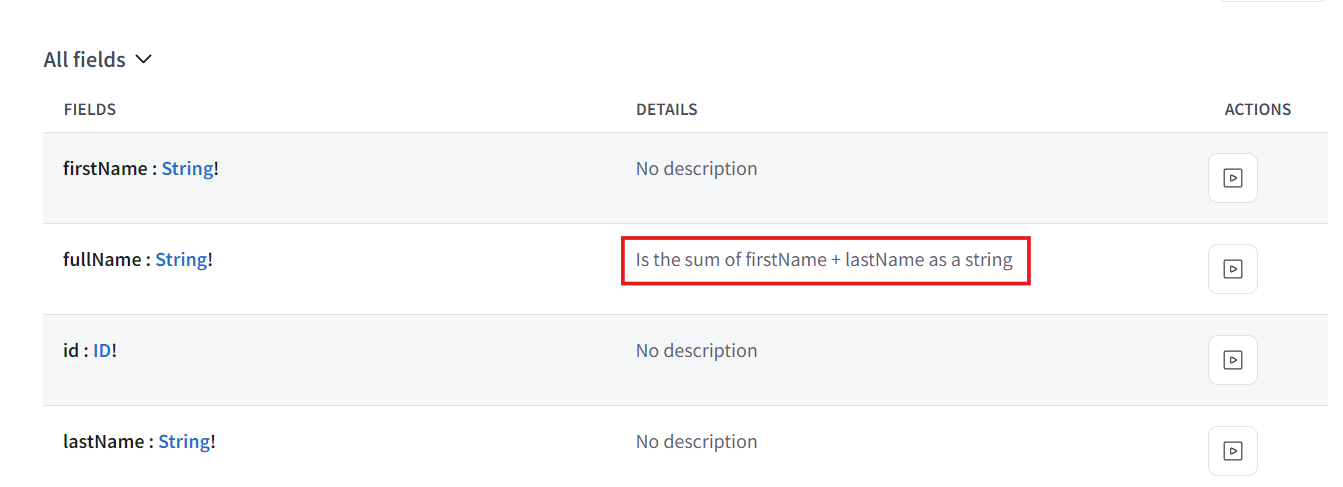
danamic field를 다뤄볼려고 한다. User type에 fullName 추가해준다. fullname은 danamic field이 될 것이다.
-
User는 fullName이란 걸 가지고 있고 "안녕!"을 return 할 것이다.
User: {
	fullName() {
		return "안녕!";
	},
},
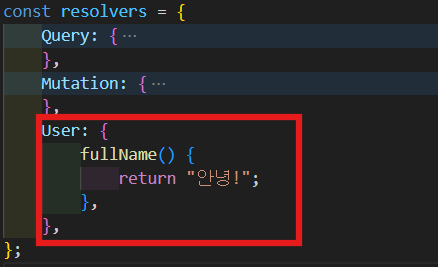
- 실행해보면 보다시피 잘 작동한다.
-
fullName은 return할 data에는 없다. 하지만 graphql이 작동 방식에 따라 fullName의 resolver가 발견돼서 fullName의 resolver가 호출된거다.
-
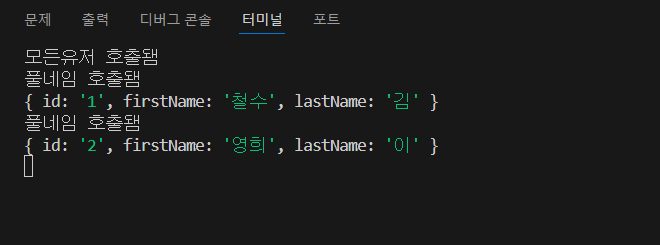
allUsers resolver하고 fullName resolver 중에 어떤게 먼저 실행되는지 console.log 통해 알아보자.
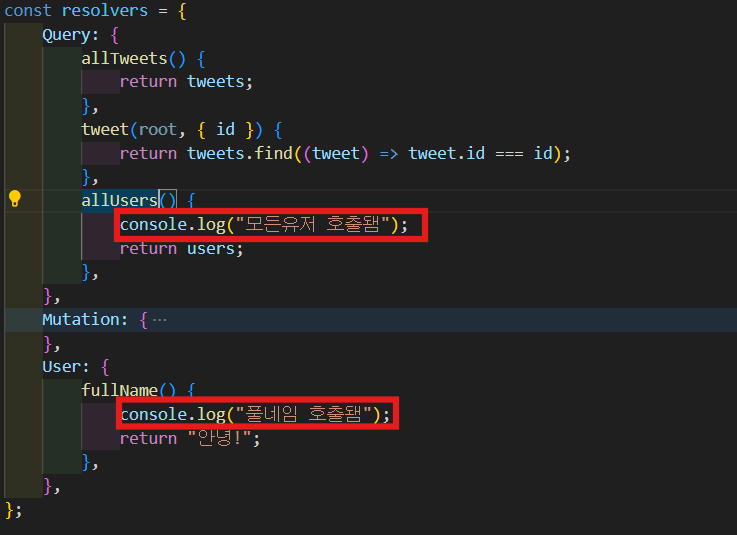
-
실행 해보면 보다시피 "모든유저 호출됌"이 먼저 출력된다. 이것을 보아 graphql이 allUsers resolver에 먼저 간다는 뜻이고 거기에 있는 모든 data를 가져왔다. 그리고 graphql은 allUsers가 return하는 data에 fullName field가 없다는 걸 알아차린거다. 그럼 graphql은 resolver를 찾을려 할 것이고 type Userd의 field 이름이 fullName인 것을 찾을 것이다. 그리고 graphql은 이 resolver 실행한다.
-
resolver의 첫번째 argument에서는 root query를 찾을 수 있다. fullName root를 가져오면, fullName을 호출하는 User를 보게 될 것이다.
-
보여 주기 위해 다른 User를 하나 만들어 볼거다. 그리고 root를 console.log 해 줄 거다.
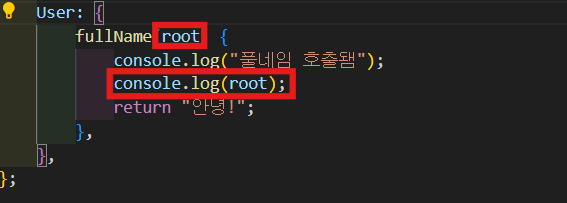
-
실행해보면 보다시피 두 명의 user가 있고 둘이 같은 fullName을 가지고 있다.
-
console.log를 보면 모든 유저가 호출되었다고 출력이된다. 하지만 풀네임은 두 번 호출되었다. 그 이유는 graphql이 찾으려고 했기 때문이다. 여기 root argument를 보면 이 resolver가 처음 호출됐을 때는 id가 1인 걸 받아왔고 두번째로 fullName이 호출되었을 때는 id가 2인 걸 받았다.
-
쉽게 말해 먼저 Query에 allUsers에 갔고 return해야 하는 두개의 User가 있으니까 graphql은 첫번째 User의 fullName을 호출했고 그 다음 두번째 User의 fullName을 호출한거다.
-
fullName 호출하는 User는 resolver function의 첫번째 argument에 있다는 것을 알 수 있다.
-
그럼 이걸 열어서 firstName하고 lastName만 받아 올 수 있다. 그리고 여기서 하나의 String을 return를 한다.
User: {
	fullName({ firstName, lastName }) {
		return `${firstName} ${lastName}`;
	},
},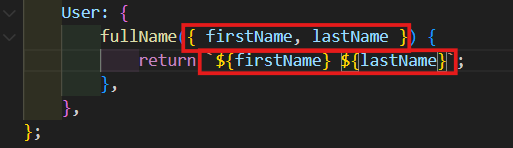
- 실행해보면 아주 잘 작동하는 것을 볼 수 있다.
4. Relationships
-
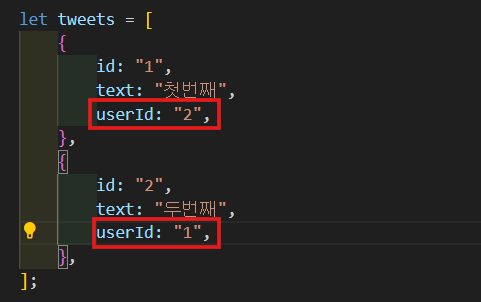
tweet한테 userId를 줄거다.
-
이건 SQL database가 저장하는 방식이랑 비슷하다. 실제로 foriegn key를 저장하고 join을 한다. 그래서 type resolver를 이용해서 join 비슷한 걸 해보려고 한다.
-
Tweet이라는 새로운 type resolver를 만들어 볼거다. author resolver의 첫번째 argument는 Tweet이 될거다. 거기서 userId만 받아 올거다. 이제 Array.find를 이용해서 tweet의 userId를 가진 user를 return 해줄거다.
Tweet: {
	author({ userId }) {
		return users.find((user) => user.id === userId);
	},
},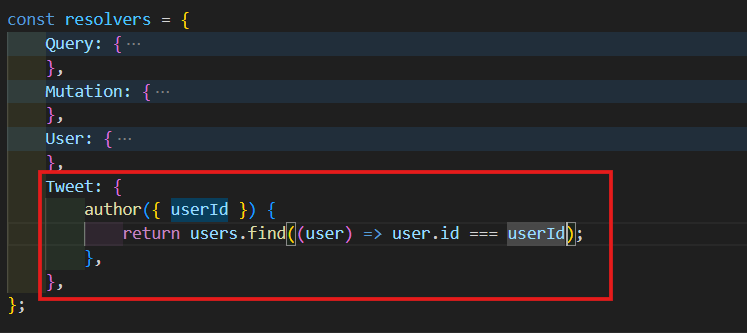
- 실행해보면 잘 작동하는 것을 볼 수 있다.

-
allTweet는 Query로서 먼저 호출되었고 많은 tweet들의 list를 return해준다. 즉, Tweet type을 return하려고 하는거다. 그럼 graphql이 Tweet resolver로 온다. 만약 author를 request 한다면 graphql은 tweets의 data에는 author라고 하는게 없다는 걸 알아차리고 graphql은 어딘가에 author resolver가 있어야한다는걸 알게 될거다. 그리고 author resolver가 찾고 graphql은 resolver의 첫번째 argument로 tweets의 모든 정보를 줄거다. 기본적으로 return하는 data인거다. 그리고 type User를 return하고 있고 type User의 fullName을 request하고 있다. user에게는 fullName이란게 없다는 것을 알고 resolver로 가서 User에 fullName resolver라는게 있다는 걸 알아차린다. 그래서 graphql은 이 User data를 fullName resolver한테 줘서 fullName이 산출되는거다.
-
보다시피 author와 fullName이라는 산출된 field를 두개 가지고 있다. 이것들은 database에는 없고 그때그때 산출해내는거다.
-
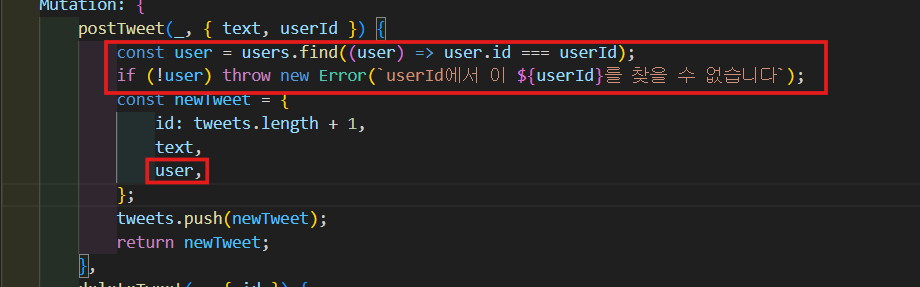
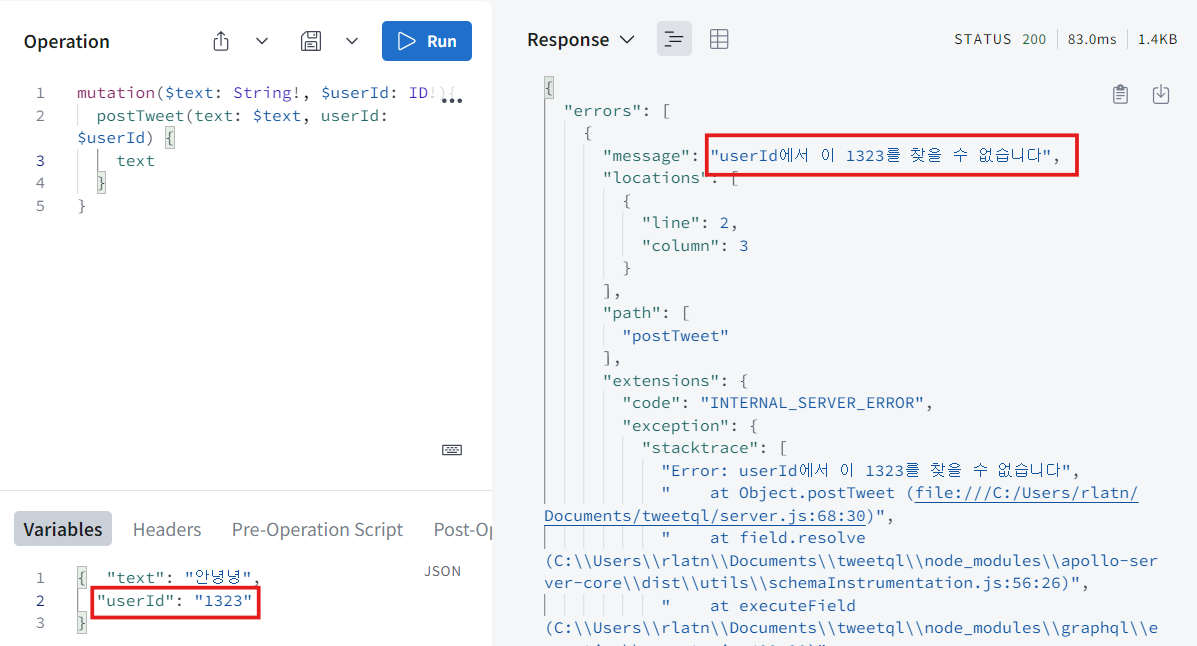
tweet 생성 전에 user database에 userId에 해당하는 user가 존재하는지 체크 후 없다면 에러를 띄우고 생성되지 않도록 한다.
const user = users.find((user) => user.id === userId);
if (!user) throw new Error(`userId에서 이 ${userId}를 찾을 수 없습니다`);
const newTweet = {
	id: tweets.length + 1,
	text,
	user,
};
5. Documentation
-
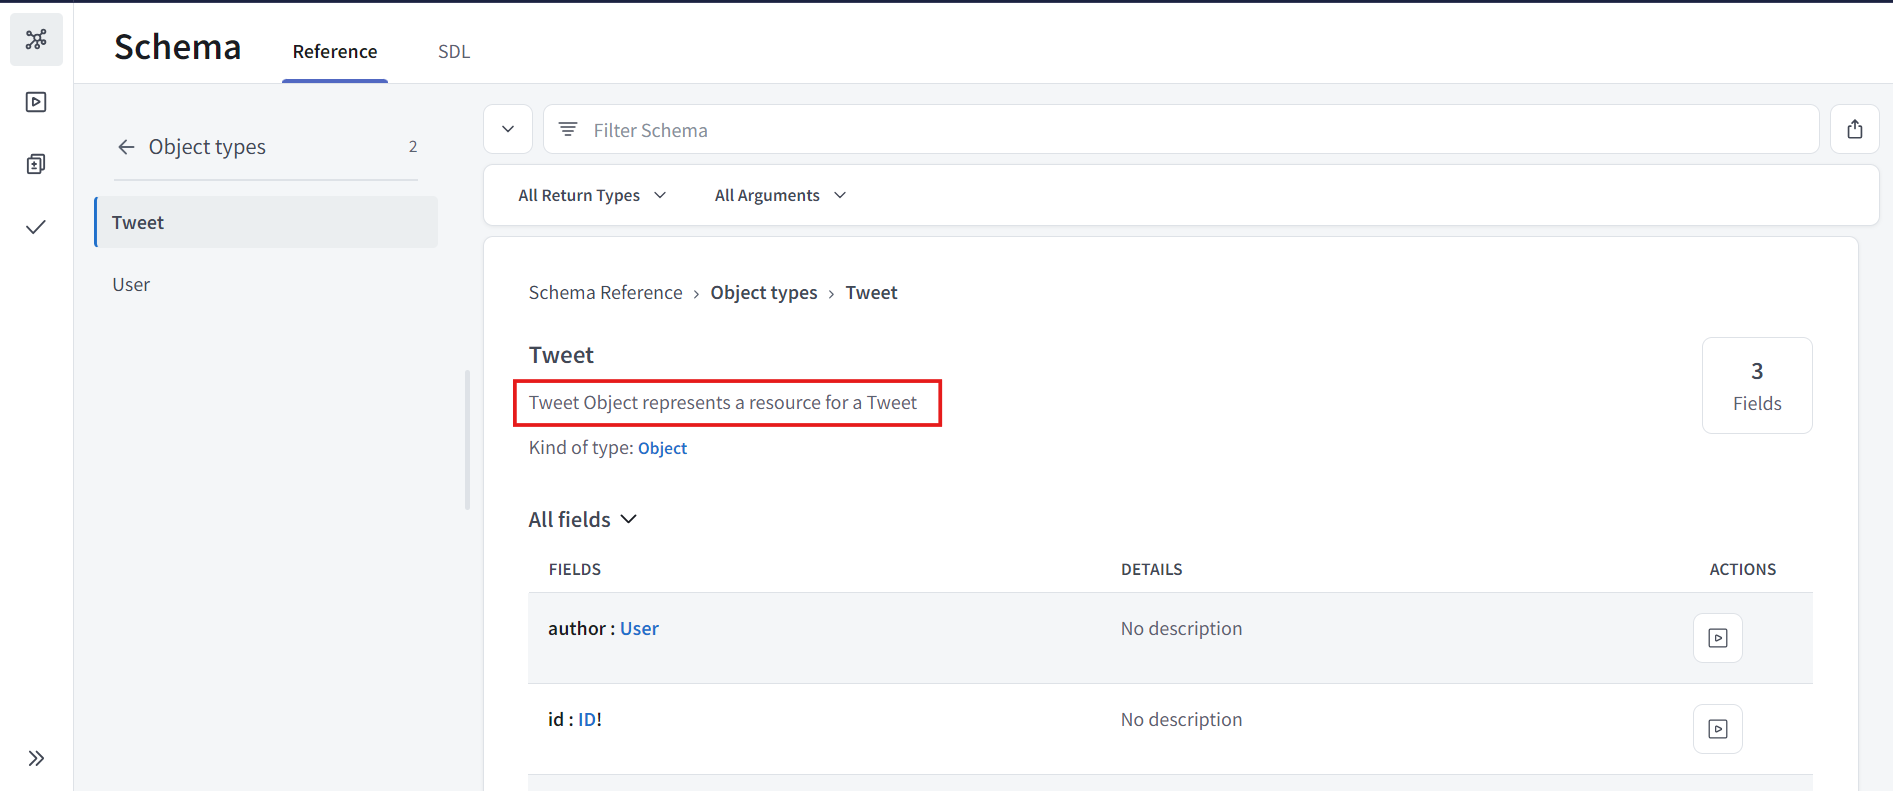
graphql studio에서 schema에는 API의 documentation이 있고 무엇을 return하는지 등등 모든 것들이 있다.
-
schema를 explore할 수 있게 할거다. 근데 여기서 schema를 상세히 설명 할 수도 있다. 각 field들에 대한 설명을 추가할 수 있다.
-
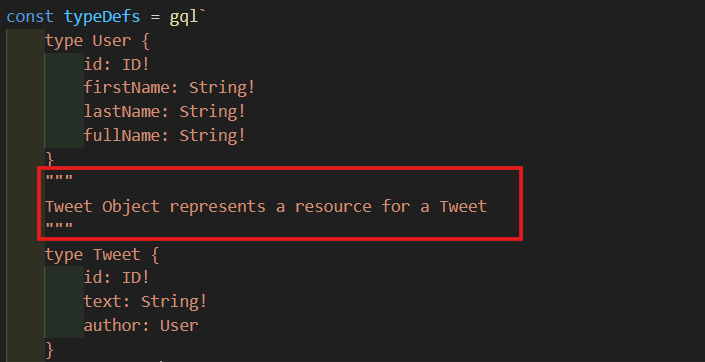
Tweet Object에 설명을 추가 해볼거다.
"""
Tweet Object represents a resource for a Tweet
"""
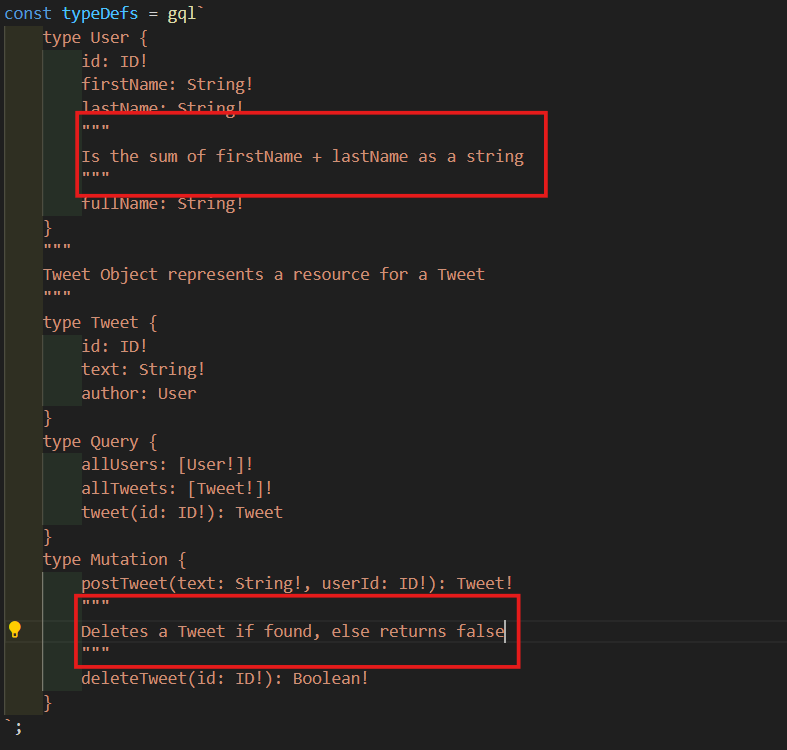
- 원한다면 모든 field에 똑같이 할 수 있다. User의 fullName에 대한 설명하고 Mutation의 deleteTweet에 대한 설명을 추가 해볼거다.
6. Migrating from REST to GraphQL

- 저 부분을 복사해준다.
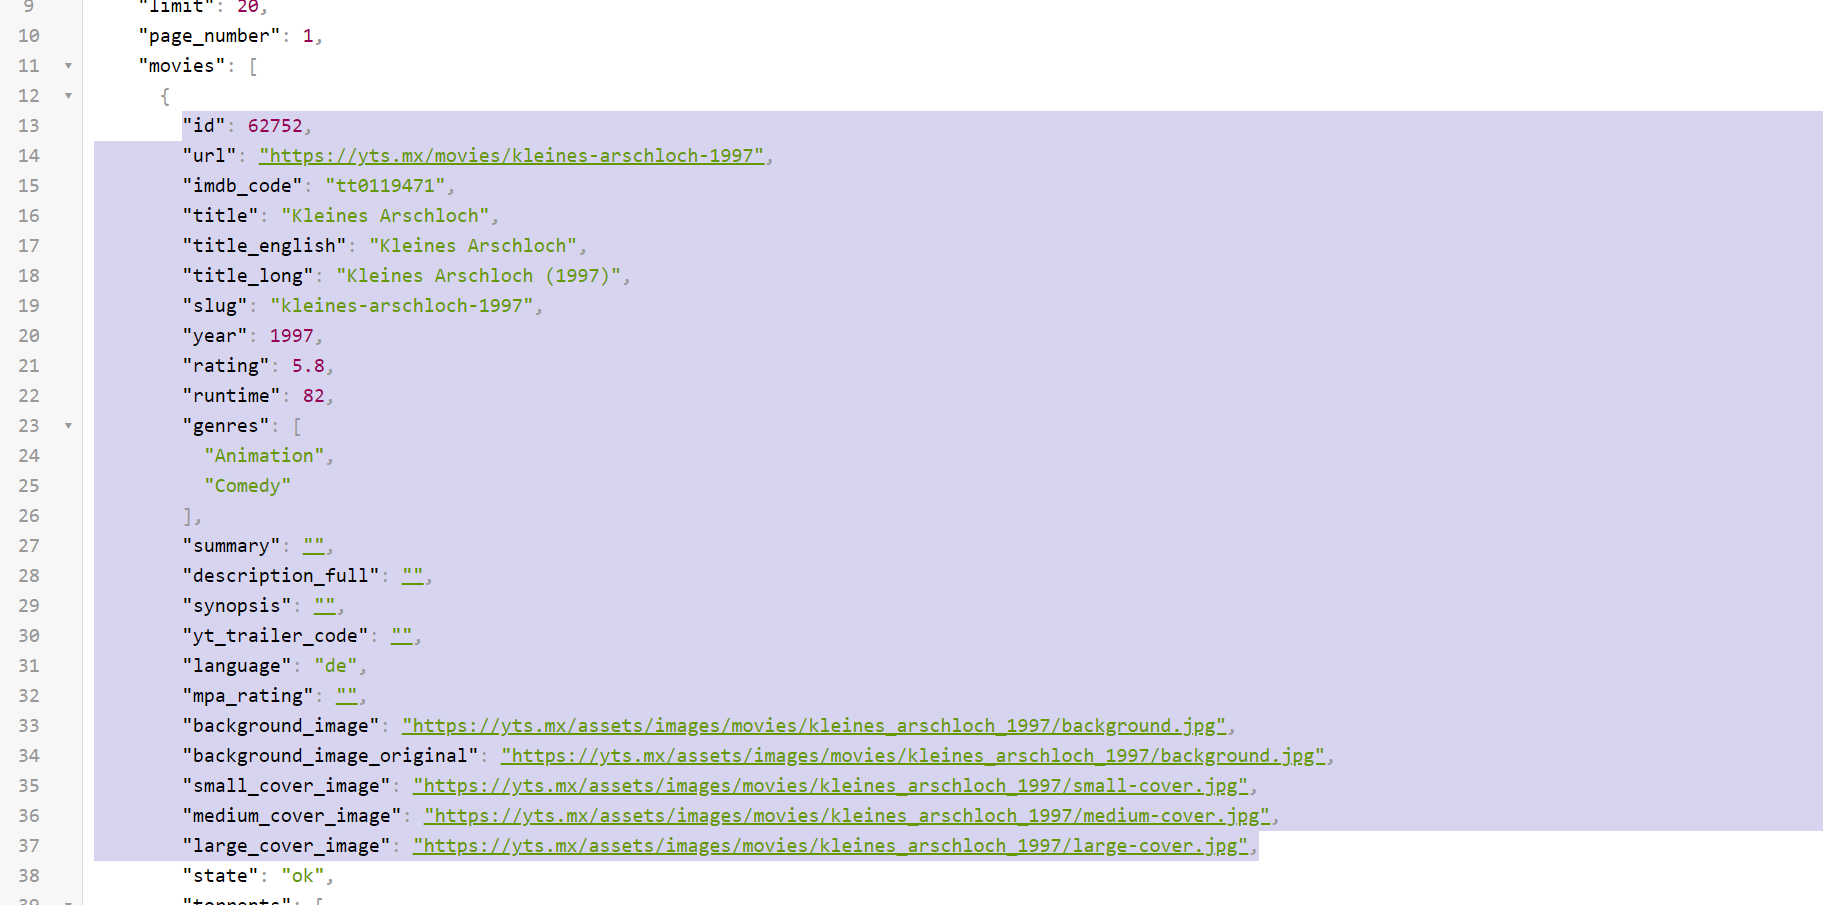
- const movie 작성 후 아까 복사한거 붙여넣기 해준다.
const movie = {"id": 62752,
        "url": "https://yts.mx/movies/kleines-arschloch-1997",
        "imdb_code": "tt0119471",
        "title": "Kleines Arschloch",
        "title_english": "Kleines Arschloch",
        "title_long": "Kleines Arschloch (1997)",
        "slug": "kleines-arschloch-1997",
        "year": 1997,
        "rating": 5.8,
        "runtime": 82,
        "genres": [
          "Animation",
          "Comedy"
        ],
        "summary": "",
        "description_full": "",
        "synopsis": "",
        "yt_trailer_code": "",
        "language": "de",
        "mpa_rating": "",
        "background_image": "https://yts.mx/assets/images/movies/kleines_arschloch_1997/background.jpg",
        "background_image_original": "https://yts.mx/assets/images/movies/kleines_arschloch_1997/background.jpg",
        "small_cover_image": "https://yts.mx/assets/images/movies/kleines_arschloch_1997/small-cover.jpg",
        "medium_cover_image": "https://yts.mx/assets/images/movies/kleines_arschloch_1997/medium-cover.jpg",
        "large_cover_image": "https://yts.mx/assets/images/movies/kleines_arschloch_1997/large-cover.jpg",}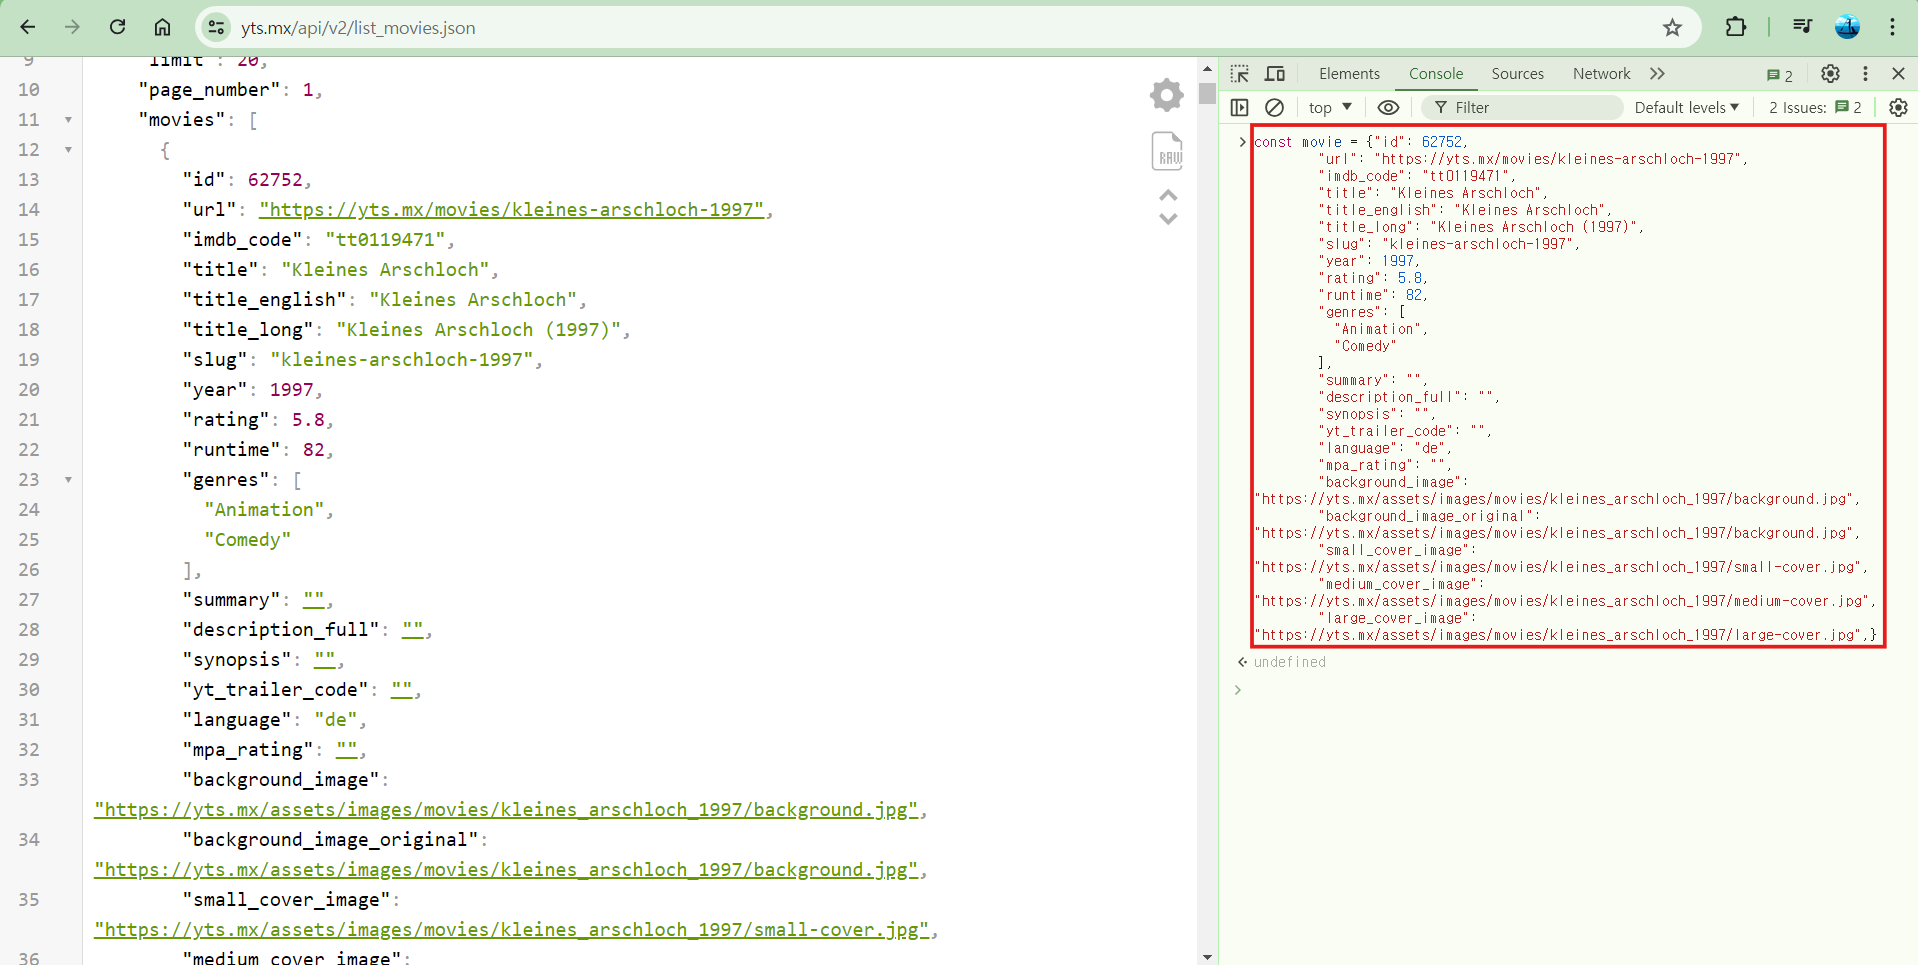
- 아래 코드를 입력해주고 출력된 값 모두 복사 해준다.
Object.keys(movie)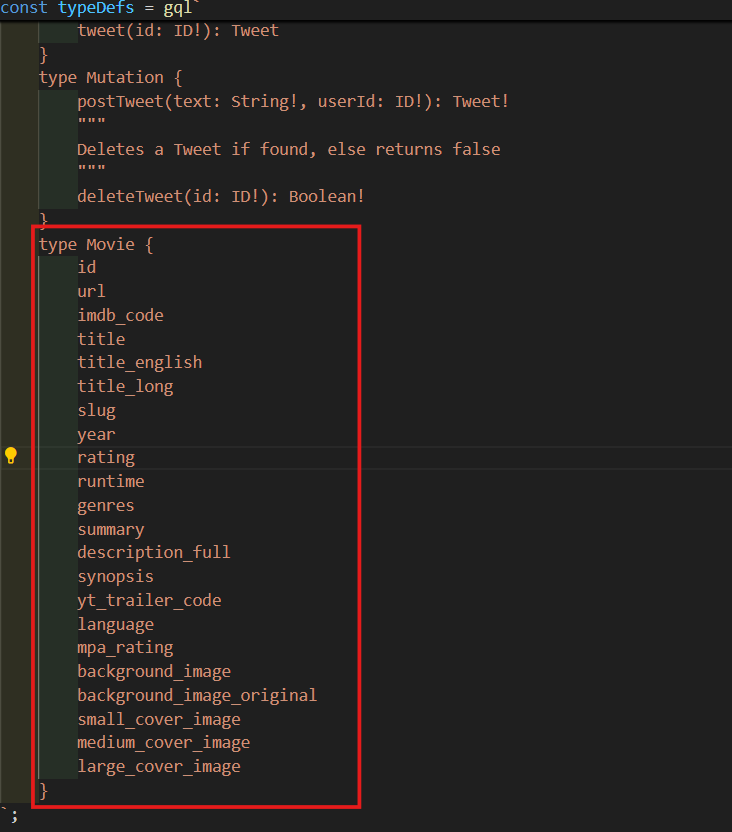
- Movie라는 새로운 type을 만들고 아까 복사한거를 붙여넣기 해준다.
type Movie {
	id
	url
	imdb_code
	title
	title_english
	title_long
	slug
	year
	rating
	runtime
	genres
	summary
	description_full
	synopsis
	yt_trailer_code
	language
	mpa_rating
	background_image
	background_image_original
	small_cover_image
	medium_cover_image
	large_cover_image
}
-
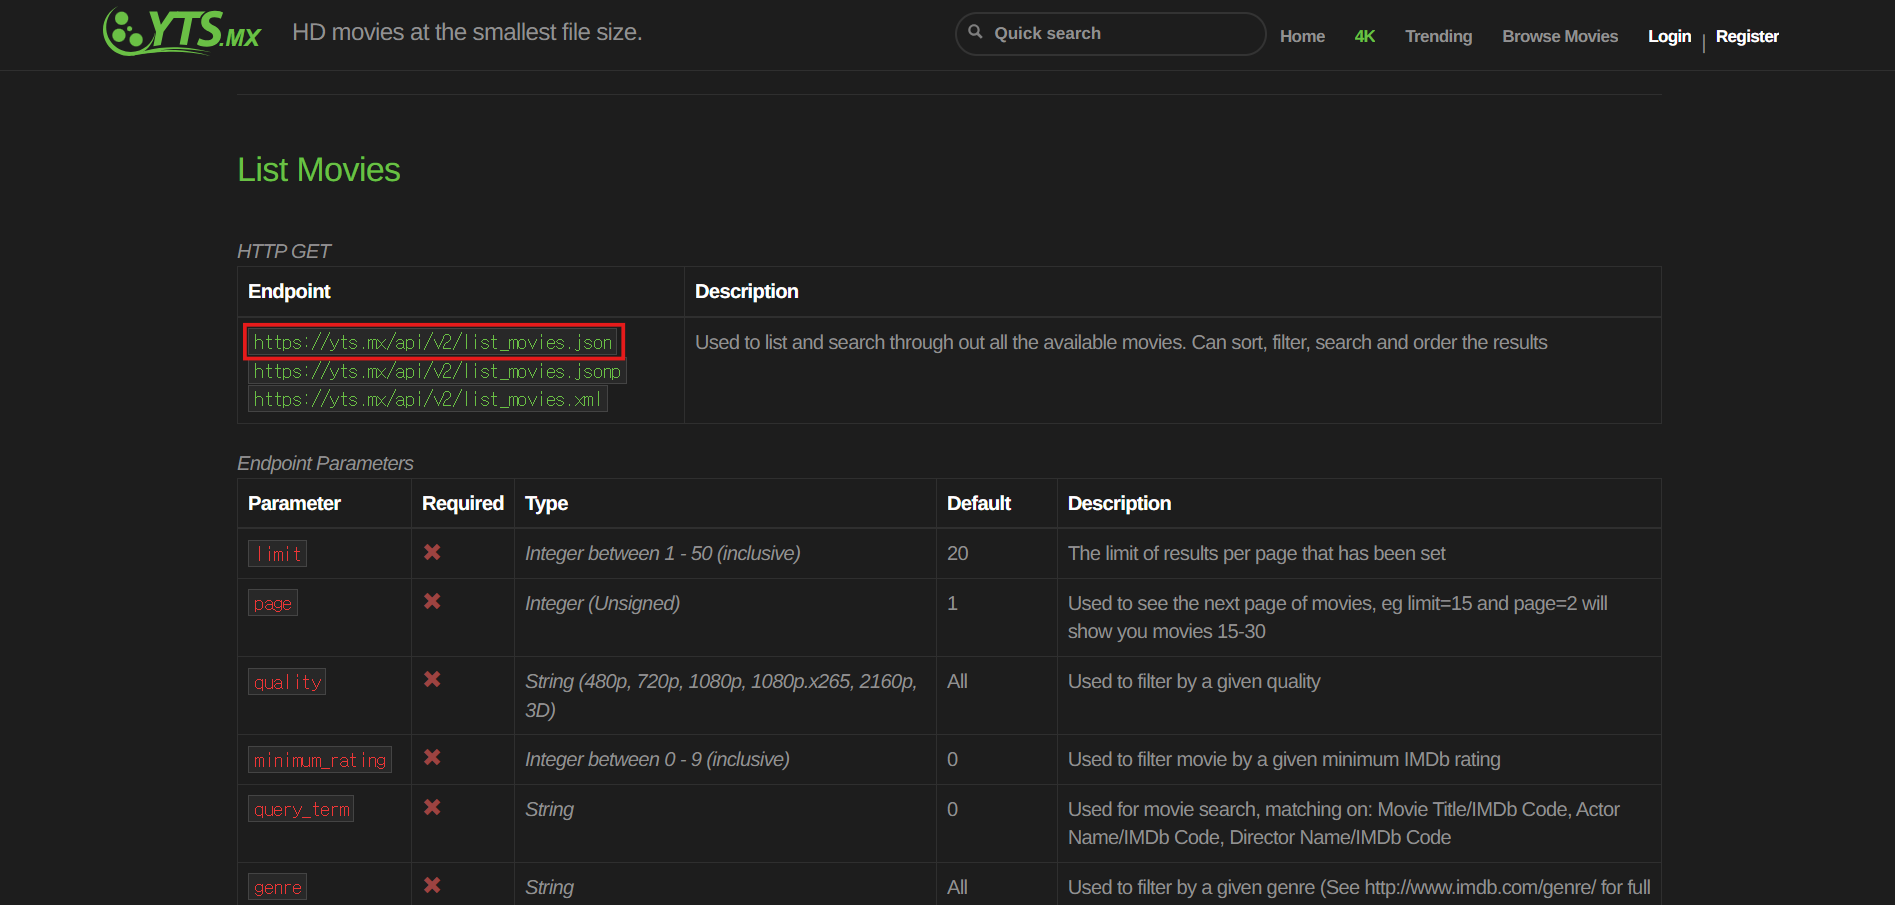
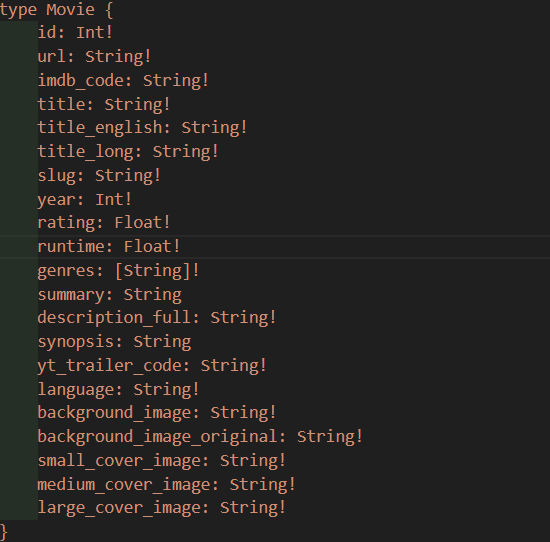
가지고 있는 REST API가 무엇을 주는지에 대해 알아보고 적어준다.
-
이 사진에 있는거 참고하여 id가 Int인지 String인지 보면서 작성하면 된다.
type Movie {
	id: Int!
    url: String!
    imdb_code: String!
    title: String!
    title_english: String!
    title_long: String!
    slug: String!
    year: Int!
    rating: Float!
    runtime: Float!
    genres: [String]!
    summary: String
    description_full: String!
    synopsis: String
    yt_trailer_code: String!
    language: String!
    background_image: String!
    background_image_original: String!
    small_cover_image: String!
    medium_cover_image: String!
    large_cover_image: String!
}
-
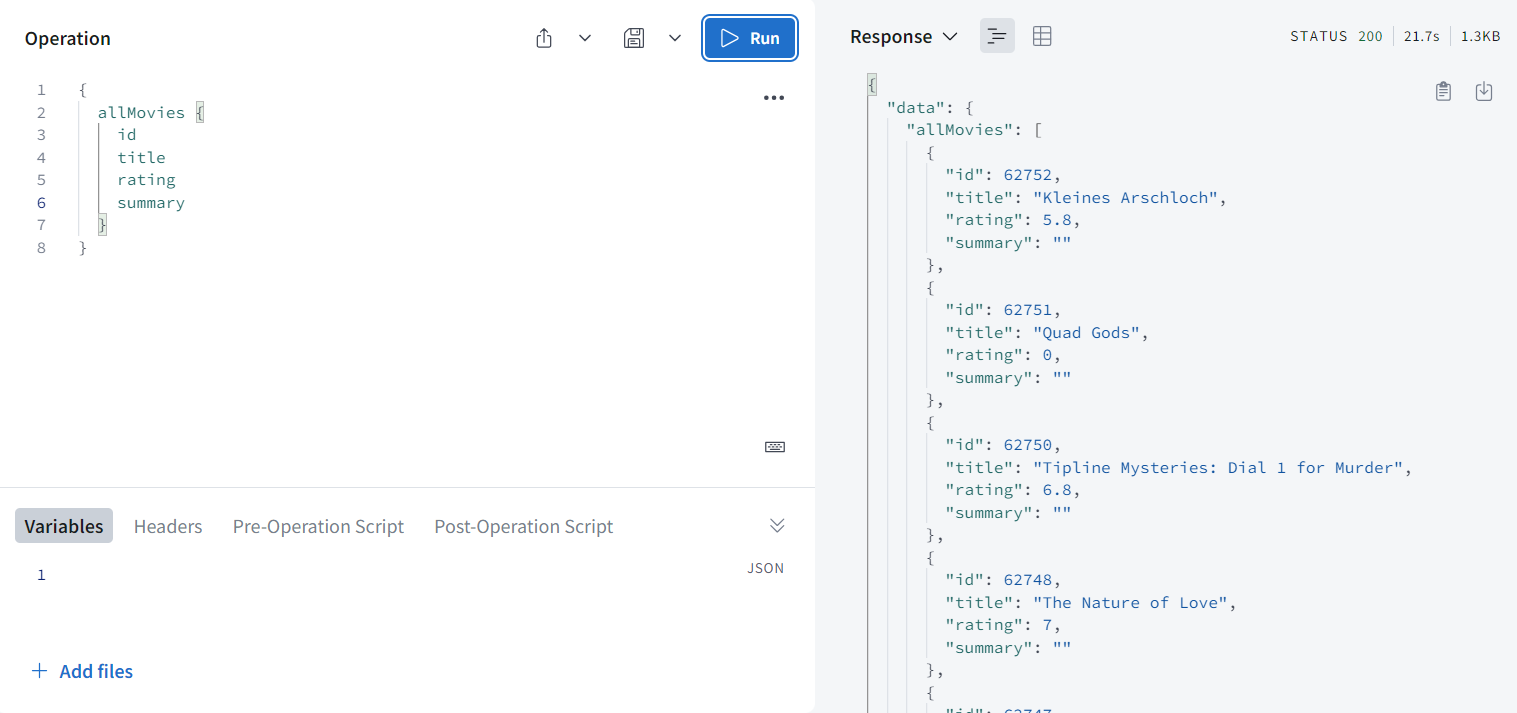
allMovies라는 resolver를 만들어 줄거다. Query type에 allMovies를 넣어주고 Movie list를 return 할거다.
-
data가 어디에서 오는지 중요하지 않다. 가짜 database에서도 올 수도 있고 실제 database에서도 올 수도 있고 아니면 다른 API에서 올 수도 있다.
-
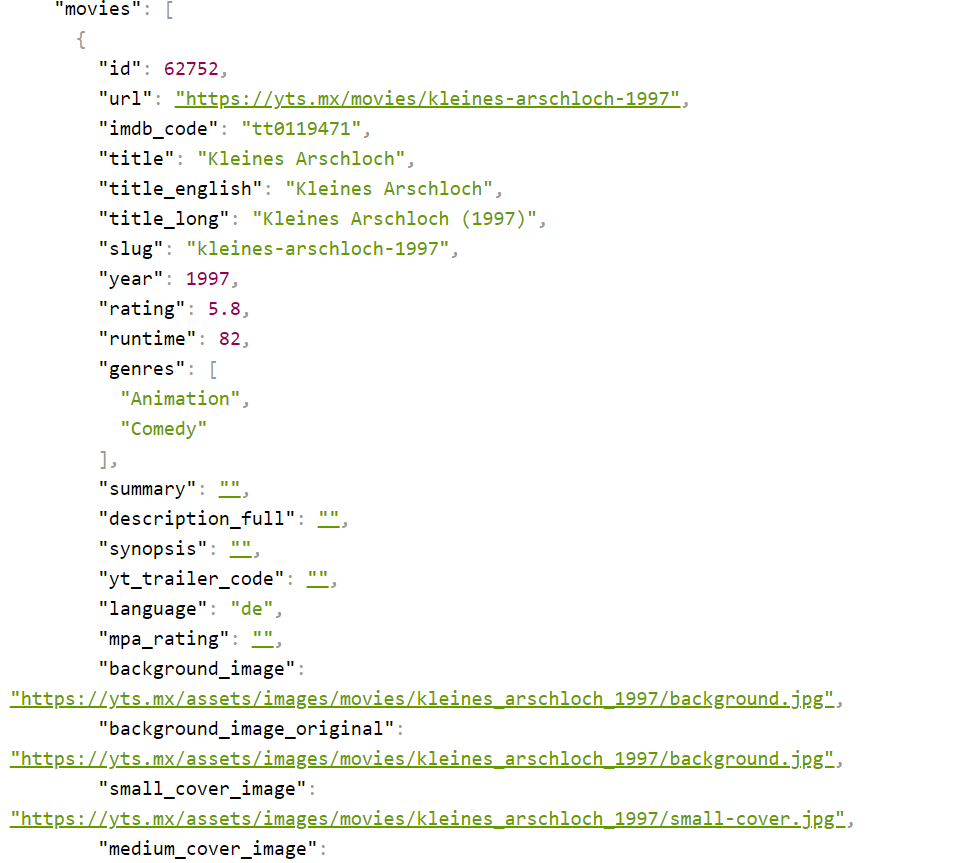
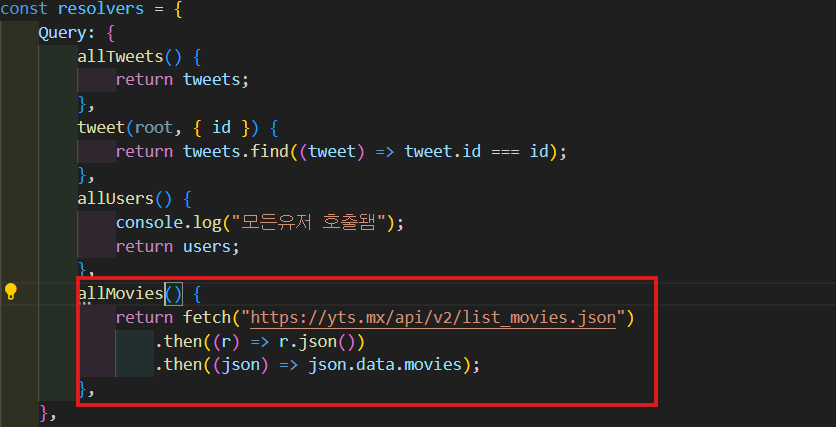
url을 fetch해서 response의 json을 받는다. 그리고 그 json을 가지고 json.data.movies를 return해줄거다.
allMovies() {
	return fetch("https://yts.mx/api/v2/list_movies.json")
	.then((r) => r.json())
	.then((json) => json.data.movies);
},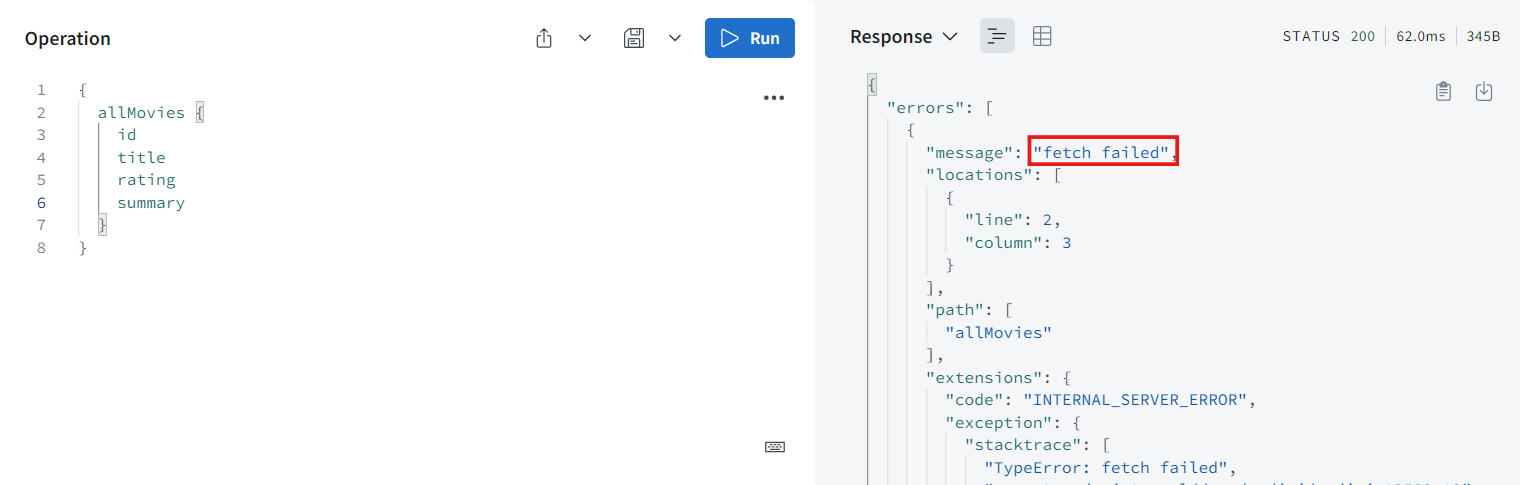
-
실행해보면 fetch is not defined라고 오류가 뜬다. 왜냐하면 지금은 NodeJS 환경이기 때문이다.
-
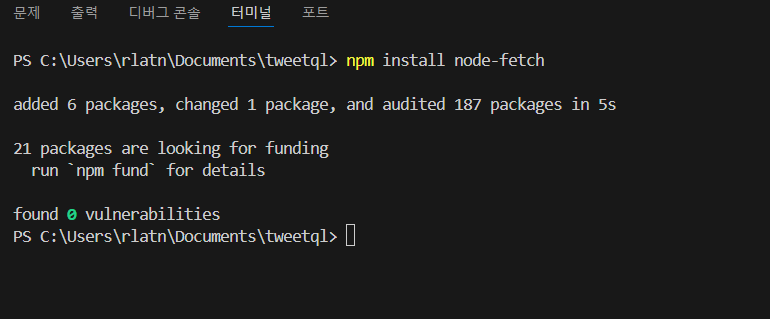
VS code 터미널에서 npm install node-fetch로 설치해준다.
npm i node-fetch
-
설치한 것을 import해주고 재실행 해주면 잘 작동하는 것을 볼 수 있다.
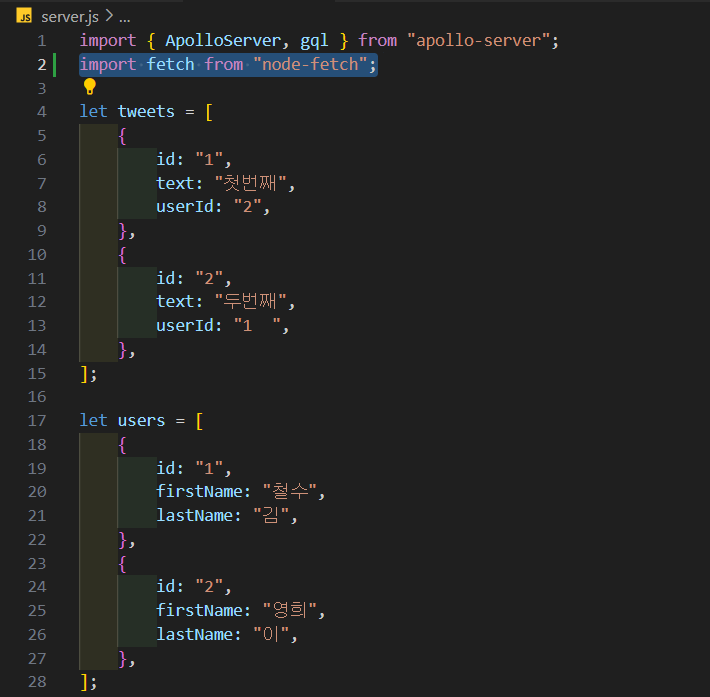
import fetch from "node-fetch";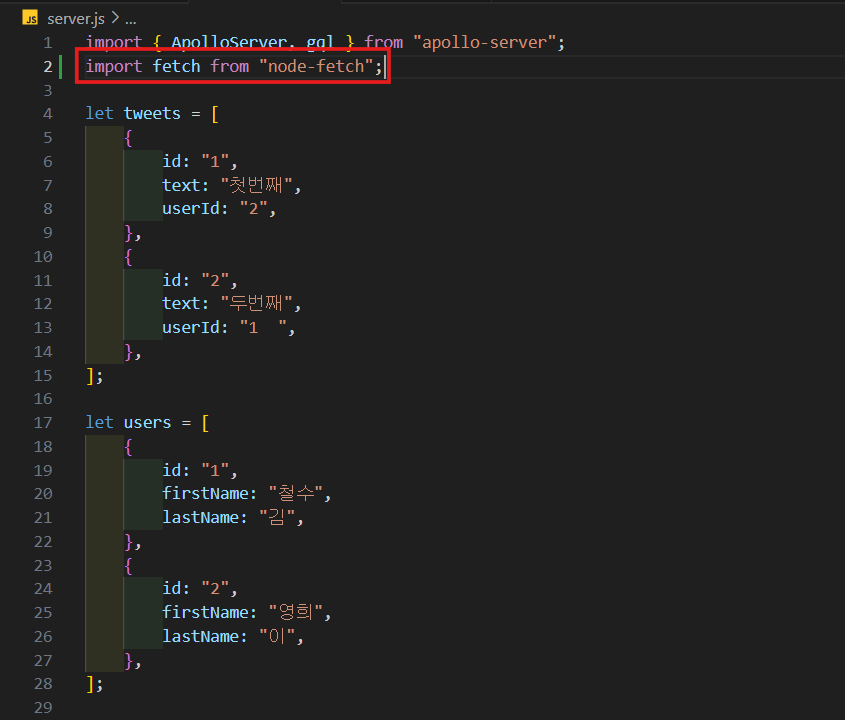
-
내 server가 다른 server로 request를 보내고 그 server가 답을하면 내 server가 graphql Query에 답을 주는 것이다.
-
이게 Rest API를 graphql API로 변환하는 방법이다.
-
id를 통해 하나의 Movie를 받아 올 수 있는 resolver를 만들거다. 이 API도 id로 Movie를 찾을 수 있게 해준다.
-
Query로 와서 movie를 만들어 주고 movie는 String인 id를 받아와서 Movie를 return할거다.

-
movie에 대한 resolver도 만들어줄거다. root는 무시해주고 id를 받아오고 allMovies에서 한 것 똑같이 할거지만 url이 달라진다.
movie(_, { id }) {
    return fetch(`https://yts.mx/api/v2/movie_details.json?movie_id=${id}`)
        .then((r) => r.json())
        .then((json) => json.data.movie);
},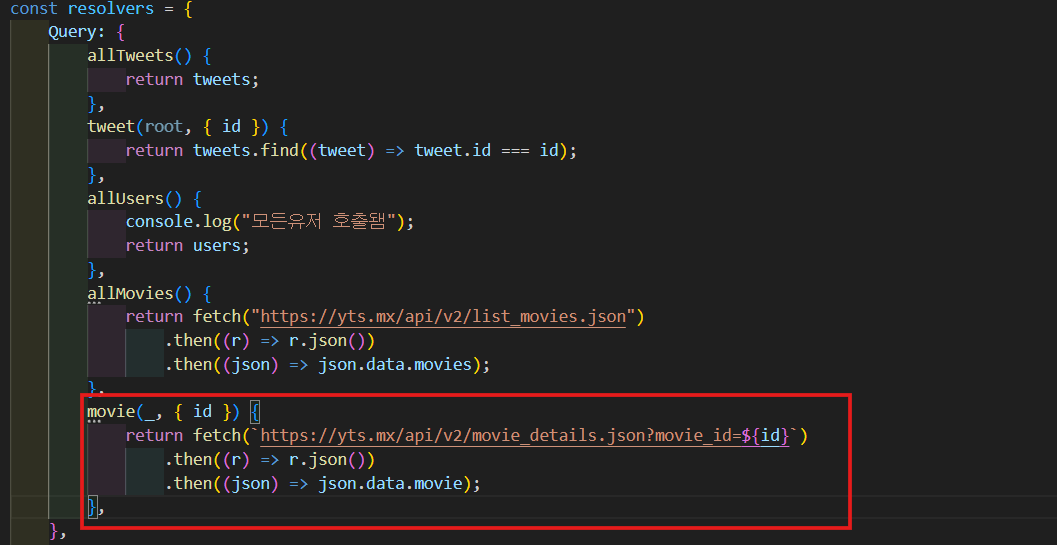
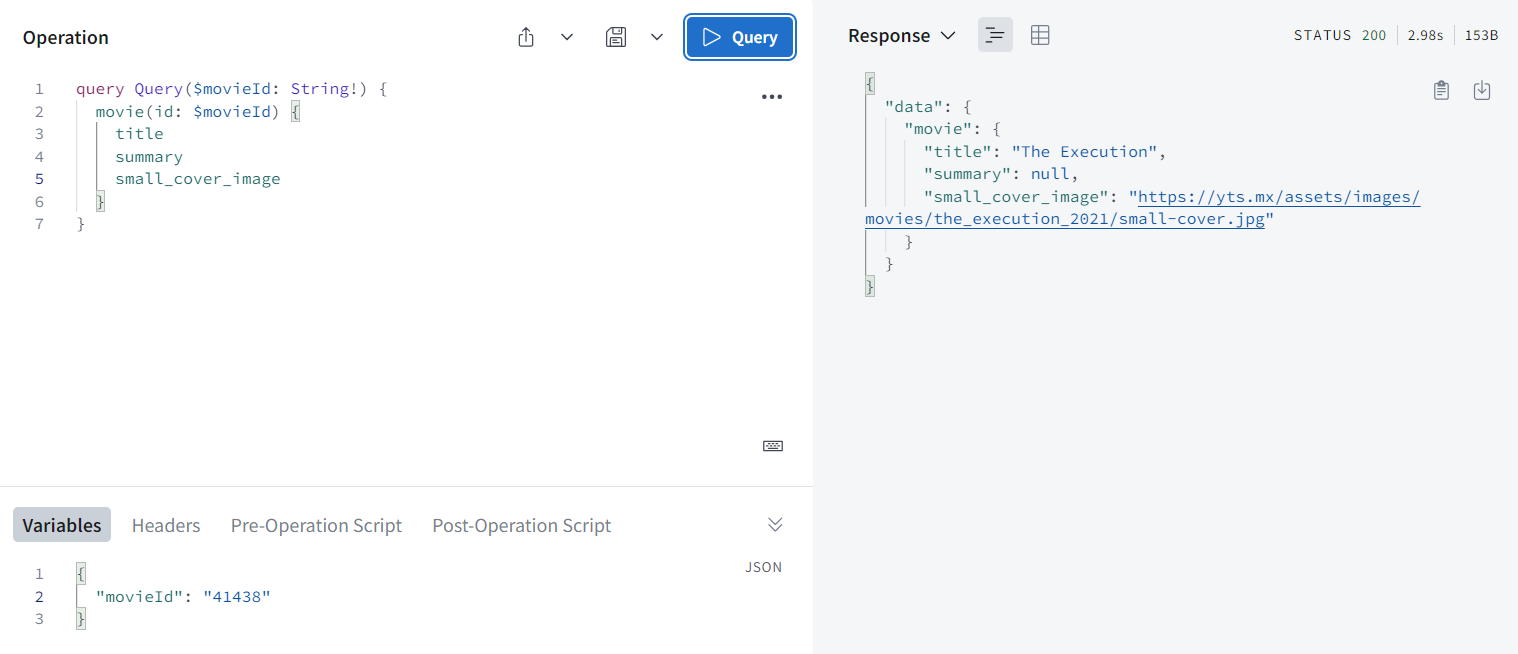
- 실행해보면 summary다 null 값 나오지만 잘 작동하는 것을 볼 수 있다.