
이 글은 Swift 공식 문서를 참고하여 작성하였습니다.
문자열 리터럴
문자열 리터럴은 쌍따옴표 (")로 둘러싸인 문자의 연속이다.
let someString = "Some string literal value"여러줄의 문자열인 경우 3개의 쌍따옴표(""") 로 둘러싸인 문자들을 여러줄 문자열 리터럴로 사용하면 된다. 줄바꿈을 원한다면 라인 끝에 역슬래쉬()를 추가하면 된다.
let quotation = """
The White Rabbit put on his spectacles.  "Where shall I begin,
please your Majesty?" he asked.

"Begin at the beginning," the King said gravely, "and go on
till you come to the end; then stop."
"""

let softWrappedQuotation = """
The White Rabbit put on his spectacles.  "Where shall I begin, \
please your Majesty?" he asked.

"Begin at the beginning," the King said gravely, "and go on \
till you come to the end; then stop."
"""
문자열 리터럴 + 특수문자
문자열 리터럴에 포함할 수 있는 특수문자
- 이스케이프 된 문자
- null 문자 (\0)
- 역슬래시 (\\)
- 수평 탭 (\t)
- 개행 (\n)
- 캐리지 리턴 (\r)
- 쌍따옴표 (\")
- 홑따옴표 (\')
- \u{n} 로 쓰여진 임의의 유니코드 스칼라 값
let message = "탭 문자:\t탭이 입력되었습니다.\n새 줄 문자:\n새 줄이 시작되었습니다."
print(message)
// 출력
// 탭 문자:	탭이 입력되었습니다.
// 새 줄 문자:
// 새 줄이 시작되었습니다.

let wiseWords = "\"Imagination is more important than knowledge\" - Einstein"
// 출력 : "Imagination is more important than knowledge" - Einstein
// 이스케이프 된 문자 쌍따옴표 사용
let dollarSign = "\u{24}"
// $, 유니코드 스칼라 U+0024
let blackHeart = "\u{2665}"
// ♥,  유니코드 스칼라 U+2665
let sparklingHeart = "\u{1F496}"
// 💖, 유니코드 스칼라 U+1F496
문자열을 위한 메서드
Swift의 String 타입은 문자열을 다루는 데 필요한 다양한 메서드를 제공한다.
1. 문자열 길이 구하기 (count)
문자열에 포함된 문자의 개수를 반환
let unusualMenagerie = "Koala 🐨, Snail 🐌, Penguin 🐧, Dromedary 🐪"
print("unusualMenagerie has \(unusualMenagerie.count) characters")
//count 메서드 사용
// 출력 "unusualMenagerie has 40 characters"
// 40개의 문자로 이루어져있음.

let message = "Swift는 강력합니다!"
let length = message.count // length는 10
2. 빈 문자열 확인 (isEmpty)
문자열이 비어있는지 확인
var emptyString = ""
// 비어있는 문자열 선언
if emptyString.isEmpty {
    print("Nothing to see here")
}
// isEmpty 메서드 사용
// 출력 :  Nothing to see here (문자열이 비어있음)
3. 특정 문자열 포함 여부 확인 (contains)
문자열에 특정 문자열이 포함되어 있는지 확인
let sentence = "Swift는 iOS 앱 개발에 사용됩니다."
if sentence.contains("iOS") {
    print("문자열에 'iOS'가 포함되어 있습니다.")
}
//contains 메서드 사용
// 출력 : 문자열에 'iOS'가 포함되어 있습니다. (sentence에 iOS 포함되어있음)
4. 문자열 결합 (+, +=)
두 개 이상의 문자열을 결합
- 덧셈 연산자 (+)를 추가하여 새로운 String 값 생성
let string1 = "hello"
let string2 = " there"
var welcome = string1 + string2
// welcome = "hello there"- 덧셈 대입 연산자 (+=)로 String 값을 연결
var instruction = "look over"
let string3 = " there"
instruction += string3
// instruction = "look over there"- append() 메서드를 이용하여 String 변수에 Character 값 추가
(Character값에 String 변수를 추가하는 것은 불가능)
var welcome = "hello there"
let exclamationMark: Character = "!"
welcome.append(exclamationMark)
// welcome = "hello there!"
5. 문자열 비교 (==, !=)
두 문자열이 같은지 비교
"같음" 연산자 (==)와 "같지 않음" 연산자 (!=)로 문자열과 문자가 같은지 확인
let quotation = "We're a lot alike, you and I."
let sameQuotation = "We're a lot alike, you and I."
if quotation == sameQuotation {
    print("These two strings are considered equal")
}
// 출력 : "These two strings are considered equal"
// 두 문자열 같음(==)
6. 접두사, 접미사 확인 (hasPrefix, hasSuffix)
문자열이 특정 접두사 또는 접미사로 시작하거나 끝나는지 확인
let fileName = "image.jpg"
if fileName.hasPrefix("image") {
    print("파일 이름이 'image'로 시작합니다.")
}
//접두사 확인, image로 시작하면 출력
if fileName.hasSuffix(".jpg") {
    print("파일 이름이 '.jpg'로 끝납니다.")
}
//접미사 확인, .jpg로 끝나면 출력
7. 부분 문자열 추출 (substring)
문자열의 특정 범위에 해당하는 부분 문자열을 추출
let text = "Hello, Swift!"
let startIndex = text.index(text.startIndex, offsetBy: 7)
// "S"의 인덱스
let endIndex = text.index(text.startIndex, offsetBy: 11)
// "t" 다음 인덱스
let substring = text[startIndex..<endIndex] // substring은 "Swift"
let greeting = "Hello, world!"
let index = greeting.firstIndex(of: ",") ?? greeting.endIndex
let beginning = greeting[..<index]
// beginning = "Hello"
let newString = String(beginning)
//새로운 저장소에 저장됨위의 예제에서 greeting 은 문자열을 구성하는 문자가 저장되는 메모리 영역이 있는 문자열이다. beginning 은 greeting 의 부분 문자열이기 때문에 greeting 이 사용하는 메모리를 재사용한다.
반대로 newString은 부분 문자열에서 생성될 때 자신만의 저장소를 가진다. 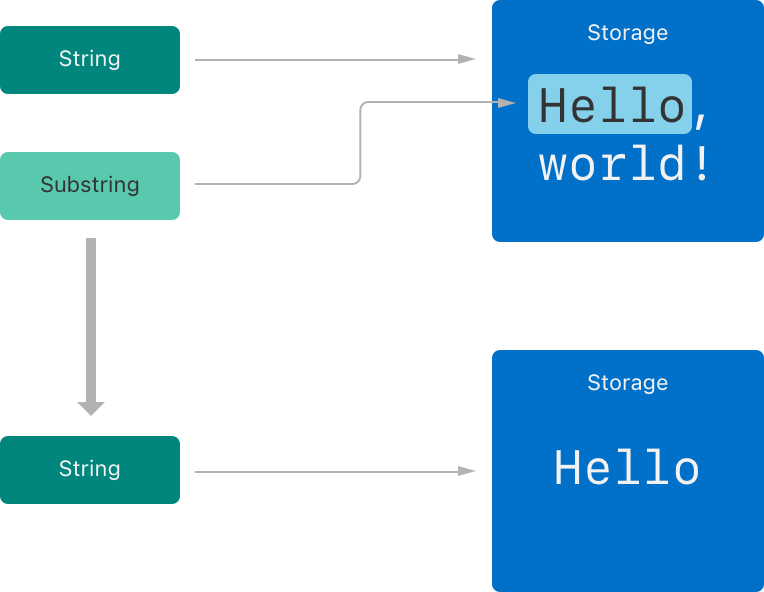
7-1. 문자열의 맨 첫 글자 구하기
- prefix(n) : 앞에서부터 n글자 가져오기
let word = hello.prefix(2)
//word = "he"- startIndex
let first = hello[hello.startIndex]
// first = "h"- String.Index(encodedOffset: 0) : 0번째 인덱스를 나타내는 인덱스 생성
7-2. 문자열의 두 번째 글자 구하기
두 번째 글자를 나타내는 인덱스 생성
let secondIndex = hello.index(after: hello.startIndex)
//secondIndex = 1
let second = hello[secondIndex]
// second = hello[1] = "e" 두번째 글자
7-3. 문자열의 n번째 글자 구하기
func String.index(Substring.Index, offsetBy: Int) -> Substring.Index
세 번째 글자를 구하는 경우, 아래와 같이 offsetBy를 2 로 설정해 구한다
let thirdIndex = hello.index(hello.startIndex, offsetBy: 2)
thirdIndex = 2
let third = hello[thirdIndex]
//third = hello[2] = "l" 세번째 글자
7-4. 문자열의 n번째 이후 모든 글자 구하기
인덱스의 범위 표현
let s = "12:00:00AM"
let timeIndex = s.index(s.startIndex, offsetBy: 7)
//timeIndex = 7
let timeStr = String(s[...timeIndex])
//timeStr = s[0~7] = "12:00:00"

let ampmIndex = s.index(s.endIndex, offsetBy: -2)
//ampaIndex = 9 (끝에서 두번째)
let ampmStr = String(s[ampmIndex...])
// ampaStr = s[9..10] = "AM"

let timeStr2 = s.prefix(8)
// "12:00:00" (앞에서부터 8글자)
let ampmStr2 = s.suffix(2)
// "AM" (뒤에서부터 2글자)
7-5. 문자열의 맨 마지막 글자 구하기
- subfix(n) : 뒤에서부터 n글자 가져오기
let word = hello.subfix(2)
//word = "lo"- endIndex
let endIndex = hello.index(before: hello.endIndex)
//문자열의 마지막 문자를 가리키는 인덱스
let last = hello[endIndex]
//last = hello[4] = "o"

let endIndex2 = hello.index(hello.endIndex, offsetBy: -1)
//문자열의 마지막 문자를 가리키는 인덱스
let last2 = hello[endIndex2]
//last2 = hello[4] = "o"
//인덱스로부터 왼쪽으로 움직일 때는 offsetBy 값으로 음수 사용
7-6. 문자열에서 특정 문자의 인덱스 구하기
- func firstIndex(of: Character) -> String.Index?
- func lastIndex(of: Character) -> String.Index?
let oIndex = hello.index(of: "o")
7-7. 문자열 잘라내기
"hello" 에서 맨 앞, 맨 뒤 글자를 제외한 ell만 구해보자.
방법1
let rangeStartIndex = hello.index(after: hello.startIndex)
//rangeStartIndex = 1
let rangeEndIndex = hello.index(hello.index, offsetBy: -2)
//rangeEndIndex = 3
let ellSubstring = hello[rangeStartIndex...rangeEndIndex]
//hello[1...3]
// Substring 타입의 "ell" 생성
방법2
let rangeStartIndex = hello.index(after: hello.startIndex)
let rangeEndIndex = hello.index(before: hello.endIndex)
let ellSubstring = hello[rangeStartIndex..<rangeEndIndex]
// ..< 을 사용함에 주의
//인덱스의 범위를 이용해 얻은 부분문자열은 String이 아닌
//Substring이라는 별도의 타입이므로, String으로 캐스팅해 주어야 한다.

let ellString = String(ellSubstring)
8. 문자열 분리 (components)
특정 구분자를 기준으로 문자열을 분리하여 배열로 반환
let fruits = "apple,banana,orange"
let fruitList = fruits.components(separatedBy: ",")
//,(콤마)를 기준으로 문자열을 분리하여 리스트에 저장
// fruitList = ["apple", "banana", "orange"]
9. 대소문자 변환 (uppercased, lowercased)
문자열을 모두 대문자 또는 소문자로 변환
let message = "Hello, World!"
let uppercasedMessage = message.uppercased()
// 대문자로 변환
// uppercasedMessage = "HELLO, WORLD!"
let lowercasedMessage = message.lowercased()
// 소문자로 변환
// lowercasedMessage = hello, world!"