디자인 패턴
가장 효율적이고 검증된 설계 방법으로, SOLID 원칙을 코드에 실제로 녹여내는 실용적인 방법.
디자인 패턴 적용시의 장점
- 재사용성과 유지보수성: 검증된 구조를 사용해 코드 안정성과 유연성이 크게 확장됨
- 효과적인 의사소통: 공용어를 사용하였기에, 복잡한 설계 의도로 동료와 공유 가능
- 코드의 구조화: 예측 가능하고 일관된 구조를 제공해, 빠르게 적응 가능
디자인 패턴의 분류 기준
-
생성 패턴
- 객체 생성 과정의 유연성을 높이고 결합도를 낮추는데에 중점을 둠
- '누가, 어떻게 객체를 만들 것인가'를 결정. 상황에 맞는 객체 생성
- 대표 패턴: 싱글톤, 팩토리 메소드, 빌더
-
구조 패턴
- 서로 다른 클래스들을 엮어 새롭거나 더 큰 기능을 제공하는 방법을 다룸
- 어떻게 클래스와 객체를 조합해 더 큰 시스템을 만들 것인가를 결정
- 대표 패턴: 데코레이터, 어댑터, 프록시 등
-
행위 패턴
- 객체 간의 상호작용과 책임 분배 방식에 대한 패턴
- 한 객체가 혼자 일을 처리하기 어려울 때, 어떻게 여러 객체가 효율적으로 협력하고 책임을 나눌지 정의
- 대표 패턴: 전략, 템플릿 메소드, 옵저버
행위 중심의 구조: 어떤 방식으로 알고리즘이 수행되는가를 정의하며, 클래스/객체들의 정적구조와 연결방식에 중점을 두는 구조.
수업에서 다룬 디자인 패턴
전략 패턴: OCP 원칙의 적용
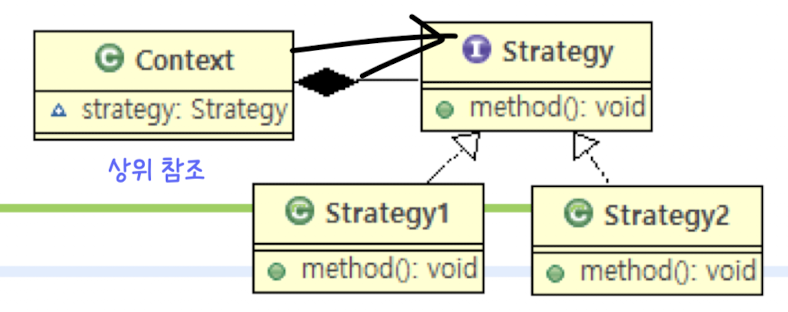
알고리즘(전략)을 통째로 갈아 끼울 수 있도록 만드는 패턴을 말함
적용할 수 있는 경우: if-else 또는 switch문으로 많은 로직을 분기처리 하고 있을 때, OCP 원칙을 적용해 코드를 개선하고 싶을 때 사용
예) 캐릭터 생성 시
Before
    public class PaymentService() {
    	public void processPayment(String paymentMethod, int amount) {
        	if ("creditCard".equals(paymentMethod) {
            	...
            }
            else if ("naverPay".equals(paymentMethod){
            	...
            }
        }
   	}
After
    //1. 전략 인터페이스 정의
    public interface PaymentStrategy {
    	void pay(int amount);
    }

    //2. 각 전략 클래스로 구현
    public class CreditCardStrategy implements PaymentStrategy {
    	public void pay(int amount) { ... }
    }

    public class KakaoPayStrategy implements PaymentStrategy {
    	public void pay(int amount) {...}
    }

    //3. 전략을 사용핳는 상황(Context) 클래스
    public class PaymentService {
    	public void processPayment (PaymentStrategy strategy, int amount) {
        	strategy.pay();
        }
    }
변경 후에는 다른 결제 방식이 추가되어도, 다른 코드의 수정 없이 NaverPayStrategy와 같은 클래스를 새로 만들기만하면 되기에 OCP 원칙을 만족함.
팩토리 메소드 패턴: 공장에 주문하기
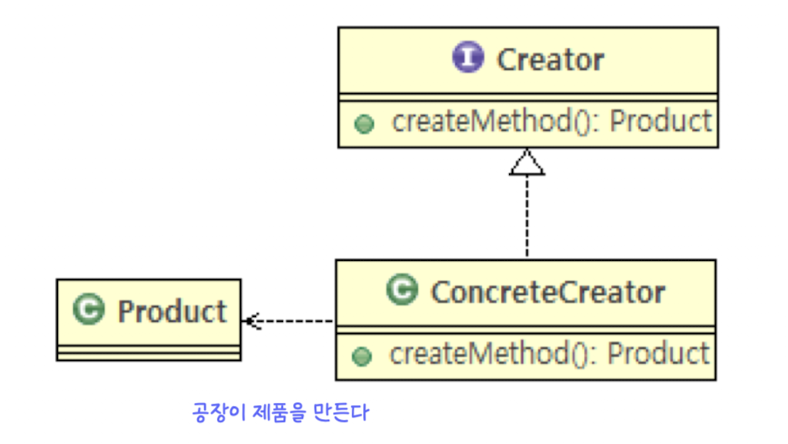 생성로직을 캡슐화하고 싶을 때 주로 사용하는 패턴.
예) coffeeFactory.createCoffee("Latte")' => 커피 종류 추가시 Factory 클래스만 수정
class CoffeeFactory {
	private final CoffeeMachine espressoMachine;
    private final MilkFrother frother;

    public CoffeeFactory (CoffeeMacine espressoMachine, MilkFrother frother) {
    	this.espressoMachine = espressoMachine;
        this.frother = frother;
    }

    public Coffee createCoffee (String name) {
    	switch(name) {
        	case "Latte":
            	return new Latte(new Espresso(espressoMachine, frother);
            case "Americano":
            	return new Americano(new Espresso(espressoMachine));
            default:
            	return new Espresso(espressoMachine);
        }
    }
}
데코레이터 패턴
기존 객체의 기능을 직접 수정하지 않고, 겹겹이 꾸미듯이 확장하는 패턴을 말함.
적용할 수 있는 경우: 추가 기능을 기존 기능의 조합으로 확장하고 싶지만, 기존 클래스는 건드리고 싶지 않을 때.
예)
	Coffee base = coffeeFactory.createCoffee(latte);
    Coffee myDrink1 = new IceDecorator(base);
    Coffee myDrink2 = new VanillaDecorator(myDrink1);
    Coffee myDrink3 = new ChocolateDecorator(myDrink2);
싱글톤 패턴
클래스의 인스턴스가 오직 하나만 존재하도록 보장하는 패턴
적용할 수 있는 경우: 시스템 전체에서 단 하나만 존재해야하는 객체가 있을 때를 말함. 여러 곳에서 객체를 생성해도 항상 동일한 인스턴스를 반환. 메모리 낭비를 방지하고 데이터 일관성을 유지할 수 있다는 장점이 존재함.
=> 스프링 프레임워크에서 관리하는 객체(Bean)들은 기본적으로 모두 싱글톤으로 동작함
예)
public class systemView {
	private static systemView instance = null;

    prviate 하늘() {} //외부에서 생성할 수 없도록 생성자 접근제한자를 private으로

    public static systemView getInstance() {
    	if (instance == null) instance = new systemView();
        return instance;
    }
}

public class Main {
	public static void main(String[] args) {
    	systemView view1 = systemView.getInstance();
        systemView view2 = systemView.getInstance();

        //view1과 view2의 레퍼런스값은 일치함. 둘이 같음.
    }
}
추가 조사해본 디자인 패턴들
스테이트 패턴
스테이트 패턴은 행위 패턴의 하나로, 객체가 내부 상태가 바뀜에 따라서 행동을 바꾸는 것으 허용하는 패턴이라고 한다. 즉, 핵심은 상태에 따른 행동을 각각 별도의 클래스로 분리해 캡슐화하고, 상태가 바뀔 때마다 해당 상태 객체를 교체하는 것을 말한다.
스테이트 패턴은 주로 세 가지 구성요소로 이루어진다.
Context
- 상태를 가지는 메인 객체
- 현재 상태를 나타내는
State객체를 참조- 클라이언트의 요청을 받으면, 실제 행동은
State객체에게 위임함- 자신의 상태를 변경할 수 있는 인터페이스를 제공해
ConcreteState객체가 상태를 변경할 수 있도록 함
State
- 모든 구체적인 상태 클래스들이 구현해야하는 공통 인터페이스/추상 클래스
- Context가 호출할 수 있는 행동 메소드를 정의함
ConcreteState
-State인터페이스를 구현한 실제 상태 클래스
- 각 클래스는 특정 상태일 때의 행동을 실제로 구현함
전략패턴 vs 상태패턴
| 구분 | 전략 패턴(Strategy Pattern) | 상태 패턴 (State Pattern) |
|---|---|---|
| 목적 | 런타임에 알고리즘/행위를 교체 | 내부 상태에 따라 행위가 달라지는 경우 |
| 상태 변경 빈도 | 낮음 | 높음 |
| 핵심 아이디어 | 알고리즘을 캡슐화하여 교체 | 상태를 객체화하여 해당 상태에 맞는 행위 구현 |
| 예) | 결제 방식 변경 | 자판기 동작: 돈이 부족할 때(NoMoney), 돈이 있을 때(HasMoney) |
조금 적용해보면 아래와 같다.
package state;

import emotion.Emotion;

public interface CharacterState {
    void play(Emotion emotion);
    void pause(Emotion emotion);
    void die(Emotion emotion);

    void attack (Emotion attacker, Emotion target);
    void weaponAttack(Emotion attacker, Emotion target);
}
public class PlayState implements CharacterState {

    @Override
    public void play(Emotion emotion) {
        System.out.println("이미 플레이중인 상태");
    }

    @Override
    public void pause(Emotion emotion) {
        emotion.setState(new PauseState());
    }

    @Override
    public void die(Emotion emotion) {
        emotion.setState(new DieState());
    }

    @Override
    public void attack(Emotion attacker, Emotion target){
        target.setCurr_hp(target.getCurr_hp() - attacker.getAttack_power());
        String s = attacker.name + "가 " + target.name + "를 공격합니다!";
        text.getInstance().updateText(s);
    }

    public void weaponAttack(Emotion attacker, Emotion target) {
        target.setCurr_hp(target.getCurr_hp() - attacker.getWeapon().getPower());
        String s = attacker.name + "가 " + attacker.getWeapon().name + "으로 " +target.name+"를 공격합니다.";
        text.getInstance().updateText(s);
    }
}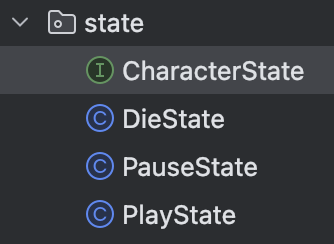
실습
디자인 패턴에 대해 학습한 것을 바탕으로 이전에 작성한 코드에 패턴들을 적용해보는 실습/과제를 진행했다.
팩토리 패턴
이전에는 플레이어의 캐릭터를 버튼 클릭 이벤트 내에서 바로 new 기쁨이()와 같이 만들었는데 팩토리 패턴을 적용해 수정해보려고 한다.
Before
angerSelectButton = new JButton("버럭이");
		angerSelectButton.addActionListener(new ActionListener() {
			public void actionPerformed(ActionEvent e) {
				player1.addEmotionList(new 버럭이());
				if(player1.getEmotionList().size() == 3) {
					setChoosePlayer2();
				}
			}
		});
After
public class EmotionFactory {

    private static EmotionFactory instance = null;

    private EmotionFactory() {

    }

    public static EmotionFactory getInstance() {
        if (instance == null) instance = new EmotionFactory();
        return instance;
    }

    public Emotion createEmotion(String emotionType) {
        switch(emotionType){
            case "기쁨이":
                return new 기쁨이();
            case "슬픔이":
                return new 슬픔이();
            case "버럭이":
                return new 버럭이();
            case "소심이":
                return new 소심이();
            case "까칠이":
                return new 까칠이();
        }

        return new 기쁨이();
    }
}
}
우선 팩토리 역할을 할 클래스를 위와 같이 정의해주었다. 프로그램 내에서 2개의 팩토리 클래스는 필요하지 않으니 싱글톤 패턴 역시 적용해 싱글톤으로 만들었다.
위를 사용해 캐릭터(감정) 생성 방식을 아래와 같이 수정했다.
public void createEmotion(ActionEvent e) {
		JButton button = (JButton)e.getSource();
		player1.addEmotionList(emotionFactory.createEmotion(button.getText()));
		if(player1.getEmotionList().size() == 3) {
			setChoosePlayer2();
		}
	}
fearSelectButton = new JButton("소심이");
fearSelectButton.addActionListener(new ActionListener() {
public void actionPerformed(ActionEvent e) {
createEmotion(e);
}
});이렇게 수정하니, 중복되는 코드 양이 줄었다.
버튼 클릭 시 createEmotion()이라는 메소드를 호출한다. 이때, 인자로 ActionEvent를 전달해준다.
클릭한 버튼의 객체에서 getText() 메소드로 생성하려는 캐릭터의 이름을 받아오고, 그걸 이용해 팩토리 클래스의 createEmotion() 메소드를 호출해 감정을 생성한다.
이렇게 하면, 이제 감정을 추가한다고했을 때, 팩토리 메소드만 수정하고, GUI 버튼을 추가해주면 된다.
이외에도 메인 메소드에서 생성하던 Situation 클래스를 팩토리 클래스를 만들어 해당 클래스 내에서 만들도록 수정하였다.
Before
public static void setSituation() {
		LocalDateTime now = LocalDateTime.now();
		int situation_random = (((int) Math.random()) * 100)+now.getSecond() % 4;

		switch (situation_random) {
			case 0:
				s = new Monday();
				break;
			case 1:
				s = new Exam();
				break;
			case 2: // 시험 보는 날
				s = new TransferDay();
				break;
			case 3: // 전학 간 날
				s = new WinHockey();
				break;
		}

		s.setSituation();
		s.applyEffect();
	}
After
SituationFactory 클래스 코드
public class SituationFactory {
    private static SituationFactory instance = null;

    private SituationFactory() {}

    public static SituationFactory getInstance() {
        if (instance == null) instance = new SituationFactory();
        return instance;
    }

    public static Situation createSituation(int index) {
        switch (index) {
            case 0:
                return new Monday();
            case 1:
                return new Exam();
            case 2: // 시험 보는 날
                return new TransferDay();
            case 3: // 전학 간 날
                return new WinHockey();
        }

        return new Monday();
    }
}
Main 코드
public static void setSituation() {
		LocalDateTime now = LocalDateTime.now();
		int situation_random = (int)(Math.random()*100)+now.getSecond() % 4;

		SituationFactory situationFactory = SituationFactory.getInstance();
		s = situationFactory.createSituation(situation_random);
		s.setSituation();
		s.applyEffect();
	}