
https://github.com/ingowald/optix7courseExample 01
// optix7.h

#pragma once

// optix 7
#include <cuda_runtime.h>
#include <optix.h>
#include <optix_stubs.h>
#include <optix_function_table_definition.h>

#define OPTIX_CHECK( call )                                             \
  {                                                                     \
    OptixResult res = call;                                             \
    if( res != OPTIX_SUCCESS )                                          \
      {                                                                 \
        fprintf( stderr, "Optix call (%s) failed with code %d (line %d)\n", #call, res, __LINE__ ); \
        exit( 2 );                                                      \
      }                                                                 \
  }
call 부분에 함수를 입력하고, 함수의 결과(OptixResult)가 OPTIX_SUCCESS 가 아닐 경우 함수 실행에 실패했음을 호출해주는 코드이다.
// common gdt helper tools
#include "gdt/gdt.h"
#include "optix7.h"

/*! \namespace osc - Optix Siggraph Course */
namespace osc {

  /*! helper function that initializes optix and checks for errors */
  void initOptix()
  {
    // -------------------------------------------------------
    // check for available optix7 capable devices
    // -------------------------------------------------------
    cudaFree(0);
    int numDevices;
    cudaGetDeviceCount(&numDevices);
    if (numDevices == 0)
      throw std::runtime_error("#osc: no CUDA capable devices found!");
    std::cout << "#osc: found " << numDevices << " CUDA devices" << std::endl;

    // -------------------------------------------------------
    // initialize optix
    // -------------------------------------------------------
    OPTIX_CHECK( optixInit() );
  }


  /*! main entry point to this example - initially optix, print hello
    world, then exit */
  extern "C" int main(int ac, char **av)
  {
    try {
      std::cout << "#osc: initializing optix..." << std::endl;

      initOptix();

      std::cout << GDT_TERMINAL_GREEN
                << "#osc: successfully initialized optix... yay!"
                << GDT_TERMINAL_DEFAULT << std::endl;

      // for this simple hello-world example, don't do anything else
      // ...
      std::cout << "#osc: done. clean exit." << std::endl;

    } catch (std::runtime_error& e) {
      std::cout << GDT_TERMINAL_RED << "FATAL ERROR: " << e.what()
                << GDT_TERMINAL_DEFAULT << std::endl;
      exit(1);
    }
    return 0;
  }

}
cudaFree(0);
- CUDA를 Initialize 한다.
cudaGetDeviceCount(&numDevices);
- Nvidia GPU device의 수를 반환한다.
optixInit();
- 해당 함수는 OptiX의 현재 버전에 맞는 함수들을 내부적으로 optix function table에 매핑시켜준다.
Example 02
해당 코드는 길기 때문에 분할해서 보겠다.
// main.cpp
#include "SampleRenderer.h"

#define STB_IMAGE_WRITE_IMPLEMENTATION
#include "3rdParty/stb_image_write.h"

/*! \namespace osc - Optix Siggraph Course */
namespace osc {

  /*! main entry point to this example - initially optix, print hello
    world, then exit */
  extern "C" int main(int ac, char **av)
  {
    try {
      SampleRenderer sample;

      const vec2i fbSize(vec2i(1200,1024));
      sample.resize(fbSize);
      sample.render();

      std::vector<uint32_t> pixels(fbSize.x*fbSize.y);
      sample.downloadPixels(pixels.data());

      const std::string fileName = "osc_example2.png";
      stbi_write_png(fileName.c_str(),fbSize.x,fbSize.y,4,
                     pixels.data(),fbSize.x*sizeof(uint32_t));
      std::cout << GDT_TERMINAL_GREEN
                << std::endl
                << "Image rendered, and saved to " << fileName << " ... done." << std::endl
                << GDT_TERMINAL_DEFAULT
                << std::endl;
    } catch (std::runtime_error& e) {
      std::cout << GDT_TERMINAL_RED << "FATAL ERROR: " << e.what()
                << GDT_TERMINAL_DEFAULT << std::endl;
      exit(1);
    }
    return 0;
  }

} // ::osc
SampleRenderer 객체를구현하고, 화면 크기를 넘겨주며, rendering 후 이미지를 stbi library를 이용하여 저장한다.
// SmapleRenderer.h
#pragma once

// our own classes, partly shared between host and device
#include "CUDABuffer.h"
#include "LaunchParams.h"

/*! \namespace osc - Optix Siggraph Course */
namespace osc {

  /*! a sample OptiX-7 renderer that demonstrates how to set up
      context, module, programs, pipeline, SBT, etc, and perform a
      valid launch that renders some pixel (using a simple test
      pattern, in this case */
  class SampleRenderer
  {
    // ------------------------------------------------------------------
    // publicly accessible interface
    // ------------------------------------------------------------------
  public:
    /*! constructor - performs all setup, including initializing
      optix, creates module, pipeline, programs, SBT, etc. */
    SampleRenderer();

    /*! render one frame */
    void render();

    /*! resize frame buffer to given resolution */
    void resize(const vec2i &newSize);

    /*! download the rendered color buffer */
    void downloadPixels(uint32_t h_pixels[]);
  protected:
    // ------------------------------------------------------------------
    // internal helper functions
    // ------------------------------------------------------------------

    /*! helper function that initializes optix and checks for errors */
    void initOptix();

    /*! creates and configures a optix device context (in this simple
      example, only for the primary GPU device) */
    void createContext();

    /*! creates the module that contains all the programs we are going
      to use. in this simple example, we use a single module from a
      single .cu file, using a single embedded ptx string */
    void createModule();

    /*! does all setup for the raygen program(s) we are going to use */
    void createRaygenPrograms();

    /*! does all setup for the miss program(s) we are going to use */
    void createMissPrograms();

    /*! does all setup for the hitgroup program(s) we are going to use */
    void createHitgroupPrograms();

    /*! assembles the full pipeline of all programs */
    void createPipeline();

    /*! constructs the shader binding table */
    void buildSBT();

  protected:
    /*! @{ CUDA device context and stream that optix pipeline will run
        on, as well as device properties for this device */
    CUcontext          cudaContext;
    CUstream           stream;
    cudaDeviceProp     deviceProps;
    /*! @} */

    //! the optix context that our pipeline will run in.
    OptixDeviceContext optixContext;

    /*! @{ the pipeline we're building */
    OptixPipeline               pipeline;
    OptixPipelineCompileOptions pipelineCompileOptions = {};
    OptixPipelineLinkOptions    pipelineLinkOptions    = {};
    /*! @} */

    /*! @{ the module that contains out device programs */
    OptixModule                 module;
    OptixModuleCompileOptions   moduleCompileOptions = {};
    /* @} */

    /*! vector of all our program(group)s, and the SBT built around
        them */
    std::vector<OptixProgramGroup> raygenPGs;
    CUDABuffer raygenRecordsBuffer;
    std::vector<OptixProgramGroup> missPGs;
    CUDABuffer missRecordsBuffer;
    std::vector<OptixProgramGroup> hitgroupPGs;
    CUDABuffer hitgroupRecordsBuffer;
    OptixShaderBindingTable sbt = {};

    /*! @{ our launch parameters, on the host, and the buffer to store
        them on the device */
    LaunchParams launchParams;
    CUDABuffer   launchParamsBuffer;
    /*! @} */

    CUDABuffer colorBuffer;
  };

} // ::osc
// SampleRenderer.cpp 생성자
SampleRenderer::SampleRenderer()
{
initOptix();
std::cout << "#osc: creating optix context ..." << std::endl;
createContext();
std::cout << "#osc: setting up module ..." << std::endl;
createModule();
std::cout << "#osc: creating raygen programs ..." << std::endl;
createRaygenPrograms();
std::cout << "#osc: creating miss programs ..." << std::endl;
createMissPrograms();
std::cout << "#osc: creating hitgroup programs ..." << std::endl;
createHitgroupPrograms();
std::cout << "#osc: setting up optix pipeline ..." << std::endl;
createPipeline();
std::cout << "#osc: building SBT ..." << std::endl;
buildSBT();
launchParamsBuffer.alloc(sizeof(launchParams));
std::cout << "#osc: context, module, pipeline, etc, all set up ..." << std::endl;
std::cout << GDT_TERMINAL_GREEN;
std::cout << "#osc: Optix 7 Sample fully set up" << std::endl;
std::cout << GDT_TERMINAL_DEFAULT;
}자세한 함수 내용은 밑의 코드와 함께 설명한다.
initOptix()
- cuda와 optix를 초기화해준다.
createContext()
- cuda device 셋팅 및 optixContext를 생성한다.
createModule()
- module object를 생성하고, program(cuda code)로 부터 컴파일된 ptx code와 module object을 연결해준다. 여기서 ptx code는 CPU의 기계어처럼 GPU의 기계어라고 생각하면 된다.
createRaygenPrograms()
- ray generation Program group을 만든다.
- 여기서 program group은 하나 이상의 module을 결합하여 만든 것이다.
- module은 1~3개까지 결합이 가능하다. 이때 ptx code에서 function name으로 접근하므로 하나의 module로도 여러 program group을 만들 수 있다.
createMissPrograms()
- miss program group을 만든다.
- 여기서 program group은 하나 이상의 module을 결합하여 만든 것이다.
- module은 1~3개까지 결합이 가능하다. 이때 ptx code에서 function name으로 접근하므로 하나의 module로도 여러 program group을 만들 수 있다.
createHitgroupPrograms()
- any-hit program, closest hit program, intersection program 에 대한 program group을 만든다.
- 여기서 program group은 하나 이상의 module을 결합하여 만든 것이다.
- module은 1~3개까지 결합이 가능하다. 이때 ptx code에서 function name으로 접근하므로 하나의 module로도 여러 program group을 만들 수 있다.
createPipeline()
- program group들을 묶은 하나의 pipeline을 만든다.
buildSBT()
- SBT에 추가할 record들을 만들고, SBT에 record들을 추가한다.
launchParamsBuffer.alloc(sizeof(launchParams));
- launchParamsBuffer는 CUDABuffer(user-defined class)로 alloc 멤버 함수를 통해 Host memory에 allocation한다.
initOptix()는 Example01에서 설명하므로 생략한다.
// SampleRenderer.cpp
  void SampleRenderer::createContext()
  {
    // for this sample, do everything on one device
    const int deviceID = 0;
    CUDA_CHECK(SetDevice(deviceID));
    CUDA_CHECK(StreamCreate(&stream));

    cudaGetDeviceProperties(&deviceProps, deviceID);
    std::cout << "#osc: running on device: " << deviceProps.name << std::endl;

    CUresult  cuRes = cuCtxGetCurrent(&cudaContext);
    if( cuRes != CUDA_SUCCESS )
      fprintf( stderr, "Error querying current context: error code %d\n", cuRes );

    OPTIX_CHECK(optixDeviceContextCreate(cudaContext, 0, &optixContext));
    OPTIX_CHECK(optixDeviceContextSetLogCallback
                (optixContext,context_log_cb,nullptr,4));
  }
GPU를 설정한 후, cudaStream을 생성한다.
그리고 cuda context의 속성을 갖고와서, cuda gpu의 이름을 출력한다.
cuCtxGetCurrent 함수를 통해 현재 cuda context를 불러온다.
만약 불러올 수 없으면 오류가 발생한다.
// SampleRenderer.cpp
  static void context_log_cb(unsigned int level,
                             const char *tag,
                             const char *message,
                             void *)
  {
    fprintf( stderr, "[%2d][%12s]: %s\n", (int)level, tag, message );
  }
cudaContext 위에 optixContext를 만들고, optix 관련 오류 및 Info를 얻기 위에 optixContext에서 발생하는 로그를 context_log_cb 함수를 통해서 출력한다.
optixDeviceContextSetLogCallback 함수의 첫 번째 인자는 optixDeviceContext를 입력받는다. 두 번째 인자는 context_log_cb를 callback 함수를 통해 callback한다.
세 번째 인자인 callabackData는 callaback function이 발생했을 때 추가적으로 넘겨줄 데이터를 의미한다. 4번째 인자는 callback log level이다. 해당 log callback은 thread safety하게 설정되어있다.
callaback 함수에서 log level은 메시지의 심각도를 나타낸다.
tag는 메시지의 카테고리에 대한 설명이고, message는 끝에 개행문자가 없는 NULL로 종료된 로그 메시지이다.
cbdata의 값인 포인터는 callback 함수를 설정할 때 제공된 포인터이다(optixDeviceContextSetLogCallback에서 3번째 인자에 해당).
log level은 다음과 같이 제공된다.
disable(0) : 모든 메시지에 대한 callback을 호출하지 않는다.
fatal(1) : 복구할 수 없는 오류가 발생한 경우. Optix에 의해 호출되며, context는 더이상 사용되지 않는 상태이다.
error(2) : 복구할 수 있는 오류. 예를들어 parameter가 비어있을 경우이다.
warning(3) : API가 정확하게 (예상대로) 작동하지 않을 때 hint로 사용된다.
print(4) : 상태 또는 진행도를 나타내는 메시지이다.
// SampleRenderer.cpp
void SampleRenderer::createModule()
  {
    moduleCompileOptions.maxRegisterCount  = 50;
    moduleCompileOptions.optLevel          = OPTIX_COMPILE_OPTIMIZATION_DEFAULT;
    moduleCompileOptions.debugLevel        = OPTIX_COMPILE_DEBUG_LEVEL_NONE;

    pipelineCompileOptions = {};
    pipelineCompileOptions.traversableGraphFlags = OPTIX_TRAVERSABLE_GRAPH_FLAG_ALLOW_SINGLE_GAS;
    pipelineCompileOptions.usesMotionBlur     = false;
    pipelineCompileOptions.numPayloadValues   = 2;
    pipelineCompileOptions.numAttributeValues = 2;
    pipelineCompileOptions.exceptionFlags     = OPTIX_EXCEPTION_FLAG_NONE;
    pipelineCompileOptions.pipelineLaunchParamsVariableName = "optixLaunchParams";

    pipelineLinkOptions.maxTraceDepth          = 2;

    const std::string ptxCode = embedded_ptx_code;

    char log[2048];
    size_t sizeof_log = sizeof( log );
#if OPTIX_VERSION >= 70700
    OPTIX_CHECK(optixModuleCreate(optixContext,
                                         &moduleCompileOptions,
                                         &pipelineCompileOptions,
                                         ptxCode.c_str(),
                                         ptxCode.size(),
                                         log,&sizeof_log,
                                         &module
                                         ));
#else
    OPTIX_CHECK(optixModuleCreateFromPTX(optixContext,
                                         &moduleCompileOptions,
                                         &pipelineCompileOptions,
                                         ptxCode.c_str(),
                                         ptxCode.size(),
                                         log,      // Log string
                                         &sizeof_log,// Log string sizse
                                         &module
                                         ));
#endif
    if (sizeof_log > 1) PRINT(log);
  }
module은 ptx code를 연결해주고 compile하는 역할을 한다.
OptixModuleCompileOption은 동일한 파이프 내의 module에 따라서 설정을 다르게 할 수 있고, OptixPipelineLinkOption와 OptixPipelineCompileOptioons는 동일 pipeline에 연결된 program gorup을 만드는 데 사용되는 모든 module에 대해 동일하게 설정해야 한다.
(OptixModuleCompileOption)
register 수는 정할 수 있고 OPTIX_COMPILE_DEFAULT_MAX_REGISTER_COUNT를 통해서 register를 최대로 설정할 수 있다.
optLevel은 ptx code를 compile할 때 얼마나 최적화 할 것인지 여부이다.
debugLevel은 ptx code를 compile할 때 debug 관련 정보를 생성할 것인지에 대한 내용으로 OPTIX_COMPILE_DEBUG_LEVEL_MINIMAL로 최소로 출력할 수도 있다.
(OptixPipelineCompileOption)
OptixPipelineCompileOption은 module을 생성할 때도 사용되고, pipeline을 생성할 때도 사용된다.
useMotionBlur는 Motion blur를 사용할 것인지에 대한 여부로, 사용하지 않는다면 false로 설정하는 것이 성능 향상에 좋다.
pipelineCompileOptions의 traversableGraphFlags는 순회할 때 AS에 대한 설정으로 OPTIX_TRAVERSABLE_GRAPH_FLAG_ALLOW_SINGLE_GAS는 하나의 GAS에 대한 설정이고, 하나의 IAS에 대한 설정은 OPTIX_TRAVERSABLE_GRAPH_FLAG_ALLOW_SINGLE_LEVEL_INSTANCING을 통해 할 수 있다. 외에도 여러 설정이 존재한다.
numAttributeValue field는 attribute(ray trace의 입력 변수)를 위해 예약된 32bit word의 수를 정한다.
numPayloadValues는 ray payload(ray trace의 결과 변수)를 저장하기 위해 예약된 32bit word의 수를 정한다.
exceptionFlags의 값은 아래와 같다.
ray tracing 과정 중에 예외 상황이 발생했을 때 실행되는 exception program을 제어하기 위한 설정이다.
enum OptixExceptionFlags {
OPTIX_EXCEPTION_FLAG_NONE = 0 ,
OPTIX_EXCEPTION_FLAG_STACK_OVERFLOW = 1u << 0 ,
OPTIX_EXCEPTION_FLAG_TRACE_DEPTH = 1u << 1 ,
OPTIX_EXCEPTION_FLAG_USER = 1u << 2 ,
OPTIX_EXCEPTION_FLAG_DEBUG = 1u << 3
}
// SampleRenderer.cpp
#pragma once

#include "gdt/math/vec.h"

namespace osc {
  using namespace gdt;

  struct LaunchParams
  {
    int       frameID { 0 };
    uint32_t *colorBuffer;
    vec2i     fbSize;
  };

} // ::osc
launch params는 ray tracing kernel을 실행할 때 사용되는 매개변수를 나타낸다. 다양한 객체와 재질, 조명 등의 정보를 전달하는데 주로 사용한다.
위의 colorBuffer의 경우 ray tracing의 결과로 나오는 이미지 데이터를 저장하기 위해 사용된다.
// devicePrograms.cu
extern "C" __constant__ LaunchParams optixLaunchParams;
"optixLaunchParams"은 devicePrograms.cu 파일에서 상수 변수로 선언되어 있다.
(OptixPipelineLinkOption)
OptixPipelinkOption은 pipeline compile, link 동작을 세부적으로 제어하는데 사용된다. 여기서 link는 pipeline을 구성하는 module과 program group을 link하는데 사용된다. 코드 상에는 createModule에서 설정하지만 실제로 사용되는 것은 createPipeline() 함수의 optixPipelineCreate() 함수에서 사용된다.
optix에서 trace depth는 ray가 물체와 상호작용하는 횟수를 나타내는 개념이다. 카메라에서 발사되는 광선은 primary ray라고 부르며 이것이 ray tracing의 시작이며 trace depth 0에서 시작한다. 반사 또는 굴절, shadow ray 등을 할 때 optixTrace를 호출하게 되는데 이때 trace depth의 깊이가 1씩 증가한다. 최대 trace depth는 32이다.
Optix 7.7 버전부터는 optixModuleCreate 함수를 사용하고, 7.7 이전 버전에서는 optixModuleCreateFromPTX 함수를 사용한다.
인자는 동일하다.

// SampleRenderer.cpp
/*! does all setup for the raygen program(s) we are going to use */
void SampleRenderer::createRaygenPrograms()
{
// we do a single ray gen program in this example:
raygenPGs.resize(1);
OptixProgramGroupOptions pgOptions = {};
OptixProgramGroupDesc pgDesc = {};
pgDesc.kind = OPTIX_PROGRAM_GROUP_KIND_RAYGEN;
pgDesc.raygen.module = module;
pgDesc.raygen.entryFunctionName = "__raygen__renderFrame";
// OptixProgramGroup raypg;
char log[2048];
size_t sizeof_log = sizeof( log );
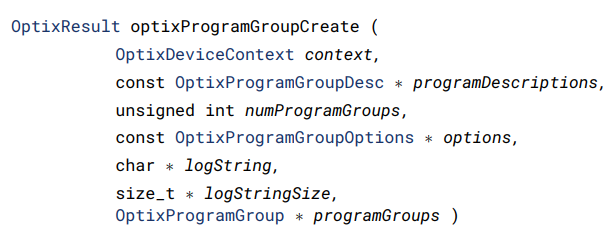
OPTIX_CHECK(optixProgramGroupCreate(optixContext,
&pgDesc,
1,
&pgOptions,
log,&sizeof_log,
&raygenPGs[0]
));
if (sizeof_log > 1) PRINT(log);
}ray-gen program group을 만드는 함수이다.
// devicePrograms.cu
  extern "C" __global__ void __raygen__renderFrame()
  {
    ...
  }
program group을 만드는데 어떤 program group을 만드는지와 어떤 device function을 callback으로 설정할지 정한다.
ray-gen에 대한 optix program group을 생성한다는 뜻으로 kind로 OPTIX_PROGRAM_GROUP_KIND_RAYGEN을 설정하고, 해당 ptx 코드를 갖고 있는 module을 설정하고, callback 함수의 이름을 설정한다.
// SampleRenderer.cpp
  void SampleRenderer::createMissPrograms()
  {
    // we do a single ray gen program in this example:
    missPGs.resize(1);

    OptixProgramGroupOptions pgOptions = {};
    OptixProgramGroupDesc pgDesc    = {};
    pgDesc.kind                     = OPTIX_PROGRAM_GROUP_KIND_MISS;
    pgDesc.miss.module            = module;
    pgDesc.miss.entryFunctionName = "__miss__radiance";

    // OptixProgramGroup raypg;
    char log[2048];
    size_t sizeof_log = sizeof( log );
    OPTIX_CHECK(optixProgramGroupCreate(optixContext,
                                        &pgDesc,
                                        1,
                                        &pgOptions,
                                        log,&sizeof_log,
                                        &missPGs[0]
                                        ));
    if (sizeof_log > 1) PRINT(log);
  }
ray-gen과 동일하다. 여기서는 miss program group을 만든다.
// SampleRenderer.cpp
  /*! does all setup for the hitgroup program(s) we are going to use */
  void SampleRenderer::createHitgroupPrograms()
  {
    // for this simple example, we set up a single hit group
    hitgroupPGs.resize(1);

    OptixProgramGroupOptions pgOptions = {};
    OptixProgramGroupDesc pgDesc    = {};
    pgDesc.kind                     = OPTIX_PROGRAM_GROUP_KIND_HITGROUP;
    pgDesc.hitgroup.moduleCH            = module;
    pgDesc.hitgroup.entryFunctionNameCH = "__closesthit__radiance";
    pgDesc.hitgroup.moduleAH            = module;
    pgDesc.hitgroup.entryFunctionNameAH = "__anyhit__radiance";

    char log[2048];
    size_t sizeof_log = sizeof( log );
    OPTIX_CHECK(optixProgramGroupCreate(optixContext,
                                        &pgDesc,
                                        1,
                                        &pgOptions,
                                        log,&sizeof_log,
                                        &hitgroupPGs[0]
                                        ));
    if (sizeof_log > 1) PRINT(log);
  }
설명은 동일하다.
hit program group을 만드는 것으로, CH는 closest hit program, AH는 any-hit program을 만든다.
// SampleRenderer.cpp
 /*! assembles the full pipeline of all programs */
  void SampleRenderer::createPipeline()
  {
    std::vector<OptixProgramGroup> programGroups;
    for (auto pg : raygenPGs)
      programGroups.push_back(pg);
    for (auto pg : missPGs)
      programGroups.push_back(pg);
    for (auto pg : hitgroupPGs)
      programGroups.push_back(pg);

    char log[2048];
    size_t sizeof_log = sizeof( log );
    OPTIX_CHECK(optixPipelineCreate(optixContext,
                                    &pipelineCompileOptions,
                                    &pipelineLinkOptions,
                                    programGroups.data(),
                                    (int)programGroups.size(),
                                    log,&sizeof_log,
                                    &pipeline
                                    ));
    if (sizeof_log > 1) PRINT(log);

    OPTIX_CHECK(optixPipelineSetStackSize
                (/* [in] The pipeline to configure the stack size for */
                 pipeline,
                 /* [in] The direct stack size requirement for direct
                    callables invoked from IS or AH. */
                 2*1024,
                 /* [in] The direct stack size requirement for direct
                    callables invoked from RG, MS, or CH.  */
                 2*1024,
                 /* [in] The continuation stack requirement. */
                 2*1024,
                 /* [in] The maximum depth of a traversable graph
                    passed to trace. */
                 1));
    if (sizeof_log > 1) PRINT(log);
  }
이전 함수들에서 만든 ray-gen program group, miss program group, hit program group을 하나의 list<OptixProgramGroup>에 저장하고, optixPipeline을 만든다.
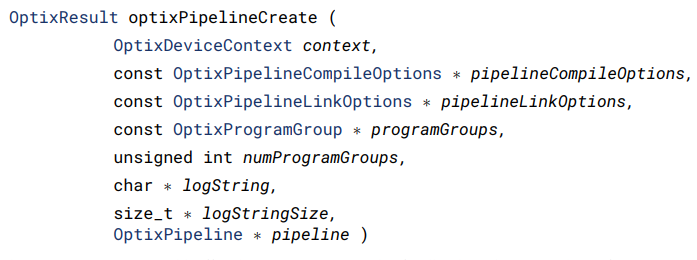
pipeline은 createModule()에서 설정한 OptixPipelineCompileOptions와 OptixPipelineLinkOptions를 인자와 list를 넣어 만든다.
ray tracing은 재귀적인 ray tracing 호출을 한다. 이때 각 호출은 stack memory를 사용한다. 스택 크기를 적절히 조절하면 재귀 호출이 깊어질 때 stack overflow를 방지한다. ( direct callable function, continuation callable function )
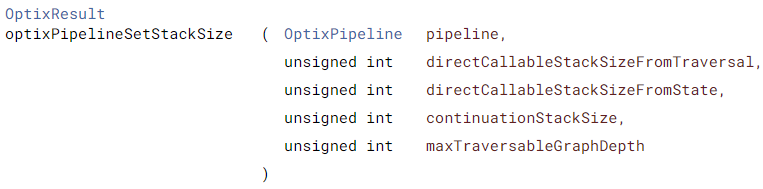
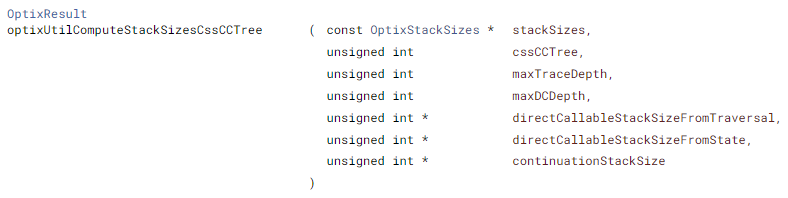
해당 값들은 실제로 계산을 해서 넘겨줄 수 있지만 아래와 같은 helping function을 통해서 상한에 대한 계산을 하여 넘겨줄 수도 있다.
// SampleRenderer.cpp
  /*! constructs the shader binding table */
  void SampleRenderer::buildSBT()
  {
    // ------------------------------------------------------------------
    // build raygen records
    // ------------------------------------------------------------------
    std::vector<RaygenRecord> raygenRecords;
    for (int i=0;i<raygenPGs.size();i++) {
      RaygenRecord rec;
      OPTIX_CHECK(optixSbtRecordPackHeader(raygenPGs[i],&rec));
      rec.data = nullptr; /* for now ... */
      raygenRecords.push_back(rec);
    }
    raygenRecordsBuffer.alloc_and_upload(raygenRecords);
    sbt.raygenRecord = raygenRecordsBuffer.d_pointer();

    // ------------------------------------------------------------------
    // build miss records
    // ------------------------------------------------------------------
    std::vector<MissRecord> missRecords;
    for (int i=0;i<missPGs.size();i++) {
      MissRecord rec;
      OPTIX_CHECK(optixSbtRecordPackHeader(missPGs[i],&rec));
      rec.data = nullptr; /* for now ... */
      missRecords.push_back(rec);
    }
    missRecordsBuffer.alloc_and_upload(missRecords);
    sbt.missRecordBase          = missRecordsBuffer.d_pointer();
    sbt.missRecordStrideInBytes = sizeof(MissRecord);
    sbt.missRecordCount         = (int)missRecords.size();

    // ------------------------------------------------------------------
    // build hitgroup records
    // ------------------------------------------------------------------

    // we don't actually have any objects in this example, but let's
    // create a dummy one so the SBT doesn't have any null pointers
    // (which the sanity checks in compilation would complain about)
    int numObjects = 1;
    std::vector<HitgroupRecord> hitgroupRecords;
    for (int i=0;i<numObjects;i++) {
      int objectType = 0;
      HitgroupRecord rec;
      OPTIX_CHECK(optixSbtRecordPackHeader(hitgroupPGs[objectType],&rec));
      rec.objectID = i;
      hitgroupRecords.push_back(rec);
    }
    hitgroupRecordsBuffer.alloc_and_upload(hitgroupRecords);
    sbt.hitgroupRecordBase          = hitgroupRecordsBuffer.d_pointer();
    sbt.hitgroupRecordStrideInBytes = sizeof(HitgroupRecord);
    sbt.hitgroupRecordCount         = (int)hitgroupRecords.size();
  }
SBT는 optiX에서 ray tracing program과 material 및 기타 정보를 결합하는 데 사용되는 데이터 구조이다. SBT는 record로 구성되고, record는 header와 data 영역으로 구분된다.
// SampleRenderer.cpp
  /*! SBT record for a raygen program */
  struct __align__( OPTIX_SBT_RECORD_ALIGNMENT ) RaygenRecord
  {
    __align__( OPTIX_SBT_RECORD_ALIGNMENT ) char header[OPTIX_SBT_RECORD_HEADER_SIZE];
    // just a dummy value - later examples will use more interesting
    // data here
    void *data;
  };

  /*! SBT record for a miss program */
  struct __align__( OPTIX_SBT_RECORD_ALIGNMENT ) MissRecord
  {
    __align__( OPTIX_SBT_RECORD_ALIGNMENT ) char header[OPTIX_SBT_RECORD_HEADER_SIZE];
    // just a dummy value - later examples will use more interesting
    // data here
    void *data;
  };

  /*! SBT record for a hitgroup program */
  struct __align__( OPTIX_SBT_RECORD_ALIGNMENT ) HitgroupRecord
  {
    __align__( OPTIX_SBT_RECORD_ALIGNMENT ) char header[OPTIX_SBT_RECORD_HEADER_SIZE];
    // just a dummy value - later examples will use more interesting
    // data here
    int objectID;
  };
Example02에서는 다음과 같은 SBT record가 존재한다.
__align( OPTIX_SBT_RECORD_ALIGNMENT )에서 __align은 데이터 구조체 또는 변수를 특정 바이트 정렬으로 정렬하도록 compiler에게 지시하는 것이다. 이는 최적화 및 메모리 효율성을 향상시킨다.
OPTIX_SBT_RECORD_ALIGNMENT는 SBT record를 정렬하는 데 사용되는 정려 값의 상수이다. 이를 통해 single instruction multiple data operation을 최적화하한다.
여기서 바이트 정렬이란 struct 내에 float int 순으로 저장되게 코드를 짰지만 compiler는 int float 순서가 더 최적화된다고 생각하고 순서를 바꾼다. 따라서 __align__은 붙이지 않아도 오류가 발생하거나 하지는 않는다.
header는 optix에서 사용하며 opaque하기 때문에 무슨 의미인지는 알 수 없다. header의 크기는 optiX 버전에 따라 다르며 OPTIX_SBT_RECORD_HEADER_SIZE를 통해 header의 크기를 알 수 있다. 현재 버전에서는 32로 초기화되어 있다.
Example02에서는 record의 data를 사용하지 않는다.

다시 기존의 buildSBT()로 돌아오면, 각 program에 맞춰서 program의 수만큼 record 구조체를 만들고 각 program group에 따른 header를 optixSbtRecordPackHeader 함수를 통해서 채운다.
그리고 sbt에 program의 kind에 따른 데이터를 넘겨준다.
이때 데이터는 device memory로 넘겨줘야 한다. (Buffer.alloc_and_upload)
여기서 알 수 있는 점은 missRecord와 hitgroup의 수는 여러 개가 될 수 있는 반면, raygen의 record는 단일 record이다.
// SampleRenderer.h
OptixShaderBindingTable sbt = {};
sbt는 SampleRenderer.h에 선언되어 있다.
  /*! resize frame buffer to given resolution */
  void SampleRenderer::resize(const vec2i &newSize)
  {
    // if window minimized
    if (newSize.x == 0 | newSize.y == 0) return;

    // resize our cuda frame buffer
    colorBuffer.resize(newSize.x*newSize.y*sizeof(uint32_t));

    // update the launch parameters that we'll pass to the optix
    // launch:
    launchParams.fbSize      = newSize;
    launchParams.colorBuffer = (uint32_t*)colorBuffer.d_ptr;
  }
resize 함수는 launchParam(host)을 설정해준다.
colorBuffer는 optixLaunch의 출력 데이터(이미지)이다.
fbSize는 image Size이다.
// SampleRenderer.cpp
/*! render one frame */
  void SampleRenderer::render()
  {
    // sanity check: make sure we launch only after first resize is
    // already done:
    if (launchParams.fbSize.x == 0) return;

    launchParamsBuffer.upload(&launchParams,1);
    launchParams.frameID++;

    OPTIX_CHECK(optixLaunch(/*! pipeline we're launching launch: */
                            pipeline,stream,
                            /*! parameters and SBT */
                            launchParamsBuffer.d_pointer(),
                            launchParamsBuffer.sizeInBytes,
                            &sbt,
                            /*! dimensions of the launch: */
                            launchParams.fbSize.x,
                            launchParams.fbSize.y,
                            1
                            ));
    // sync - make sure the frame is rendered before we download and
    // display (obviously, for a high-performance application you
    // want to use streams and double-buffering, but for this simple
    // example, this will have to do)
    CUDA_SYNC_CHECK();
  }
launchParams는 위에서 설명했듯이 조명과 같은 전역 const 상수를 저장한다. 해당 데이터를 device에 upload한다.

optixLaunch 함수를 통해서 ray tracing을 시작한다.
cuda stream은 cuda device context에 속해야 한다. 여러 스레드에서 다른 stream으로 병렬로 여러 번 실행하는 경우 문제가 발생할 수 있다.
pipelineParms가 가리키는 device memory의 data를 복사하므로 후에 지워도 된다.
optixLaunch 함수를 호출하면 ray generation program이 실행된다.
optixLaunch 함수의 widthheightdepth 만큼 cuda thread가 생성이 된다. 각각의 ray는 별도의 스레드로 처리된다.
CUDA_SYNC_CHECK() 매크로는 optixLaunch가 asynchronize하므로 동기화시켜주고, 오류가 발생 시 출력하고 종료해준다.
// SampleRenderer.cpp
  void SampleRenderer::downloadPixels(uint32_t h_pixels[])
  {
    colorBuffer.download(h_pixels,
                         launchParams.fbSize.x*launchParams.fbSize.y);
  }
결과 데이터를 device memory에서 host memory로 복사한다.
// devicePrograms.cu
#include <optix_device.h>

#include "LaunchParams.h"

using namespace osc;

namespace osc {

  /*! launch parameters in constant memory, filled in by optix upon
      optixLaunch (this gets filled in from the buffer we pass to
      optixLaunch) */
  extern "C" __constant__ LaunchParams optixLaunchParams;

  //------------------------------------------------------------------------------
  // closest hit and anyhit programs for radiance-type rays.
  //
  // Note eventually we will have to create one pair of those for each
  // ray type and each geometry type we want to render; but this
  // simple example doesn't use any actual geometries yet, so we only
  // create a single, dummy, set of them (we do have to have at least
  // one group of them to set up the SBT)
  //------------------------------------------------------------------------------

  extern "C" __global__ void __closesthit__radiance()
  { /*! for this simple example, this will remain empty */ }

  extern "C" __global__ void __anyhit__radiance()
  { /*! for this simple example, this will remain empty */ }


  //------------------------------------------------------------------------------
  // miss program that gets called for any ray that did not have a
  // valid intersection
  //
  // as with the anyhit/closest hit programs, in this example we only
  // need to have _some_ dummy function to set up a valid SBT
  // ------------------------------------------------------------------------------

  extern "C" __global__ void __miss__radiance()
  { /*! for this simple example, this will remain empty */ }


  //------------------------------------------------------------------------------
  // ray gen program - the actual rendering happens in here
  //------------------------------------------------------------------------------
  extern "C" __global__ void __raygen__renderFrame()
  {
    if (optixLaunchParams.frameID == 0 &&
        optixGetLaunchIndex().x == 0 &&
        optixGetLaunchIndex().y == 0) {
      // we could of course also have used optixGetLaunchDims to query
      // the launch size, but accessing the optixLaunchParams here
      // makes sure they're not getting optimized away (because
      // otherwise they'd not get used)
      printf("############################################\n");
      printf("Hello world from OptiX 7 raygen program!\n(within a %ix%i-sized launch)\n",
             optixLaunchParams.fbSize.x,
             optixLaunchParams.fbSize.y);
      printf("############################################\n");
  }

    // ------------------------------------------------------------------
    // for this example, produce a simple test pattern:
    // ------------------------------------------------------------------

    // compute a test pattern based on pixel ID
    const int ix = optixGetLaunchIndex().x;
    const int iy = optixGetLaunchIndex().y;

    const int r = (ix % 256);
    const int g = (iy % 256);
    const int b = ((ix+iy) % 256);

    // convert to 32-bit rgba value (we explicitly set alpha to 0xff
    // to make stb_image_write happy ...
    const uint32_t rgba = 0xff000000
      | (r<<0) | (g<<8) | (b<<16);

    // and write to frame buffer ...
    const uint32_t fbIndex = ix+iy*optixLaunchParams.fbSize.x;
    optixLaunchParams.colorBuffer[fbIndex] = rgba;
  }

} // ::osc
ray-gen program을 제외한 모든 program은 사용하지 않으므로 설명을 생략하겠다.
optixGetLaunchIndex는 optixLaunch에서 넘겨준 width, height, depth를 기반으로 index를 넘겨준다.
여기서 index는 cuda의 threadIdx, blockIdx와 같이 같은 SM에서 순서대로 있다는 보장이 없으므로 주의해야 한다.
launch index를 기반으로 출력 buffer를 채운다.