서론
새롭게 토이프로젝트를 시작하면서, 소셜 로그인 기능을 Oauth2로 네이버와 구글과 연계해 구현해보았다. 그동안 편하게 서비스를 이용해오면서, 어떻게 동작하는지에 대한 기술적인 호기심을 해결할 수 있었고 이를 기록하고자 한다.
해당 게시글은 다음 강의를 참고하여 작성했습니다.
https://www.youtube.com/watch?v=xsmKOo-sJ3c&list=PLJkjrxxiBSFALedMwcqDw_BPaJ3qqbWeB&ab_channel=%EA%B0%9C%EB%B0%9C%EC%9E%90%EC%9C%A0%EB%AF%B8
본론
OAuth2란 ❓
Open Authorization의 약자로 제 3자 인증 방식으로, 신뢰할 수 있는 웹사이트에 등록되어 있는 회원 정보를 활용하여 서비스에 로그인을 하는 기능을 말한다. 이는 정확히 말하자면, 대신 로그인을 하는 게 아니고 사용자 정보를 위임하는 기술이다.
인증과정
- 이미지 출처 : https://wildeveloperetrain.tistory.com/247
- 글 출처 : https://velog.io/@black_han26/Spring-Security-OAuth-%EA%B0%9C%EB%85%90-%EB%B0%8F-%EB%8F%99%EC%9E%91-%EB%B0%A9%EC%8B%9D
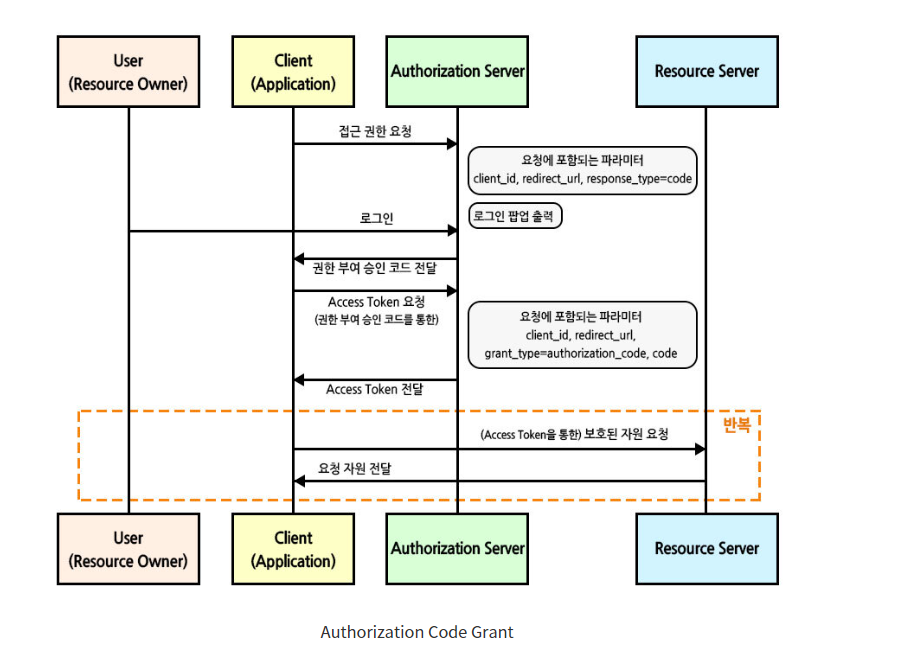
주의! 위 사진과 아래에서 설명하는 내용 중 Client는 우리가 일반적으로 알고 있는 프론트 단의 클라이언트가 아닌 우리가 이용하는 서비스다.
Authorization, Resource 서버를 네이버라고 예를 들어서 설명하겠습니다.(구글, 페이스북, 깃헙 다 될 수 있음)
- 서비스를 제공하는 Client는 사용자에게 네이버에 대한 접근 권한 요청
- 사용자는 "네이버 로그인"을 클릭하고, 클라이언트는 사용자를 네이버 로그인 페이지로 redirect한다.
- 사용자는 네이버 로그인 페이지에서 네이버 계정으로 로그인하고 인증 요청
- 네이버는 사용자을 확인하고, 사용자에게 Client가 네이버에 접근 할 수 있도록 권한 여부를 묻는다.
- 사용자가 Client에게 네이버 접근 권한을 부여하면, 네이버는 Client에게 Access Token을 발급
- Client는 Access Token을 사용해 네이버 리소스에 접근
- Client는 네이버 리소스에서 사용자의 정보 조회, 정보를 기반으로 서비스 제공
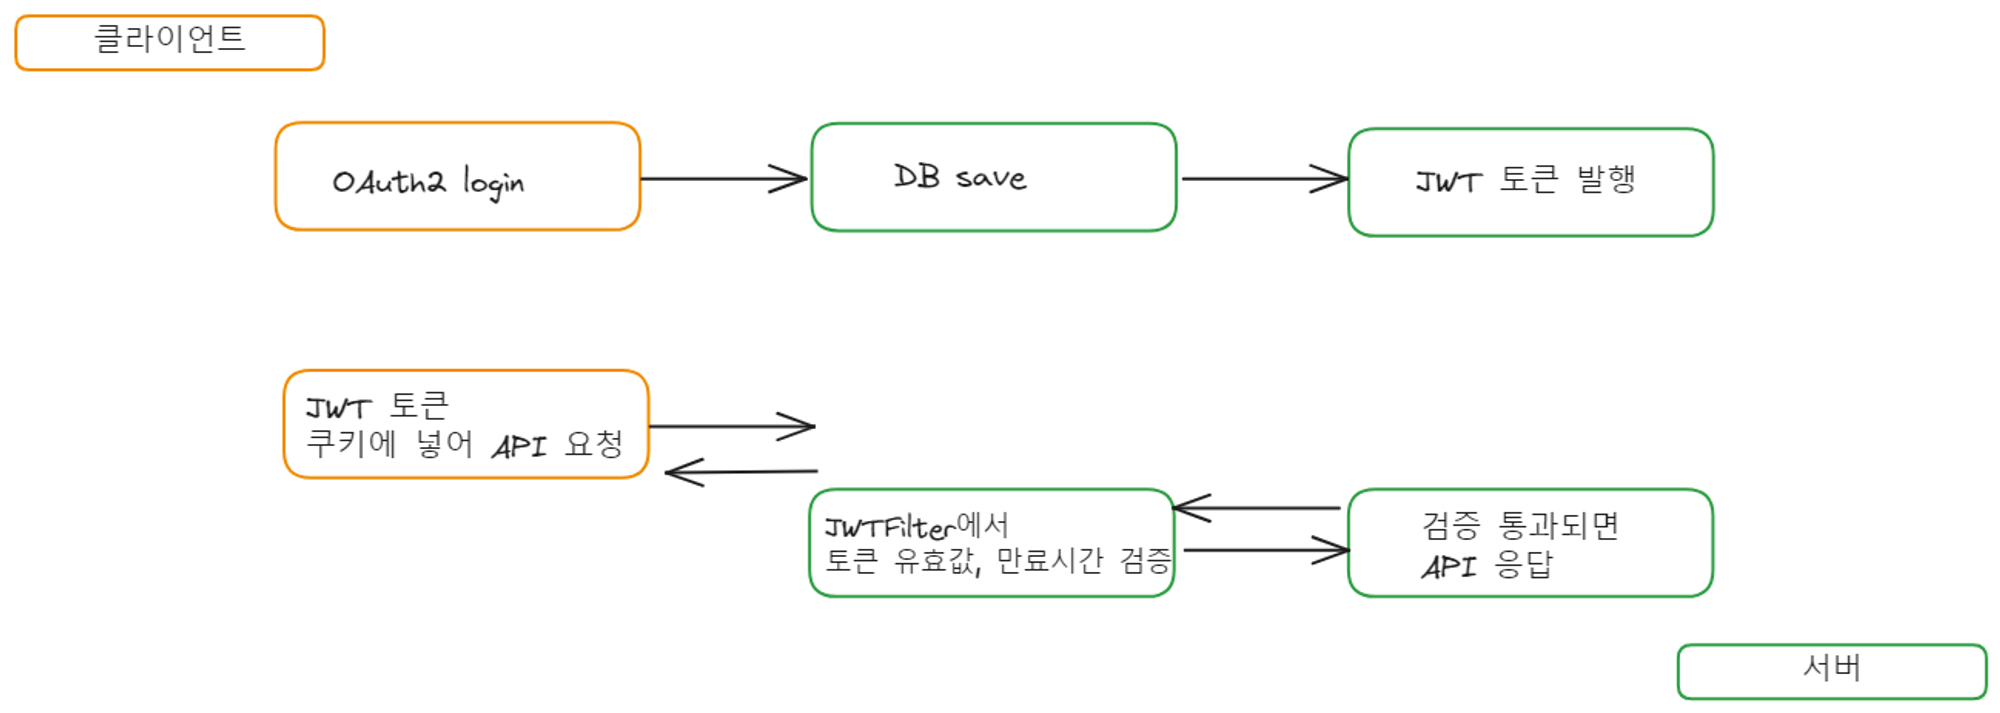
동작 과정

- 사용자가 접근하면 OAuth2AuthorizationRequestRedirectFilter에서
해당 oauth 제공 서비스(google, naver ...)로 redirect 시켜서 인증 유도 - OAuth2LoginAuthenticationFilter에서 인증 서버로 로그인 요청
- 성공적으로 인증이 완료되면 인증 서버로부터 코드를 발급받고, 코드를 통해 사용자 인증 정보를 제공받는다.
- 사용자 인증 정보를 기반으로 서비스 계층에서 JWT 토큰을 발행한다.
흐름도
기술 스택
- JDK 17, Springboot, Spring-Security, OAuth2, JWT, JPA
build.gradle
dependencies {
	implementation 'org.springframework.boot:spring-boot-starter-data-jpa'
	implementation 'org.springframework.boot:spring-boot-starter-jdbc'
	implementation 'com.github.gavlyukovskiy:p6spy-spring-boot-starter:1.5.7'
	implementation 'org.springframework.boot:spring-boot-starter-web'

	//Security && oauth2
	implementation 'org.springframework.boot:spring-boot-starter-security'
	implementation 'org.springframework.security:spring-security-oauth2-client'
	//compileOnly('org.springframework.boot:spring-boot-starter-security')

	//JWT
	implementation 'io.jsonwebtoken:jjwt-api:0.12.3'
	implementation 'io.jsonwebtoken:jjwt-impl:0.12.3'
	implementation 'io.jsonwebtoken:jjwt-jackson:0.12.3'

	implementation'org.mariadb.jdbc:mariadb-java-client'
	implementation 'org.springframework.session:spring-session-jdbc'
	compileOnly 'org.projectlombok:lombok'
	runtimeOnly 'org.mariadb.jdbc:mariadb-java-client'
	annotationProcessor 'org.projectlombok:lombok'
	testImplementation 'org.springframework.boot:spring-boot-starter-test'
}
SecurityConfig
@Configuration
@EnableWebSecurity
@RequiredArgsConstructor
@EnableMethodSecurity(securedEnabled = true, prePostEnabled = true)
public class SecurityConfig {

    private final CustomOAuth2UserService customOAuth2UserService;
    private final CustomSuccessHandler customSuccessHandler;
    private final JWTUtil jwtUtil;

    @Bean
    public SecurityFilterChain config(HttpSecurity http, HandlerMappingIntrospector introspector) throws Exception{

        http
                .cors(corsCustomizer -> corsCustomizer.configurationSource(new CorsConfigurationSource() {
                    @Override
                    public CorsConfiguration getCorsConfiguration(HttpServletRequest request) {

                        CorsConfiguration configuration = new CorsConfiguration();

                        configuration.setAllowedOrigins(Collections.singletonList("http://localhost:3000"));
                        configuration.setAllowedMethods(Collections.singletonList("*"));
                        configuration.setAllowCredentials(true);
                        configuration.setAllowedHeaders(Collections.singletonList("*"));
                        configuration.setMaxAge(3600L);

                        configuration.setExposedHeaders(Collections.singletonList("Set-Cookie"));
                        configuration.setExposedHeaders(Collections.singletonList("Authorization"));

                        return configuration;
                    }
                }));

       //csrf disable
        http
                .csrf((auth) -> auth.disable());

        //Form 로그인 방식 disable
        http
                .formLogin((auth) -> auth.disable());

        //Http Basic 인증 방식 disable
        http
                .httpBasic((auth) -> auth.disable());

        //JWT 필터 추가
        http
                .addFilterAfter(new JWTFilter(jwtUtil), UsernamePasswordAuthenticationFilter.class);

        //oauth2
        http
                .oauth2Login((oauth2) -> oauth2
                        .userInfoEndpoint((userInfoEndpointConfig -> userInfoEndpointConfig
                                .userService(customOAuth2UserService)))
                        .successHandler(customSuccessHandler)
                );

        //경로별 인가 작업
        http
                .authorizeHttpRequests((auth) -> auth
                        .requestMatchers("/").permitAll()
                        .anyRequest().authenticated());

        //세션 설정 : STATELESS
        http
                .sessionManagement((session) -> session
                        .sessionCreationPolicy(SessionCreationPolicy.STATELESS));

        return http.build();
    }
}
로그인 요청이 들어오면 oauth2로 redirect하고 성공하면 successhandler에서 jwt 토큰을 발행한다.
jwtfilter에서 jwt토큰을 검증하고 유효할 경우, SecurityContextHolder에 유저 정보를 저장한다.
다음 포스트에서 entity, dto와 successhandler, jwt 발행 클래스, jwtFilter를 구현하겠습니다.

잘보고갑니다