
🎯 TEST 내용
네 편에 걸쳐 포스팅할 예정입니다!
1. 애플리케이션 환경 구성 및 frontend, backend 구성(이번 것)
2. Dockerfile 작성 (운영 환경 , 개발 환경을 나눠 볼 예정)
3. Travis ci 연동 및 AWS Elastic Beanstalk에 배포
4. 실행 결과 확인
🚀 애플리케이션 설계
🧑💻 화면에 문자를 입력하면 리액트를 통해 노드로 전달 시킨 뒤 입력된 문자에 Hello를 덧 붙여서 저장 시키는 애플리케이션을 만들어 봅시다!
- Backend
node.js
- Frontend
React.js
- Database
- 개발 환경 :
MySql - 운영 환경 :
AWS RDS
- 개발 환경 :
Nginx를 활용하여 운영 환경에서의 일종의 Proxy역할 및 리액트 에서는 정적 파일(html,js,css)을 제공해 주는 용도로 사용할 것
운영 환경에서의 로직 흐름
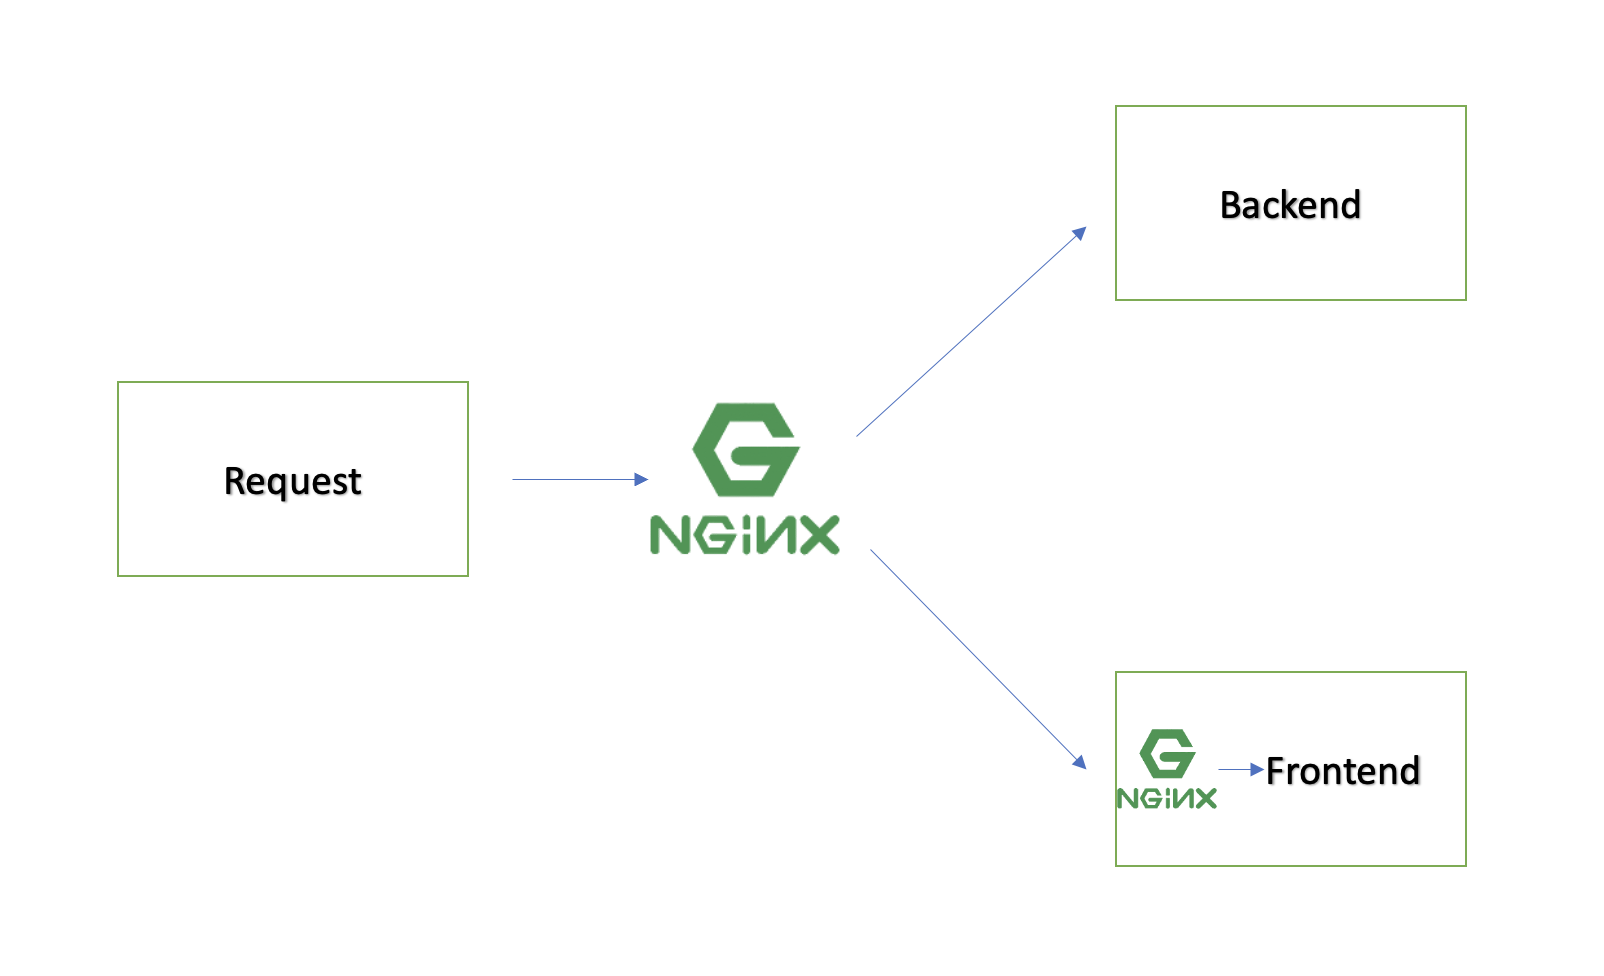
이런 식으로 구성해 볼 예정 입니다!
🚀 Backend 환경
- node.js 사용
해당 디렉토리 터미널 창에npm init입력
package.json
- dependencies
expressmysql
{
  "name": "backend",
  "version": "1.0.0",
  "description": "",
  "main": "index.js",
  "scripts": {
    "test": "echo \"Error: no test specified\" && exit 1",
    "start": "node server.js"
  },
  "author": "",
  "license": "ISC",
  "dependencies": {
    "express": "4.16.3",
    "mysql": "2.16.0",
    "body-parser": "1.19.0"
  }
}
db.js
- pool을 만들어서 사용 할 예정
const mysql=require("mysql");
const pool=mysql.createPool({
    connectionLimit: 10,
    host: process.env.MYSQL_HOST,
    user: process.env.MYSQL_USER,
    password: process.env.MYSQL_ROOT_PASSWORD,
    database: process.env.MYSQL_DATABASE,
    port: process.env.MYSQL_PORT
})

exports.pool=pool;
server.js
- 비즈니스 로직이 실행 될 장소
const express=require("express");
const db=require("./db");

const app=express();

app.use(express.urlencoded({ extended: true }));

app.use(express.json());

app.listen(5000,()=>{
    console.log("application start in port 5000.")
})


db.pool.query('CREATE TABLE lists (id INTEGER AUTO_INCREMENT,value TEXT,PRIMARY KEY (id))',
(err,results,field)=>{
        console.log(results)
    })

app.post('/api/values',function(req,res){
    var str=req.body.value+" Hello";
    db.pool.query('INSERT INTO lists (value) VALUES(?);',str,
    (err,results,fields)=>{
        if(err)
        return res.status(500).send(err);
        else
        return res.json({success: true, value: str})
    })

})
🚀 Frontend
- 리액트에서 기본으로 제공하는 화면을 사용할 것임
- form만 추가로 제공해서 데이터베이스에 저장 되었나 직접 확인 해 볼 것
npx create-react-app frontend
package.json
- dependencies
reactaxiosreact-domreact-scripts
{
"name": "frontend",
"version": "0.1.0",
"private": true,
"dependencies": {
"@testing-library/jest-dom": "^5.14.1",
"@testing-library/react": "^11.2.7",
"@testing-library/user-event": "^12.8.3",
"axios": "^0.21.1",
"react": "^17.0.2",
"react-dom": "^17.0.2",
"react-scripts": "4.0.3",
"web-vitals": "^1.1.2"
},
"scripts": {
"start": "react-scripts start",
"build": "react-scripts build",
"test": "react-scripts test",
"eject": "react-scripts eject"
},
"eslintConfig": {
"extends": [
"react-app",
"react-app/jest"
]
},
"browserslist": {
"production": [
">0.2%",
"not dead",
"not op_mini all"
],
"development": [
"last 1 chrome version",
"last 1 firefox version",
"last 1 safari version"
]
}
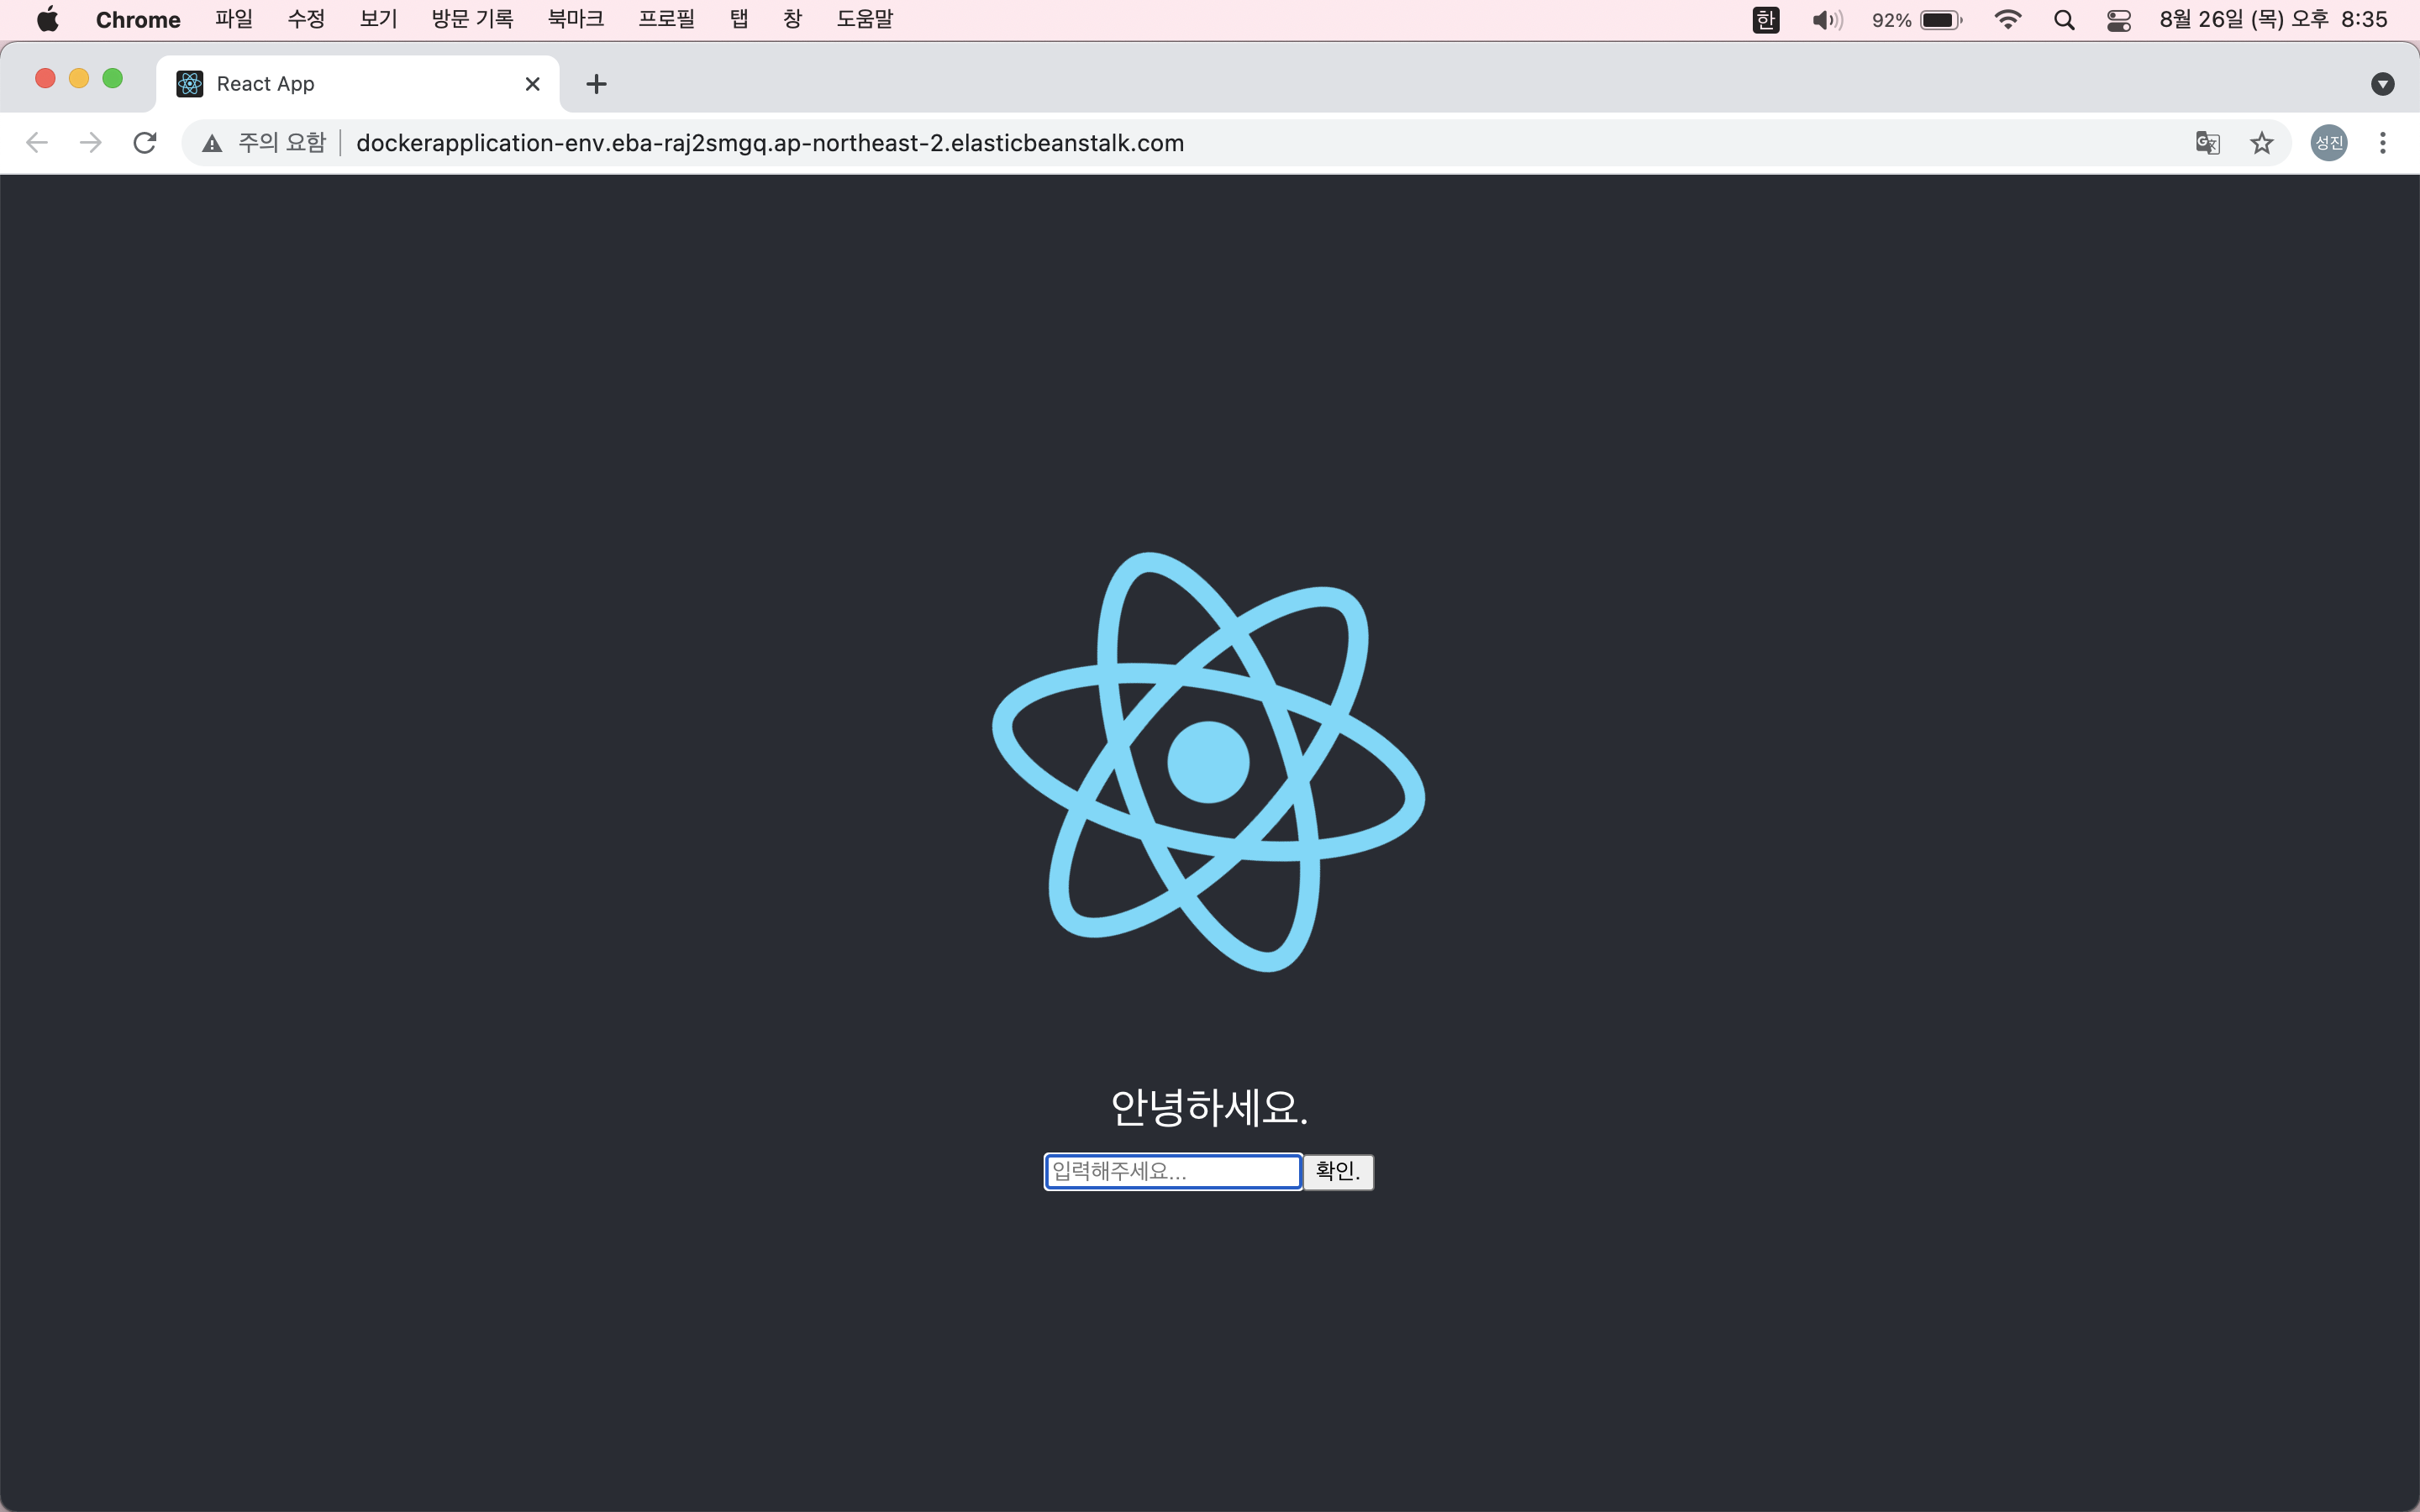
}App.js
import React, { useState, useEffect } from 'react';
import logo from './logo.svg';
import './App.css';
import axios from 'axios';

function App() {

  const [lists, setLists] = useState([])
  const [value, setValue] = useState("")


  const changeHandler = (event) => {
    setValue(event.currentTarget.value)
  }

  const submitHandler = (event) => {
    event.preventDefault();

    axios.post('/api/values', { value: value })
      .then(response => {
        if (response.data.success) {
          setLists([...lists, response.data])
          setValue("");
        } else {
          alert('값을 DB에 넣는데 실패했습니다.')
        }
      })
  }


  return (
    <div className="App">
      <header className="App-header">
        <img src={logo} className="App-logo" alt="logo" />
        <div className="container">


          <br />
            안녕하세요.
          <form className="example" onSubmit={submitHandler}>
            <input
              type="text"
              placeholder="입력해주세요..."
              onChange={changeHandler}
              value={value}
            />
            <button type="submit">확인.</button>
          </form>
        </div>
      </header>
    </div>
  );
}

export default App;
이제 이런 모습의 화면과 서버 쪽 동작은 완성 하였습니다!
😍 이상으로 포스팅을 마치겠습니다. 감사합니다 :)

WEB STUDY & etc.. HELLO!