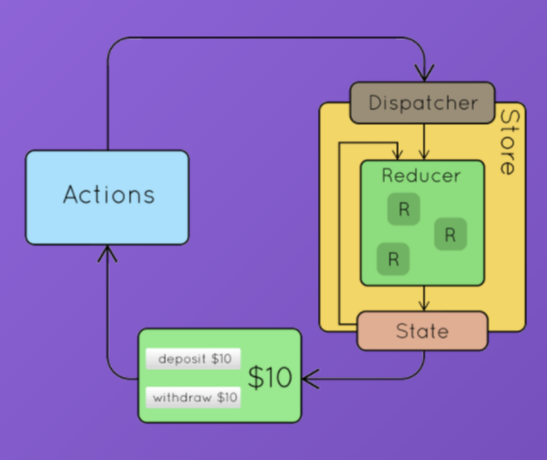
Flux 패턴 (Redux)
Flux 어플리케이션은 다음 핵심적인 세가지 부분으로 구성되어 있다
Dispatcher
 1. disaptcher는 store 간의 의존성을 관리할 수 있다.
 2. dispatcher는 store를 등록하기 위한 콜백을 실행한 이후에 action을 모든 store로 전달한다.
Stores
Store는 어플리케이션의 상태와 로직을 포함하고 있다
//console.log(store)
{dispatch: dispatch(action), subscribe: subscribe(listener), getState: getState(), replaceReducer: replaceReducer(nextReducer)}
Views
view는 사용자의 상호작용에 응답하기 위해 새로운 action을 만들어 시스템에 전파한다
Flux 구조와 데이터 흐름
Flux는 MVC와 다르게 단방향으로 데이터가 흐른다.

dispatcher, store과 view는 독립적인 노드로 입력과 출력이 완전히 구분된다.
action은 새로운 데이터를 포함하고 있는 간단한 객체로 type 프로퍼티로 구분된다.
Redux 예시를 통해 Flux의 각 구성 요소를 어떻게 작성하는지 알아보자

Your Order (action) ⇒ Restaurant server (dispatch) ⇒ chef (reducer)
쉬운 예로 우리가 레스토랑에 가서 음식을 주문한다고 하면
action : 주문
주문을 하게되면 레스토랑 서버가 음식을 가져다 줄 것이다
dispatch : (레스토랑)서버
받은 주문을 만드는 과정이 필요한데 이떄 그 역할을 chef가 담당할 것이다
reducer : 주방장
action 선언!
 const action = {
	type: "INCREMENT"
}

function increment(amount){
	return {
		type: "INCREMENT",
		payload: amount
	}
}

function decrement(){
	return {
		type: "DECREMENT"
	}
}

console.log(increment()) // {type : "INCREMENT"}
console.log(decrement()) // {type : "DECREMENT"}
reducer, dispatch 선언!
function reducer(state = {count: 0}, action){
	// action type에 따른 새로운 state를 리턴!
	switch(action.type) {
        case "INCREMENT":
            return {
                count: state.count + action.payload
            }
        case "DECREMENT":
            return {
                count: state.count - 1
            }
				default:
						return state
    }
}

const store = redux.createStore(reducer)
console.log(store)
// store 콘솔 내용
// {dispatch: dispatch(action), subscribe: subscribe(listener), getState: getState(), replaceReducer: replaceReducer(nextReducer)}

store.subscribe(()=>{
	console.log(store.getState())  // {count: 1}
})

store.dispatch({type: "INCREMENT"})
store.dispatch(increment(5)) // {count: 6}
store.dispatch({type: "INCREMENT"}) // {count: 2}
🥸 리덕스 툴킷 맛보기
action type을 정의하고, action creator를 만들고 redux-saga를
사용하는 경우 saga 만들고, reducer까지 만들어야 하는데 redux-toolkit의 createSlice는 이를 한 방에 해결 가능하게 한다.
// 타입정의
interface User {
  uid: string;
  displayName: string;
  photoURL: string;
}

interface UserState {
  user: User;
}

const initialState: UserState = {
  user: {
    loading: false,
    data: null,
    error: null,
  }
}
// action type 과 state, reducer을 한번에 관리 할 수 있게 한다.

const slice = createSlice({
  name: 'user',
  initialState,
  reducers: {
    signInRequest(state, action: Action) {
      state.user = {
        loading: true,
        data: null,
        error: null,
      };
    },
    signInSuccess(state, { payload: userInfo }: PayloadAction<User>) {
      state.user = {
        loading: false,
        data: userInfo,
        error: null,
      };
    },
    signInFailure(state, { payload: error }: PayloadAction<Error>) {
      state.user = {
        loading: false,
        data: null,
        error,
      };
    },
  },
})

// dispatch 구조
export const {
  signInRequest,
  signInSuccess,
  signInFailure
} = slice.actions

export default slice.reducer

export const selectUser = state => state.user

export const fetchUser = () => async dispatch => {
  try {
    dispatch(signInRequest())
    // api data 통신이 있을 경우 이렇게!
    const response = await getUser()
    const data = await response.json()
    dispatch(signInSuccess({ ...data }))
  } catch (error) {
    dispatch(signInFailure(error))
  }
flux 와 redux 의 차이점
flux는 store가 여러 개이고, callback 함수로 store를 업데이트 한다. redux는 store가 1개이고, store를 변경하는 reducer를 여러 개 둔다. 이때, reducer 간에 합성이 가능해서 공통로직을 재사용하기가 좋다.
reference
https://taegon.kim/archives/5288
https://haruair.github.io/flux/docs/overview.html
