목차
- 서론
- Spring Security
- JWT
- 강의 내용 정리
서론
이 글은 인프런 강의를 보고 정리한 내용입니다.
Spring Security
Spring Security는 Spring과는 별개로 작동하는 보안담당 프레임워크이다.
Security의 동작
1. Authenticatio(인증) : 특정 대상이누구인지 확인하는 절차이다.
2. Authorization(권한) : 인증된 주체가 특정한 곳에 접근 권한을 확인하는 것이다.
Spring Security Architecture
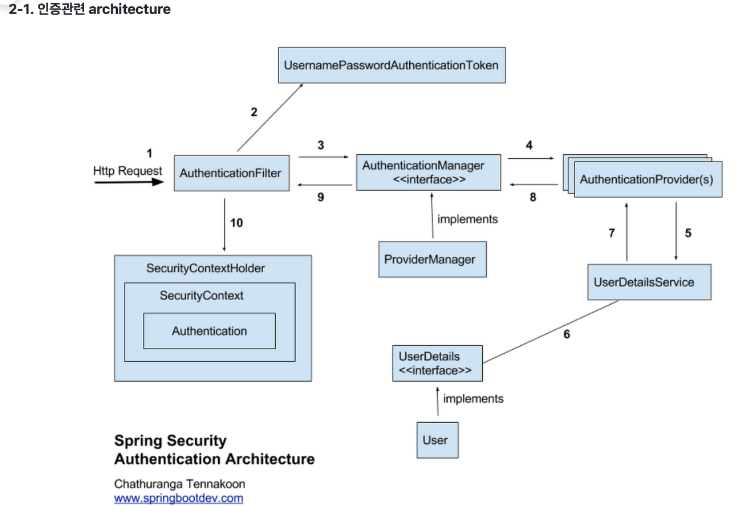
- Http Request가 서버로 전송된다.
- AuthenticationFilter가 요청을 받는다.
- AuthenticationFilter에서 Request의 Id, Password를 이용하여 AuthenticationToken 생성
- 토큰을 AuthenitcationManager가 받는다.
- AuthenticationManager는 토큰을 AuthenticationProvider에게 토큰을 넘겨준다.
- AuthenticationProvider는 UserDetailsService로 토근의 사용자 아이디를 전달하여 DB에 ID 존재를 확인한다. 이 때, UserDetailsService는 DB의 회원정보를 UserDetails라는 객체로 반환 받는다.
- AuthenticationProvider는 반환받은 UserDetails 객체와 실제 사용자의 입력정보를 비교한다.
- 비교가 완료되면 사용자 정보를 가진 Authentication 객체를 SecurityContextHolder에 담은 이후 AuthenticationSuccessHandle를 실행한다.(실패시 AuthenticationFailureHandler를 실행한다.)
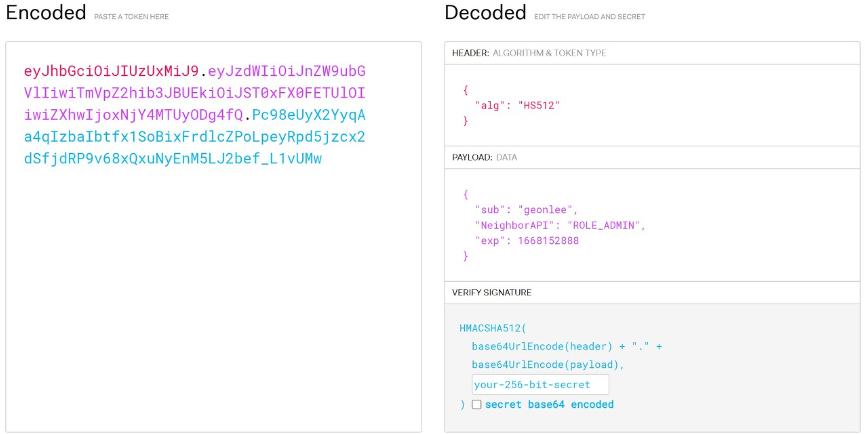
JWT(Json Web Token)
JWT는 일반적으로 클라이언트와 서버 통신 시 권한 인가(Authorization)을 위해 사용하는 토큰이다.
JSON 객체를 사용하여 토큰 자체에 정보를 저장하는 Web Token이다.
다른 인증 방식들에 비해 가벽고 간편해서 유용한 인증 방식
JWT의 구조
JWT는 Header, Payload, Signature로 구성되어 있다.
- Header : Signature를 해싱하기 위한 알고리즘 정보
- Payload : 서버와 클라이언트가 주고받을 시스템에서 실제 사용될 정보
- Signature : 토큰의 유효성 검증을 위한 문자열
JWT의 장/단점
- 장점
- 중앙의 인증서버, 데이터 스토어에 대한 의존성이 없다. 수평 확장에 유리하다.- Base64 URL Safe Encoding을 사용하기 떼문에 URL, Cookie, Header 모두 사용 가능
- 단점
- Payload의 정보가 많아지면 네트워크 사용량이 증가한다.- Token이 클라이언트에 저장되기 때문에 서버에서 클라이언트의 토큰 조작 불가능
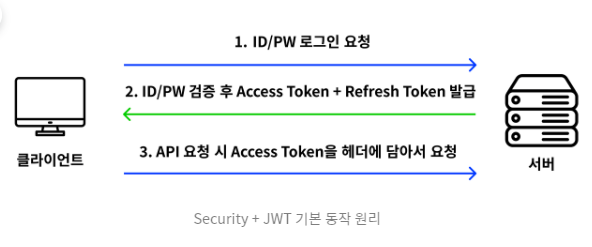
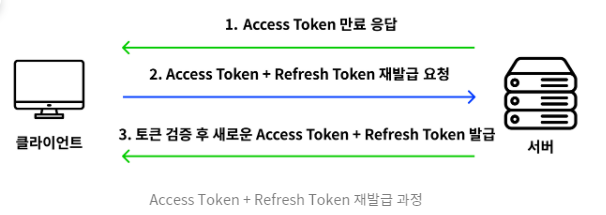
Spring Security + JWT 동작과정
구현 코드
코드들을 하나씩 살펴보자
build.gradle
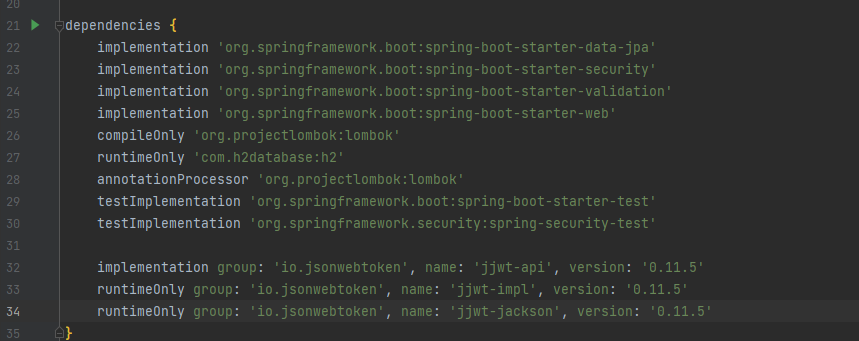
- L23 : security 라이브러리
- L32 ~ 34 : jwt 관련 라이브러리
application.yml
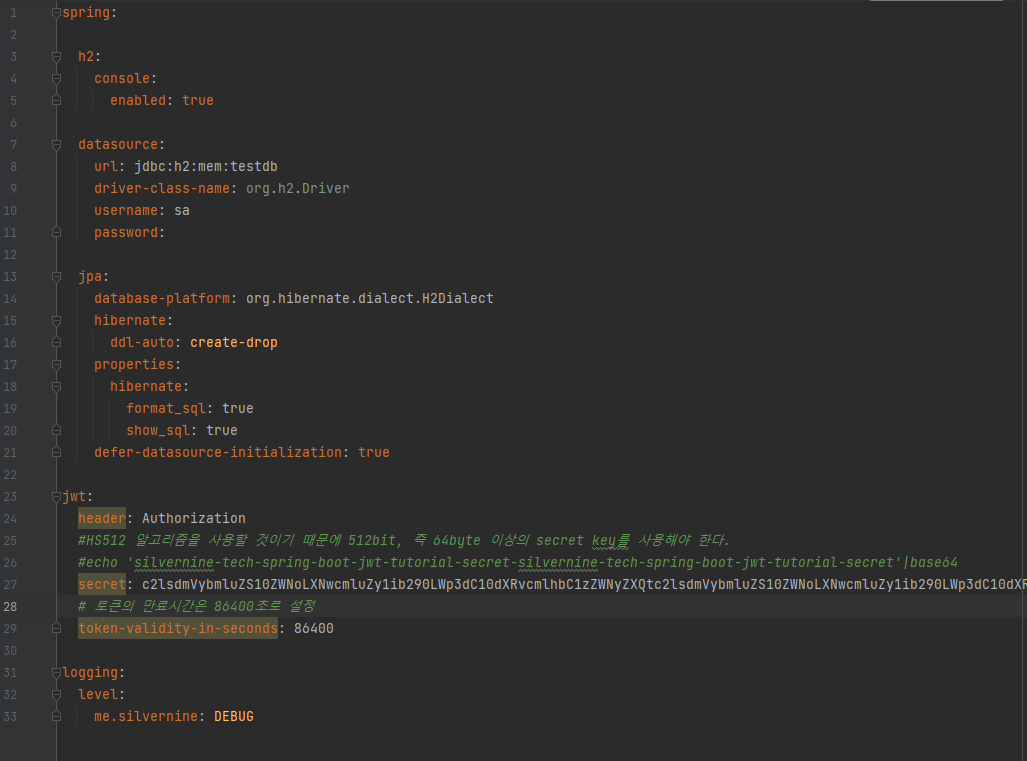
- L3 ~ L21 : h2 데이터베이스와 jpa 설정
- L23 ~ L29 :
header의 이름은 Authorization이고,secret에 암호화할 알고리즘을 적는다. 여기서는 HS512 알고리즘을 사용했다. 그리고Token-validity-in-seconds는 발행한 키의 유효 시간이다. 86400초 동안 사용한다는 의미
/config/SecurityConfig
Spring Security에서 사용할 보안 설정을 넣는 공간이다.
초기 구현
@EnableWebSecurity//기본적인 web 보안을 활성화 하겠다는 의미의 어노테이션
public class SecurityConfig extends WebSecurityConfigurerAdapter {

    @Override
    public void configure(WebSecurity web){
        web
                .ignoring()//무시한다
                .antMatchers(// `/h2-console/**` 과 `/favicon.ico` 하위 모든 요청과 파비콘은 인증을 무시한다.
                        "/h2-console/**"
                        ,"/favicon.ico"
                );
    }

    @Override
    protected void configure(HttpSecurity http) throws Exception{
        http
                .authorizeRequests()//httpServletRequest를 사용하는 요청들에 대한 접근 제한을 설정하겠다는 의미
                .antMatchers("/api/hello").permitAll()// `/api/hello`에 대한 요청은 인증없이 접근을 허용하겠다는 의미
                .anyRequest().authenticated();//나머지 요청들은 인증되어야 한다.
    }
}
Spring-Security의 WebSecurityConfigurerAdapter 인터페이스를 상속받아 사용한다. 여기서 config내에 내가 정한 규칙을 구현한다.
최종 구현
@EnableWebSecurity
@EnableGlobalMethodSecurity(prePostEnabled = true)
public class SecurityConfig {
    private final TokenProvider tokenProvider;
    //private final CorsFilter corsFilter;
    private final JwtAuthenticationEntryPoint jwtAuthenticationEntryPoint;
    private final JwtAccessDeniedHandler jwtAccessDeniedHandler;

    public SecurityConfig(
            TokenProvider tokenProvider,
            //CorsFilter corsFilter,
            JwtAuthenticationEntryPoint jwtAuthenticationEntryPoint,
            JwtAccessDeniedHandler jwtAccessDeniedHandler
    ) {
        this.tokenProvider = tokenProvider;
        //this.corsFilter = corsFilter;
        this.jwtAuthenticationEntryPoint = jwtAuthenticationEntryPoint;
        this.jwtAccessDeniedHandler = jwtAccessDeniedHandler;
    }

    @Bean
    public PasswordEncoder passwordEncoder() {
        return new BCryptPasswordEncoder();//BCryptEncoder 기법
    }

    @Bean
    public WebSecurityCustomizer webSecurityCustomizer() {
        return (web) -> web.
                ignoring()//무시한다.
                .antMatchers("/h2-console/**"
                , "/favicon.ico"// `/h2-console/**` 과 `/favicon.ico` 하위 모든 요청과 파비콘은 인증을 무시한다.
                , "/error");
    }

    @Bean
    public SecurityFilterChain filterChain(HttpSecurity httpSecurity) throws Exception {
        httpSecurity
                // token을 사용하는 방식이기 때문에 csrf를 disable합니다.
                .csrf().disable()

                //.addFilterBefore(corsFilter, UsernamePasswordAuthenticationFilter.class)

                .exceptionHandling()
                .authenticationEntryPoint(jwtAuthenticationEntryPoint)
                .accessDeniedHandler(jwtAccessDeniedHandler)

                // enable h2-console
                .and()
                .headers()
                .frameOptions()
                .sameOrigin()

                // 세션을 사용하지 않기 때문에 STATELESS로 설정
                .and()
                .sessionManagement()
                .sessionCreationPolicy(SessionCreationPolicy.STATELESS)

                .and()
                .authorizeRequests()
                .antMatchers("/api/hello").permitAll()
                .antMatchers("/api/authenticate").permitAll()
                .antMatchers("/api/signup").permitAll()

                .anyRequest().authenticated()

                .and()
                .apply(new JwtSecurityConfig(tokenProvider));

        return httpSecurity.build();
    }
}
jwt의 tokenProvider와 jwtAtuthenticationEntryPoint, jwtAccessDeniedHandler를 가져와서 사용한다.
tokenProvider는 토큰의 생성, 토근의 유효성 검증을 담당하는 Provider이다.
jwtAtuthenticationEntryPoint는 유효한 자격증명을 제공하지 않고 접근하려할 때 401에러를 리턴하는 클래스이다.
jwtAccessDeniedHandler는 필요한 권한이 존재하지 않을 경우 403 forbidden 에러를 리턴하는 클래스이다.
위 내용은 뒤에 추가하겠다.
    @Bean
    public PasswordEncoder passwordEncoder() {
        return new BCryptPasswordEncoder();//BCryptEncoder 기법
    }
JWT를 사용하기 위해서는 기본적으로 password encoder가 필요한데, 여기서는 Bycrypt encoder를 사용했다.
    @Bean
    public WebSecurityCustomizer webSecurityCustomizer() {
        return (web) -> web.
                ignoring()//무시한다.
                .antMatchers("/h2-console/**"
                , "/favicon.ico"// `/h2-console/**` 과 `/favicon.ico` 하위 모든 요청과 파비콘은 인증을 무시한다.
                , "/error");
    }
나만의 Security 규칙이라고 할 수 있다. 초기 구현과 동일
    @Bean
    public SecurityFilterChain filterChain(HttpSecurity httpSecurity) throws Exception {
        httpSecurity
                // token을 사용하는 방식이기 때문에 csrf를 disable합니다.
                .csrf().disable()

                //.addFilterBefore(corsFilter, UsernamePasswordAuthenticationFilter.class)

                .exceptionHandling()
                .authenticationEntryPoint(jwtAuthenticationEntryPoint)
                .accessDeniedHandler(jwtAccessDeniedHandler)

                // enable h2-console
                .and()
                .headers()
                .frameOptions()
                .sameOrigin()

                // 세션을 사용하지 않기 때문에 STATELESS로 설정
                .and()
                .sessionManagement()
                .sessionCreationPolicy(SessionCreationPolicy.STATELESS)

                .and()
                .authorizeRequests()
                .antMatchers("/api/hello").permitAll()
                .antMatchers("/api/authenticate").permitAll()
                .antMatchers("/api/signup").permitAll()

                .anyRequest().authenticated()

				//JwtSecurityConfig 적용
                .and()
                .apply(new JwtSecurityConfig(tokenProvider));

        return httpSecurity.build();
    }
가장 중요한 Token의 규칙을 적는 부분이다.
-
csrf().disable() : csrf 보안을 사용하지 않는다는 의미이다.
-
.exceptionHandling()
.authenticationEntryPoint(jwtAuthenticationEntryPoint)
.accessDeniedHandler(jwtAccessDeniedHandler)
: 필자가 만든 JWT의 401, 403 Exception 핸들러을 추가해주는 부분이다. -
.and()
.headers()
.frameOptions()
.sameOrigin()
: h2-console를 허용한다는 의미이다. -
.and()
.sessionManagement()
.sessionCreationPolicy(SessionCreationPolicy.STATELESS)
: 세션을 사용하지 않기 때문에 SATELESS 상태로 설정한 것이다. -
.and()
.authorizeRequests()//요청에 대한 사용 권한 체크
.antMatchers("/api/hello").permitAll()
.antMatchers("/api/authenticate").permitAll()
.antMatchers("/api/signup").permitAll().anyRequest().authenticated()
: /api/~~는 인증이 필요하지 않다는 것이고
나머지 Request는 인증이 필요하다고 설정한 것이다.
/jwt/JwtSecurityConfig
아래 생성할 TokenProvider를 주입받아서 JwtFilter를 Security 로직에 등록해주는 클래스
import org.springframework.security.config.annotation.SecurityConfigurerAdapter;
import org.springframework.security.config.annotation.web.builders.HttpSecurity;
import org.springframework.security.web.DefaultSecurityFilterChain;
import org.springframework.security.web.authentication.UsernamePasswordAuthenticationFilter;

import lombok.RequiredArgsConstructor;

@RequiredArgsConstructor
public class JwtSecurityConfig extends SecurityConfigurerAdapter<DefaultSecurityFilterChain, HttpSecurity> {

    private final TokenProvider tokenProvider;

    @Override
    public void configure(HttpSecurity http){
        JwtFilter customFilter = new JwtFilter(tokenProvider);
        http.addFilterBefore(customFilter, UsernamePasswordAuthenticationFilter.class);
    }
}
JwtFilter
Jwt의 인증정보를 SercurityContext에 저장하는 역할을 한다.
JwtFilter의 doFilter 메소드에서 Requset가 들어올 때 SecurityContext에 Authentication 객체를 저장해 사용한다.
import org.slf4j.Logger;
import org.slf4j.LoggerFactory;
import org.springframework.security.core.Authentication;
import org.springframework.security.core.context.SecurityContextHolder;
import org.springframework.util.StringUtils;
import org.springframework.web.filter.GenericFilterBean;

import javax.servlet.FilterChain;
import javax.servlet.ServletException;
import javax.servlet.ServletRequest;
import javax.servlet.ServletResponse;
import javax.servlet.http.HttpServletRequest;
import java.io.IOException;

public class JwtFilter extends GenericFilterBean {

   private static final Logger logger = LoggerFactory.getLogger(JwtFilter.class);
   public static final String AUTHORIZATION_HEADER = "Authorization";
   private TokenProvider tokenProvider;
   public JwtFilter(TokenProvider tokenProvider) {
      this.tokenProvider = tokenProvider;
   }

   //실제 필터링 로직, 토근의 인증정보를 SecurityContext에 저장하기 위한 역할 수행
   @Override
   public void doFilter(ServletRequest servletRequest, ServletResponse servletResponse, FilterChain filterChain) throws IOException, ServletException {
      HttpServletRequest httpServletRequest = (HttpServletRequest) servletRequest;
      String jwt = resolveToken(httpServletRequest);
      String requestURI = httpServletRequest.getRequestURI();

      if (StringUtils.hasText(jwt) && tokenProvider.validateToken(jwt)) {
         Authentication authentication = tokenProvider.getAuthentication(jwt);
         SecurityContextHolder.getContext().setAuthentication(authentication);
         logger.debug("Security Context에 '{}' 인증 정보를 저장했습니다, uri: {}", authentication.getName(), requestURI);
      } else {
         logger.debug("유효한 JWT 토큰이 없습니다, uri: {}", requestURI);
      }

      filterChain.doFilter(servletRequest, servletResponse);
   }

   //Request Header에서 토큰 정보를 꺼내오는 로직
   private String resolveToken(HttpServletRequest request) {
      String bearerToken = request.getHeader(AUTHORIZATION_HEADER);

      if (StringUtils.hasText(bearerToken) && bearerToken.startsWith("Bearer ")) {
         return bearerToken.substring(7);
      }

      return null;
   }
}
TokenProvider
Token의 생성, 인증정보 조회, 유효성 검증, 암호화 설정 등의 역할을 하는 클래스이다.
InitializingBean을 implemnets 받아 afterPropertiesSet을 Override 하는 이유는 TokenProvider Bean이 생성되고, 주입을
받은 후에 secret 값을 Base64 Decode해서 key 변수에 할당하기 위함이다.
import io.jsonwebtoken.*;
import io.jsonwebtoken.io.Decoders;
import io.jsonwebtoken.security.Keys;
import org.slf4j.Logger;
import org.slf4j.LoggerFactory;
import org.springframework.beans.factory.InitializingBean;
import org.springframework.beans.factory.annotation.Value;
import org.springframework.security.authentication.UsernamePasswordAuthenticationToken;
import org.springframework.security.core.Authentication;
import org.springframework.security.core.GrantedAuthority;
import org.springframework.security.core.authority.SimpleGrantedAuthority;
import org.springframework.security.core.userdetails.User;
import org.springframework.stereotype.Component;

import java.security.Key;
import java.util.Arrays;
import java.util.Collection;
import java.util.Date;
import java.util.stream.Collectors;

//토근의 생성, 토근의 유효성 검증을 담당하는 provider
@Component
public class TokenProvider implements InitializingBean {//InitializingBean 인터페이스의 afterPropertiesSet() 메소드에 빈 객체 초기화 시 필요한 코드 구현

    private final Logger logger = LoggerFactory.getLogger(TokenProvider.class);
    private static final String AUTHORITIES_KEY = "auth";
    private final String secret;
    private final long tokenValidityInMilliseconds;
    private Key key;

    public TokenProvider(
            @Value("${jwt.secret}") String secret,
            @Value("${jwt.token-validity-in-seconds}") long tokenValidityInSeconds) {
        this.secret = secret;
        this.tokenValidityInMilliseconds = tokenValidityInSeconds * 1000;
    }

    //빈이 생성이 되고 의존성 주입 이후에 secret값을 Base64 Decode해서 key 변수에 할당하기 위함
    @Override
    public void afterPropertiesSet() {
        byte[] keyBytes = Decoders.BASE64.decode(secret);
        this.key = Keys.hmacShaKeyFor(keyBytes);
    }

    public String createToken(Authentication authentication) {
        String authorities = authentication.getAuthorities().stream()
                .map(GrantedAuthority::getAuthority)
                .collect(Collectors.joining(","));

        long now = (new Date()).getTime();
        Date validity = new Date(now + this.tokenValidityInMilliseconds);

        return Jwts.builder()
                .setSubject(authentication.getName())
                .claim(AUTHORITIES_KEY, authorities)
                .signWith(key, SignatureAlgorithm.HS512)
                .setExpiration(validity)
                .compact();
    }

    public Authentication getAuthentication(String token) {
        Claims claims = Jwts
                .parserBuilder()
                .setSigningKey(key)
                .build()
                .parseClaimsJws(token)
                .getBody();

        Collection<? extends GrantedAuthority> authorities =
                Arrays.stream(claims.get(AUTHORITIES_KEY).toString().split(","))
                        .map(SimpleGrantedAuthority::new)
                        .collect(Collectors.toList());

        User principal = new User(claims.getSubject(), "", authorities);

        return new UsernamePasswordAuthenticationToken(principal, token, authorities);
    }

    public boolean validateToken(String token) {
        try {
            Jwts.parserBuilder().setSigningKey(key).build().parseClaimsJws(token);
            return true;
        } catch (io.jsonwebtoken.security.SecurityException | MalformedJwtException e) {
            logger.info("잘못된 JWT 서명입니다.");
        } catch (ExpiredJwtException e) {
            logger.info("만료된 JWT 토큰입니다.");
        } catch (UnsupportedJwtException e) {
            logger.info("지원되지 않는 JWT 토큰입니다.");
        } catch (IllegalArgumentException e) {
            logger.info("JWT 토큰이 잘못되었습니다.");
        }
        return false;
    }
}
JwtAuthenticationEntryPoint, JwtAccessDeniedHandler
401, 403 예외 핸들러 클래스이다.
//유효한 자격증명을 제공하지 않고 접근하려할 떄 401에러를 리턴하는 클래스
@Component
public class JwtAuthenticationEntryPoint implements AuthenticationEntryPoint {
   @Override
   public void commence(HttpServletRequest request,
                        HttpServletResponse response,
                        AuthenticationException authException) throws IOException {
      // 유효한 자격증명을 제공하지 않고 접근하려 할때 401
      response.sendError(HttpServletResponse.SC_UNAUTHORIZED);
   }
}
//필요한 권한이 존재하지 않을 경우 403 Forbidden 에러를 리턴하는 클래스
@Component
public class JwtAccessDeniedHandler implements AccessDeniedHandler {
@Override
public void handle(HttpServletRequest request, HttpServletResponse response, AccessDeniedException accessDeniedException) throws IOException {
//필요한 권한이 없이 접근하려 할때 403
response.sendError(HttpServletResponse.SC_FORBIDDEN);
}
}참고 문헌