앞에서 flutter를 이용해서 인가코드를 받아서 전달하는 것까지 해보았다.
이번에는 인가코드를 spring에서 받아서 -> 액세스 토큰을 받는 과정까지 진행해보자.
1. 인가코드 받아오기
@RequestMapping("kakao/oauth") //내가 설정한 redirect url
    public String kakaoSignin(@RequestParam("code") String code){
        Map<String, Object> result = kakaoService.execKakaoLogin(code);
        return "redirect:webauthcallback://success?customToken=" + result.get("customToken").toString();
    }
인가코드를 받아오는 과정은 MainController의 "kakaoService.execKakaoLogin(code);"이 부분 에서 진행한다.
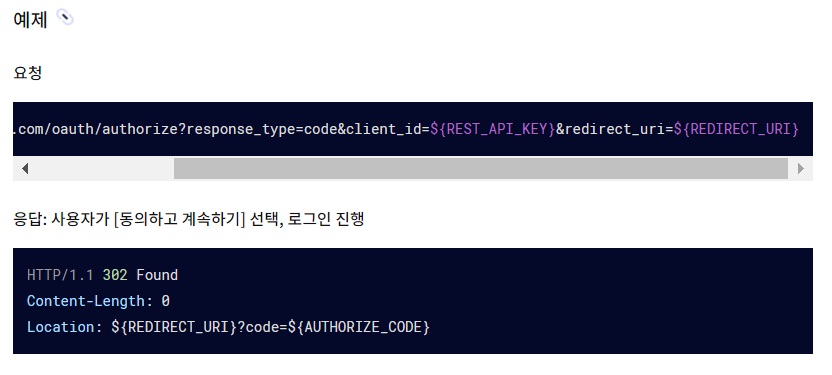
문서를 보면 알 수 있듯이, 인가코드를 받는 것에 성공했을 경우 응답으로 code= 부분에 담겨서 온다. 즉, @RequestMapping("kakao/oauth")을 통해 "/kakao/oauth" 경로에 대한 요청을 처리할 메서드를 지정한다. 앞에서 봤듯이, 이 경로는 인가코드를 받고, 처리하는 기능을 한다.
여기서 request parameter로 날라오는 @RequestParam("code") 이 code 부분을 받아오면 인가코드를 받아올 수 있다.
2. 액세스 토큰 받기
public String getAccessToken(String authorize_code) throws IOException {
        String access_Token = "";
        String refresh_Token = "";
        String restApiKey = "";

        // 프로퍼티 파일을 읽어들입니다.
        Properties properties = new Properties();
        try (FileInputStream fis = new FileInputStream("path/to/your/application.properties")) {
            properties.load(fis);
        }

        // 프로퍼티에서 값을 가져와 변수에 할당합니다.
        restApiKey = properties.getProperty("rest.api.key");
        System.out.println("Rest API Key: " + restApiKey);

        String reqURL = "https://kauth.kakao.com/oauth/token";

        try {
            URL url = new URL(reqURL);

            HttpURLConnection conn = (HttpURLConnection) url.openConnection();

            //POST 요청을 위해 기본값이 false인 setDoOutput을 true로 설정

            conn.setDoOutput(true);
            conn.setRequestMethod("POST");
            conn.setDoInput(true);

            //POST 요청에 필요로 요구하는 파라미터 스트림을 통해 전송
            BufferedWriter bw = new BufferedWriter(new OutputStreamWriter(conn.getOutputStream()));
            StringBuilder sb = new StringBuilder();

            sb.append("grant_type=authorization_code");
            sb.append("&client_id="); //client~ + rest_api_key
            sb.append(restApiKey);

            sb.append("&redirect_uri=http://192.168.200.165:8080/kakao/oauth"); //redirect url
            sb.append("&code=" + authorize_code);

            bw.write(sb.toString());
            bw.flush();

            //결과 코드가 200이라면 성공이다.
            int responseCode = conn.getResponseCode();

            //요청을 통해 얻은 JSON타입의 Response 메세지 읽어오기
            BufferedReader br = new BufferedReader(new InputStreamReader(conn.getInputStream()));

            String line;
            String result = "";

            while ((line = br.readLine()) != null) {
                result += line;
            }

            JsonElement element = JsonParser.parseString(result);
            JsonObject jsonObject = element.getAsJsonObject();

            if (jsonObject.has("access_token") && jsonObject.get("access_token").isJsonPrimitive()) {
                access_Token = jsonObject.get("access_token").getAsString();
            }

            if (jsonObject.has("refresh_token") && jsonObject.get("refresh_token").isJsonPrimitive()) {
                refresh_Token = jsonObject.get("refresh_token").getAsString();
            }
            br.close();
            bw.close();

        } catch (IOException e) {
            e.printStackTrace();
        }
        return access_Token;
    }
이제 액세스 토큰을 받아보자.
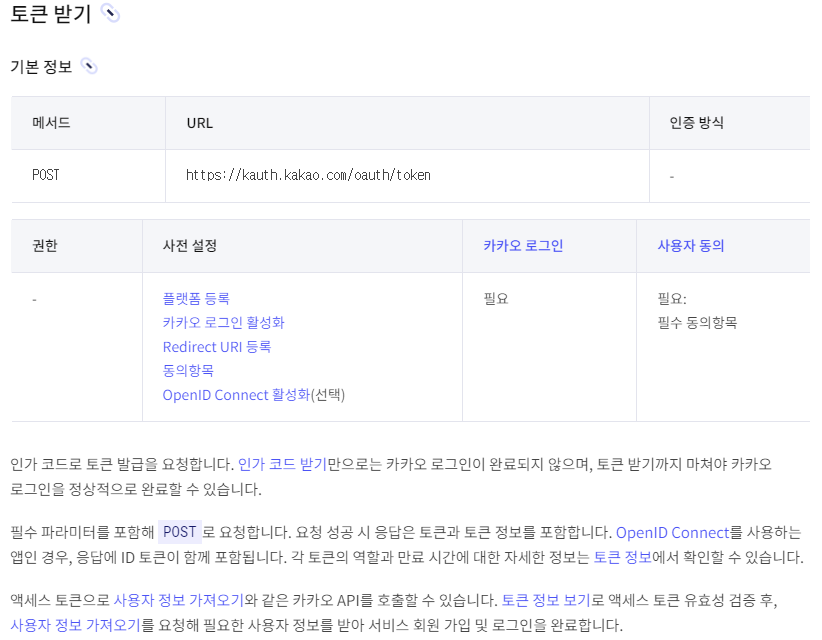
토큰은 post로 받아올 수 있으며, 다음과 같은 url을 사용한다.
1. 연결 준비
String reqURL = "https://kauth.kakao.com/oauth/token";

        try {
            URL url = new URL(reqURL);

            HttpURLConnection conn = (HttpURLConnection) url.openConnection();

            //POST 요청을 위해 기본값이 false인 setDoOutput을 true로 설정

            conn.setDoOutput(true);
            conn.setRequestMethod("POST");
이 부분은 연결을 준비하기 위한 부분이다.
1. HttpURLConnection conn = (HttpURLConnection) url.openConnection(); : 이를 통해 해당 URL에 대한 연결을 설정한다. 이 연결을 통해 HTTP 요청을 보내고 응답을 받을 수 있게 된다.
2. conn.setDoOutput(true); = 이는 출력 스트림을 사용하여 요청 본문을 전송할 것임을 나타낸다. POST 요청을 보낼 때는 서버로 데이터를 보내야 하므로 출력 스트림을 활성화해야 한다
3. conn.setRequestMethod("POST") = =요청 메서드를 POST로 설정한다. POST 요청은 클라이언트가 서버로 데이터를 보내는 요청 방식이다.
2. 파라미터 전송
 //POST 요청에 필요로 요구하는 파라미터 스트림을 통해 전송
            BufferedWriter bw = new BufferedWriter(new OutputStreamWriter(conn.getOutputStream()));
            StringBuilder sb = new StringBuilder();

            sb.append("grant_type=authorization_code");
            sb.append("&client_id="); //client~ + rest_api_key
            sb.append(restApiKey);

            sb.append("&redirect_uri=http://192.168.200.165:8080/kakao/oauth"); //redirect url
            sb.append("&code=" + authorize_code);

            bw.write(sb.toString());
            bw.flush();
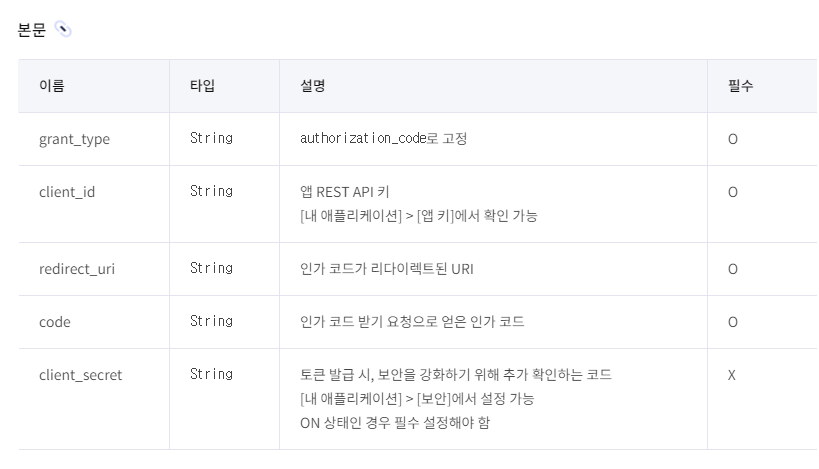
사이트의 가이드라인에 따르면, 본문에 다음과 같은 요소들이 포함되어야 한다.
필요한 요소들을 buffer를 통해 추가해서 넣어준다.
3. 액세스 토큰 받아오기
//요청을 통해 얻은 JSON타입의 Response 메세지 읽어오기
            BufferedReader br = new BufferedReader(new InputStreamReader(conn.getInputStream()));

            String line;
            String result = "";

            while ((line = br.readLine()) != null) {
                result += line;
            }

            JsonElement element = JsonParser.parseString(result);
            JsonObject jsonObject = element.getAsJsonObject();

            if (jsonObject.has("access_token") && jsonObject.get("access_token").isJsonPrimitive()) {
                access_Token = jsonObject.get("access_token").getAsString();
            }

            if (jsonObject.has("refresh_token") && jsonObject.get("refresh_token").isJsonPrimitive()) {
                refresh_Token = jsonObject.get("refresh_token").getAsString();
}- BufferedReader br = new BufferedReader(new InputStreamReader(conn.getInputStream())); : 이를 통해 리다이렉트로 날라온 json input을 받아온다.
- while ((line = br.readLine()) != null) { result += line;} : line(받아온 부분)이 null이 아닐 경우, 즉 결과물이 있을 경우 더해준다. 여기서 access_token을 얻는다.
- if (jsonObject.has("access_token") && jsonObject.get("access_token").isJsonPrimitive()) : "access_token"이라는 값이 존재하는지, 원시 유형에 해당하는지(형태가 string등..에 해당하는지)를 검사한다.
이를 통해 access token을 받아오고, 처리할 수 있다.