Dark Mode is a new look
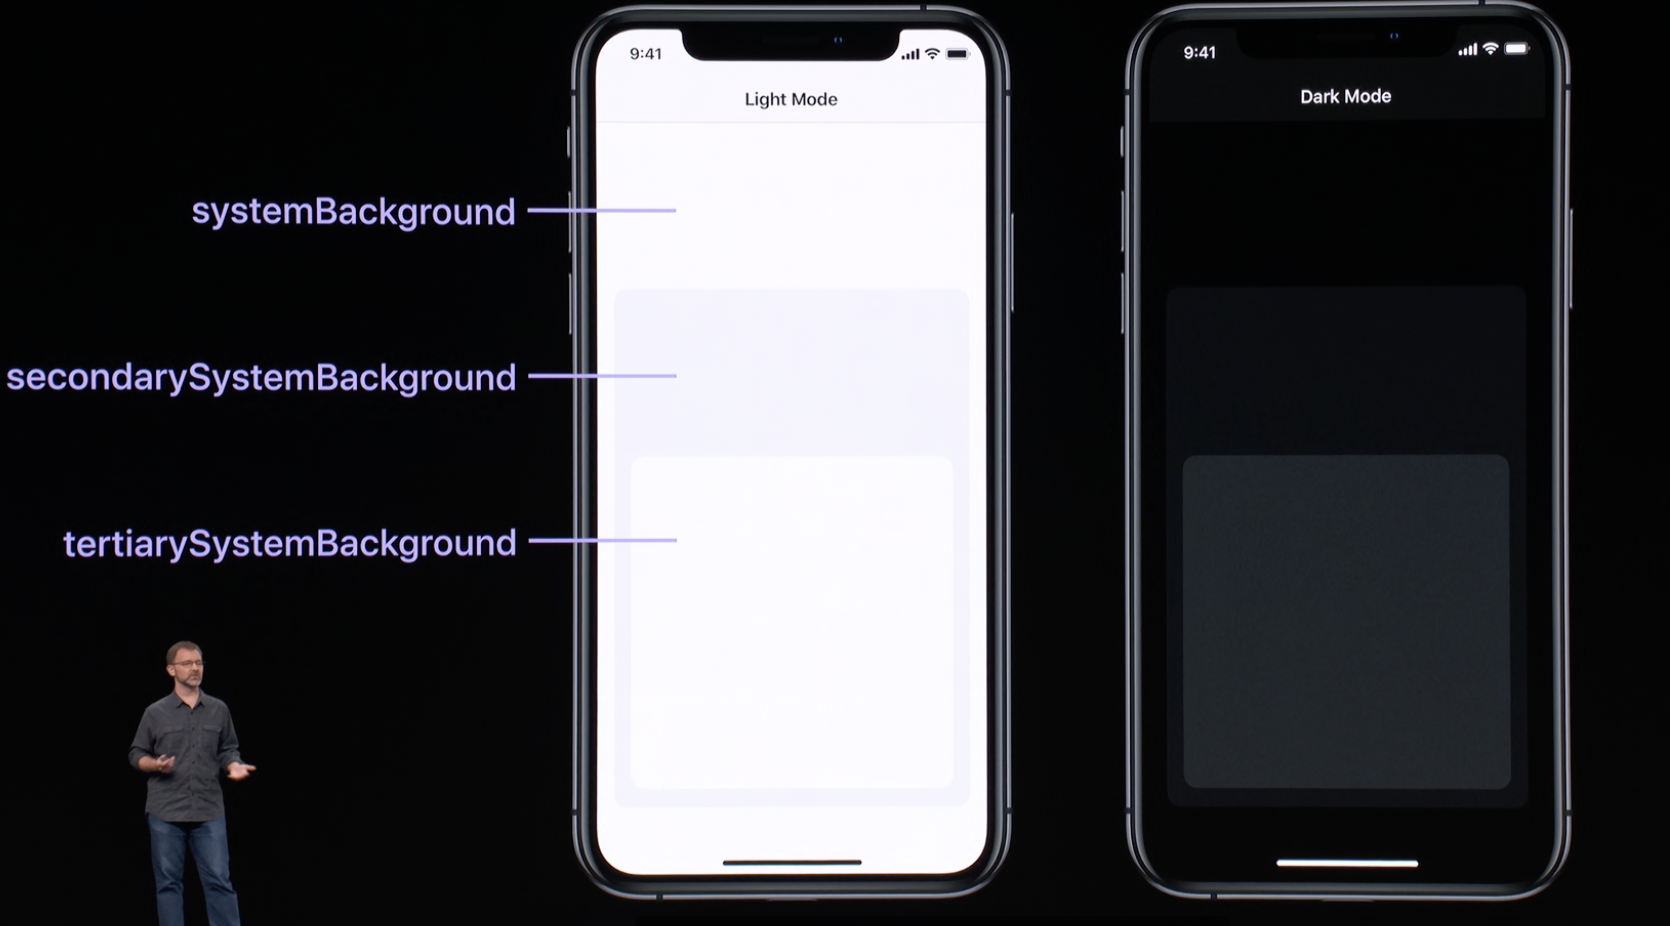
- We have a stack of background colors here designed to work together.
- System background is the base background color, it's pure white in light mode.
- On top of that, there's secondary and tertiary system background colors, and these allow you to structure the information hierarchy of your app.
- Note that dark mode is not just a simple inversion of light mode. It's more subtle than that.

- We use this idea of hierarchy for text as well.
- There's four levels of text colors and they let you emphasize which elements are important relative to others.
- For instance, the primary color might be used for things like titles.
- The secondary color might be used for subtitles and so on.
- Now, let's move on to the second part of our design system - materials.
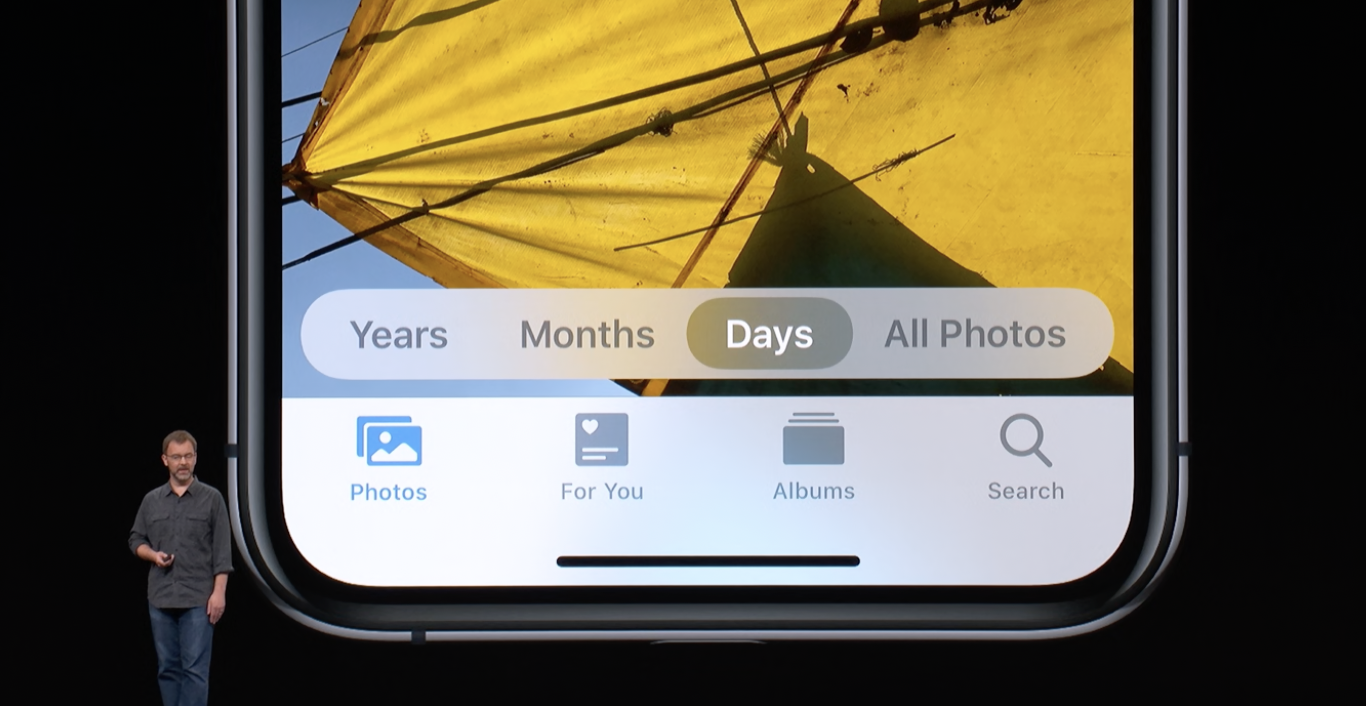
- Materials are more than just colors. There are blur effects that look like a translucent material on top of a background. and they work in dark and in light mode.
How to implement
- Now in the past, each UI color had only one single value. It was always the same. Now they can be dynamic.
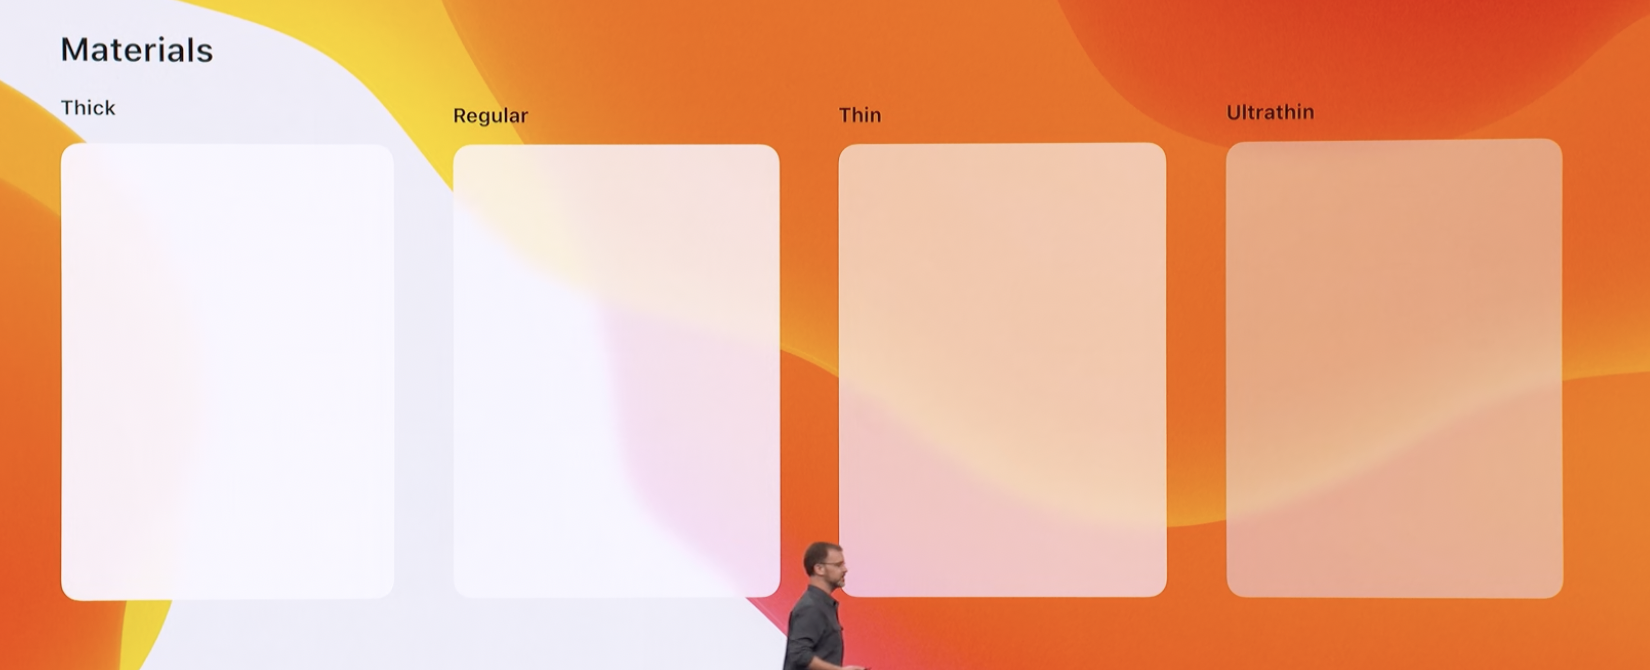
- So, let me show some examples of these materials. Here's some new blur effects.
- There's thick, regular, thin, and ultra thin styles. And of course these work in light and in dark.
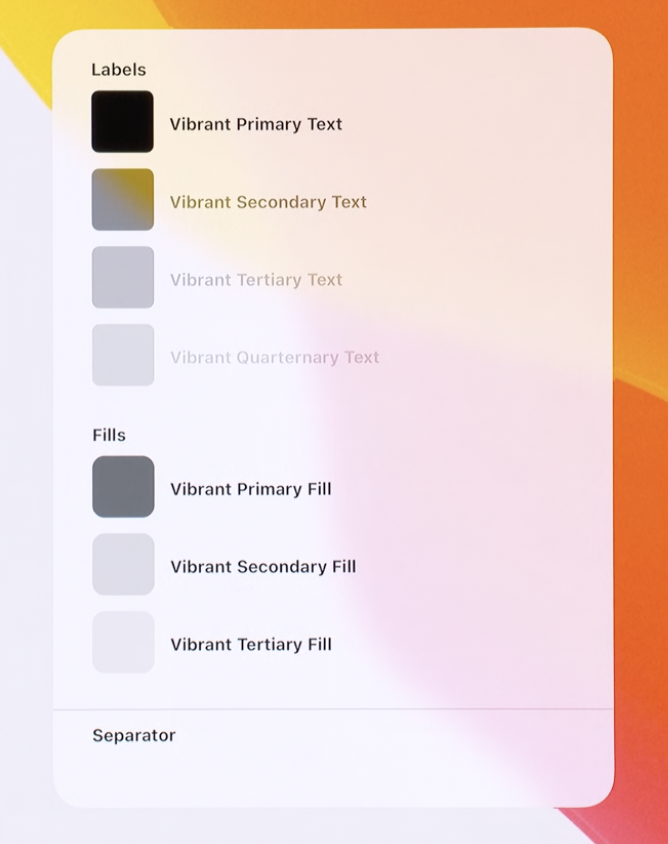
- Now, on top of Blur effects, you can have vibrant content.
- here's four styles for text, three styles for larger filled areas, and even a style for thin separator lines. Of course, these work in light and in dark.
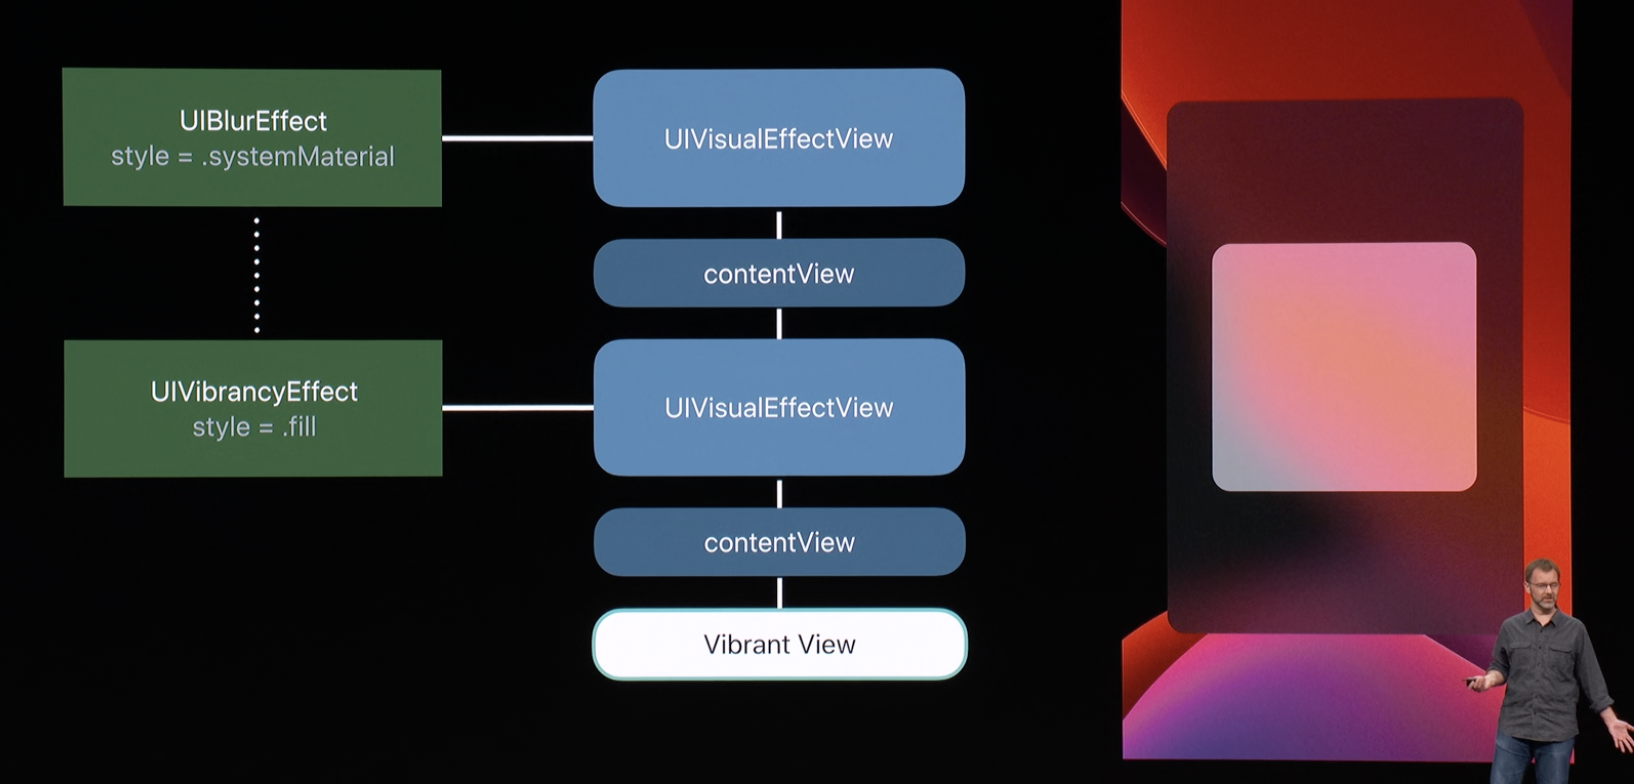
- Now, vibrancy's always added on top of Blur, so, we're starting with the same setup from before.
- Note that when you create a vibrancy effect, you give it a reference to a Blur effect. The two things operate together.
- To show the vibrancy effect, we make another visual effect view, and then we'll put that inside the Blur effect.
- Now, there's something a little subtle here, is that we don't ever add views directly as subviews of a visual effect view. Instead, we go through its content view.
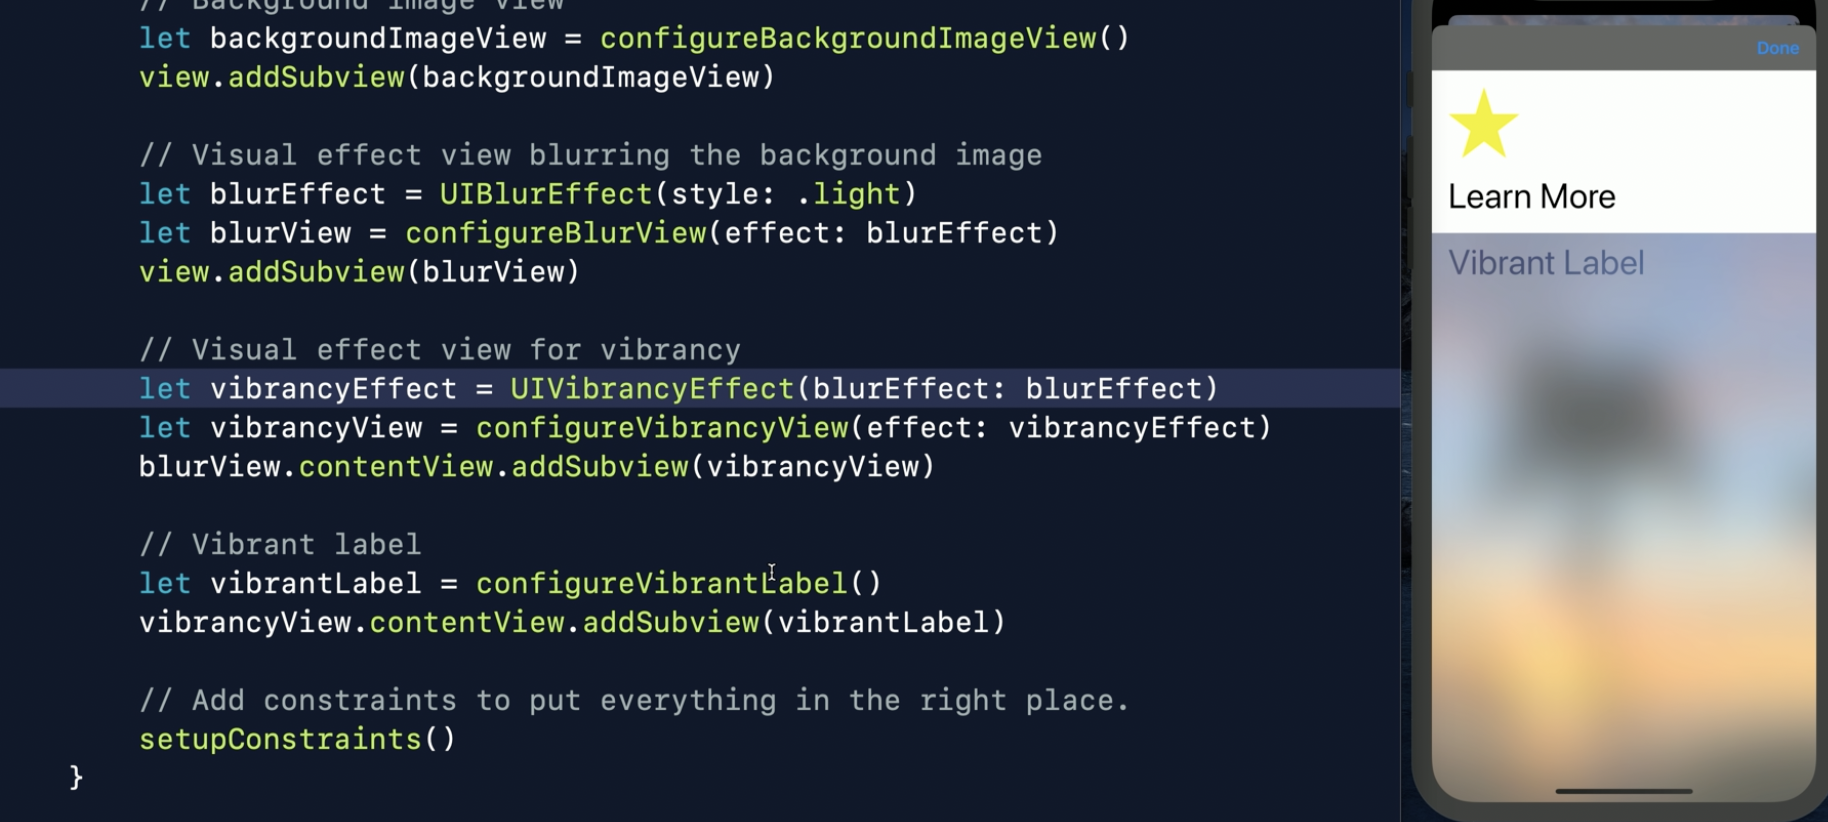
- To show the vibrancy effect, we make another visual effect view, and then we'll put that inside the Blur effect.
- Now we'll add the views that become vibrant. So again, I get the content view and then I add the views that will become vibrant and you see how it looks.
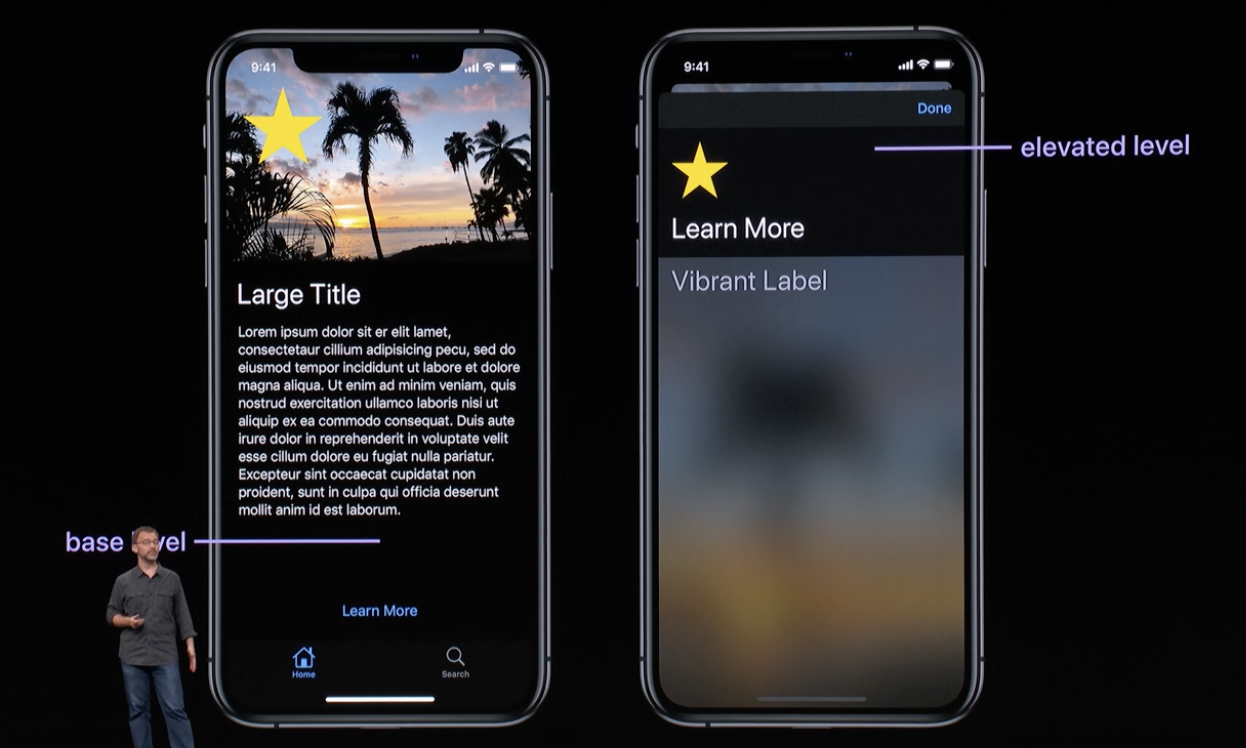
- That's because the design for Dark Mode has two different levels.
- When the view fills the whole screen edge to edge, we call that the base level.
- And then when content appears in a separate layer above that, we call that the elevated level.
- So, in Dark Mode, the system-provided background colors have lighter values in the elevated level. This helps distinguish them from the black background underneath.
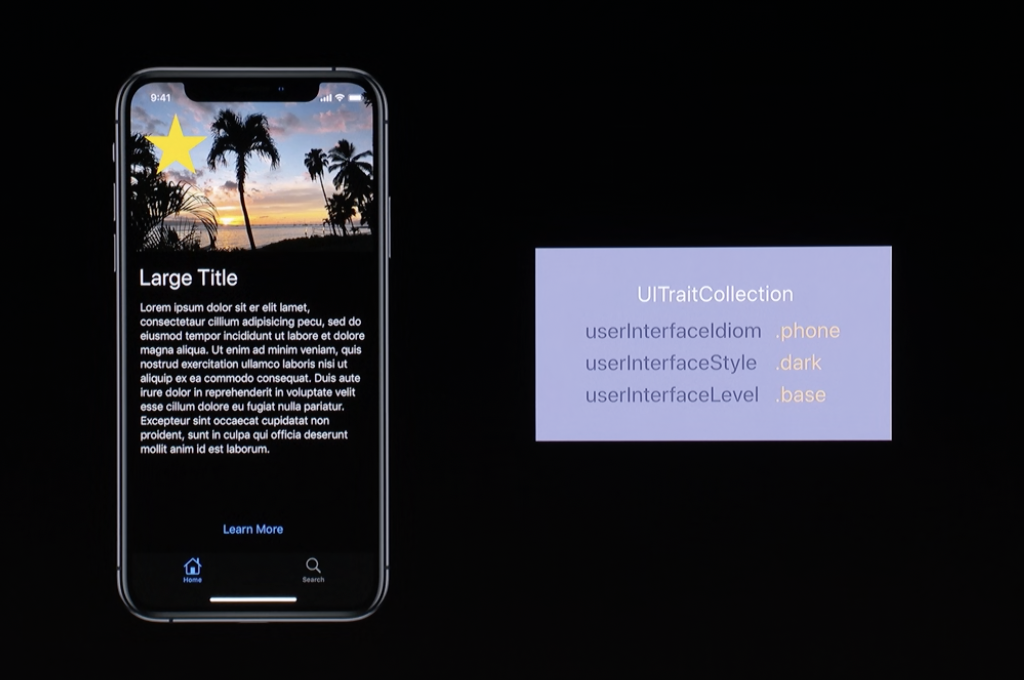
- So, we've seen how dynamic colors automatically resolve their appearance, but how does the color know whether it's light or dark?
- This is done with trait collections. So, each view and view controller in your app has a trait collection, and this helps determine the appearance of the views.
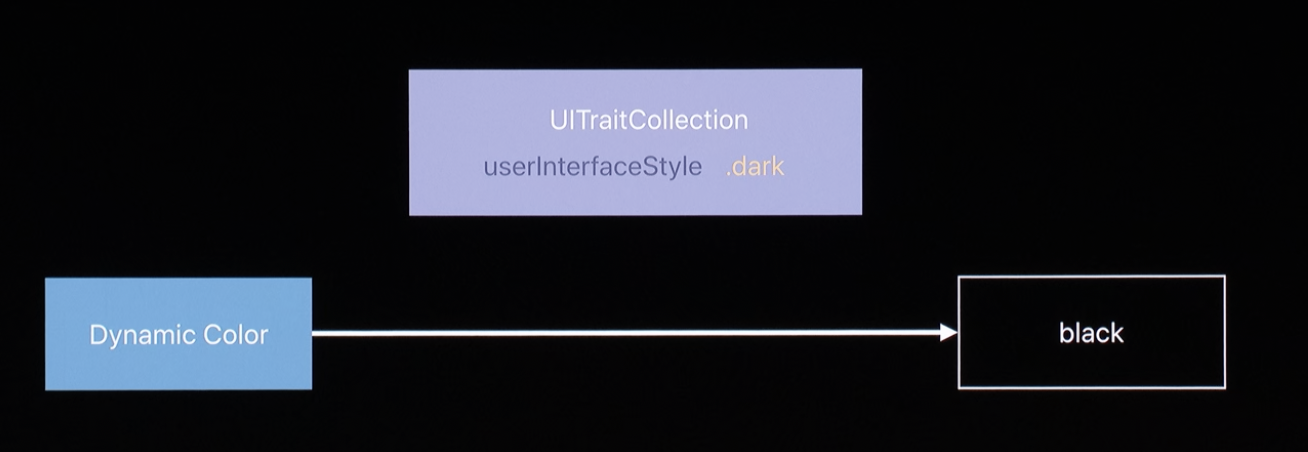
- Now, dynamic colors are resolved using a trait collection.
- So, it's the combination of a dynamic color and a trait collection that determine the final resolved color.
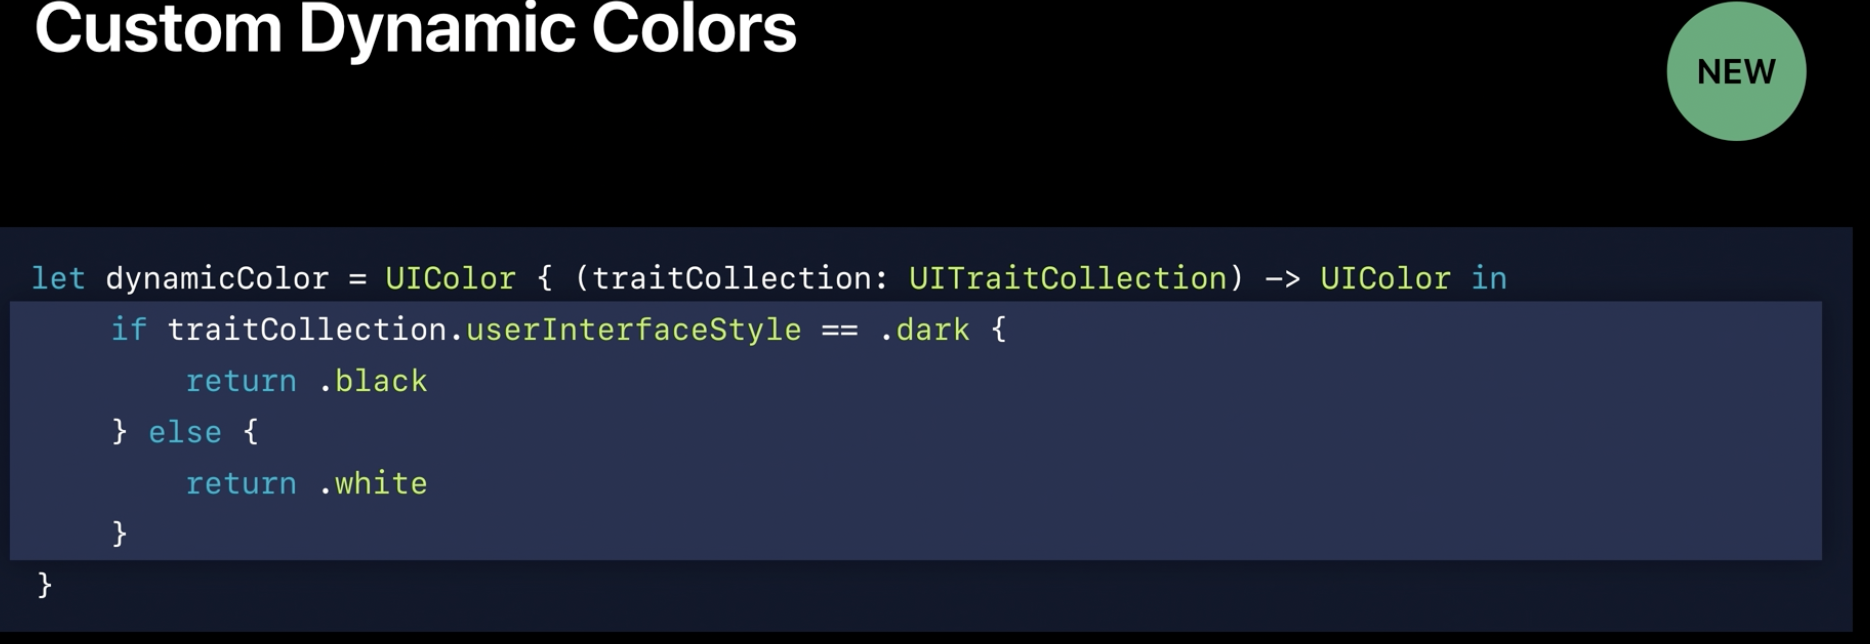
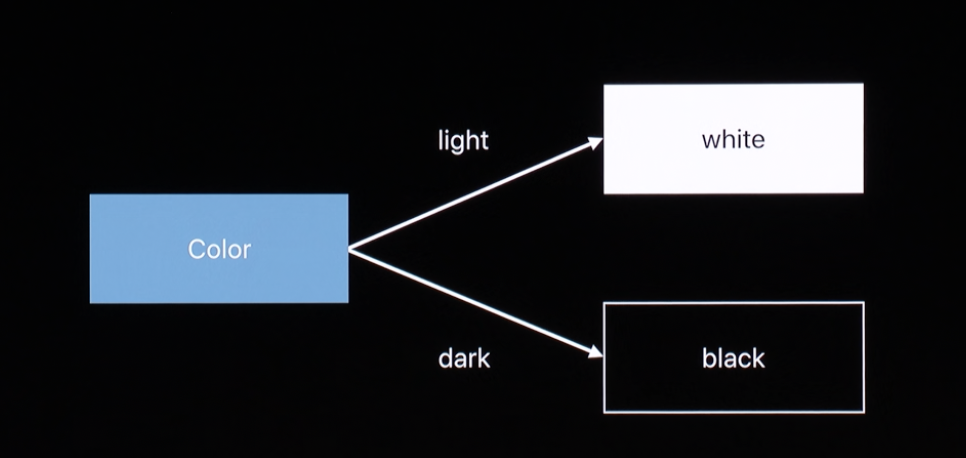
- You can also make custom dynamic colors.
- Initialize a color with a closure, and the argument is a trait collection.
- So, each time this dynamic color needs to be resolved, that closure will be called with the appropriate trait collection.
- And in the closure, you can use that trait collection to determine another color to return. This example is implementing the diagram that we just saw.
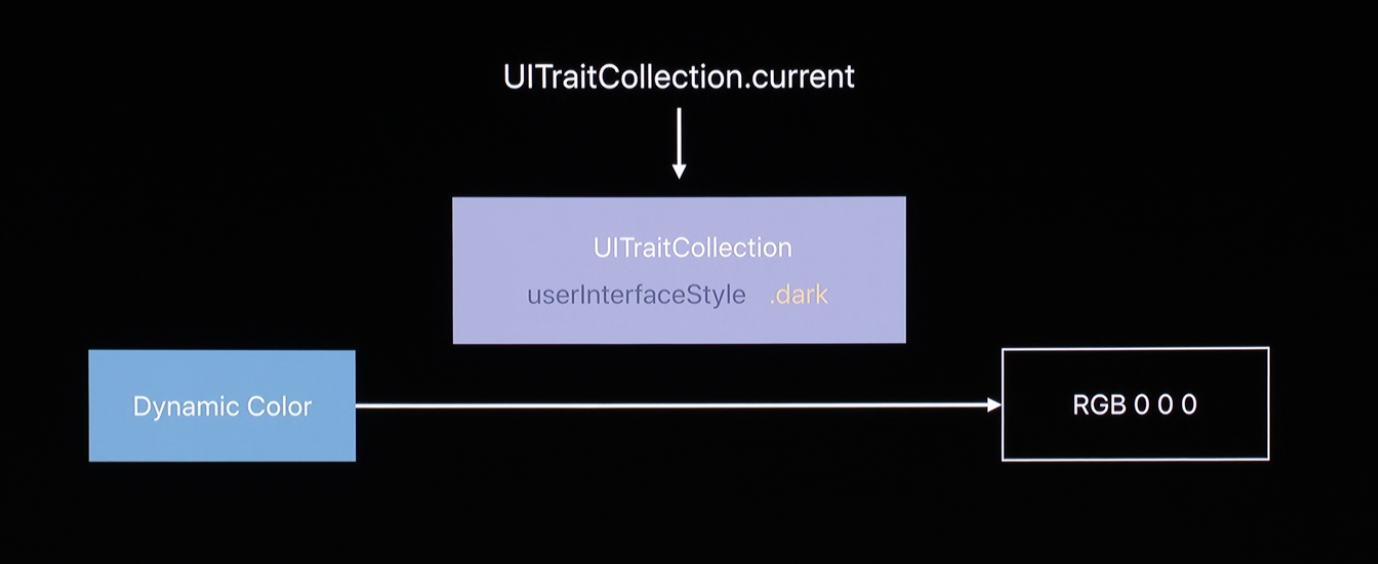
- You might be wondering since dynamic colors can be used directly like any other color, how did they get resolved automatically?
- If I have a dynamic color and I ask it for its RGB components, it'll return a result. If I have black, I'll get 000. Well, when I ask it, I don't pass in a Trait Collection.
- How does it know? Well, there's a new property on UITrait Collection called current, and this is set for you by UIKit.
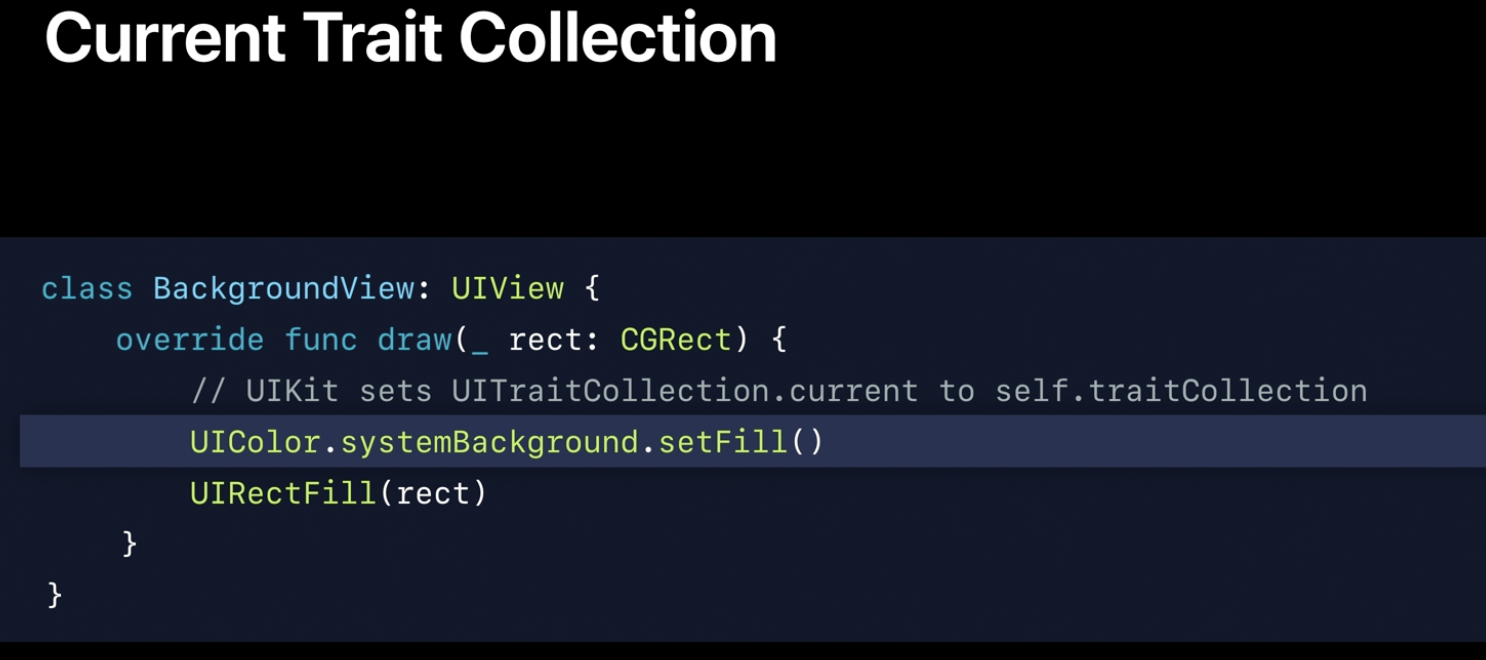
- I have a UIVIew Subclass and I've overridden the draw method. So, this view will do all of its own drawing.
- Before it calls this method, UIKit will set the current Trait Collection to the Views Trait Collection.
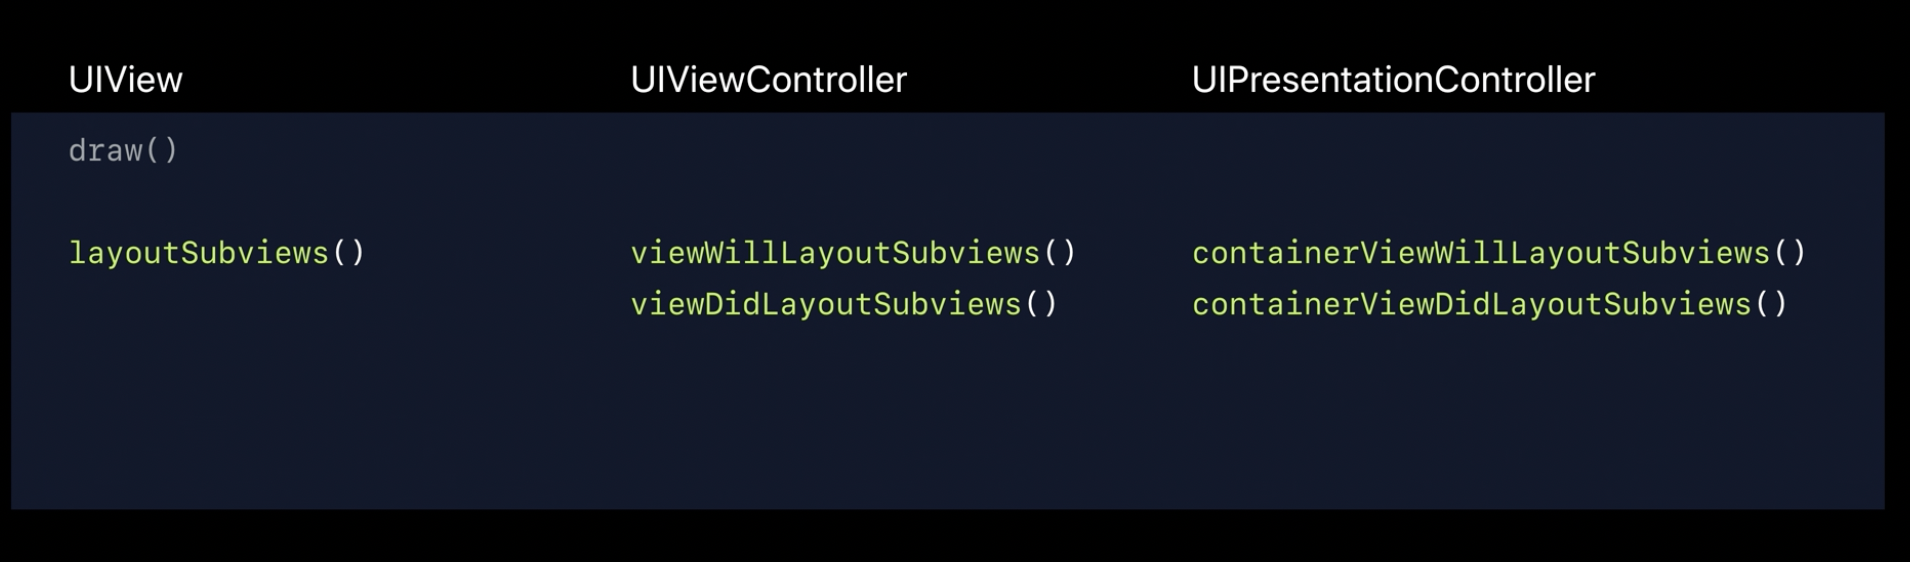
- UIKit also sets the current Trait Collection during layout.
- So, override layout subviews in your view subclass and then add code that resolves dynamic colors. When the mode changes, set needs layout will be called. Layout will happen again. And this includes the corresponding calls on view controller and presentation controller.
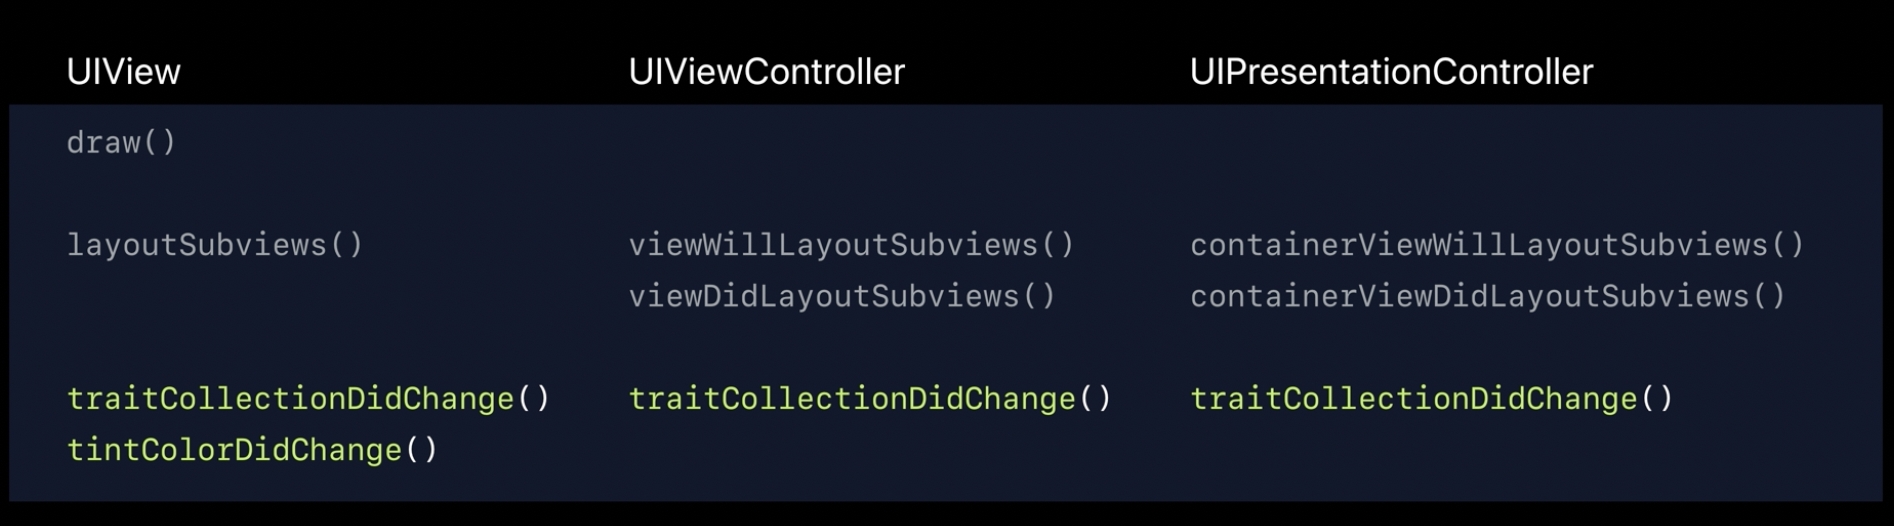
- Finally, all three kinds of these objects get trait collection did change, when a trait changes. And views get tint color did change when the tint color changes.
- Outside of these methods, the current trait collection is not guaranteed to have any particular value, so if you need to resolve a dynamic color outside of these methods, you need to manage it.
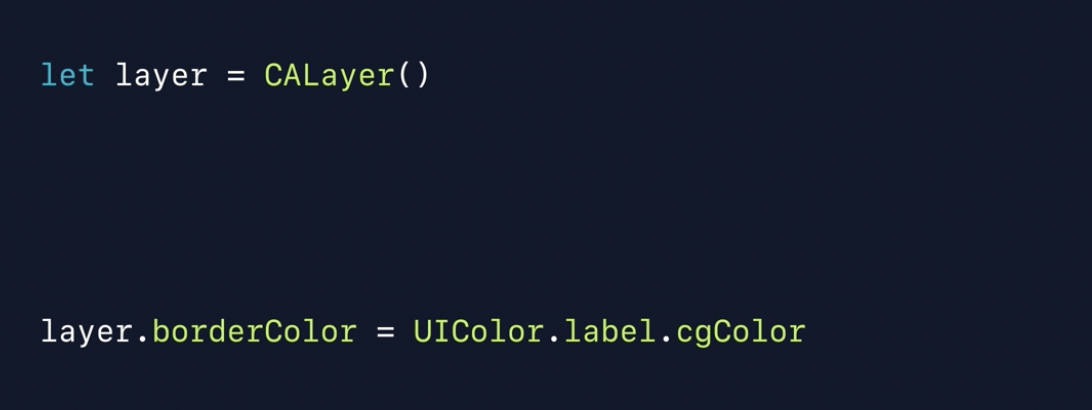
- Lower-level classes, like CA Layer and CG Color, don't understand dynamic colors. It's a UIKit concept.
- So in this case, we're creating a layer and then setting its border color. That takes a CG Color which can't be dynamic.
- So, calling CG Color on a UIKit dynamic color needs to resolve it.
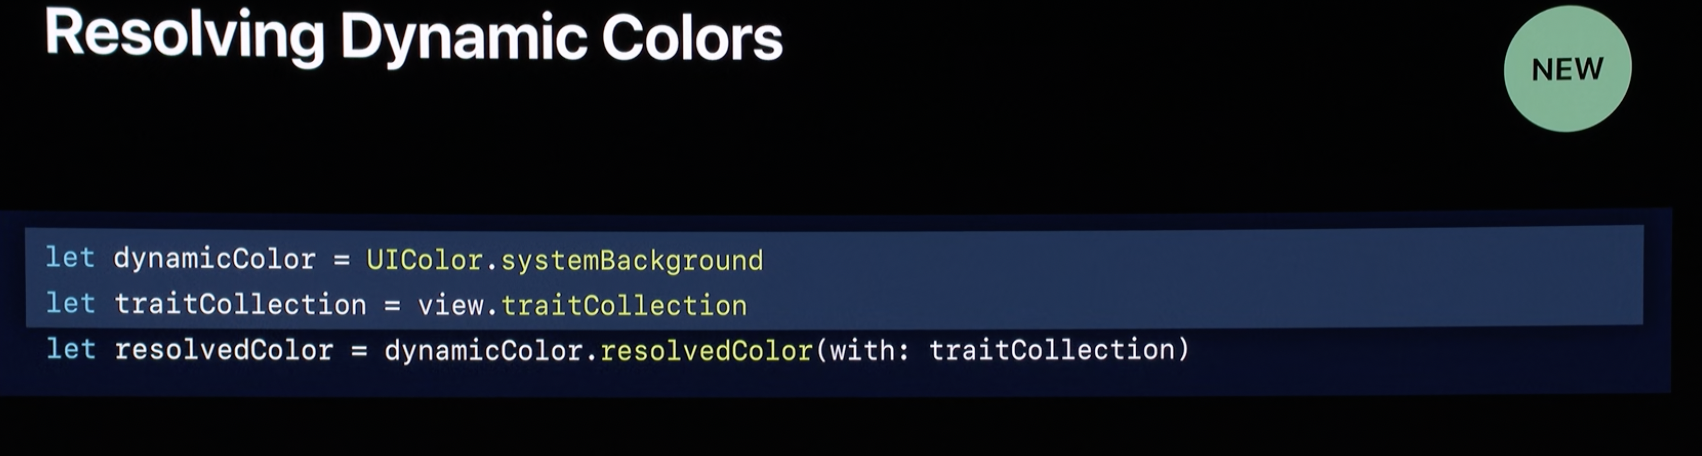
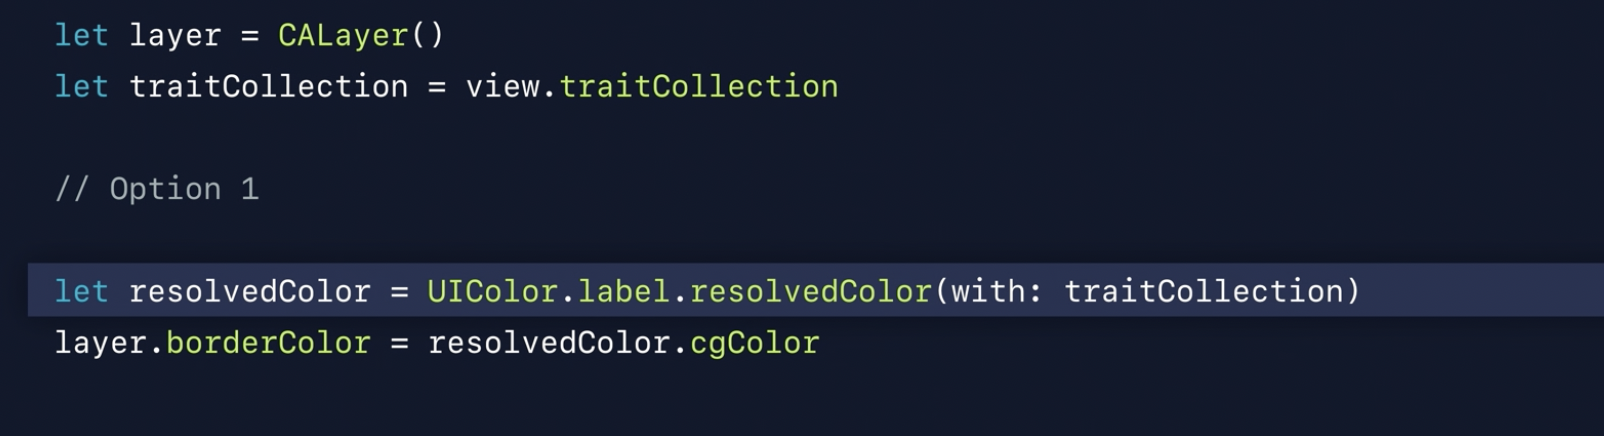
- Now we need to use that Trait Collection, and I'll show three ways to do this. The first way we've already seen. Ask the color to resolve itself using that Trait Collection.
- f you have only a single color, but it can be awkward if you've got more. And you have to remember to do it every time.
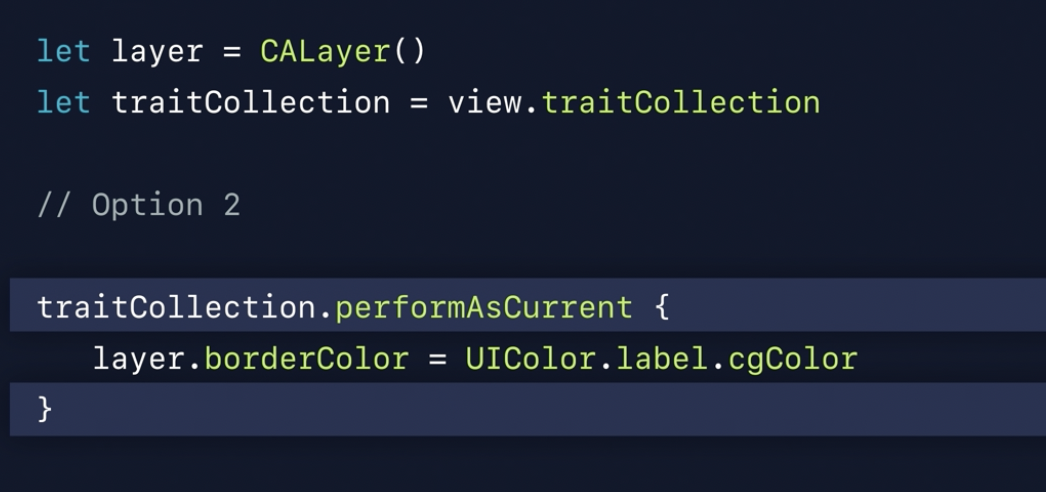
- The second way is easier. Just call perform as current on the Trait Collection.
- That makes that Trait Collection become the current Trait Collection, and then it runs the code in the closure that you provide.
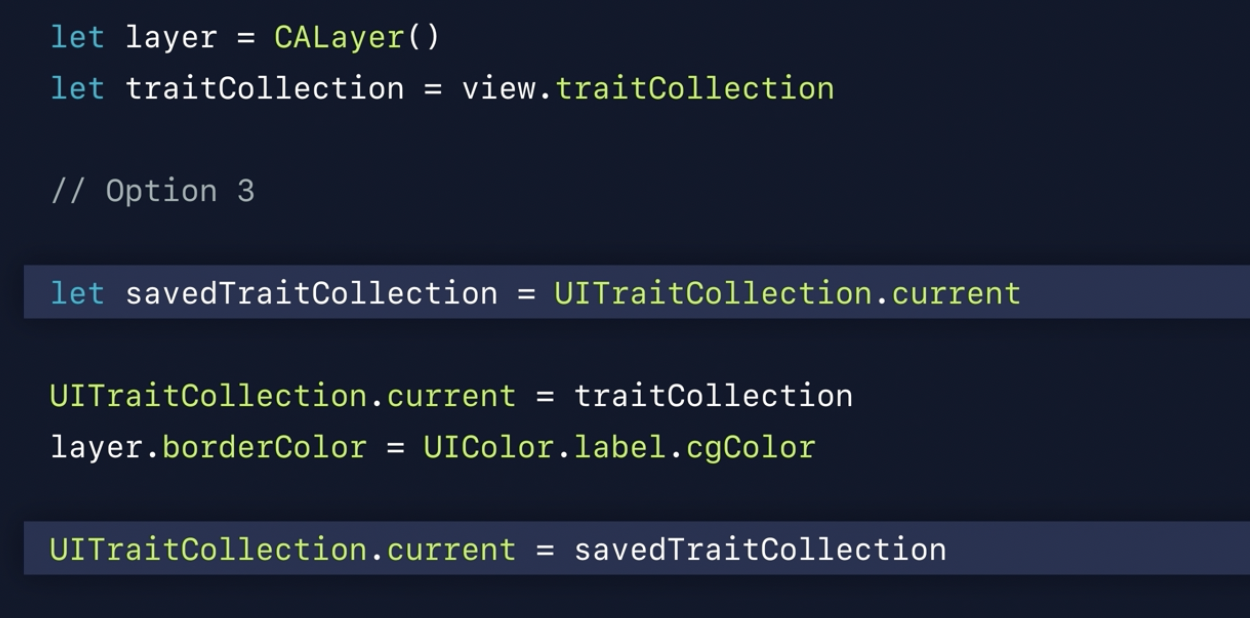
- Finally, the third option, directly set the current Trait Collection.
- This looks a little intimidating but it's absolutely safe. It's lightweight. There are no side effects.
- If you're going to do this, it's a good idea to save the current Trait Collection and then restore it afterwards in case any other code was relying on it.
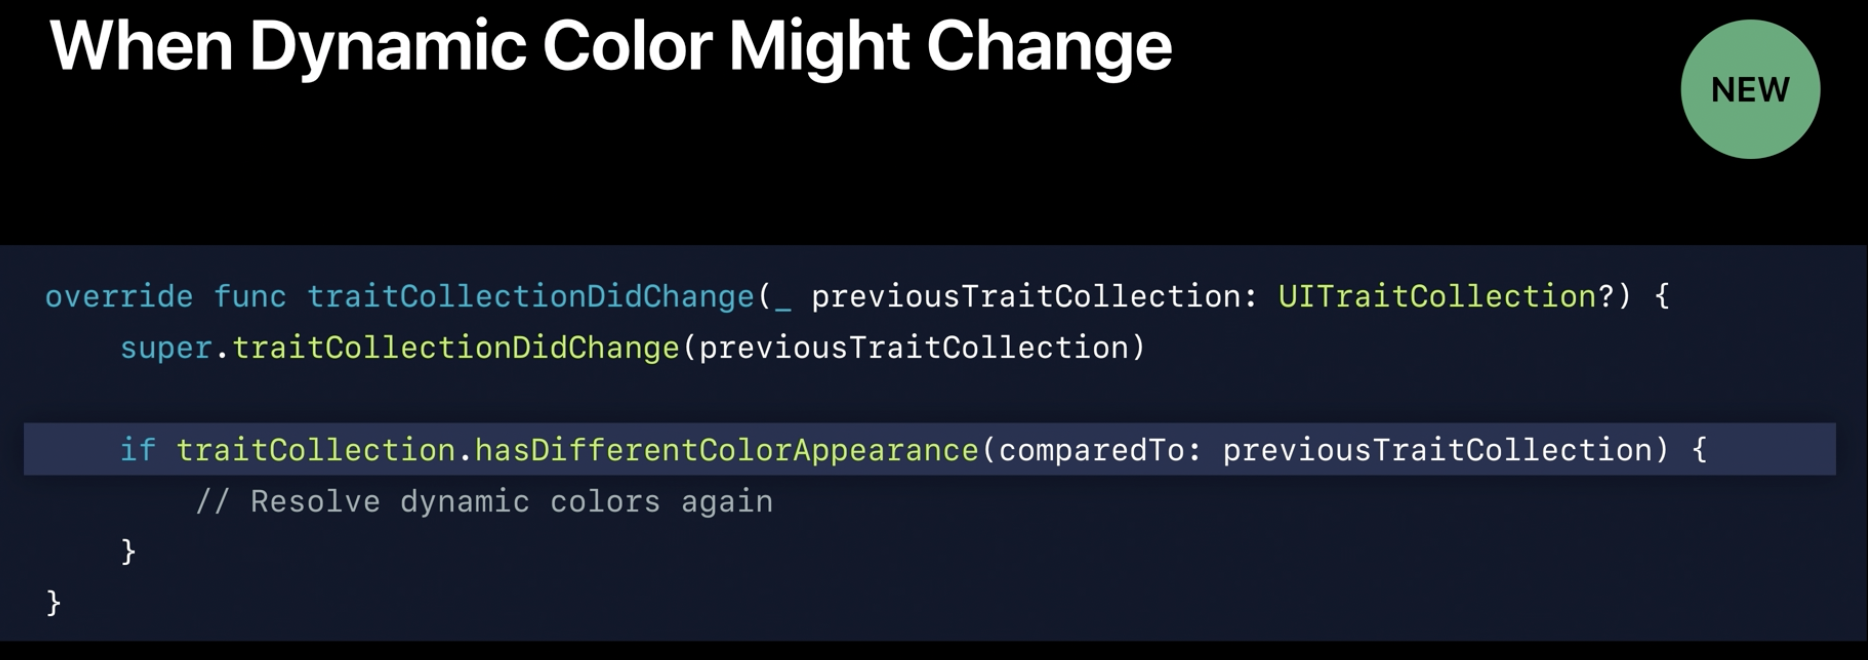
- When traits change, Trait Collection did change as called.
- But not all trait changes will affect colors. If the user interface style changes from light to dark, that will obviously affect colors.
- But if something like a size class changes because your app was resized, that won't affect colors.
- So, it's best to use this method has different color appearance to see if the relevant traits have changed.
- If it didn't, then you should resolve those dynamic colors again.
Dynamic Image
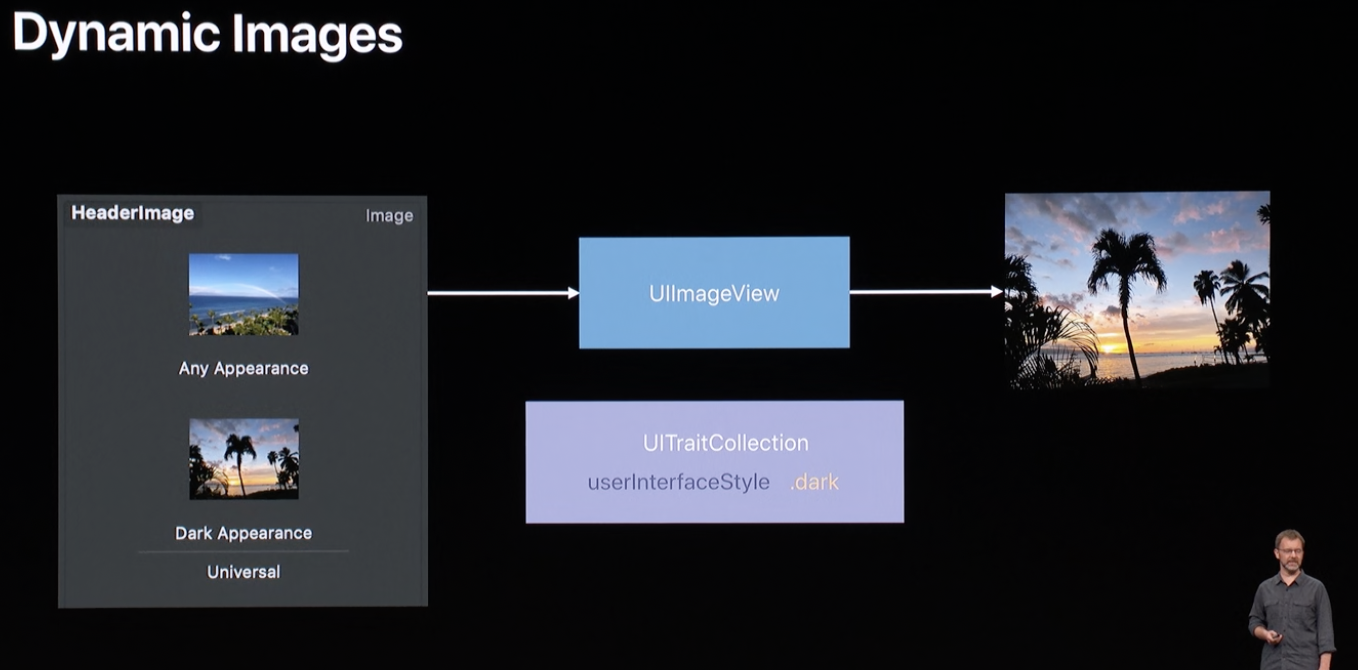
- As you saw, you can create dynamic images in the asset catalog.
- And when you show one of these images with UIImage view, it uses its Trait Collection to determine which image to display.
- Now, UIImage view is doing the work here. Unlike UIColor, UIImage doesn't pay attention to the current Trait Collection.
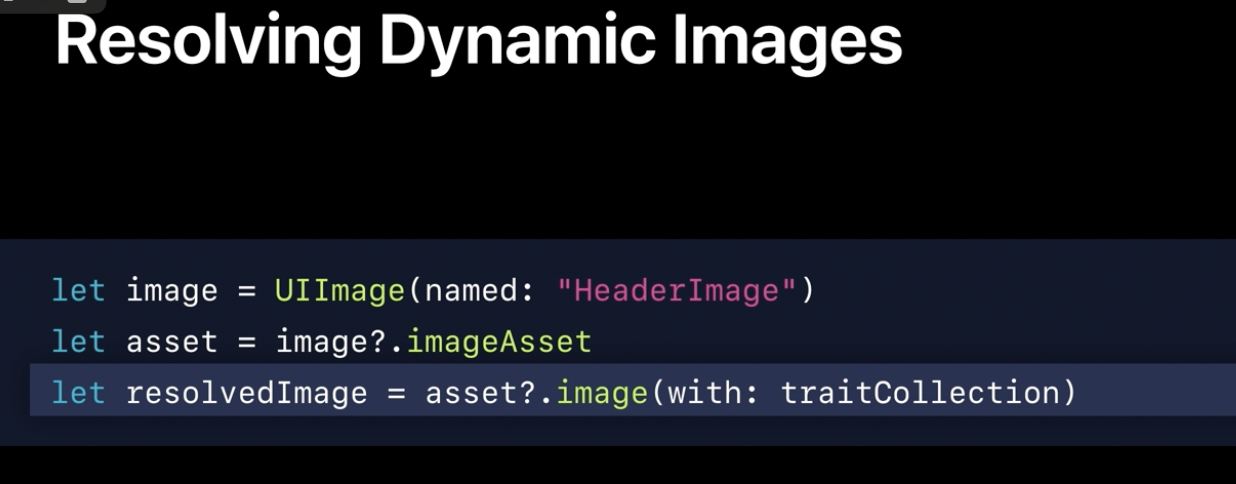
- So, we recommend most of the time use UIImage view. But if you need to resolve the color yourself, you can.
- Given an image, just ask for its image asset. That's that collection of all the different image variations.
- Next, ask for a specific image that matches a specific Trait Collection.
Trait Collection
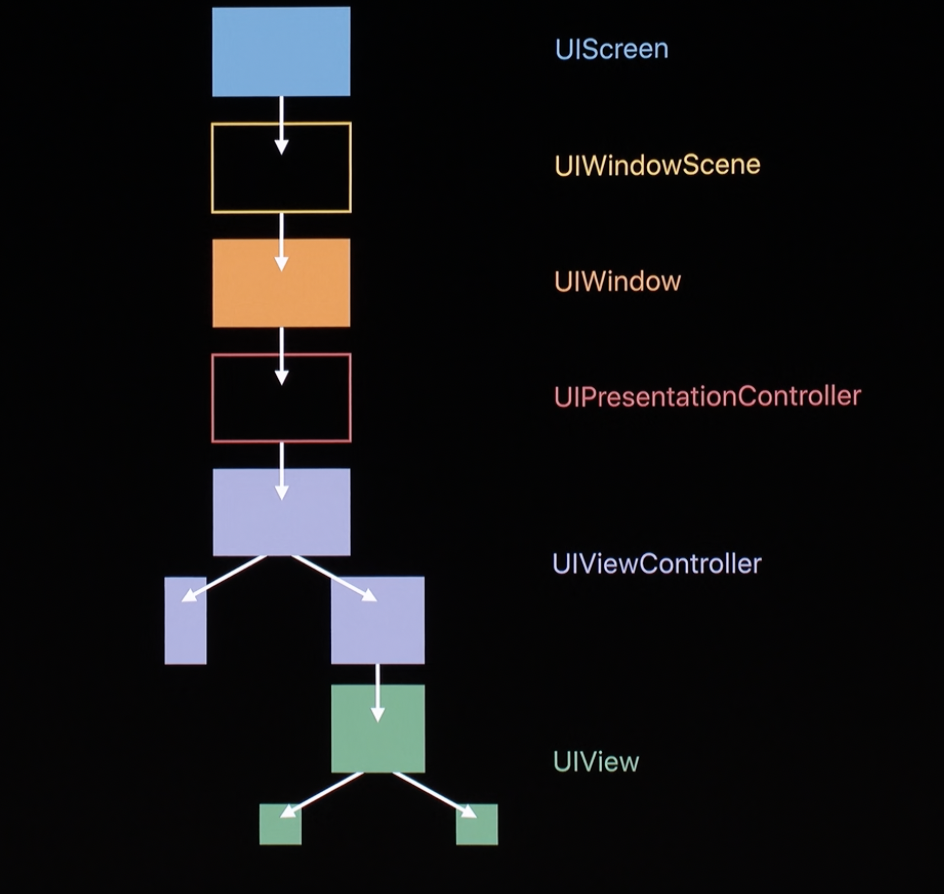
- The most important thing to remember about Trait Collections is that there is not just one in your entire app.
- Trait Collections actually cascade through the hierarchy of your app, starting at the root level with the screen, then down to the window scene, which is new this year in iOS 13.
- And finally, traits cascade through the view hierarchy inside each of your view controllers.
- Because of this hierarchy, you always want to use the trait collection of the most specific view or view controller you can.
- And when the value of a trait changes, you're going to receive trait collection did change on all of these objects inside of your app when they get that change.
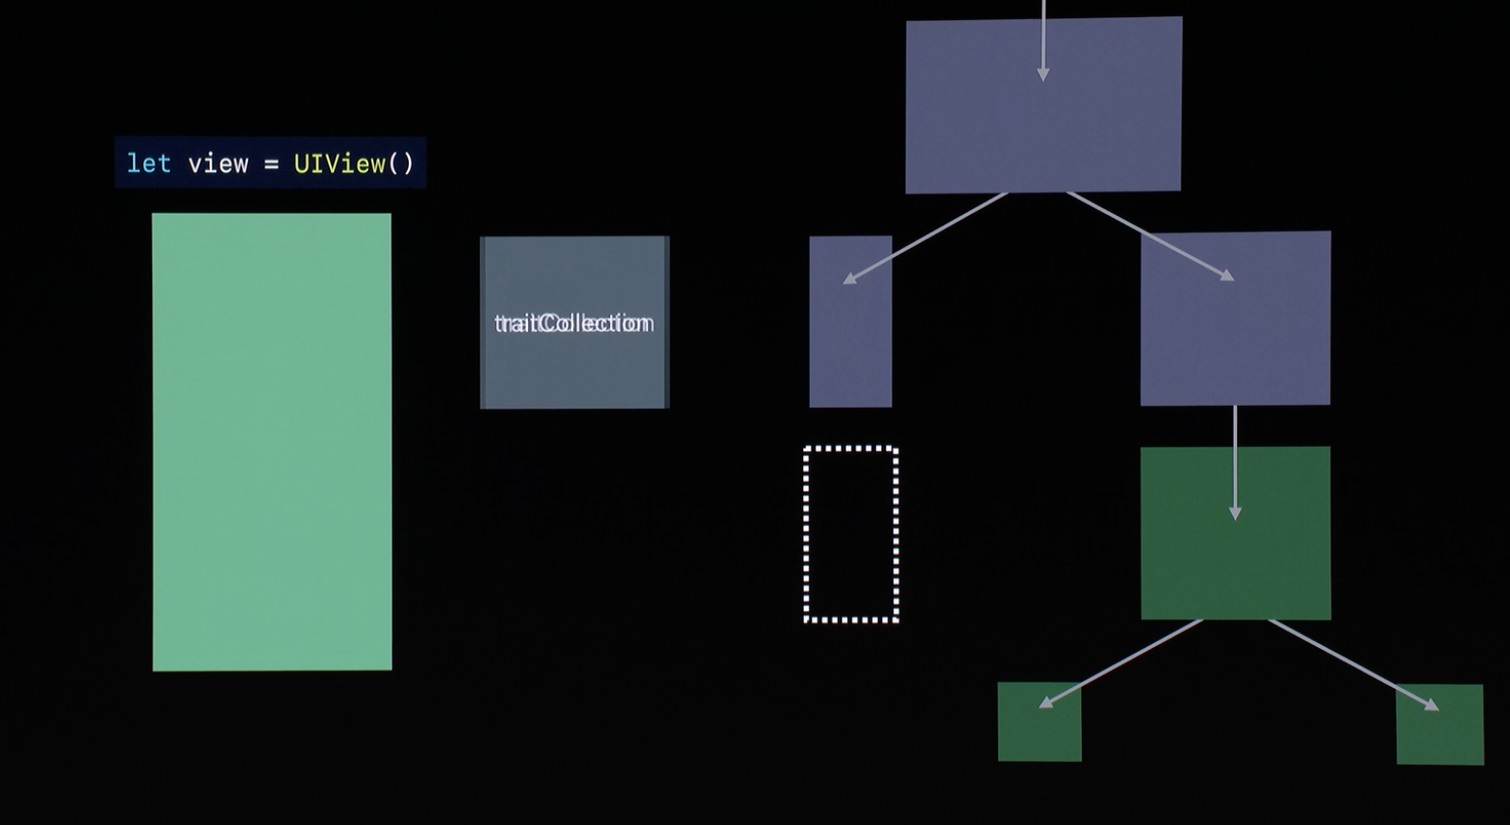
- The first thing that we'll do is create that view. Now, when a view is being initialized, it hasn't yet been added inside of this trait hierarchy.
- So, when the view's created, in iOS 13, UIKit is going to make a prediction about where it expects that view will end up, and populate that view's Trait Collection right from the start based on the predicted destination.
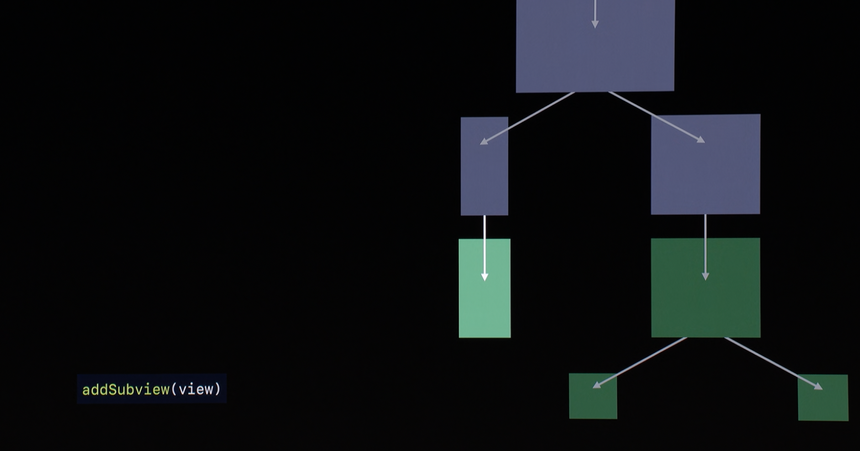
- So, we'll do that by calling out subview. It moves over. And once the view's actually added, it's going to inherit its actually traits from its parent trait environment, in this case the view controller above it.
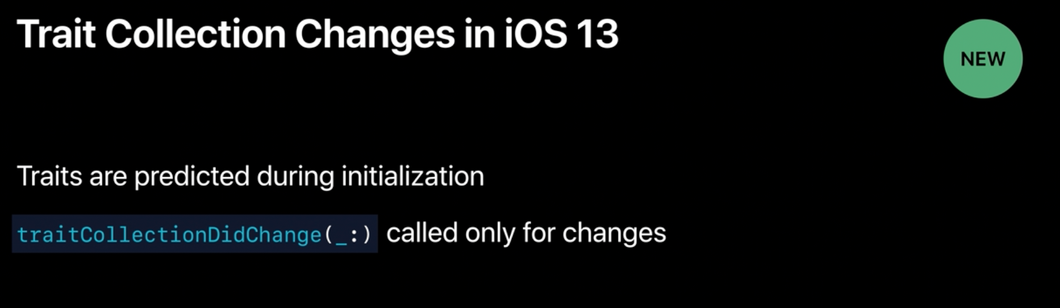
- View controllers and views will all receive a pretty complete Trait Collection right up front, which is really useful. And then Trait Collection did change will only be called afterwards if any of those initial traits change.
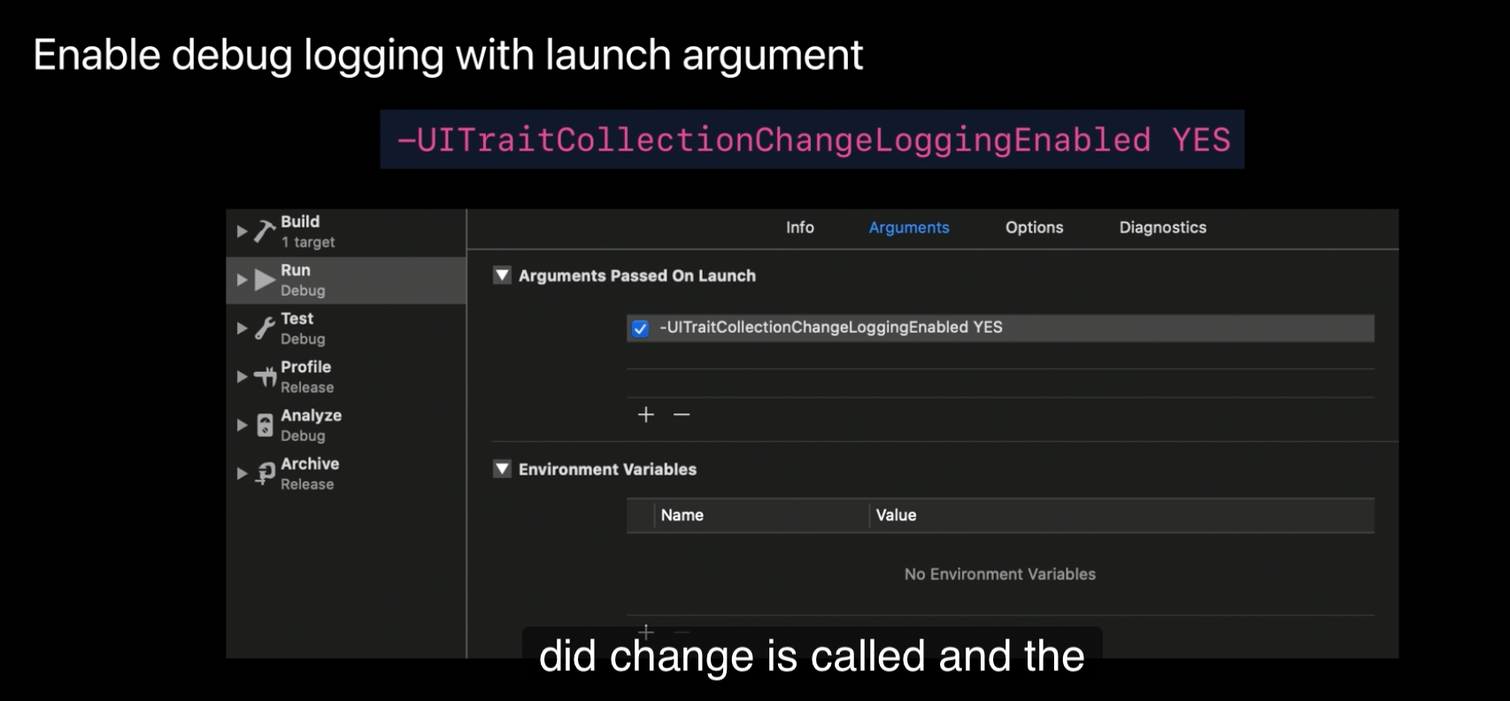
- Now, to make it a little bit easier to see when some of these trait changes are occurring in iOS 13, we have some helpful new debug logging this year. You can enable using this launch argument and it'll tell you exactly when Trait Collection did change is called and the details of each of those changes. It's really cool and you should give it a try.
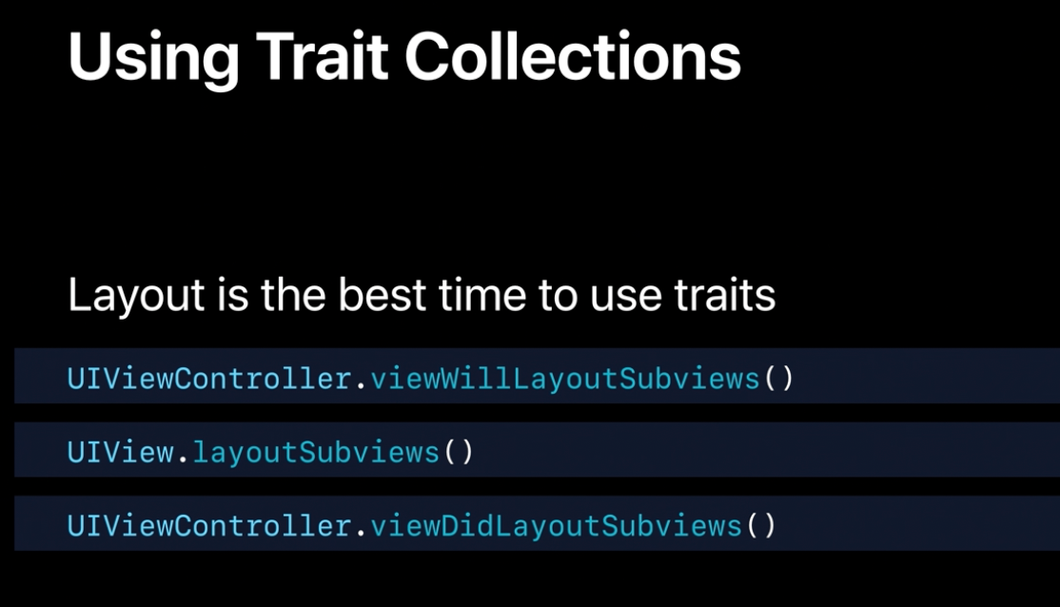
- Now, as you're updating your existing code or adding new code that uses traits, the best practice is to wait until layout to actually read the Trait Collection from the view or view controller and perform work based on it
- Traits are always updated before layout occurs.
- And so if you get the Trait Collection from inside of one of these methods, you can rest assured that it's not going to be a prediction anymore. It'll reflect the actual values that it was inheriting from its parent.
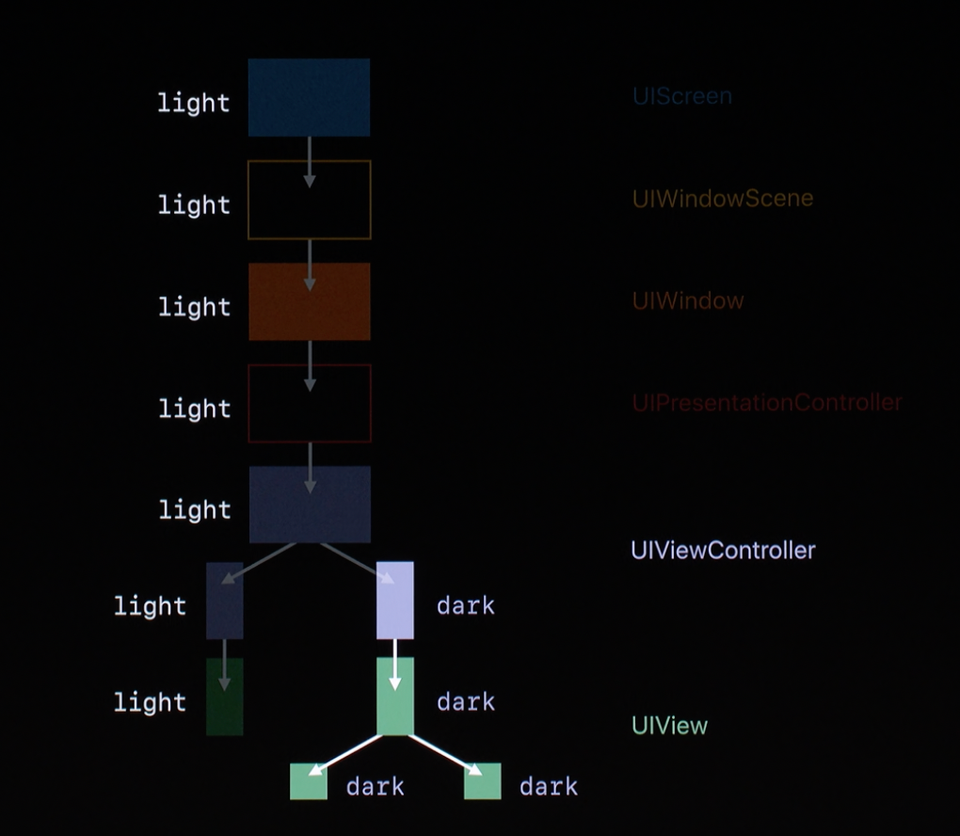
- if we just want let's say that one view controller on the bottom right and everything on the side of it to be dark, we can do that by overriding the user interface style trait with dark.
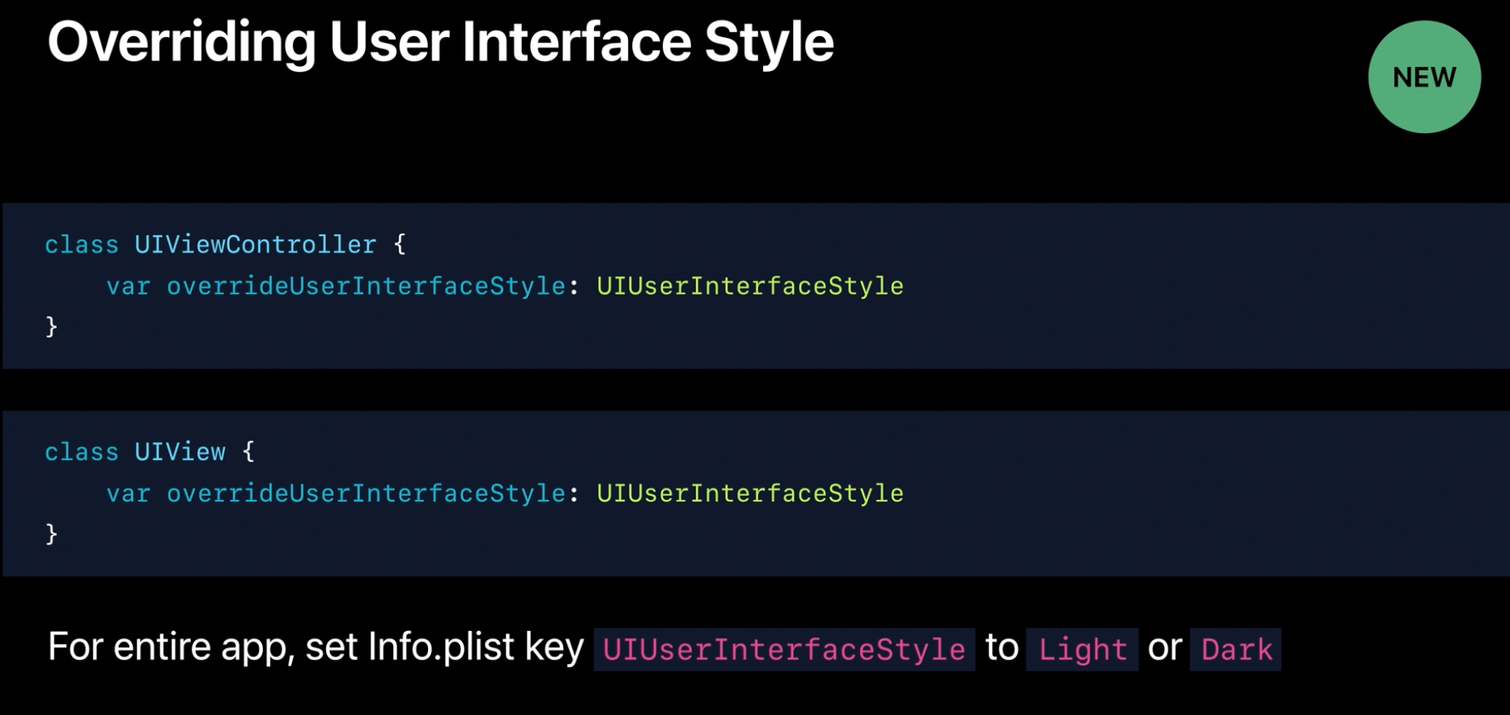
- So, how do you actually do this override? We have some new API this year in iOS 13 to make this really easy.
- if your entire app should always just be light or dark, we have an info p list key you can set to make this really easy.
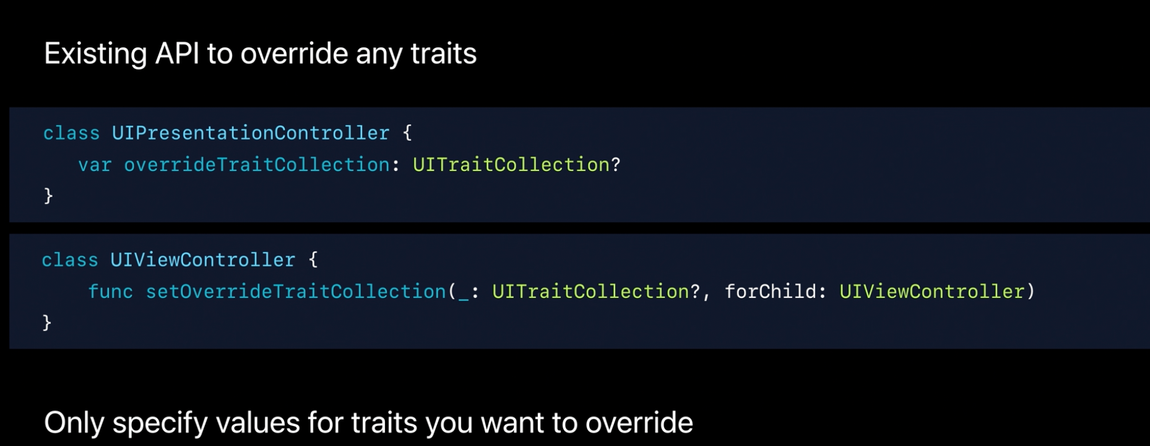
- . And the key thing to remember when you use this is that the override trait collection that you set should only contain values for the specific traits you care about overriding.
- Leave all of the other traits unspecified - just don't touch them - so that UIKit will automatically fill in the normal inherited values for those traits.
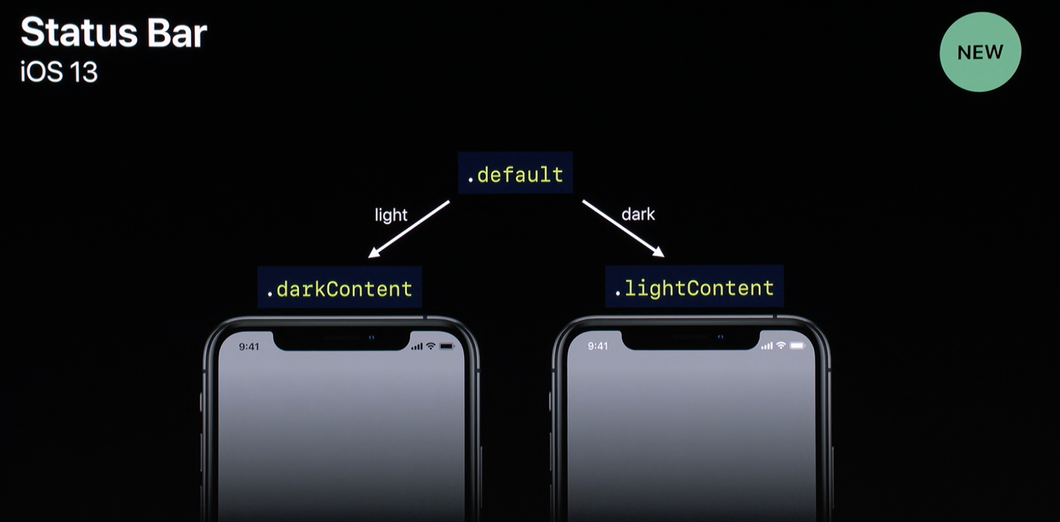
- New in iOS 13, we have a new dark content style, which is sort of taking over the place of what used to be default, and we've repurposed default to become an automatic style switching mode.

- In iOS 13, these existing styles are now deprecating. And that's because they were implying a very specific color appearance, which doesn't really make sense anymore.
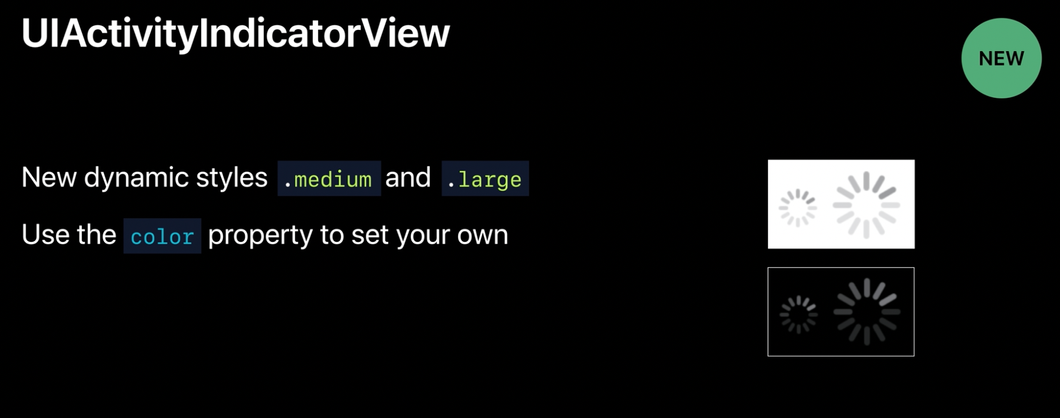
- But in their place, we've introduced a handful of new styles, which are just based on the size of the activity indicator.
- They also use a nice dynamic grey color by default, so they look great in light and dark mode without any changes.
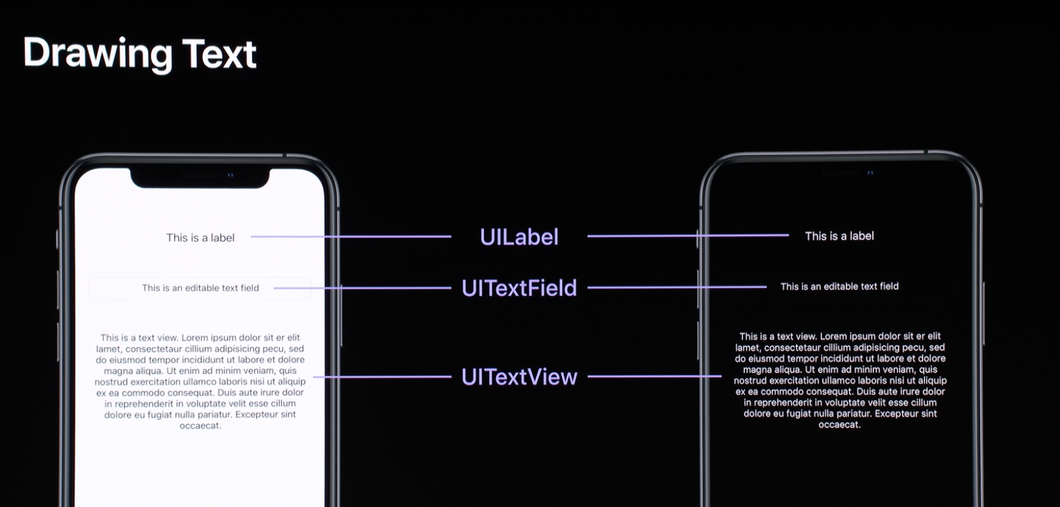
- Now, by default, text classes like UILabel, UIText field, and UIText view use the label color.
- So, if you're just setting the text on a new text field or text view, or a label, you'll just get a nice, correct appearance in both light and dark by default.
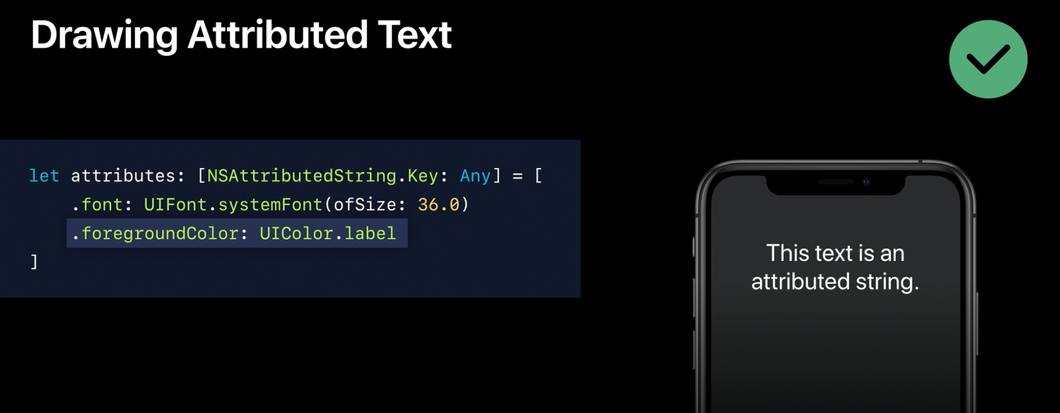
- But if you use attributed strings in your app, and you set the attributed text of one of these text classes, or if you draw that attributed string yourself manually, you should keep in mind that you need to specify a foreground color.
- Drawing an attributed string without any foreground color attribute like this, is actually defined to yield black text.
- So, if you see black text in your app in Dark Mode, and you're using attributed strings, just make sure you're specifying a dynamic color like label, just as you see here for that foreground color attribute.

Hi 👋🏻 I'm an iOS Developer who loves to read🤓