
🌼 학습내용
generic, Utility, TypeORM, Mysql
1️⃣ Generic
클래스 내부에서 지정하는 것이 아닌 외부에서 사용자에 의해 지정되는 것을 의미Generic 타입들이 많이 쓰인다.
| type | 설명 |
|---|---|
| T | Type |
| E | Element |
| K | Key |
| V | Value |
| N | Number |
// 1. 문자, 숫자, boolean 기본타입
const getPrimitive = (arg1: string, arg2: number, arg3: boolean): [boolean, number, string] => {
  return [arg3, arg2, arg1];
};

const result = getPrimitive("철수", 123, true);

//
// 2. any 타입(JS랑 같다.)
const getAny = (arg1: any, arg2: any, arg3: any): [any, any, any] => {
  console.log(arg1 + 100); // any는 아무거나 다 됨
  return [arg3, arg2, arg1];
};

const result = getAny("철수", 123, true);

//
// 3. unknown 타입
const getUnknown = (arg1: unknown, arg2: unknown, arg3: unknown): [unknown, unknown, unknown] => {
  if (typeof arg1 === "number") console.log(arg1 + 100);
  return [arg3, arg2, arg1];
};

const result = getUnknown("철수", 123, true);

//
// 4. generic 타입
function getGeneric<MyType1, MyType2, MyType3>(arg1: MyType1, arg2: MyType2, arg3: MyType3): [MyType3, MyType2, MyType1] {
  return [arg3, arg2, arg1];
}

const result = getGeneric<string, number, boolean>("철수", 123, true);

//
// 4. generic2 타입
function getGeneric2<T1, T2, T3>(arg1: T1, arg2: T2, arg3: T3): [T3, T2, T1] {
  return [arg3, arg2, arg1];
}

const result = getGeneric2<string, number, boolean>("철수", 123, true);

//
// 5. generic3 타입
function getGeneric3<T, U, V>(arg1: T, arg2: U, arg3: V): [V, U, T] {
  return [arg3, arg2, arg1];
}

const result = getGeneric3("철수", 123, true);

//
// 6. generic4 타입(화살표 함수 타입)
const getGeneric4 = <T, U, V>(arg1: T, arg2: U, arg3: V): [V, U, T] => {
  return [arg3, arg2, arg1];
};

const result = getGeneric4("철수", 123, true);
2️⃣ Utility & Recoed
제네릭 타입이라고 볼수 있다.Record <Key, Type> 형식으로 키가 Key이고 값이 Type인 객체 타입입니다.
interface IProfile {
  name: string;
  age: number;
  school: string;
  hobby?: string;
}

// 1. Partial 타입(?가 붙는다)
type aaa = Partial<IProfile>;

// 2. Required 타입(?가 없어진다.)
type bbb = Required<IProfile>;

// 3. Pick(골라서 쓰기)
type ccc = Pick<IProfile, "name" | "hobby">;

// 4. Omit 타입(제외시키기)
type ddd = Omit<IProfile, "school">;

// 5. Record 타입
type eee = "철수" | "영희" | "훈이"; // Union 타입
let child1: eee = "철수"; // 철수, 영희, 훈이 만 됨
let child2: string = "사과"; // 철수, 영희, 훈이, 사과, 바나나 다 됨

type fff = Record<eee, IProfile>; // Record 타입

// 6. 객체의 key들로 Union 타입 만들기
type ggg = keyof IProfile; // name, age, shcool, hobby
let myprofile: ggg = "hobby";

// 7. type VS interface 차이    => interface는 선언 병합 가능
interface IProfile {
  candy: number; // 선언 병합으로 추가됨
}

// 8. 배운거 응용
let profile: Partial<IProfile> = {
  candy: 10,
};
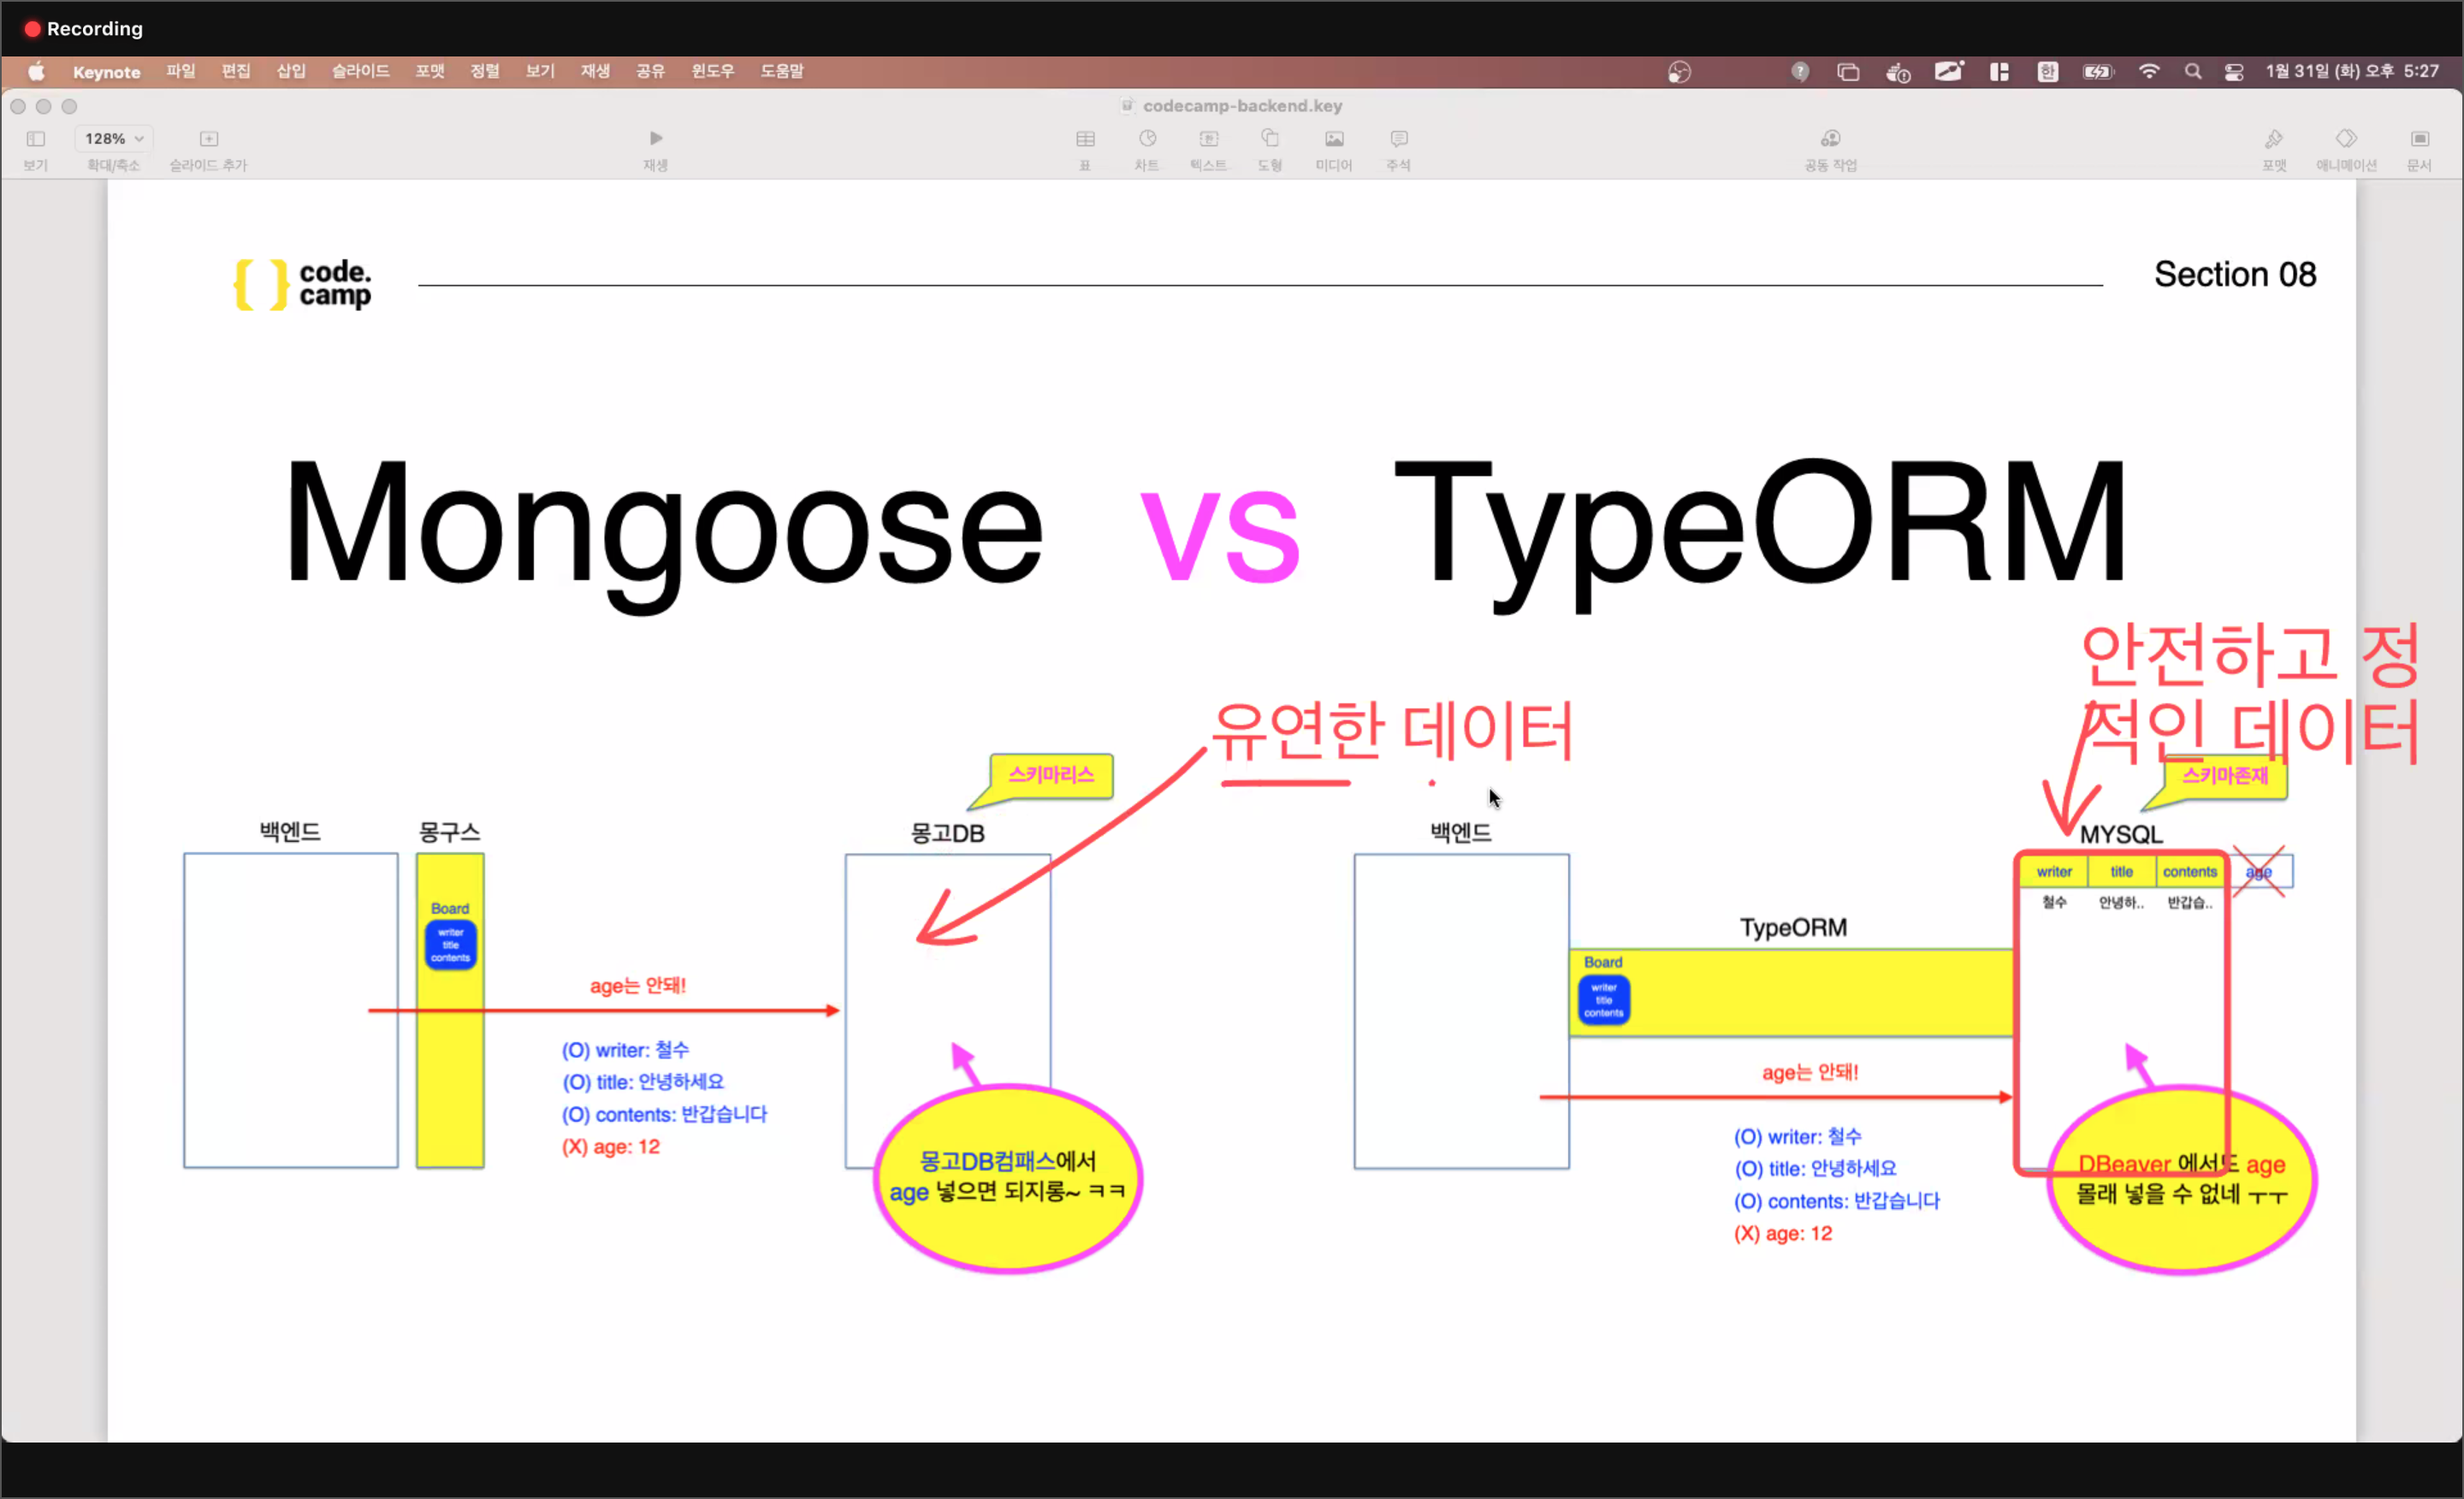
3️⃣ Mongoose vs MySQL
Mongoose
Mongoose는 스키마를 따로 저장 하지 않고도 사용이 가능한데,Mongoose를 사용해필터링을 해주어 우리가 원하는 데이터만 주고 받을 수 있게 해준다.Mongoose는 몽고DB컴패스에서 데이터 추가 가능
MySQL
반면, MySQL은 스키마를 따로 저장하고 정의된 데이터만을 주고 받을 수 있다.DBeaver(GUI)를 사용해 스키마에 저장된 컬럼이 없으면 추가 할 수 없다
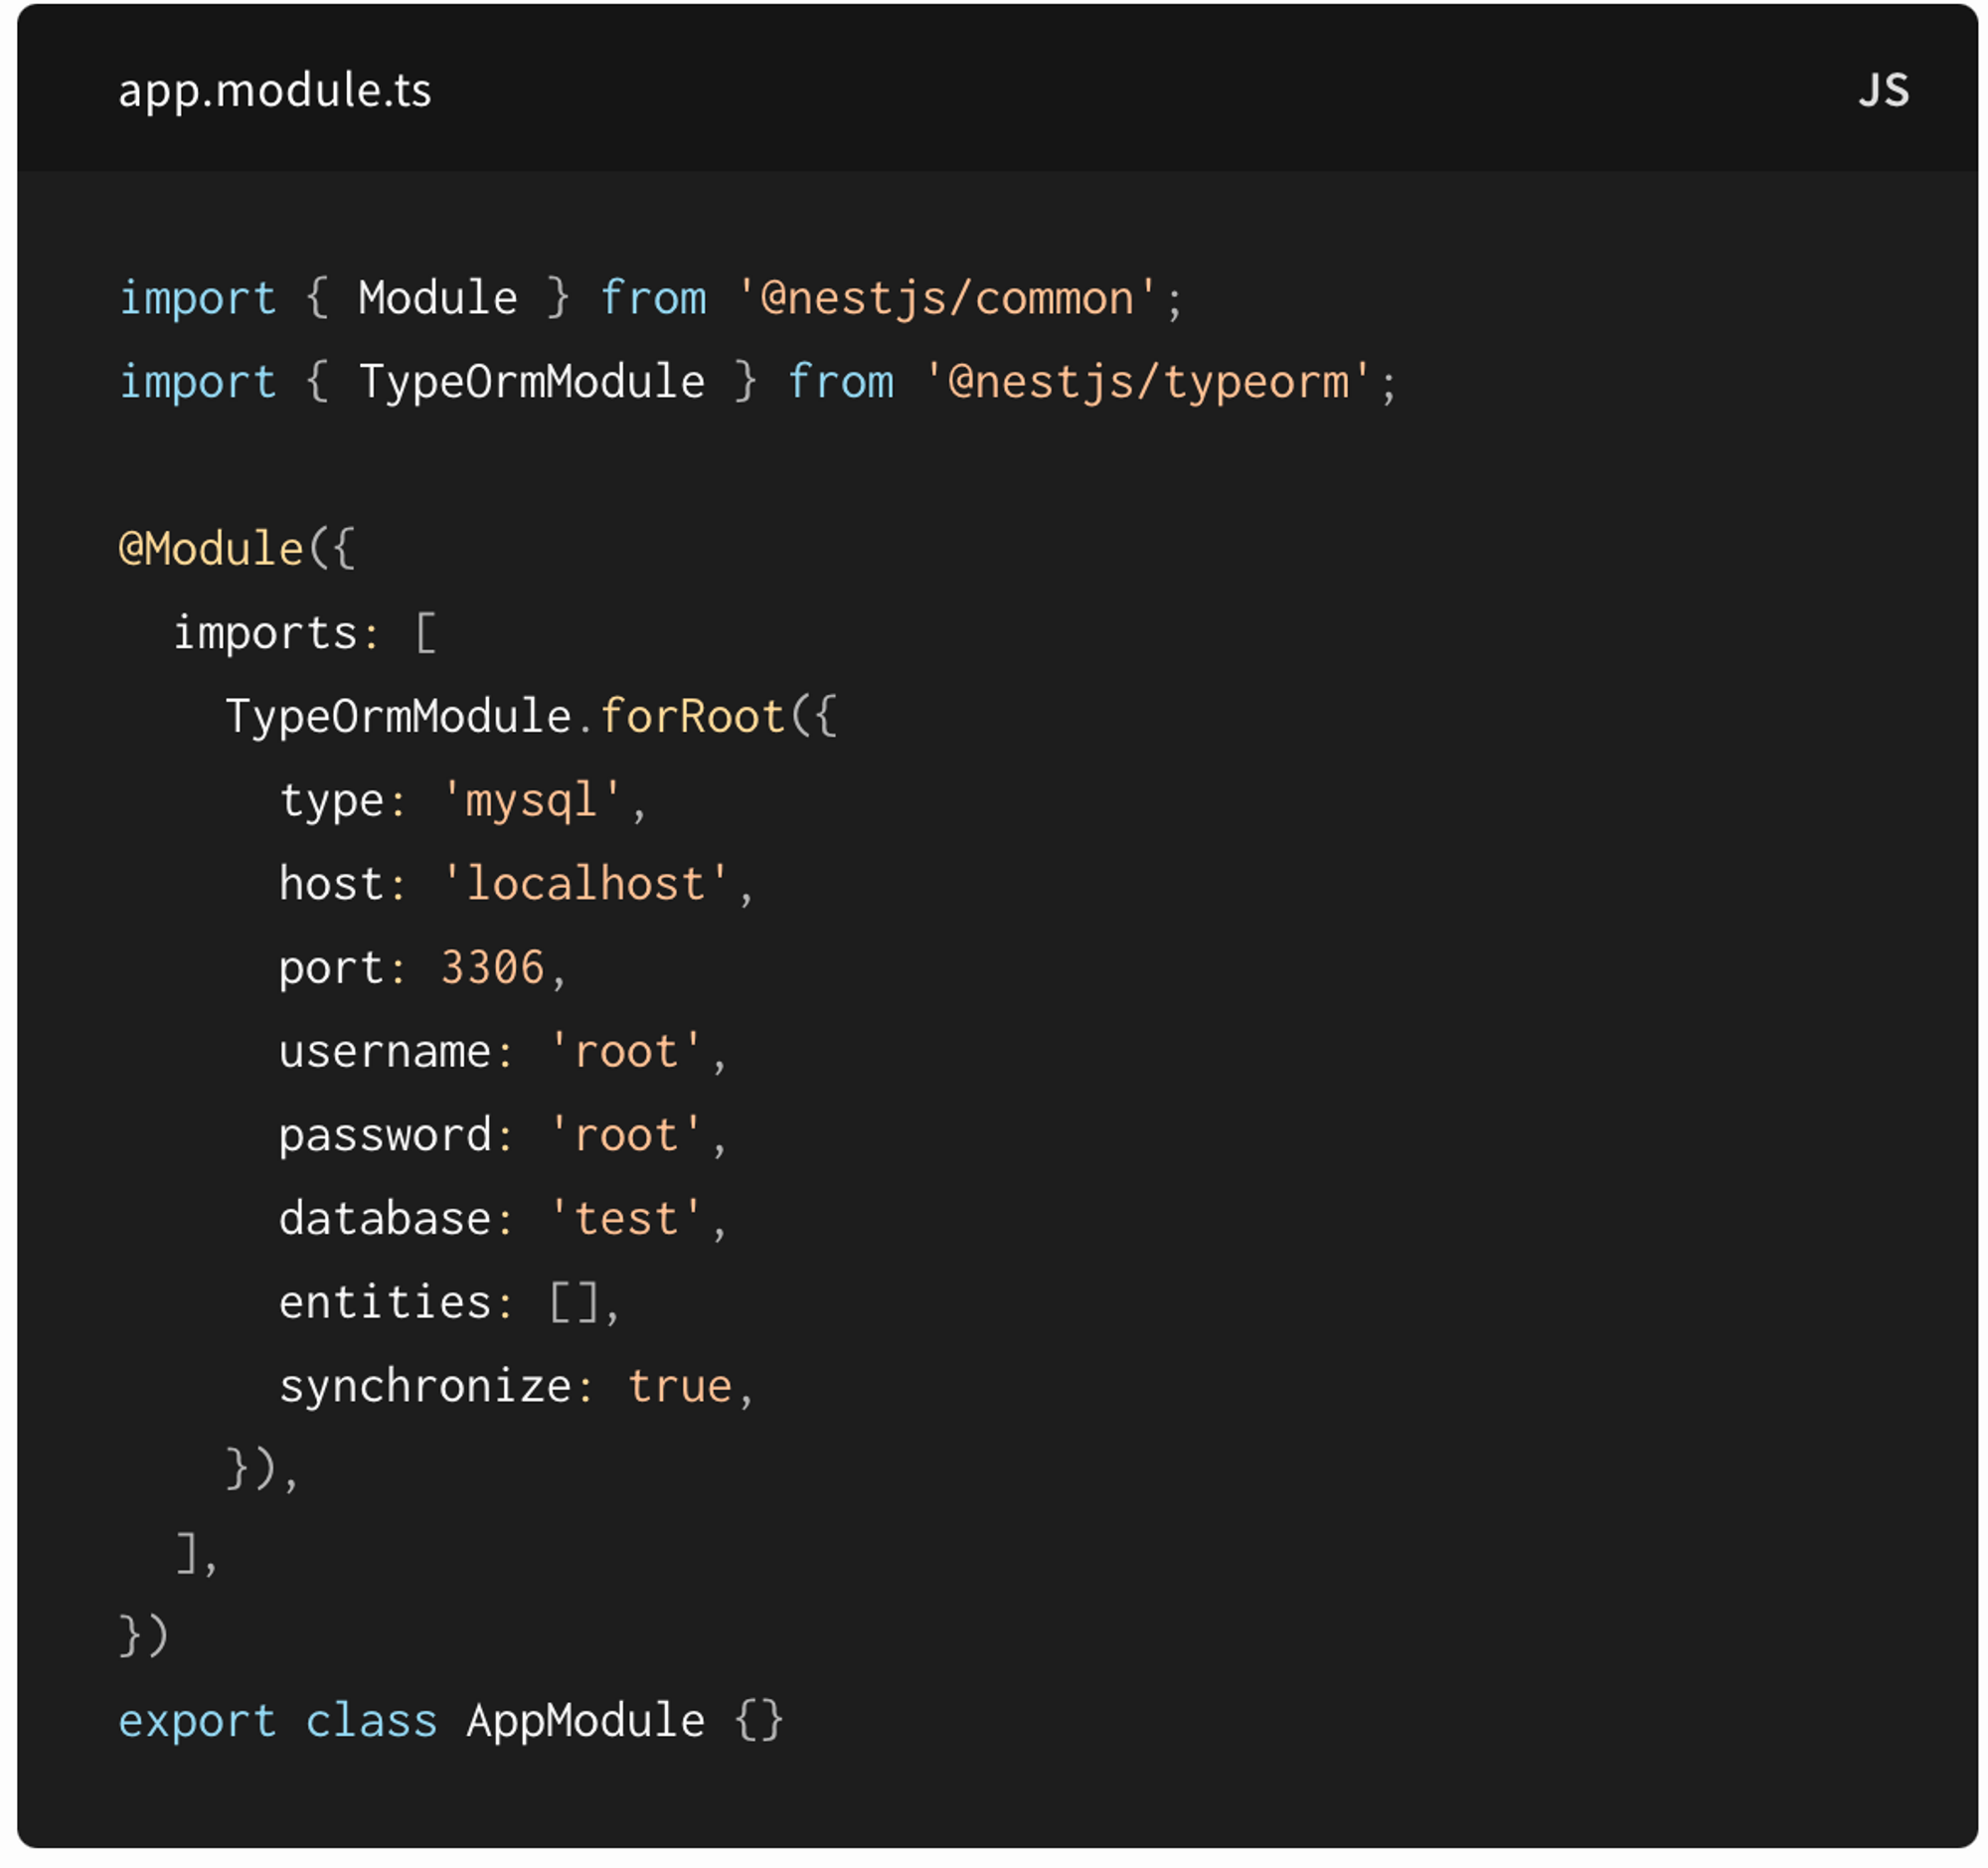
TypeOrmModule.forRoot({
      type: 'mysql',            // 데이터 베이스 타입
      host: 'localhost',        // local 환경으로 진행
      port: 3306,               // mysql은 기본 port는 3306
      username: 'root',         // mysql은 기본 user는 root로 지정
      password: 'root',         // 본인의 mysql password
      database: 'myproject',    // 연결할 데이터 베이스명
      entities: [Board],        // 데이터 베이스와 연결할 entity
      synchronize: true,        // entity 테이블을 데이터베이스와 동기화할 것인지
      logging: true,            // 콘솔 창에 log를 표시할 것인지
    }),
4️⃣ Entity
@Entity ; Typeorm에 의해 Entity테이블 생성
@PrimaryGeneratedColumn : 자동으로 생성될 값의 컬럼입니다.increment : 데이터가 한 줄씩 쌓일 때마다 자동으로 숫자가 1씩 증가하여 값이 생성됩니다.uuid:중복되지 않는 문자열 ID가 자동으로 생성됩니다.
@Column : 표 형태에서 열 에 해당. 실제 들어갈 데이터의 값의 컬럼
@Entity()
export class Board {
    @PrimaryGeneratedColumn('increment')
    id: number;

    @Column()
    writer: string;

    @Column()
    title: string;

    @Column()
    contents: string;
}
5️⃣ MongoDB(CLI) vs MySQL(SQL Query)
MongoDB는 실제 명렁어 대신 Mongoose를 사용해 .save()등과 같은 내용을 변경되었다.MySQL은 TypeORM이 이역할을 대신한다(SQL Query문이라고 함)TypeORM을 통해 SQL Query문으로 작성되는 것을 logging으로 터미널에서 확인가능하다.snchronize-> Entity와 MySQL DB에 있는 실제 저장된 컬럼들을 동기화 시켜준다.사용하기 편하긴 하지만, ORM으로 커버가 되지 않는 것들은 SQL Query문을 사용해야 한다.
6️⃣ Graphql
Query => 조회, Mutation => 등록, 수정, 삭제TypeORM에 맞게 @(데코레이터)를 붙여서 사용함수 뒤에 오는 string은 리턴 타입을 의미
@Resolver() // @Controller를 대체
export class Resolver {
  constructor(private readonly service: Service) {}

  // @Get를 대체 (()=>String) -> Graphql return 타입)
  @Query(() => String, { nullable: true })
  findAll(): string { // return 타입
    return this.service.findAll();
  }

  // @Create, Patch, Delet를 대체  (()=>String) -> Graphql return 타입)
  @Mutation(() => String)
  create(): string { // return 타입
    return this.service.create();
  }
}
7️⃣ ObjectType && Args 개별로 받기
⛔️ ObjectType
TypeScript 에서는 number 로 타입 지정GraphQL 에서는 Int 로 타입 지정
@Entity()
@ObjectType() // 객체 형태의 Graphql 타입으로 봐꿔준다.
export class Board {
    @PrimaryGeneratedColumn('increment')
    @Field(() => Int) // Graphql Field 라고 알려주고 타입을 지정
    id: number;

    @Column()
    @Field(() => String) // Graphql Field 라고 알려주고 타입을 지정
    writer: string;

    @Column()
    @Field(() => String) // Graphql Field 라고 알려주고 타입을 지정
    title: string;

    @Column()
    @Field(() => String) // Graphql Field 라고 알려주고 타입을 지정
    contents: string;
}
Resolver.js
@Resolver() // @Controller를 대체
export class Resolver {
  constructor(private readonly service: Service) {}

  // @Get를 대체 (()=>[Board]) -> Graphql return 타입)
  @Query(() => [Board], { nullable: true })
  findAll(): Board[] { // return 타입
    return this.service.findAll();
  }

  // @Create, Patch, Delet를 대체  (()=>String) -> Graphql return 타입)
  @Mutation(() => String)
  create(): string { // return 타입
    return this.service.create();
  }
}
⛔️ InputType으로 받기 (Args 받기)
Args받기 -> gql에 arguments
  // @Create, Patch, Delet를 대체  (()=>String) -> Graphql return 타입)
  @Mutation(() => String)
  create(
  	@Args('writer') writer: string,
    @Args('title') title: string,
    @Args('contents') contents: string,
    // @Args() GQ타입 그뒤는 TS타입
  ): string { // return 타입
    return this.service.create({writer,title,contents});
  }
}
InputType DTO로 묶어서 받기
// create.input.ts
@InputType() // gql -> InputType이라고 말해줌
export class CreateInput {
  @Field(() => String)
  writer: string;

  @Field(() => String)
  title: string;

  @Field(() => String)
  contents: string;
// create.input.ts
@Mutation(() => String)
createBoard(
// @Args('writer') writer: string,
// @Args('title') title: string,
// @Args('contents') contents: string,
@Args('createBoardInput') createBoardInput: CreateBoardInput,
): string {
return this.boardsService.create({createBoardInput});
}
}interface 재사용을 위해 하나로 모아 따로 관리
export interface IServiceCreate {
  createBoardInput: CreateBoardInput;
}
Service
// service.ts
create({ createBoardInput }: IBoardsServiceCreate): string {
    // 1. 브라우저에서 보내준 데이터 확인하기
	console.log(createBoardInput.writer);
	// 3. DB에 저장이 잘 됐으면, 결과를 브라우저에 응답(response) 주기
    return '게시물 등록에 성공하였습니다!!';
  }
}
8️⃣ Docker 패키징
MySQL과 Docker 연결.env.docker파일을 만들어 환경변수를 설정해준다.
// .env
DATABASE_TYPE=mysql
DATABASE_HOST=localhost
DATABASE_PORT=3306
DATABASE_USERNAME=root
DATABASE_PASSWORD=root        // 본인의 mysql password
DATABASE_DATABASE=mydocker   // 연결할 데이터 베이스명
---------------------------------------------------------
// app.ts
TypeOrmModule.forRoot({
      type: process.env.DATABASE_TYPE as 'mysql',
      host: process.env.DATABASE_HOST,
      port: Number(process.env.DATABASE_PORT),
      username: process.env.DATABASE_USERNAME,
      password: process.env.DATABASE_PASSWORD,
      database: process.env.DATABASE_DATABASE,
      entities: [Board],
      synchronize: true,
      logging: true,
    }),
 ---------------------------------------------------------
 // 기존 docker-compose mongoDB 부분을 MySQL로 수정
 my-database:
    image: mysql:latest // 최신버전 설정
    environment:
      MYSQL_DATABASE: 'mydocker'  // env파일 DATABASE 명
      MYSQL_ROOT_PASSWORD: 'root' // env파일 PASSWORD
    ports:
      - 3306:3306 // 몽고DB는 27017:27017
코린이 열심히 배우자!