1편에서 웹소켓을 통하여 가격을 받아오는 것까지 성공했으니, 이제 조건에 맞춰서 알림을 줄 시간입니다.
최종적인 기능 목표는 유저가 설정한 가격의 상/하한선 , 상/하한 퍼센티지에 따라 해당 바운더리를 넘어갔을시 알림을 주는것이지만, 우선은 가격의 하한선 기능을 구현하는 것을 목표로 하겠습니다.
웹 푸시 알림 기능은 Firebase 클라우드 메시징(FCM) 을 활용할 것입니다.
FCM을 활용하여 메시지를 보내는 아키텍쳐는 다음과 같습니다
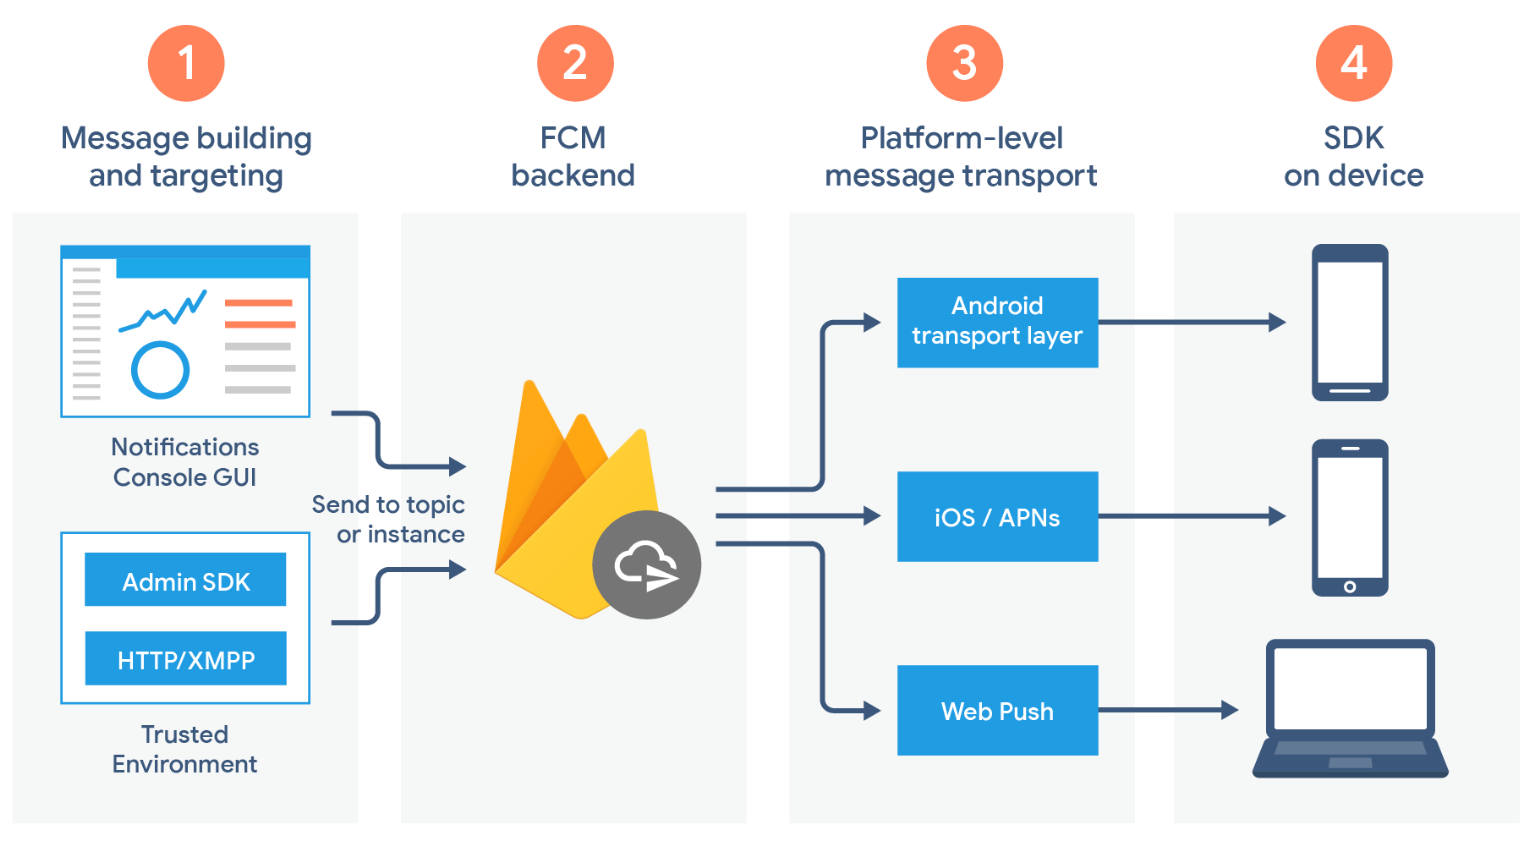
- 메시지 요청을 구현
: 직접 Notification을 스프링 단에서 만듭니다 - FCM 백엔드
: 마찬가지로, 메시지 메타데이터를 생성하며 메시지를 전송하는 등의 역할을 하는 FcmService 클래스를 구현합니다 - 플랫폼 수준 전송 레이어
: 웹 푸시 프로토콜을 따라 메시지가 전송됩니다. - 기기의 FCM SDK
: 애플리케이션 로직에 따라 메시지가 처리됩니다.
추상적으로 느껴질 수 있기 때문에, 직접 코드를 보면서 설명하겠습니다.
일단, 파이어베이스에서 생성한 비밀 키 파일(json파일) 을 resources 디렉토리 안에 저장해줍니다. 여기 private key가 있기 때문에, .gitignore에도 추가해줍니다.
NotificationRequest 객체를 만들고, 이후 메시지는 해당 객체를 통해 생성합니다.
@Getter
@ToString
@NoArgsConstructor
public class NotificationRequest {
    private String title;
    private String message;
    private String token;

    @Builder
    public NotificationRequest(String title, String message, String token) {
        this.title = title;
        this.message = message;
        this.token = token;
    }
}
어플리케이션 시작 시, DI 이후 초기화시점에 FCM을 시작해주어야합니다....
이를 담당한 FcmInitializaer를 만들어줍니다.
@Service
public class FcmInitializer {
    private static final Logger logger = LoggerFactory.getLogger(FcmInitializer.class);
    private static final String FIREBASE_CONFIG_PATH = "webpush-coin-firebase-adminsdk-2eytt-04a22bac7d.json";

    @PostConstruct
    public void initialize() {
        try {
            FirebaseOptions options = FirebaseOptions.builder()
                    .setCredentials(GoogleCredentials.fromStream(new ClassPathResource(FIREBASE_CONFIG_PATH).getInputStream())).build();
            if (FirebaseApp.getApps().isEmpty()) {
                FirebaseApp.initializeApp(options);
                logger.info("Firebase application has been initialized");
            }
        } catch (IOException e) {
            logger.error(e.getMessage());
        }
    }

}- 이때 위에서 받아놓은 비밀 키 json을 FIREBASE_CONFIG_PATH 로 지정하여 이를 통해 증명해줍니다.
이제 Fcm을 통해서 메시지를 보내는 기능을 만들어줄건데요..
FcmService 를 만들어줍니다.
@Service
public class FcmService {
    private static final Logger logger = LoggerFactory.getLogger(FcmService.class);

    public void send(final NotificationRequest notificationRequest) throws InterruptedException, ExecutionException {
        System.out.println("리퀘 : " + notificationRequest);
        Message message = Message.builder()
                .setToken(notificationRequest.getToken())
                .setWebpushConfig(WebpushConfig.builder().putHeader("ttl", "300")
                .setNotification(
                        new WebpushNotification(notificationRequest.getTitle(),
                        notificationRequest.getMessage()))
                        .build()
                )
                .build();

        String response = FirebaseMessaging.getInstance().sendAsync(message).get();
        logger.info("Sent message: " + response);
    }
}- NotificationRequest를 인자로 받아 메시지를 보내줄 겁니다.
- NotificationRequest는 토큰값을 가지고 있는데요, 이는 NotificationService 에서 tokenMap을 통해 저장한 값입니다.
- tokenMap에 토큰을 저장하는 것은 사용자 로그인 후에 이뤄집니다.
notification.js
const firebaseModule = (function () {
    async function init() {
        // Your web app's Firebase configuration
        if ('serviceWorker' in navigator) {
            window.addEventListener('load', function() {
                navigator.serviceWorker.register('/firebase-messaging-sw.js')
                    .then(registration => {
                        var firebaseConfig = {
                              apiKey: "AIzaSyBpT8NxVl85PnQNjaFWoNCiUD8wsW4m81E",
                              authDomain: "webpush-coin.firebaseapp.com",
                              projectId: "webpush-coin",
                              storageBucket: "webpush-coin.appspot.com",
                              messagingSenderId: "824680102690",
                              appId: "1:824680102690:web:5897e0c6bf6ceb4513437b",
                              measurementId: "G-GFQBMDM8YW"
                        };

                        // Initialize Firebase
                        firebase.initializeApp(firebaseConfig);

                        // Show Notificaiton Dialog
                        const messaging = firebase.messaging();
                        messaging.requestPermission()
                        .then(function() {
                            return messaging.getToken();
                        })
                        .then(async function(token) {
                            await fetch('/register', { method: 'post', body: token })
                            messaging.onMessage(payload => {
                                const title = payload.notification.title
                                const options = {
                                    body : payload.notification.body
                                }
                                navigator.serviceWorker.ready.then(registration => {
                                    registration.showNotification(title, options);
                                })
                            })
                        })
                        .catch(function(err) {
                            console.log("Error Occured");
                        })
                    })
            })
        }
    }

    return {
        init: function () {
            init()
        }
    }
})()

firebaseModule.init()
서비스워커를 등록해주고, <이메일, 토큰> 을 등록해줍니다.
이때 로그인 이후 자꾸 서비스워커 파일 자체로 리다이렉트 되는 사소한 에러가 있었는데요..
서비스워커(firebase-messaging-sw.js)
importScripts('https://www.gstatic.com/firebasejs/5.9.2/firebase-app.js');
importScripts('https://www.gstatic.com/firebasejs/5.9.2/firebase-messaging.js');

firebase.initializeApp({
    messagingSenderId: "824680102690"
});

const messaging = firebase.messaging()
왜 그런고 하여 검색을 하던 중 해당 링크를 통해 문제를 해결했습니다.
로그인은 현재 HTTP세션의 마지막 요청된 리소스로 리다이렉트를 해줍니다. 로그인 시 서비스 워커를 등록하다 보니 이곳으로 자동 리다이렉션을 걸어주는 듯하여 SecurityConfig에 해당 url로의 리다이렉션을 막아주는 코드를 추가하여 이를 방지해주었습니다.
    @Override
    public void configure(WebSecurity security){
        security.ignoring().antMatchers("/firebase-messaging-sw.js");
    }
아무튼 다시 FcmService로 돌아와서 , 메시지를 등록해줍니다.
이제 메시지를 원하는 타이밍에 보내주기만 하면 됩니다.
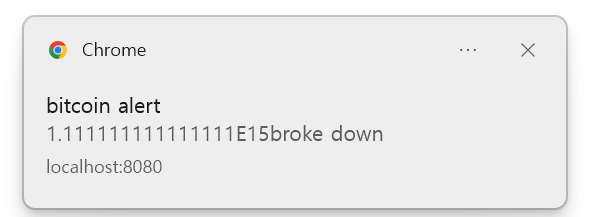
 public void AlertUser() {
         Alert alert = alertRepository.findAll().get(0);
         double SetPrice = alert.getPrice();
        JSONParser jsonParser = new JSONParser();

        final NotificationRequest build = NotificationRequest.builder()
                .title("bitcoin alert")
                .message(SetPrice + "broke down")
                .token(notificationService.getToken(userDetailService.returnUser().getEmail()))
                .build();

        try {
            final WebsocketClientEndpoint clientEndPoint = new WebsocketClientEndpoint();

            Session session = clientEndPoint.connect(new URI("wss://ws.coincap.io/prices?assets=bitcoin"));

            WebsocketClientEndpoint.MessageHandler handler = new WebsocketClientEndpoint.MessageHandler() {
                public void handleMessage(String message) throws ParseException, IOException {
                    Object obj = jsonParser.parse(message);

                    JSONObject jsonObject = (JSONObject) obj;
                    System.out.println(jsonObject);

                    double price = Double.parseDouble(jsonObject.get("bitcoin").toString());

                    if (price < SetPrice) {
                        System.out.println("끝");
                        notificationService.sendNotification(build);
                        session.close();
                    }

                    try {
                        Thread.sleep(1000);
                    } catch (InterruptedException ex) {
                        System.err.println("InterruptedException exception: " + ex.getMessage());
                    }
                }
            };

            clientEndPoint.addMessageHandler(handler);

        } catch (URISyntaxException ex) {
            System.err.println("URISyntaxException exception: " + ex.getMessage());
        }
    }
하한선 가격을 밑으로 가격이 떨어지면 NotificationService의 sendNotification을 통하여 메시지를 보내줍니다
    public void sendNotification(final NotificationRequest request) {
        try {

            fcmService.send(request);
        } catch (InterruptedException | ExecutionException e) {
            logger.error(e.getMessage());
        }
    }
원하는 대로 웹 푸시 알림이 잘 오는 것을 확인할 수 있습니다
참고
https://velog.io/@skygl/FCM-Spring-Boot%EB%A5%BC-%EC%82%AC%EC%9A%A9%ED%95%98%EC%97%AC-%EC%9B%B9-%ED%91%B8%EC%8B%9C-%EA%B8%B0%EB%8A%A5-%EA%B5%AC%ED%98%84%ED%95%98%EA%B8%B0
https://firebase.google.com/docs/cloud-messaging/fcm-architecture?hl=ko
