오늘은 상위 1% 개발자가 사용하는 (아마 들어본 적도 없는) Python 코드 저장소를 살펴보겠습니다.
이 글은 개발자들의 수익창출 서비스 Quine의 DevRel Lead인 Bap이 게시한 🐍 8 backend repos used by the top 1% of python devs 🏆를 번역한 글입니다.
상위 1% 개발자들이 사용하는 코드 저장소를 어떻게 찾을 수 있나요?
Quine에서는 DevRank를 기준으로 개발자들의 순위를 매깁니다.
DevRank는 Google의 페이지랭크 알고리즘을 사용하여 오픈소스에 대한 기여도를 바탕으로 얼마나 개발자가 오픈소스 생태계에서 중요한지 측정합니다.
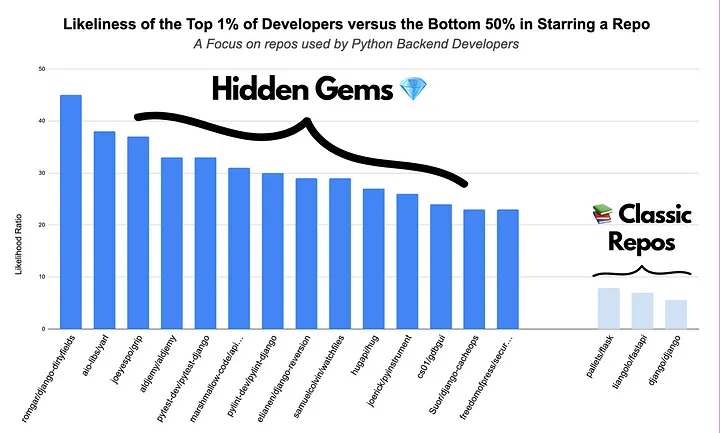
우리는 상위 1% 개발자가 별표를 표시한 저장소를 살펴봅니다. 그다음 하위 50%의 개발자가 그렇지 않을 확률과 상위 1% 개발자가 별표를 표시할 확률을 계산합니다.
마지막으로, 인간의 선택으로 마지막 8개의 저장소를 찾았습니다.
대략적인 사용량 측정 방식으로 별표 표시를 사용했습니다. 이 방법은 완벽하지 않지만 최고의 개발자들이 선호하는 도구에 대한 통찰력을 얻을 수 있습니다.
이러한 저장소는 강력한 백엔드로 프로젝트를 구축하는데 특히 유용합니다.
🕸️ aio-libs/yarl
당신이 들어보지 못한 URL 라이브러리
Yarl은 Yarl은 Python에서 쉽고 효율적인 URL 관리 및 분석을 위해 설계되었습니다. 인코딩 및 디코딩을 처리하므로 간단한 방법으로 URL을 생성, 분석 및 수정할 수 있습니다.
https://github.com/aio-libs/yarl
from yarl import URL
url = URL('https://www.python.org/~guido?arg=1#frag')

# All url parts: scheme, user, password, host, port, path, query and fragment are accessible by properties:

>>> url.scheme
'https'
>>>  url.host
'www.python.org'
>>> url.path
'/~guido'
>>> url.query_string
'arg=1'
>>> url.query
<MultiDictProxy('arg': '1')>
>>> url.fragment
'frag'
🗃️ Suor/django-cacheops
당신의 새로운 캐싱 베스트 프렌드
https://github.com/Suor/django-cacheops
Django-cacheops는 Redis를 사용하여 자동 쿼리 캐싱 및 이벤트 기반 자동 캐싱을 포함한 고급 캐싱 기능을 제공하는 Django 애플리케이션입니다. 데이터 로드를 줄여 Django 애플리케이션 속도를 높일 수 있으며 기능 및 뷰 캐싱과 같은 기능을 갖추고 있습니다.
역주 : 간단한 데코레이터를 제공합니다. 메인 로직이 캐시 관리 로직에 방해받지 않도록 코드를 작성하기 쉽습니다.
# Function caching
from cacheops import cached_as

@cached_as(Article, timeout=120)
def article_stats():
    return {
        'tags': list(Article.objects.values('tag').annotate(Count('id')))
        'categories': list(Article.objects.values('category').annotate(Count('id')))
    }
👀 samuelcolvin/watchfiles
Python의 파일 감시 그리고 코드 재시작
https://github.com/samuelcolvin/watchfiles
Watchfile은 변경할 때마다 자동으로 코드를 재설정하므로 필수적입니다. 즉, 콘텐츠를 업데이트할 때마다 서버를 다시 시작할 필요가 없습니다. 또한 다양한 프로젝트에 대한 설치 및 작업이 매우 쉽기 때문에 개발 프로세스가 더욱 원활하고 효율적으로 이루어집니다.
역주 : 개발 환경에서 watchfiles를 이용하면 불필요하게 소모되는 코드 재실행 시간을 단축할 수 있습니다.
from watchfiles import watch

for changes in watch('./path/to/dir'):
    print(changes)
🧪 FactoryBoy/factory_boy
가장 현실적인 가짜 데이터로 테스트하세요.
https://github.com/FactoryBoy/factory_boy
Factory_boy는 Python 애플리케이션을 테스트하기 위해 가짜이지만 현실적인 데이터를 빠르게 생성하는 데 도움이 되는 도구입니다. 필요한 테스트 케이스를 자동으로 생성할 수 있는 보조자가 있는 것과 같습니다. 이렇게 하면 애플리케이션이 다양한 상황에서 제대로 작동하는지 확인하기가 더 쉬워집니다.
import factory
from . import models

class UserFactory(factory.Factory):
    class Meta:
        model = models.User

    first_name = 'John'
    last_name = 'Doe'
    admin = False

# Another, different, factory for the same object
class AdminFactory(factory.Factory):
    class Meta:
        model = models.User

    first_name = 'Admin'
    last_name = 'User'
    admin = True

class FooTests(unittest.TestCase):

    def test_with_factory_boy(self):
        # We need a 200€, paid order, shipping to australia, for a VIP customer
        order = OrderFactory(
            amount=200,
            status='PAID',
            customer__is_vip=True,
            address__country='AU',
        )
        # Run the tests here

    def test_without_factory_boy(self):
        address = Address(
            street="42 fubar street",
            zipcode="42Z42",
            city="Sydney",
            country="AU",
        )
        customer = Customer(
            first_name="John",
            last_name="Doe",
            phone="+1234",
            email="john.doe@example.org",
            active=True,
            is_vip=True,
            address=address,
        )
        # etc.
💽 hugapi/hug
최대한 간단한 API 개발
Hug는 Python에서 API를 쉽게 생성할 수 있는 프레임워크이며 코드를 최대한 보호하도록 설계되었습니다. 자체 문서화 코드 지원을 위해 제작되어 개발을 더욱 직관적으로 만듭니다.
역주 : WSGI 백엔드 지원, Testing, Versioning, Asyncio을 지원합니다.
# Build an example API with a simple endpoint in just a few lines.

# filename: happy_birthday.py
"""A basic (single function) API written using hug"""
import hug


@hug.get('/happy_birthday')
def happy_birthday(name, age:hug.types.number=1):
    """Says happy birthday to a user"""
    return "Happy {age} Birthday {name}!".format(**locals())
📑 joeyespo/grip
GitHub README.md 파일을 커밋하기 전에 로컬에서 미리 봅니다.
Grip을 사용하면 GitHub에 푸시하기 전에 GitHub의 자체 Markdown API를 사용하여 README와 같은 로컬 Markdown 아카이브를 생성할 수 있습니다. 이는 푸시하고 검토하는 시행착오 없이 파일을 GitHub에 직접 가져오는 데 유용합니다.
# To render the readme of a repository
$ cd myrepo
$ grip
  * Running on http://localhost:6419/
🔎 joerick/pyinstrument
왜, 어디에서 내 코드가 느린지 찾으세요!
https://github.com/joerick/pyinstrument
Pyinstrument는 애플리케이션 속도를 저하시키는 코드 영역을 식별하는 데 도움이 되는 성능 분석 도구입니다. 평소와 같이 스크립트를 실행하고 가장 많은 시간을 소비하는 위치에 대한 자세한 정보를 얻을 수 있으므로 코드를 보다 효율적으로 조정하는 데 도움이 됩니다.
time.time() 대신 사용할 수 있겠네요!
# Instead of writing python script.py, type pyinstrument script.py.
# Your script will run as normal, and at the end (or when you press ^C)
# Pyinstrument will output a colored summary showing where most of the time was spent.


# Pyinstrument also has a Python API. Just surround your code with Pyinstrument, like this:

from pyinstrument import Profiler

profiler = Profiler()
profiler.start()

# code you want to profile

profiler
.stop()

profiler.print()
✍️ marshmallow-code/apispec
가능한 API 스펙 제너레이터 플러그인
https://github.com/marshmallow-code/apispec
Apispec은 OpenAPI 사양에 대한 특정 지원을 포함하는 API 문서를 생성하기 위한 도구입니다. 이는 API 엔드포인트에 대한 명확하고 구조화된 문서를 자동으로 생성합니다.
from apispec import APISpec
from apispec.ext.marshmallow import MarshmallowPlugin
from apispec_webframeworks.flask import FlaskPlugin
from flask import Flask
from marshmallow import Schema, fields


# Create an APISpec
spec = APISpec(
    title="Swagger Petstore",
    version="1.0.0",
    openapi_version="3.0.2",
    plugins=[FlaskPlugin(), MarshmallowPlugin()],
)

# Optional marshmallow support
class CategorySchema(Schema):
    id = fields.Int()
    name = fields.Str(required=True)


class PetSchema(Schema):
    category = fields.List(fields.Nested(CategorySchema))
    name = fields.Str()


# Optional security scheme support
api_key_scheme = {"type": "apiKey", "in": "header", "name": "X-API-Key"}
spec.components.security_scheme("ApiKeyAuth", api_key_scheme)


# Optional Flask support
app = Flask(__name__)


@app.route("/random")
def random_pet():
    """A cute furry animal endpoint.
    ---
    get:
      description: Get a random pet
      security:
        - ApiKeyAuth: []
      responses:
        200:
          content:
            application/json:
              schema: PetSchema
    """
    pet = get_random_pet()
    return PetSchema().dump(pet)


# Register the path and the entities within it
with app.test_request_context():
    spec.path(view=random_pet)
우리의 발견이 가치 있고 강력한 백엔드를 구축하는데 도움이 되기를 바랍니다.
이 글의 원본은 dev.to에 게시되어 있습니다.