Spring에서 스케줄러를 사용하는 방법은 여러가지가 있다.(Spring Scheduler,Spring Quartz....)
나는 그 중 Spring Quartz를 사용해보기로 했다.
Spring Quartz란?
Spring 프레임워크와 Quartz 스케줄러를 통합하여 스케줄링 기능을 지원하는 라이브러리로 설정이 다소 복잡하지만 복잡한 요구사항을 충족할 수 있는 강력한 스케줄링 기능을 제공한다!
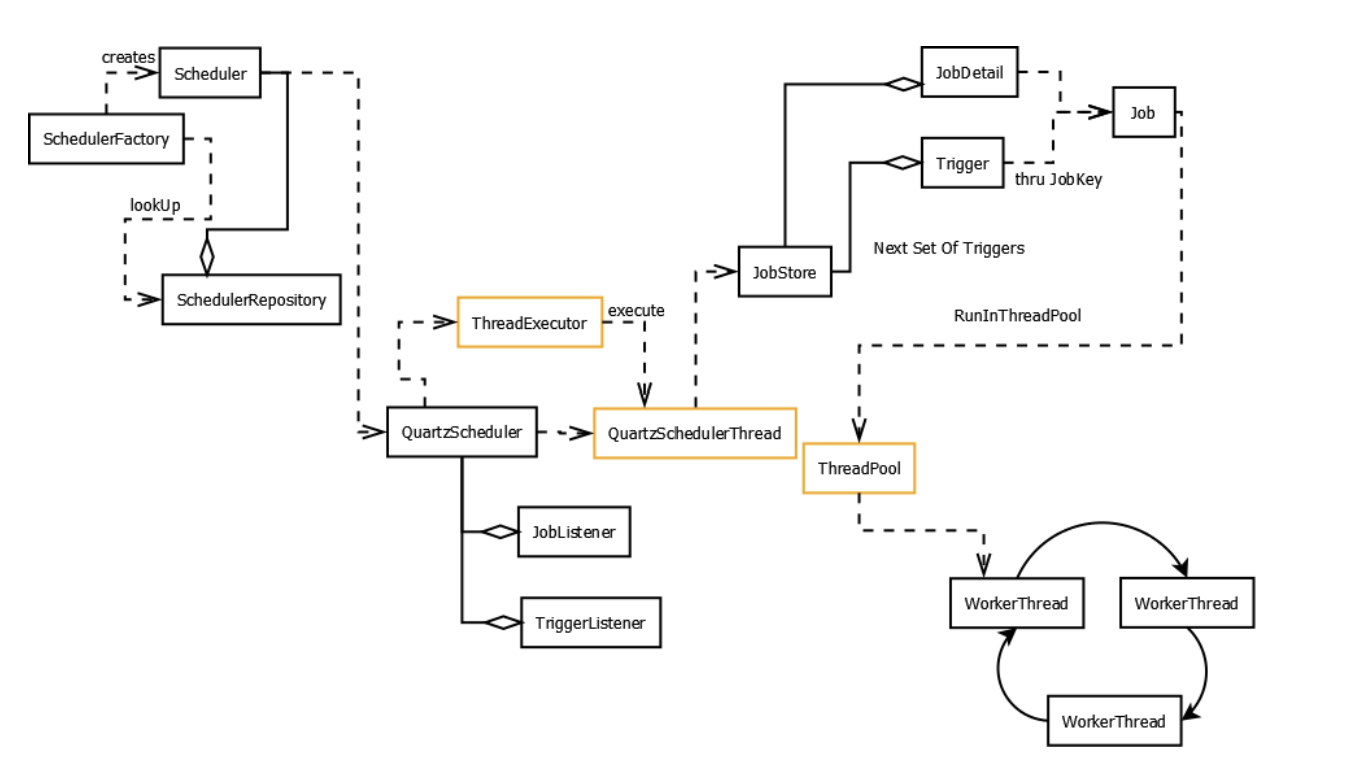
Quartz로 스케줄링을 하기 위해서는 3개의 요소가 필수적으로 필요하다
1. Job(interface)
실제 수행되어야 할 작업을 정의하는 인터페이스이다.
해당 인터페이스의 execute 메서드를 Override 하여 실행할 로직을 작성한다.
public MyJob interface Job {
    void execute(JobExecutionContext context) throws JobExecutionException{
    /*구현*/
    };
}
2. JobDetail
Job의 세부 정보를 정의하는 클래스로 스케줄러가 Job을 어떻게 실행할지에 대한 정보를 제공한다.
JobDetail은 실행할 Job 클래스와 해당 Job의 고유 식별자인 JobKey를 가지고 있는데 JobKey는 이름과 그룹으로 구성되어 있으며, 스케줄러 내에서 Job을 식별하는 데 사용된다.
   JobDetail job = newJob(MyJob.class)
            .withIdentity("myJob")
            .build();
3. Trigger
Job을 언제 실행할지 정의하는 클래스이다.
[구성요소]
TriggerKey: Trigger의 고유 식별자로, 이름과 그룹으로 구성됨.
Start Time: Job이 처음 실행될 시간.
End Time: Job이 더 이상 실행되지 않을 시간.
Schedule: Job이 실행될 주기를 정의하는 스케줄. --- SimpleSchedule : 단순하게 일정한 시간 간격으로 반복 실행되는 트리거
-- CronSchedule : cron 표현식을 사용하여 복잡한 스케줄을 정의할 수 있는 트리거
Misfire Instructions: Trigger가 실행되어야 할 시점에 실행되지 못했을 때 어떻게 처리할지를 정의.
//SimpleSchedule
Trigger trigger = newTrigger()
       .withIdentity("myTrigger","myGroup")
       .startNow()           				   .withSchedule(simpleSchedule()                  .withIntervalInSeconds(10)//10초마다 실행
           .repeatForever())
       .build();

//CronSchedule
Trigger trigger = newTrigger()
       .withIdentity("myTrigger","myGroup")  		.withSchedule(cronSchedule("0 0 9 * * ?"))
       .build();
Quartz 사용해보기
우선...스케줄러를 적용하고 테스트해보기 위해서는 지속적으로 변동되는 데이터가 필요한데 그 데이터를 어디서 가져올까~ 하다가 네이버 증권 > 검색상위 종목을 크롤링하여 가져오기로 했다. 장 열리는 시간엔 주가랑 순위가 계속 변동되니까!
1. dependency 추가
먼저 quartz 라이브러리를 추가해준다!
implementation group: 'org.springframework.boot', name: 'spring-boot-starter-quartz', version: '2.3.2.RELEASE'2. 크롤링 설정
실시간으로 변동되는 데이터를 가져오기 위해 네이버페이 증권의 검색상위 종목을 크롤링할 수 있는 클래스를 만들어준다. 데이터는 순위, 종목명, 현재가 정도만 가져오기로 했다
public class NaverFinance {
    private static final String URL = "https://finance.naver.com/sise/lastsearch2.naver";
    public static void crawling(){
    try{
        Document doc;
        doc = Jsoup.connect(URL)
                .userAgent("Mozilla/5.0 (Windows NT 10.0; Win64; x64) AppleWebKit/537.36 (KHTML, like Gecko) Chrome/91.0.4472.124 Safari/537.36")
                .get();
        Elements numberElements = doc.select("td.no");
        Elements titleElements = doc.select("a.tltle");
        Elements priceElements = doc.select("td.number:nth-of-type(4)");

        //데이터를 담을 List
        List<Map<Object, String>> list = new ArrayList<>();

        //데이터 담기
        for(int i=0; i<numberElements.size(); i++){
            Element numberElement = numberElements.get(i);
            Element titleElement = titleElements.get(i);
            Element priceElement = priceElements.get(i);

            String number = numberElement.text();
            String title = titleElement.text();
            String currentPrice = priceElement.text();

            Map<Object, String> map = new HashMap<>();
            map.put("number", number);
            map.put("title", title);
            map.put("currentPrice", currentPrice);
            list.add(map);
        }

    }catch (Exception e){
        e.printStackTrace();
    }
    }
}
3. Job 설정
실제 수행 작업을 정의할 Job 클래스를 만들어준다
public class MyJob implements Job {

    @Override
    public void execute(JobExecutionContext context) throws JobExecutionException {
        try {
            NaverFinance.crawling();
        } catch (Exception e) {
            e.printStackTrace();
            throw new JobExecutionException(e);
        }
    }
4. JobListener 설정
실제로 job 상태가 잘 로깅되는지 확인하기 위해 JobListener 클래스도 만들어준다~~
//Job 상태 로깅
public class MyJobListener implements JobListener {

    // JobListener의 이름
    @Override
    public String getName() {
        return MyJobListener.class.getName();
    }

    //Job 수행 전 상태
    @Override
    public void jobToBeExecuted(JobExecutionContext context) {
        System.out.println(String.format("[%-18s][%s] Job 작", "jobToBeExecuted", context.getJobDetail().getKey().toString()));
    }

    //Job 중단 상태
    @Override
    public void jobExecutionVetoed(JobExecutionContext context) {
        System.out.println(String.format("[%-18s][%s] Job 단", "jobExecutionVetoed", context.getJobDetail().getKey().toString()));
    }

   //Job 수행 완료 상태
    @Override
    public void jobWasExecuted(JobExecutionContext context, JobExecutionException jobException) {
        System.out.println(String.format("[%-18s][%s] Job 료", "jobWasExecuted", context.getJobDetail().getKey().toString()));
    }

}
5. Application 설정
이제 Job을 실행하기 위해 스케줄러를 Application에 설정해준다
@SpringBootApplication
public class BatchExampleApplication {

    public static void main(String[] args) throws SchedulerException {
        SpringApplication.run(BatchExampleApplication.class, args);

        // SchedulerFactory 생성 및 Scheduler 인스턴스 생성
        SchedulerFactory schedFact = new org.quartz.impl.StdSchedulerFactory();
        Scheduler sched = schedFact.getScheduler();
        sched.start();

        // 실행할 Job
        JobDetail job = newJob(MyJob.class)
                .withIdentity("myJob")
                .build();

        // 실행 주기 : 10초마다 반복
        Trigger trigger = newTrigger()
                .withIdentity("myTrigger")
                .startNow()
                .withSchedule(simpleSchedule()
                        .withIntervalInSeconds(5)
                        .repeatForever())
                .build();

        // Listener 추가
        sched.getListenerManager().addJobListener(new MyJobListener());

        // Scheduler에 job, trigger 등록
        sched.scheduleJob(job, trigger);
        }
        }
6. 실행
설정이 다 끝났으니 Application 을 실행해보자~
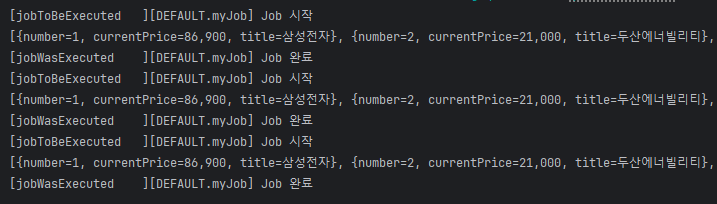
10초 간격으로 스케줄러가 정상적으로 수행된당ㅎㅎㅎㅎ