
💫 Window 객체
- 모든 객체가 포함된
최상위 객체 - 전역객체
- 웹 브라우저의 창(window)을 제어
- 식별자
window를 통해서 접근이 가능하며, 호출 시 생략도 가능하다.
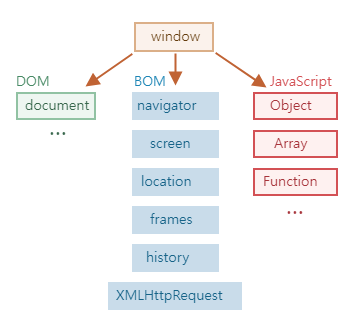
Window 객체 구조
브라우저 새 창 열기
- window.open(URL, Name, Option);
1. URL : 새 창의 URL
2. Name : 새 창 이름 > 중복창 제어
3. Option : 새 창 옵션들
var child; // 전역변수

function m1() {
	window.open('https://naver.com', 'child', '');
	child = window.open('ex16_child.html', 'child', 'width=500 height=300 left=0 top=0');
}
브라우저 창 닫기
- window.close()
1. Screen 객체
- window > screen
- 사용자의 디스플레이 화면에 대한 다양한 정보를 저장하는 객체
현재 사용자의 화면 크기
- screen 객체의 width와 height 프로퍼티는 사용자의 디스플레이 화면의 크기를 픽셀 단위로 반환한다.
console.log('현재 사용자의 디스플레이 화면의 너비: ' + window.screen.availWidth);
console.log('현재 사용자의 디스플레이 화면의 높이: ' + window.screen.availHeight);
한 색상당 사용할 수 있는 비트 수
- screen 객체의 colorDepth 프로퍼티는 사용자 화면에서 한 색상당 사용할 수 있는 비트 수를 반환한다.
- 대부분의 컴퓨터는 24비트의 트루 컬러(true colors)나 30/36/48비트의 디프 컬러(deep colors)를 사용한다.
console.log(window.screen.colorDepth); // 24웹 페이지 화면 방향(가로/세로)
console.log(window.screen.orientation); // ScreenOrientation {angle: 0, type: 'landscape-primary', onchange: null}2. Location 객체
- window > location
- 현재 브라우저의 페이지(URL)와 관련된 행동
현재 문서의 읽기 기능
console.log(location.host);        // 127.0.0.1:5500
console.log(location.hostname);    // 127.0.0.1
console.log(location.port);        // 5500
console.log(location.protocol);    // http:
현재 문서의 ULR 주소 ★★★
- href 프로퍼티는 현재 문서의 전체 URL 주소를 문자열로 반환한다.
console.log("현재 문서의 주소는 " + location.href + "입니다.");

// 페이지 이동
window.location.href = 'https://naver.com';

// 새로고침
window.location.href = 'ex18_location.html';
현재 문서 새로고침
window.location.reload();3. History 객체
- window > history
- 브라우저의 히스토리(탐색기록)을 접근(제어)
히스토리 목록 접근하기
window.history.back();  // 뒤로가기
history.forward(); 		// 앞으로 가기


history.go(-2);	// 2칸 뒤로
history.go(1);	// 1칸 앞으로
💭 전역 이벤트 : 어떤 상황에서 무슨 행동을 하던지 항상 발생하는 이벤트
// window 객체에 키 이벤트를 걸면
window.onkeydown = function() {

  if (evt.keyCode == 49) {
    window.location.href = 'https://naver.com';
  } else if (evt.keyCode == 50) {
    window.location.href = 'https://google.com';
  } else if (evt.keyCode == 51) {
    window.location.href = 'https://daum.net';
  }
}
💭 추가
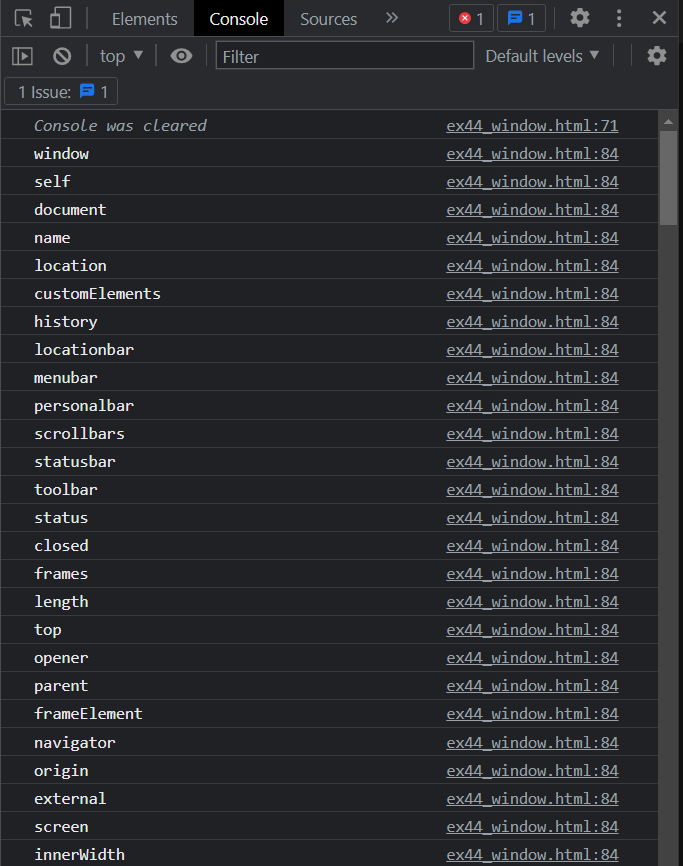
- var 선언한 전역 변수의 전역 함수는 개발자가 의지와 상관없이 무조건 window 객체의 프로퍼티로 등록이 된다.
- 향상된 for문은 프로퍼티 탐색 도구이다.
for (let p in window) {
 	console.log(p);
}
💫 BOM(Browser Object Model)
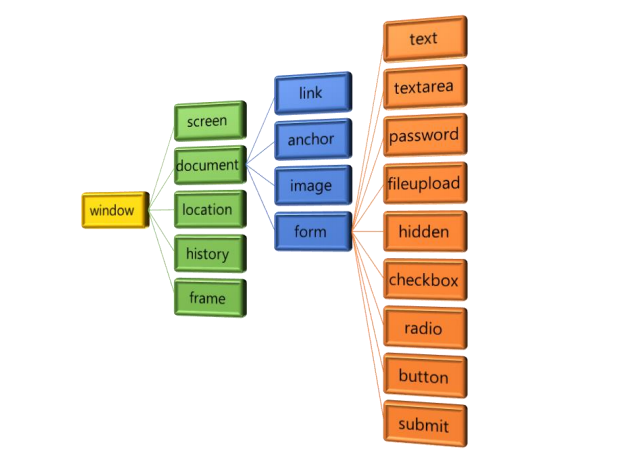
- 웹 페이지의 내용을 제외한 브라우저 창에 포함된 모든 객체 요소들을 객체화 시킨 것
- window 객체를 통해 접근이 가능하다.
- 초창기 모델
- BOM 트리에 존재하는 태그만 조작이 가능하다. (이미지, 링크, 폼 태그)
- CSS, PCDATA 조작 불가능
- 태그 접근 시
name을 사용해서접근한다. - id, class는 인식 불가능
접근 예제
<!DOCTYPE html>
<html lang="en">
<head>
  <meta charset="UTF-8">
  <meta http-equiv="X-UA-Compatible" content="IE=edge">
  <meta name="viewport" content="width=device-width, initial-scale=1.0">
  <title>BOM</title>
</head>
<body>

  <h1>BOM, Browser Object Model</h1>
  <img src="images/catty01.png" name="cat1">

  <hr>

  <form name="form1">
    <div name="div1">
      <label>이름: </label>
      <input type="text" name="txt1">
    </div>
    <div>
      <label>나이: </label>
      <input type="text" name="txt2">
    </div>
  </form>

  <script>
	// window.document.form1.txt1 - 1. 태그 검색
	// window.document.form1.txt1.value - 2. 속성 접근
	// window.document.form1.txt1.value = '홍길동'; - 3. 속성 조작
	window.document.form1.txt1.value = '홍길동';
  </script>
</body>
</html>
💫 DOM(Document Object Model)
- 웹 페이지의 모든 요소를 JavaScript를 통해 동적으로 변경 가능하다.
- window 객체의 하위객체이기 때문에 window.
document로 접근할 수 있다.(window 생략 가능) - CSS, PCDATA 조작 가능
- 발전 모델
- BOM + a
- 전역 모델로 모든 태그의 조작이 가능하다.
- 모델 : DOM Level 1 ~ 3
- name, id, class 모두 인식 가능
HTML 태그 검색 도구
- id : document.getElementById('id')
- class : document.getElementsByClassName('class')
- name : document.getElementsByName('name')
- 태그명 : document.getElementsByTagName('tag')
- 선택자
- document.querySelector('selector') > 단수 반환
- document.querySelectorAll('selector') > 복수 반환
- BOM으로 검색하던, DOM으로 검색하던 찾고난 결과는 동일한 객체이다.
alert(document.form1.txt1 === document.getElementById('txt1'))💭 getElements : 배열을 반환한다.
💭 BOM? DOM? 구분하는 TIP
- BOM - 프로퍼티 / DOM - 대부분 메서드이고, 이름이 길다.
HTML 이벤트 핸들러 추가
- document.getElementById('id').onclick = function(){ 실행할 코드 }
HTML Content 조작
- DOM만 Content 조작이 가능하다.
- content : 시작 태그와 끝 태그의 사이의 내용물
프로퍼티 종류
- innerText
- 시작 태그와 끝 태그의 사이의 문자열 읽기/쓰기 프로퍼티
- 문자열만 읽기/쓰기
- 태그를 의미없는 문자열로 취급한다. (문자열 그대로 입출력)
- 비표준(MS)
innerHTML- 시작 태그와 끝 태그의 사이의 문자열 읽기/쓰기 프로퍼티
- 문자열 +
태그 읽기/쓰기
- outerText
- 내용물 + 태그
- outerHTML
- 내용물 + 태그
textContent- 시작 태그와 끝 태그의 사이의 문자열 읽기/쓰기 프로퍼티
- innerText와 동일한 프로퍼티
- 표준
HTML 객체의 선택
- 객체 집합을 이용하면 HTML 객체를 손쉽게 선택할 수 있다.
내장 배열 or 컬렉션
- 문서 내용을 기반으로 자동 생성되는 배열
| 객체 집합 | 설명 |
|---|---|
| document.images | <img>요소를 모두 반환함 |
| document.links | <a href=""> 요소를 모두 반환함 |
| document.anchors | <a name=""> 요소를 모든 반환함 |
| document.form | <form>요소를 모두 반환함 |
| document.forms[index].elements | 특정 폼내의 모든 입력 태그 |
| document.all | 문서 내의 모든 태그 > 비표준(MS) |
links
<a href="http://naver.com" name="link1">네이버</a>

<form name="form1">
 <input type="button" name="btn1" value="버튼1">
</form>

<script>
 document.form1.btn1.onclick = m1;

 function m1() {

 // 방법1.
 // document.link1

 // 방법2.
 // document.links[0]

 // 방법3.
 // document.links['link1']

 // 3.1 BOM
 document.links['link1'].href = 'http://google.com';
 document.links['link1'].target = '_blank';
 document.links['link1'].title = '구글로 이동합니다.';

 // 3.2 DOM
 document.links['link1'].innerText = '구글';   	// 비표준(MS)
 document.links['link1'].textContent = '구글';   // 표준

 document.link1.textContent = 'google';
 }
</script>
images
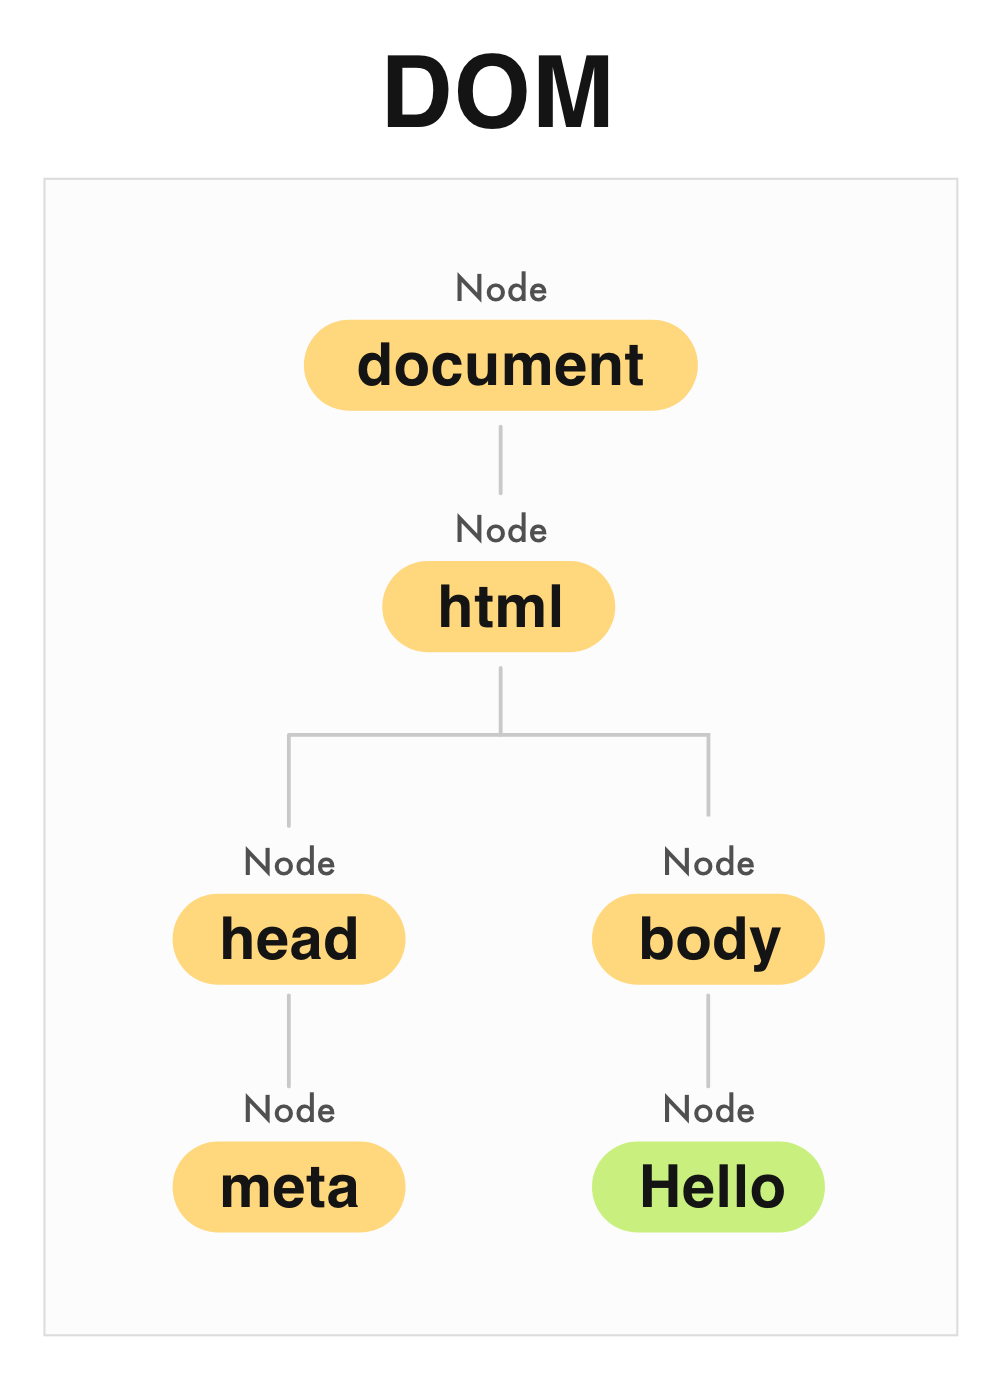
DOM 노드
- 노드(Node)
- 트리 구조
- 노드 간의 관계를 보여준다.
- 태그, PCDATA, 주석, 엔티티, 선언문, 속성 등...
노드 접근하는 방법
- getElementsByTagName() 메소드를 이용하는 방법 > 불안정함 X
- 노드 간의 관계를 이용하여 접근하는 방법
노드 프로퍼티 종류
- nodeType
- 해당 노드의 타입
- 열거형(숫자)
- 읽기 전용
| 노드 | 프로퍼티 값 |
|---|---|
| 태그 | 1 |
| 속성 | 2 |
| PCDATA | 3 |
| 주석 | 8 |
| 선언문 | 13 |
- nodeName
- 해당 노드의 이름
- 읽기 전용
| 노드 | 프로퍼티 값 |
|---|---|
| 태그 | 태그명(영문자로 대문자) |
| 속성 | 속성명 |
| PCDATA | #text |
- nodeValue
- 해당 노드의 값
| 노드 | 프로퍼티 값 |
|---|---|
| 태그 | null |
| 속성 | 해당 속성의 속성값 |
| PCDATA | 해당 텍스트 문자열 |
| 값 X | 공백 |
노드 간의 관계 태그
-
자식 노드 찾는 방법
childNodes: 자식 노드 리스트(친자식)
firstChild: 첫 번째 자식 노드(= me.childNodes[0])
lastChild: 마지막 자식 노드(= me.childeNodes[me.childNodes.length - 1]) -
자식 태그 찾는 방법
children: 자식 태그 리스트
firstElementChild: 첫번째 자식 태그 (= me.children[0])
lastElementChild: 마지막 자식 태그 (= me.children[me.children.length - 1] -
부모 & 조상 노드 / 태그 찾는 방법
parentNode
parentElement -
형제 노드 찾는 방법
previousSibling: 본인 노드 기준으로 바로 위의 형제
nextSibling: 본인 노드 기준으로 바로 밑의 형제 -
형제 태그 찾는 방법
previousElementSibling: 본인 노드 기준으로 바로 위의 형제
nextElementSibling: 본인 노드 기준으로 바로 밑의 형제
💭 추가
- DOM 트리구조의 최상위 노드 : document 객체
- html 태그의 부모는 태그가 아니다 -> node로 접근해야 한다.
alert(me.parentElement.parentElement.parentElement.parentElement.parentNode);
- XXXList > 배열
class 속성은 javaScript에서className으로 사용- class 속성 제어 프로퍼티
- className : 단일 클래스 - BOM
- classList : 다중 클래스(배열) - DOM
  <div class="check one two three">     > 클래스 여러개 가능
  me.className = 'check one two three'; > 유지보수 하기 어렵다. 조작하기 어렵다.

  me.classList.add('check');
  me.classList.add('two');
  me.classList.add('three');

  me.classList.remove('check');
태그 노드의 생성
- 생성할 노드의 종류에 따라 다음과 같은 메소드를 사용할 수 있다.
- createElement()
- createAttribute()
- 같은 이름의 속성 노드가 이미 존재하면, 기존의 속성 노드는 새로운 속성 노드로 대체된다.
이미 존재하는 요소 노드에 속성 노드를 생성하고자 할 때에는 setAttribute() 메소드를 사용할 수 있다.
- createTextNode()
[1번 예제]
function createNode() {
    var criteriaNode = document.getElementById("text"); // 기준이 되는 요소로 아이디가 "text"인 요소를 선택함.

    var newNode = document.createElement("p");          // 새로운 <p> 요소를 생성함.
    newNode.innerHTML = "새로운 단락입니다.";
    document.body.insertBefore(newNode, criteriaNode);  // 새로운 요소를 기준이 되는 요소 바로 앞에 추가함.
}
[2번 예제]
// 방법1.
function createNode() {
    var text = document.getElementById('text');           // 아이디가 "text"인 요소를 선택함.

    var newAttribute = document.createAttribute('type');  // 새로운 type 속성 노드를 생성함. type=""
    newAttribute.value = 'text';                          // type="text"
    text.setAttributeNode(newAttribute);                  // 해당 요소의 속성 노드로 추가함. <input type="text"> 연결 시켜줌
}

//방법2
text.setAttribute('type','text');
text.setAttribute('size', 50); // <input type="text" size="50">
div1.appendChild(input); // 우리 눈에 보이게 해줌
[3번 예제]
function createNode() {
    var elementNode = document.getElementById("text");           // 아이디가 "text"인 요소를 선택함.

    var newText = document.createTextNode("새로운 텍스트에요!"); // 새로운 텍스트 노드를 생성함.
    elementNode.appendChild(newText);                            // 해당 요소의 자식 노드로 추가함.
}
[예제]
function m2() {

  // 고양이 x 5
  for (var i=1; i<=5; i++) {
    // div1.innerHTML += '<img>';

    // 1. 태그를 만들자.
    var img = document.createElement('img');

    // 2. 속성을 만들자.
    img.setAttribute('src', 'images/cat0' + i + '.jpg');
    img.setAttribute('title', '고양이' + i);

    // + 이벤트를 추가하자.
    img.addEventListener('click', f2);

    // 3. 우리 눈에 보이게 하자.
    // div1.appendChild(img); // 막내로 추가
    // div1.append(img); // 막내로 추가
    // div1.prepend(img);  // 첫째로 추가
  }
}