Thymeleaf 란?
- 템플릿 엔진 (Thyemeleaf, Freemarker, Mustache, Groovy)
- JSP와 같이
서버측에서 클라이언트가 보게될 웹 페이지를 동적으로 만드는 역할 - Spring Boot에서 공식적으로 선택한 템플릿 엔진
- 순수 HTML 페이지 기반 > 서버측 도움없이 자체적으로 실행 가능한 템플릿
Thymeleaf 사용 선언
<html xmlns:th="http://www.thymeleaf.org">Thymeleaf 표현식
1. Variable Expressions : ${...}
- 컨트롤러에서 전달된 값을 출력한다.
- JSP의 EL 표현식과 유사하다. > SpringEL
<div th:text="${data}"></div>
<div>숫자: <span th:text="${num}"></span></div>
2. Selection Variable Expressions : *{...}
- 객체/맵 프로퍼티를 출력한다.
th:object속성 값을 사용한다.
<h3>복합 데이터(객체, 맵) 프로퍼티</h3>

<!-- 변수 표현식 -->
<div>이름 : <span th:text="${dto.getName()}"></span></div>
<div>이름 : <span th:text="${dto.name}"></span></div>
<div>나이 : <span th:text="${dto.age}"></span></div>
<div>주소 : <span th:text="${dto.address}"></span></div>

<!-- 선택 변수 표현식 -->
<div th:object="${dto}">
	<div>이름 : <span th:text="*{name}"></span></div>
	<div>나이 : <span th:text="*{age}"></span></div>
	<div>주소 : <span th:text="*{address}"></span></div>
</div>
3. Message Expressions : #{...}
- 스프링 메시지를 출력한다.
- 스프링 메시지
- "전역" 문자열(모든 페이지에서 공통으로 사용 가능한 문자열)
- 다국화(국제화) 표현 > 한국어, 영어, 일본어
<h3 th:text="#{item.title}"></h3>4. Link URL Expressions : @{...}
- 링크의 URL을 출력한다.
- 매개변수 표현이 편리하다.
- Context Root Path 자동으로 삽입된다.
<a th:href="@{/m8(seq=${seq})}">링크입니다.</a>

<a href="/m8?seq=100&mode=add">링크입니다.</a>
<a th:href="@{/m8(seq=${seq}, mode=${mode})}">링크입니다.</a>
5. Fragment Expressions : ~{...}
- 조각 페이지를 삽입한다.
- JSP => <%@inlclude %>
- Spring => Tiles
📎 th:fragment=""
- 조각 페이지 정의
📎 th:insert="~{파일경로 :: 조각이름}"
- 조각 페이지 삽입
- 해당 태그는 그대로 렌더링 + 조각 페이지를 자식으로 추가한다.
📎 th:replace="~{파일경로 :: 조각이름}"
- 조각 페이지 삽입
해당 태그가 사라지고 대신 조각 페이지를 출력한다.
📎 th:include="템플릿명 :: 조각이름"
- 3.0 이후 비권장
[ex] 특정 영역을 가져오는 방법 1
<!-- sub2.html -->
<div th:fragment="title">제목입니다.</div>
위 sub2.html에 th:fragment 속성에 title라는 값이 보여진다.
다른 페이지에서 위의 fragment="title" 부분을 insert하는 예제이다.
<!-- m14.html -->
<div th:insert="~{inc/sub2.html :: title}"></div>
th:insert="~{템플릿명 :: 조각이름}"의 형태로 가져올 수 있다.
[ex] 특정 영역을 가져오는 방법 2
<!-- sub2.html -->
<div th:fragment="title">제목입니다.</div>

<div th:fragment="content">내용입니다.</div>

<div th:fragment="owner(name,tel)">
	소유주: <span th:text="${name}"></span>,
	연락처: <span th:text="${tel}"></span>
</div>
<!-- m14.html -->
<div th:insert="~{inc/sub2.html :: title}"></div>
<div th:insert="~{inc/sub2::content}"></div>
<div th:insert="~{inc/sub2::owner('아무개', '010-1234-5678')}"></div>
<div th:insert="~{inc/sub2::owner('테스트', '010-8547-8523')}"></div>- .html을 생략할 수 있다. 아래와 같이 설정해주었기 때문에
<!-- application.properties -->
# template 경로 접미사
spring.thymeleaf.suffix=.html- 출력결과

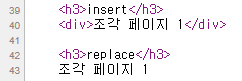
[ex] insert vs replace
<!-- sub1.html -->
조각 페이지 1
<!-- m14.html -->
<h3>insert</h3>
<div th:insert="~{inc/sub1.html}"></div>
<h3>replace</h3>
<div th:replace="~{inc/sub1.html}"></div>