
✣ 생활코딩(인프런) - React ✣
Section 6: Update & Delete 기능 구현
6-1) update 구현
UpdateContent.js 생성
update 기능을 구현하기 위해, 먼저 새로운 UpdateContent.js파일을 만들어준다. 기존의 CreateContent.js를 복사해서 사용하면 편리하다.
< UpdateContent.js >
...
class UpdateContent extends Component {
    render() {
        console.log("UpdateContent render");

      return (
        <article>
              <h2>Update</h2>
        <form action='/create_process' method='post'
          onSubmit={function(e){
            e.preventDefault();
            //debugger;
            this.props.onSubmit(
              e.target.title.value,
              e.target.desc.value
            );
            alert('Submit!!!');
          }.bind(this)}
          >
...
article, tag 이름 등을 파일에 맞게 수정해준 후 웹 사이트에서 잘 작동하는지 확인해준다.
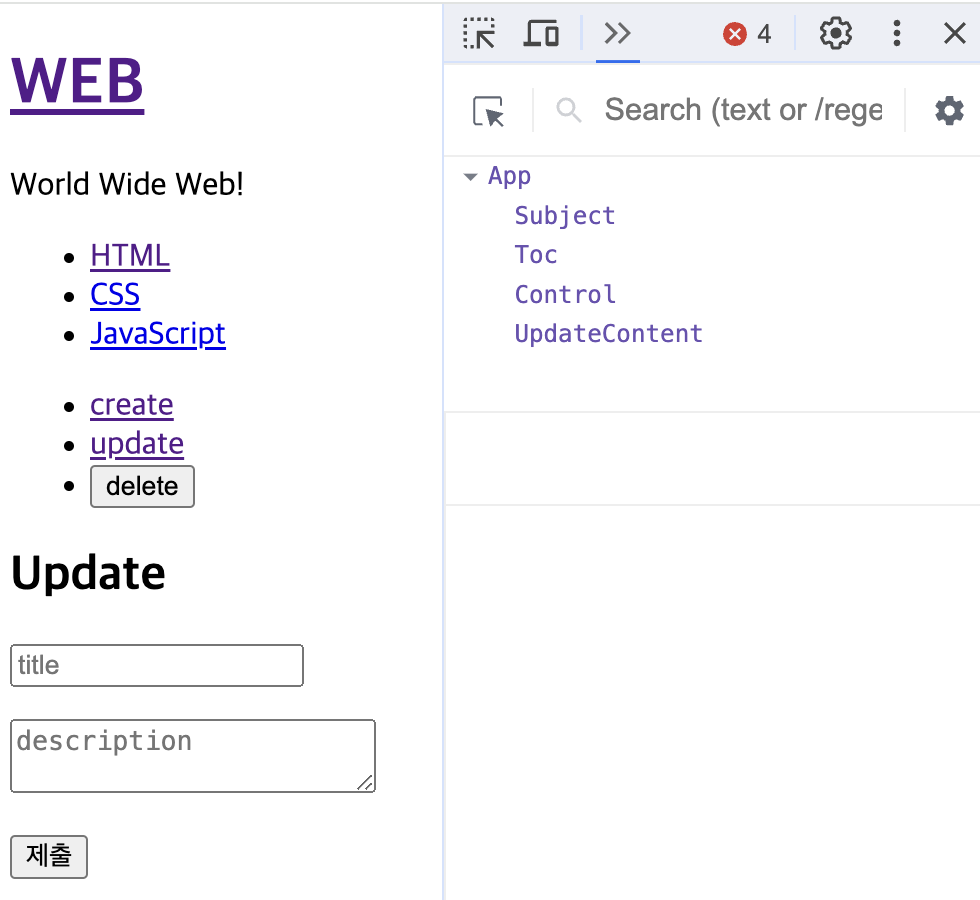
update로 잘 수정이 되었다.
render 함수 간단하게 만들기
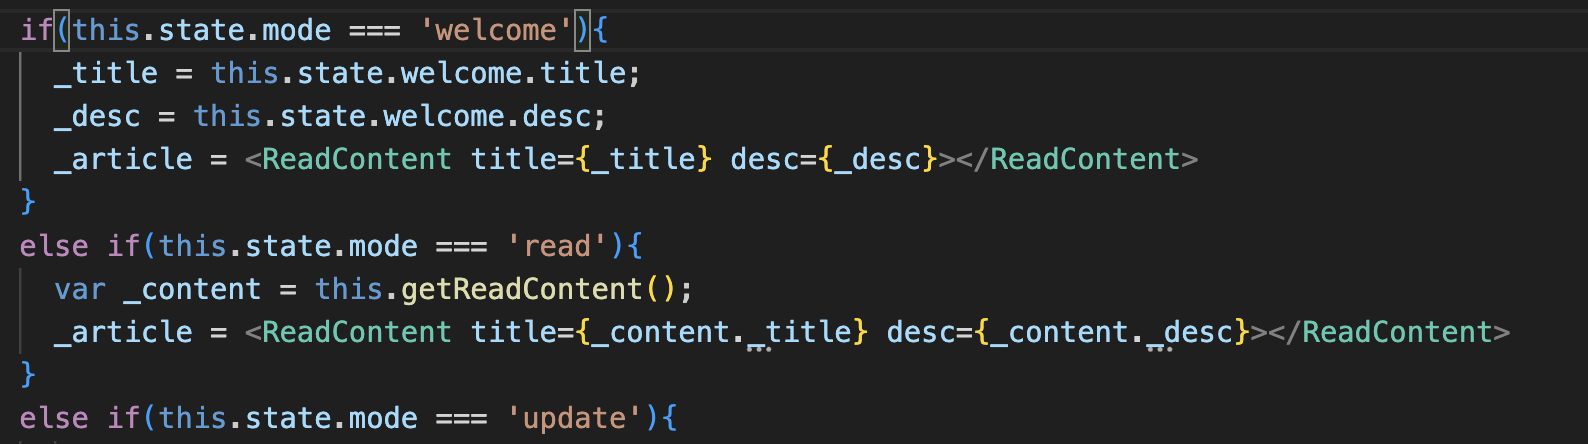
현재의 App.js를 보면, render() 함수에 너무 많은 양의 코드가 복잡하게 작성되어 있는 것을 볼 수 있다. 이를 간단하게 만들기 위해, 외부에 함수를 만들어서 대치해줄 것이다.
  getContent(){
    var _title, _desc, _article = null;

    if(this.state.mode === 'welcome'){
      _title = this.state.welcome.title;
      _desc = this.state.welcome.desc;
      _article = <ReadContent title={_title} desc={_desc}></ReadContent>
    }
    else if(this.state.mode === 'read'){
      var _content = this.getReadContent();
      _article = <ReadContent title={_content._title} desc={_content._desc}></ReadContent>
    }
    else if(this.state.mode === 'update'){
        _content = this.getReadContent();
        _article = <UpdateContent onSubmit={function(_title, _desc){
          //add content to this.state.contents
          this.max_content_id++;
          //this.state.contents.push({id:this.max_content_id, title:_title, desc:_desc});
          //this.setState({
          //  contents:this.state.contents
          //});
          /*var _contents = this.state.contents.concat(
            {id:this.max_content_id, title:_title, desc:_desc}
          )
            this.setState({
              contents:_contents
            }); */
          var newContents = Array.from(this.state.contents);
          newContents.push({id:this.max_content_id,
          title: _title,
          desc:_desc});
          this.setState({
            contents:newContents
          });
          console.log(_title, _desc);
        }.bind(this)}></UpdateContent>;
      }

      return _article;
  }
다음과 같이 getContent()함수를 만들어 _article을 반환하도록 한다. 이렇게 하면 _article을 결정하는 부분은 밖으로 빼고, return 부에 {this.getContent()}만 작성함으로서 결정된 _article을 출력하게끔 할 수 있다.
getReadContent() 함수 생성
getReadContent(){
    var i = 0;
      while(i < this.state.contents.length){
        var data = this.state.contents[i];
        if(data.id === this.state.selected_content_id){
          return data;
          break;
        }
        i++;
      }
  }
render() 함수에서 위의 부분에 해당하는 코드도 getReadContent()라는 함수로 빼서 간단하게 만들어준다.
그러면 이렇게 두 번째 else if 문을 getReadContent() 함수를 이용해 깔끔하게 만들 수 있다.
6-2) update 구현 : form
...
		<p>
            <input
              type="text"
              name="title"
              placeholder='title'
              value={this.state.title}
              onChange={this.inputFormHandler}
              ></input>
              </p>
        <p>
...
value부터의 코드를 추가하여 title 입력 칸에 기존의 title이 들어오도록 한다.
그 밑의 onChange를 쓰는 이유는 다음과 같다.
만약 update를 클릭한 후, 기존 content의 값을 title 입력 칸에 불러와서 값을 수정하려고 하면 에러가 뜨면서 되지 않는다. react에서 props 값을 바꾸지 못하도록 막는 것이다.
하지만 onChange를 써주면 값을 수정할 수 있게 되는 것이다.

이렇게 기존 title이 칸에 들어오고 수정할 수 있게 된다.(사진은 이미 완성된 코드여서 내용 입력 칸까지 채워져 있다.)
그리고 위에서 쓴 imputFormHandler() 함수의 코드는 아래와 같다.
  inputFormHandler(e){
    this.setState({[e.target.name]:e.target.value});
}onChange안에 들어가는 기능이 중복되므로 함수를 새로 만들어 사용하는 것이다.
this.inputFormHandler = this.inputFormHandler.bind(this);UpdateComponent.js의 contructor에 위의 코드 한 줄을 작성해주면, 매번 .bind(this)를 뒤에 붙여주는 수고를 덜 수 있다.
6-3) update 구현 : state 변경
onSubmit 안의 코드를 작성하여 update가 구현될 수 있게 한다.
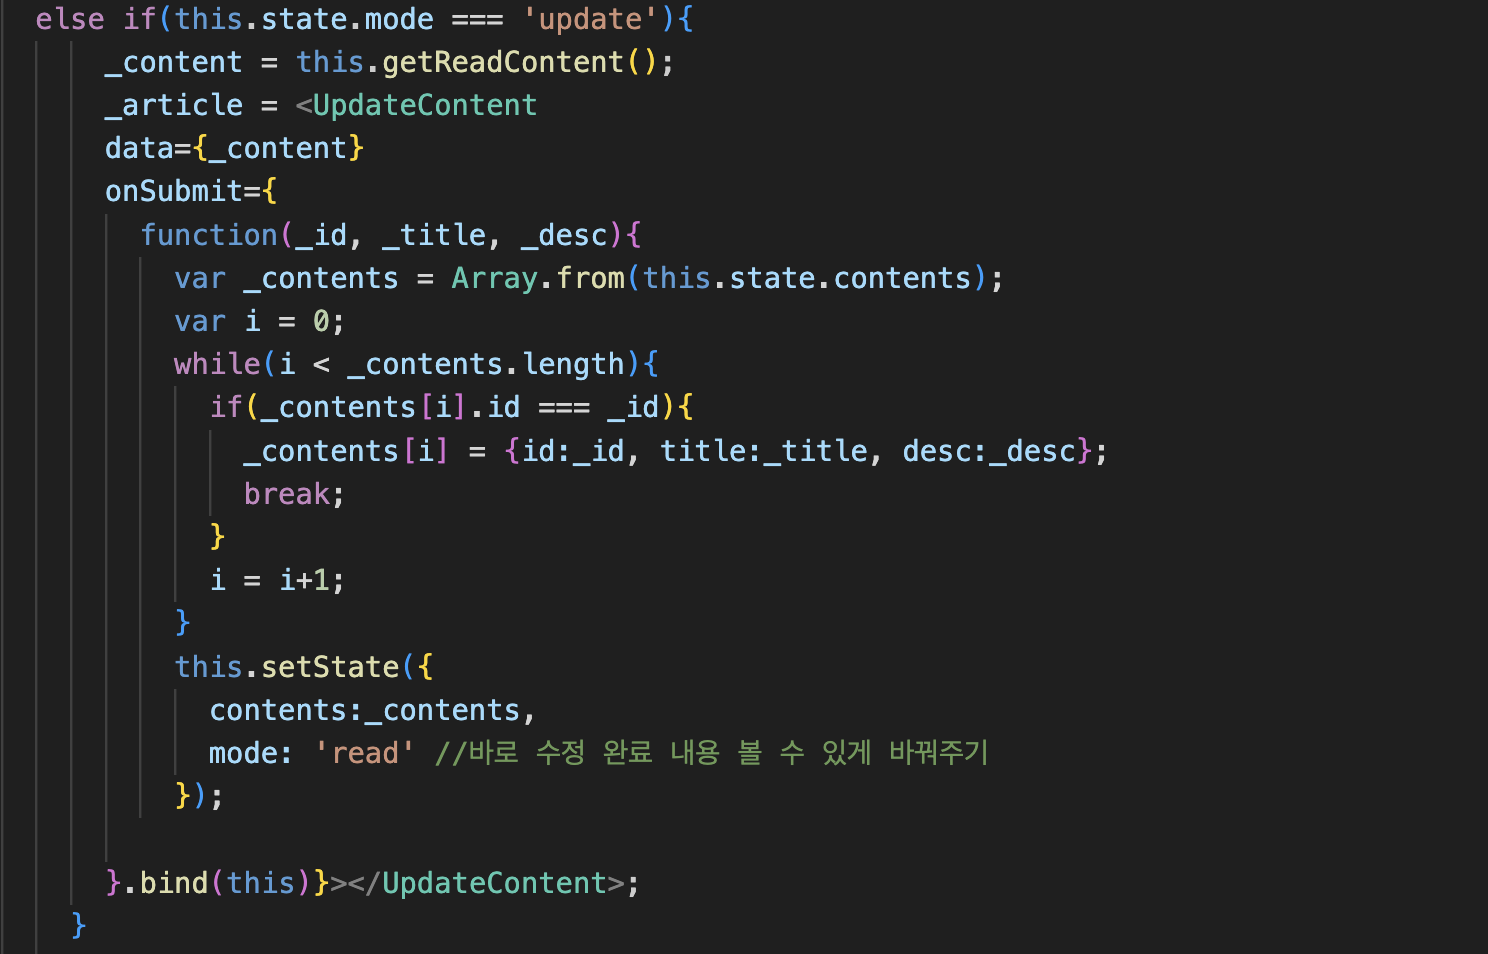
setState를 할 때 mode:'read'으로 변경해줌으로서, 수정 사항이 반영된 것을 바로 확인할 수 있게끔 한다.
6-4) delete 구현