저번에 만든것에 이어 만들어 보겠습니다.
깃허브링크 남겨두겠습니다. 완성본 파일 있습니다.
1. 과일만들기
과일을 만들기 위해서 과일이 만들어진 파일이 있어야 합니다.

public 폴더에 00 부터 10 까지 이름을 가진 과일들을 저장해 두었습니다.
이후 fruits.js 라는 이름으로 src 폴더에 js 파일을 만들어 주고
const FRUITS = [
  {
    name: "00_cherry",
    radius: 33 / 2,
  },
  {
    name: "01_strawberry",
    radius: 48 / 2,
  },
  {
    name: "02_grape",
    radius: 61 / 2,
  },
  {
    name: "03_gyool",
    radius: 69 / 2,
  },
  {
    name: "04_orange",
    radius: 89 / 2,
  },
  {
    name: "05_apple",
    radius: 114 / 2,
  },
  {
    name: "06_pear",
    radius: 129 / 2,
  },
  {
    name: "07_peach",
    radius: 156 / 2,
  },
  {
    name: "08_pineapple",
    radius: 177 / 2,
  },
  {
    name: "09_melon",
    radius: 220 / 2,
  },
  {
    name: "10_watermelon",
    radius: 259 / 2,
  },
];

export { FRUITS };
위와 같이 파일이름과 맞춘 과일을 저장해 두었습니다.
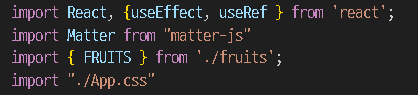
그 후 과일을 사용하기 위해 위 그림처럼 import 해 주었습니다.
2. 과일 추가하기
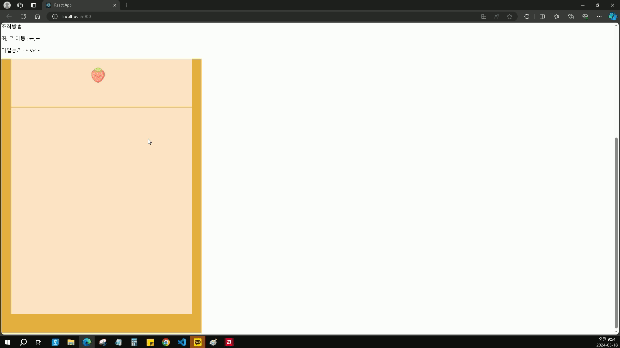
과일사진을 준비하였으니 화면에 과일을 추가해 보겠습니다.
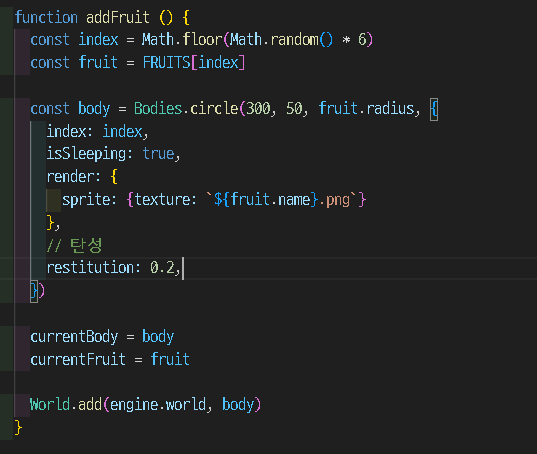
-
랜덤한 과일을 뽑기 위해
Math.floor(Math.random() * 6)으로 1부터 6중에 랜덤으로 번호를 가져오게 하였습니다. -
가져온 과일을 동그랗게 뽑기 위해 Bodies의 circle을 이용해 주었습니다.
circle에 지정된 속성값은 각각x축, y축, 반지름, 옵션순서이고 과일을 가운데에 생성하기 위해서 전체 게임판 크기의 절반인 300에 높이 50에 과일을 생성해 주었습니다. -
지정된 옵션에 현재 index번호를 저장해 주었고
isSleeping으로 과일이 바로 떨어지지 않고 특정 동작 후 떨어지게 해주었습니다. -
그 후 circle로 생성한 원 안에 과일 이미지를 넣기 위해 render를 이용해 주었습니다.
-
restitution은 말그대로 탄성으로 circle로 생성한 물체가 바닥에 닿으면 얼마나 튕기는지를 설정하는 것으로 0 ~ 1까지 설정할 수 있습니다.
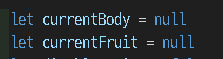
상단에 아래 코드를 입력해서 현재 생성된 물체와 과일을 저장하는 공간을 지정해 주었습니다.
이후 생성한 물체와 과일을 저장해 주고 화면에 그려주었습니다.
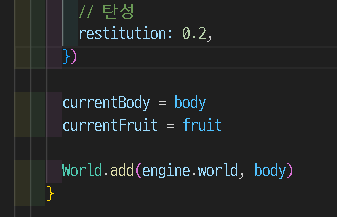
- 이 후 생성된 과일을 World에 추가해 주었습니다.
3. 과일 움직이기
Matter-js의
Mouse와MouseConstraint를 이용해 마우스로 물체를 선택할 수 도 있지만 여기선 키보드를 이용해 과일을 움직여 보겠습니다.
- 과일 좌우로 부드럽게 움직이기
- space 바로 과일 떨어뜨리기
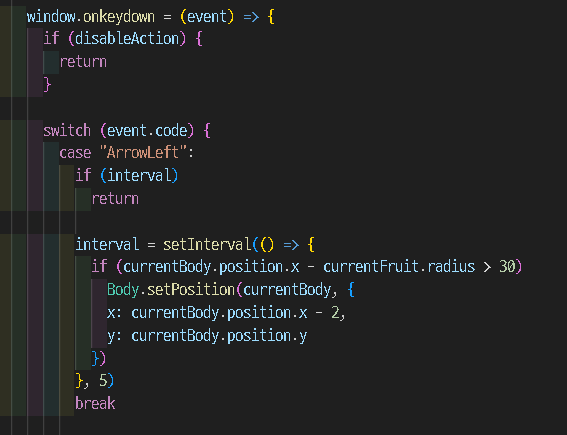
우선 과일을 움직이기 위해 window.onKeydown 을 이용해 줍니다.
window.onkeydown = (event) => {
	switch (event.code) {
    	case "ArrowLeft":
        if (currentBody.position.x - currentFruit.radius > 30)
              Body.setPosition(currentBody, {
              x: currentBody.position.x - 2,
              y: currentBody.position.y
            })
        	break

        case "ArrowRight":
        if (currentBody.position.x + currentFruit.radius < 590)
              Body.setPosition(currentBody, {
              x: currentBody.position.x + 2,
              y: currentBody.position.y
            })
        	break

        case "Space":
        currentBody.isSleeping = false
        addFruit()
        	break

    }
}-
왼쪽을 눌렀을때 현재 위치에서 과일의 반지름을 뺏을 때 30보다 크다면(왼쪽벽의크기) 그 안에서만 움직일 수 있도록 설정해 주었습니다.
-
오른쪽역시 마찬가지로 설정해 주었고
-
Space바를 눌렀을 때 isSleeping를 false로 바꾸면 과일이 떨어지게 하였습니다.
-
이후 새로운 과일을 가운데 생성하여 과일을 쌓을 수 있게 하였습니다.
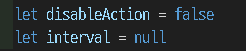
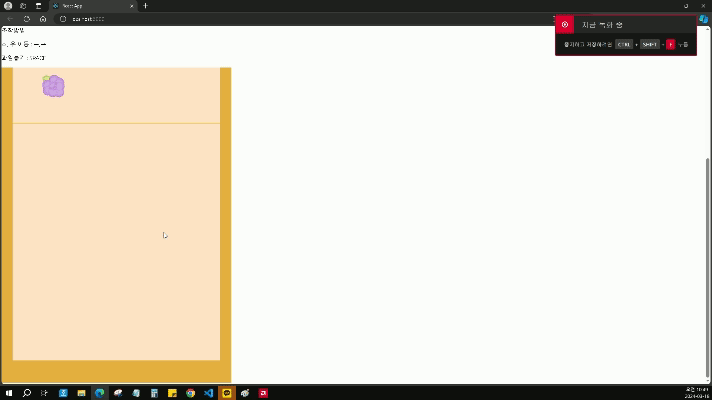
과일이 topLine에 걸리면 종료를 알리기 위한 disableAction 과 부드럽게 움직이기 위한 interval 입니다.
disableAction을 설정한 이유는 수박을 그냥 떨어트려도 게임 종료가 나와 그냥 떨어질때와 쌓아서 걸릴때를 구분하기 위함입니다.
우선 topLine을 수정해 주었습니다.

interval을 이용해 과일이 부드럽게 움직이게 설정해 주었습니다.
왼쪽키를 눌렀을때 왼쪽으로 2칸움직이는걸 5번반복해 부드럽게 움직이는 원리입니다.
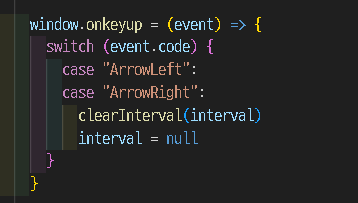
왼쪽 키를 눌렀다 떼면 intervar을 삭제해 무한루프를 돌지 않게 해주었습니다.
아래 gif 처럼 과일이 잘 떨어지는걸 볼 수 있습니다.
4. 과일 합치기
동일한 과일끼리 부딪혔을때 과일이 합쳐지게 하기 위해 Matter - js 의
Events를 이용해 주었습니다.
- 동일한 과일이 부딪히면 부딪힌 과일은 World에서 삭제되어야 하고
- 해당 자리에는 1개 커진 과일이 생성되어야 합니다.

과일이 부딪히는 이벤트를 설정하는 Events 로 body가 충돌이 시작되었을때를 감지하기 위해 collisionStart를 이용해 주었습니다.
- 충돌이 감지되면 충돌한 쌍들을 감지하여 줍니다.
- 이때 충돌이 감지된 A물체와 B물체가 감지되는데 이들의 index 즉 과일의 index 번호가 동일하다면
World.remove(engine.world, [collision.bodyA, collision.bodyB])로 삭제됩니다. - 이때 충돌된 과일의 index를 저장해 두었다가 새로운 과일을 생성하는데 사용합니다.
- 새로운 과일은 삭제된 과일의 index + 1 이기에
const newFruit = FRUITS[index + 1]로 설정해 주었습니다. - 삭제하고 생성될 과일의 자리는 충돌지점의 x좌표와 y좌표를 얻기 위해 supports를 이용해 x좌표와 y좌표를 받아옵니다.
- 그 후 반지름은 해당 과일의 반지름을 가져오고 인덱스를 새로이 저장해 줍니다.
- 마지막으로 새로 과일을 World에 추가해주어 완성하였습니다.
과일이 잘 합쳐지는걸 볼 수 있습니다.
5. 게임 종료
과일이
topLine에 부딪히면 게임을 종료하여 줍니다.

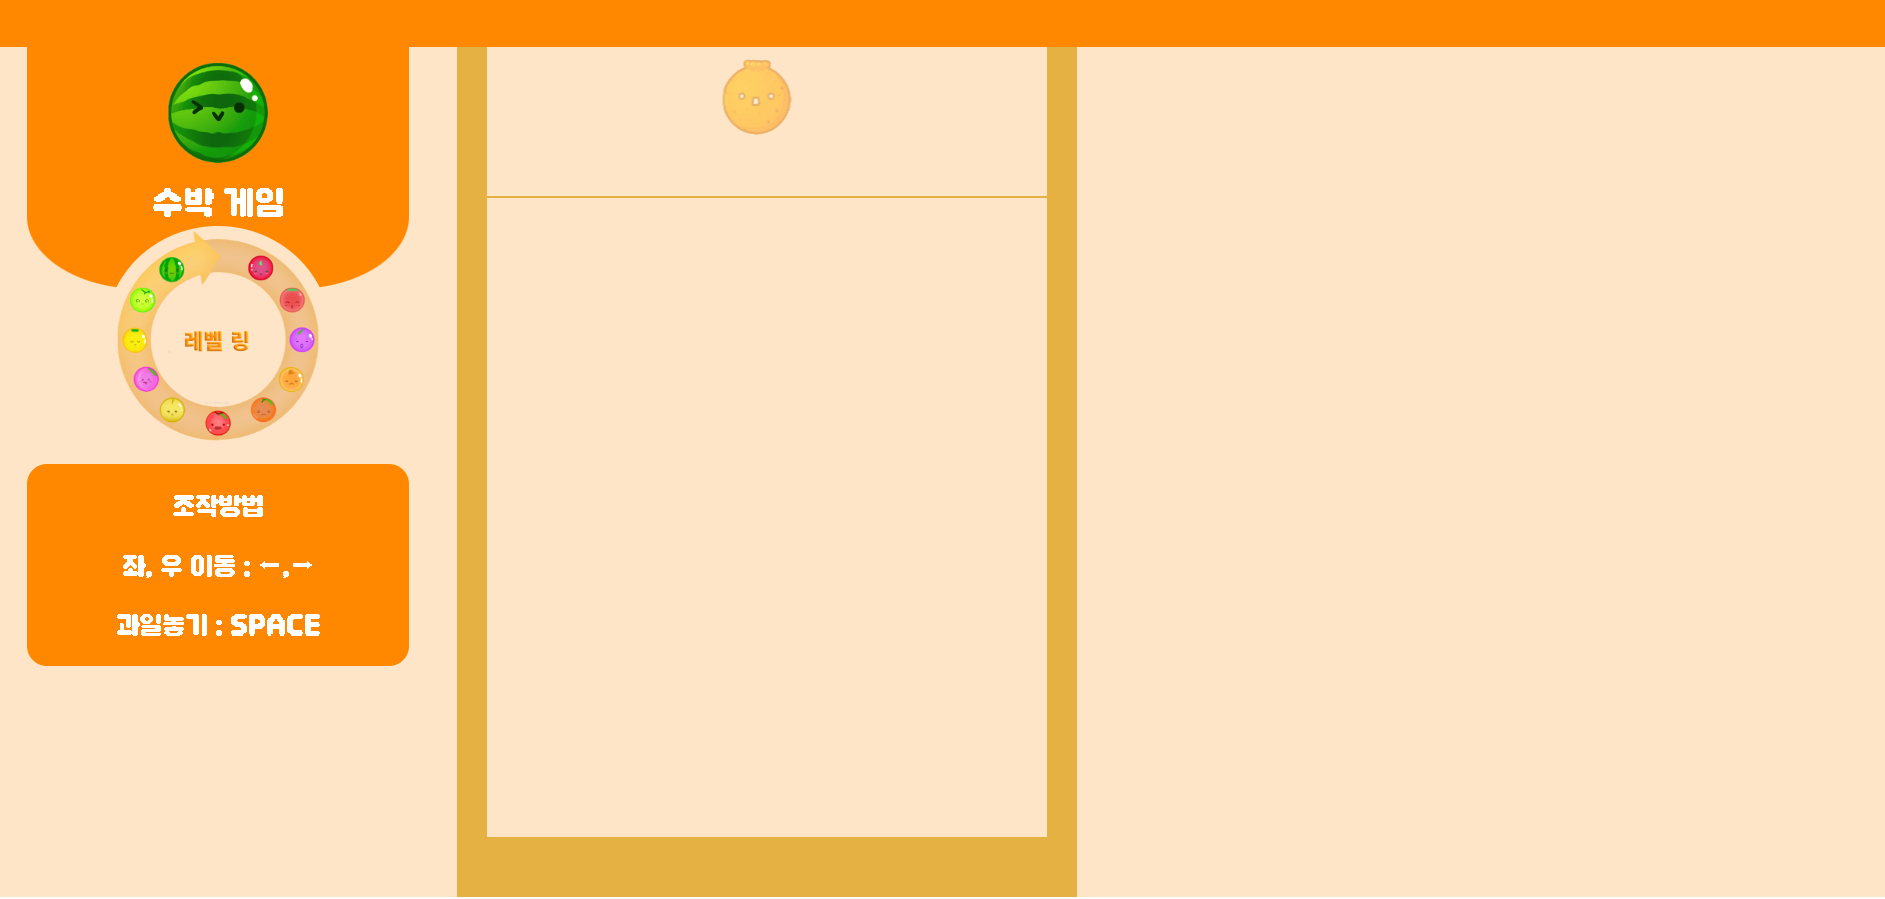
6. 전체 코드 및 디자인
간단한 디자인 과 전체코드를 올립니다.
App.js
/* eslint-disable default-case */
import React, {useEffect, useRef } from 'react';
import Matter from "matter-js"
import { FRUITS } from './fruits';
import "./App.css"
import wattermelon from "./10_watermelon.png"
import wmlevel from "./wmlevel.png"

export default function MatterGame () {
  const containerRef = useRef()
  const canvasRef = useRef(null)

  useEffect(() => {

    let currentBody = null
    let currentFruit = null
    let disableAction = false
    let interval = null

    let Engine = Matter.Engine
    let Render = Matter.Render
    let World = Matter.World
    let Body = Matter.Body
    let Bodies = Matter.Bodies
    let Events = Matter.Events

    let engine = Engine.create()

    let render = Render.create({
      element: containerRef.current,
      engine: engine,
      canvas: canvasRef.current,
      options: {
        wireframes: false,
        width: 620,
        height: 850,
        background: "#ffe5c7"
      }
    })

    const leftWall = Bodies.rectangle(15, 395, 30, 790, {
      isStatic: true,
      render: { fillStyle: "#E6B143" }
    })

    const rightWall = Bodies.rectangle(605, 395, 30, 790, {
      isStatic: true,
      render: { fillStyle: "#E6B143" }
    })

    const ground = Bodies.rectangle(310, 820, 620, 60, {
      isStatic: true,
      render: { fillStyle: "#E6B143" }
    })

    const topLine = Bodies.rectangle(310, 150, 620, 2, {
      name: "topLine",
      isStatic: true,
      isSensor: true,
      render: { fillStyle: "#E6B143" }
    })

    function addFruit () {
      const index = Math.floor(Math.random() * 6)
      const fruit = FRUITS[index]

      const body = Bodies.circle(300, 50, fruit.radius, {
        index: index,
        isSleeping: true,
        render: {
          sprite: {texture: `${fruit.name}.png`}
        },
        // 탄성
        restitution: 0.2,
      })

      currentBody = body
      currentFruit = fruit

      World.add(engine.world, body)
    }

    window.onkeydown = (event) => {
      if (disableAction) {
        return
      }

      switch (event.code) {
        case "ArrowLeft":
          if (interval)
            return

          interval = setInterval(() => {
            if (currentBody.position.x - currentFruit.radius > 30)
              Body.setPosition(currentBody, {
              x: currentBody.position.x - 2,
              y: currentBody.position.y
            })
          }, 5)
          break

        case "ArrowRight":
          if (interval)
            return

          interval = setInterval(() => {
            if (currentBody.position.x + currentFruit.radius < 590)
              Body.setPosition(currentBody, {
              x: currentBody.position.x + 2,
              y: currentBody.position.y
            })
          }, 5)
          break

        case "Space":
          currentBody.isSleeping = false
          disableAction = true

          setTimeout(() => {
            addFruit()
            disableAction = false
          }, 1000)

          break
      }
    }

    window.onkeyup = (event) => {
      switch (event.code) {
        case "ArrowLeft":
        case "ArrowRight":
          clearInterval(interval)
          interval = null
      }
    }

    addFruit()

    Events.on(engine, "collisionStart", (event) => {
      event.pairs.forEach((collision) => {
        if (collision.bodyA.index === collision.bodyB.index) {

          // 현재 과일의 index를 저장
          const index = collision.bodyA.index

          // 수박 검사 로직
          if (index === FRUITS.length - 1) {
            return
          }

          // 과일이 충돌한 경우 월드에서 삭제
          World.remove(engine.world, [collision.bodyA, collision.bodyB])

          // 새로운 과일은 현재 index + 1 이 되어야 함
          const newFruit = FRUITS[index + 1]

          const newBody = Bodies.circle(
            collision.collision.supports[0].x,
            collision.collision.supports[0].y,
            newFruit.radius,
            {
              render: {
                sprite: { texture: `${newFruit.name}.png` }
              },
              index: index + 1
            }
          )

          World.add(engine.world, newBody)
        }

        if (!disableAction && (collision.bodyA.name === "topLine" || collision.bodyB.name === "topLine")) {
          alert("Game Over")
        }
      })
    })

    World.add(engine.world, [leftWall, rightWall, ground, topLine])
    Matter.Runner.run(engine)
    Render.run(render)

  }, [])

  return (
    <div >
      <div className="game-title"></div>

      <div className="game-main" ref={containerRef}>
        <canvas ref={canvasRef}></canvas>

        <div className="game-explain">
          <img src={wattermelon} alt="" />
          <p>수박 게임</p>
          <div>
            <img src={wmlevel} alt="" />
          </div>

          <div className="explain-text">
            <p>조작방법</p>
            <p>좌, 우 이동 : ⬅,➡</p>
            <p>과일놓기 : SPACE</p>
          </div>

        </div>
      </div>
    </div>
  )
}
App.css
@font-face{
  font-family:'DNFBitBitv2';
  font-style:normal;font-weight:400;src:url('//cdn.df.nexon.com/img/common/font/DNFBitBitv2.otf')format('opentype')}

.game-title {
  text-align: center;
  font-size: 2rem;
  background-color: rgb(255, 136,0);
  height: 5vh;
}

.game-main {
  display: flex;
  width: 100vw;
  background-color: rgb(255, 229, 199);
}

.game-explain {
  background-color: rgb(255, 136,0);
  width: 20%;
  margin:0 3rem;
  display: flex;
  flex-direction: column;
  align-items: center;
  height: 25vh;
  border-bottom-left-radius: 30%;
  border-bottom-right-radius: 30%;
}

.game-explain > img {
  width: 100px;
  height: 100px;
  padding-top: 1rem;
}

.game-explain > p {
  font-family: "DNFBitBitv2";
  color: white;
  font-size: 2rem;
  margin: 0;
  padding-top: 1rem;
}

.game-explain > div > img {
  border-radius: 50%;
  position: relative;
}

.explain-text {
  background-color: rgb(255, 136,0);
  width: 100%;
  margin: 1rem;
  border-radius: 20px;
  font-family: "DNFBitBitv2";
  font-size:1.5rem;
  text-align: center;
  color: white;
}
아래는 assets 입니다.
참고.
https://github.com/kairess/suika-game
https://velog.io/@rificul/%EB%A6%AC%EC%95%A1%ED%8A%B8%EC%97%90%EC%84%9C-Matter.js-%EC%82%AC%EC%9A%A9%ED%95%B4%EB%B3%B4%EA%B8%B0#%EC%B5%9C%EC%A2%85-%EC%BD%94%EB%93%9C