모듈 없이 JavaScript 와 CSS 만을 이용해서 react의 슬라이더 효과(cauousel) 효과를 구현해 보겠습니다.
1. 기본셋팅
<div className="container">
	<div className="container-slider">
    	<div className="box-1"></div>
        <div className="box-2"></div>
        <div className="box-3"></div>
        <div className="box-4"></div>
    </div>
</div>
박스 4개를 준비하고 그 박스들을 감쌀 slider 와 그 slider를 감쌀 container를 준비해 줍니다.
1.1 CSS 설정
여기에 css를 이용하여 각각의 박스에 색상과 크기를 지정해 주겠습니다.
.box-1 {
  background-color: red;
  width: 300px;
  height: 300px;
}
.box-2 {
  background-color: blue;
  width: 300px;
  height: 300px;
}
.box-3 {
  background-color: green;
  width: 300px;
  height: 300px;
}
.box-4 {
  background-color: yellow;
  width: 300px;
  height: 300px;
}
이렇게 각각 300px의 크기를 지닌 4개의 박스를 만들었습니다.

2. css 속성변경
구현하고자 하는 슬라이더는 가로 슬라이더이기 때문에 각각의 box를 감싼 container-slider에 display: flex 속성을 이용하여 가로 정렬을 실시하겠습니다.
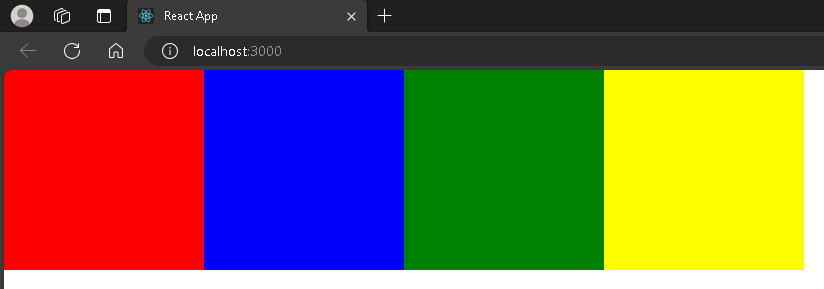
가로 정렬된 박스들을 감싼 slider의 부모속성인 container에 크기와 overflow-x 속성을 이용하여 가로 스크롤 형태로 변환이 가능합니다.
.container {
  display: flex;
  width: 300px;
  overflow-x: scroll;
}
.container-slider {
  display: flex;
}
3. 꾸미기 단계
display: flex 속성과 overflow-x: scroll 을 이용하여 가로 스크롤이 가능한 슬라이더를 구현하였다면 입맛에 맞게 바꾸어 보겠습니다.
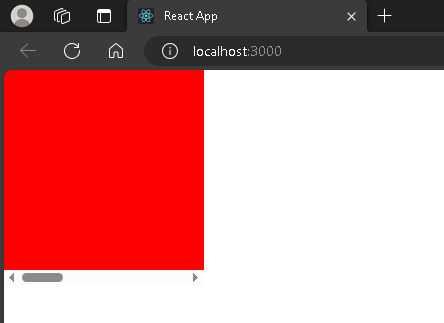
간단한 중앙정렬을 실시하고, 스크롤바도 없애 보도록 하겠습니다..container { position: absolute; top: 50%; left: 50%; transform: translate(-50%, -50%); width: 300px; display: flex; overflow-x: scroll; } .container::-webkit-scrollbar { display: none; }

이렇게 작성해주시면 가운데 정렬된 박스에 스크롤이 사라진걸 확인할 수 있습니다.
아무것도 없는 배경에 빨간 박스만 있는것 같은데 빨간 박스에 마우스를 올리고 shift + 휠을 이용하면 스크롤이 움직입니다
이제는 JavaScript를 활용하여 버튼을 만들고 버튼이 클릭되면 box의 크기만큼 가로로 이동시켜 보도록 하겠습니다.
4. JavaScript - React
우선 생성한 박스의 총 갯수와 현재 위치를 표시하기위해 useState를 사용해 주겠습니다.
현재 위치를 표시하기위한 currentIndex 와 총 박스의 갯수를 표시하기 위한 totalBoxes를 선언해 줍니다.
- 현재 생성한 박스가 총 4개이니 여기서는 4로 바로 선언해 주었습니다. 만약 map함수를 활용하여 리스트를 돌린다면 총 박스의 갯수는 리스트의 길이로 선언해 주시면 됩니다.
const [currentIndex, setCurrentIndex] = useState(0)
const totalBoxes = 4
다음으로 useRef를 활용하여 현재 박스의 위치를 참조해 주겠습니다.
const sliderRef = useRef()
.
.
.

<div className="container" ref={sliderRef}>
  <div className="container-slider" >
    <div className="box-1"></div>
    <div className="box-2"></div>
    <div className="box-3"></div>
    <div className="box-4"></div>
  </div>
</div>
먼저 useRef를 사용하기 위해 sliderRef를 선언해준뒤 sliderRef를 container와 연결해 줍니다.
이렇게 작성하면 container 의 DOM을 조작가능하고 불필요한 재렌더링을 줄여줄 수 있습니다.
다음으로 버튼을 선언하고 버튼에 onClick 이벤트를 부여해 줍니다.
	<button onClick={moveLeft}>왼쪽</button>
    <button onClick={moveRight}>오른쪽</button>
이제 onClick에 사용될 이벤트를 정의해 주시면 됩니다.
useRef를 사용하면 current 속성을 사용할 수 있습니다. 이를 활용해서 스크롤의 위치를 이동시켜 주는 이벤트를 작성해 줍니다.
const moveLeft = () => {
    if (currentIndex > 0) {
      sliderRef.current.scroll({
        left: sliderRef.current.scrollLeft - 300,
        behavior: 'smooth'
      });
      setCurrentIndex(currentIndex - 1)
    }
  }

  const moveRight = () => {
    if (currentIndex < totalBoxes - 1) {
      sliderRef.current.scroll({
        left: sliderRef.current.scrollLeft + 300,
        behavior: 'smooth'
      });
      setCurrentIndex(currentIndex + 1)
    }
  }
sliderRef의 현재위치에서 스크롤움직을 변경해주느 코드입니다.
left는 방향을 의미하고
behavior은 움직임을 의미합니다.
현재 box번호가 0보다 클때 왼쪽을 누르면 왼쪽으로 -300px 만큼 스크롤이 이동하는데
부드럽게 움직이는 효과를 추가한 것입니다.
오른쪽도 마찬가지 입니다.
진짜 마지막으로 버튼과 현재 위치표시를 꾸며주면 끝입니다.
전체코드 입니다.
import React, { useRef, useState} from 'react';
import './App.css';

function App() {
  const sliderRef = useRef()
  const [currentIndex, setCurrentIndex] = useState(0)
  const totalBoxes = 4

  const moveLeft = () => {
    if (currentIndex > 0) {
      sliderRef.current.scroll({
        left: sliderRef.current.scrollLeft - 300,
        behavior: 'smooth'
      });
      setCurrentIndex(currentIndex - 1)
    }
  }

  const moveRight = () => {
    if (currentIndex < totalBoxes - 1) {
      sliderRef.current.scroll({
        left: sliderRef.current.scrollLeft + 300,
        behavior: 'smooth'
      });
      setCurrentIndex(currentIndex + 1)
    }
  }

  return (
    <>
    <div className="container" ref={sliderRef}>
      <div className="container-slider" >
        <div className="box-1"></div>
        <div className="box-2"></div>
        <div className="box-3"></div>
        <div className="box-4"></div>
      </div>


    </div>
      <div className='tools'>
        <button onClick={moveLeft}>왼쪽</button>
        <div>{currentIndex + 1} / {totalBoxes}</div>
        <button onClick={moveRight}>오른쪽</button>

      </div>

    </>

  );
}

export default App;
.container {
  position: absolute;
  top: 50%;
  left: 50%;
  transform: translate(-50%, -50%);
  width: 300px;
  height: 400px;
  display: flex;
  overflow-x: scroll;
}

.container::-webkit-scrollbar {
  display: none;
}

.container-slider {
  display: flex;
}

.box-1 {
  background-color: red;
  width: 300px;
  height: 300px;
}

.box-2 {
  background-color: blue;
  width: 300px;
  height: 300px;
}

.box-3 {
  background-color: green;
  width: 300px;
  height: 300px;
}

.box-4 {
  background-color: yellow;
  width: 300px;
  height: 300px;
}

.tools {
  position: absolute;
  top: 65%;
  left: 50%;
  transform: translate(-50%);
  display: flex;
}

.tools > button {
  margin: 0 1rem;
  border: none;
  padding: 0.5rem 1rem;
  border-radius: 20px;
  background-color: #2437e1;
  color: white;
}

.tools > button:active {
  opacity: 0.8;
}