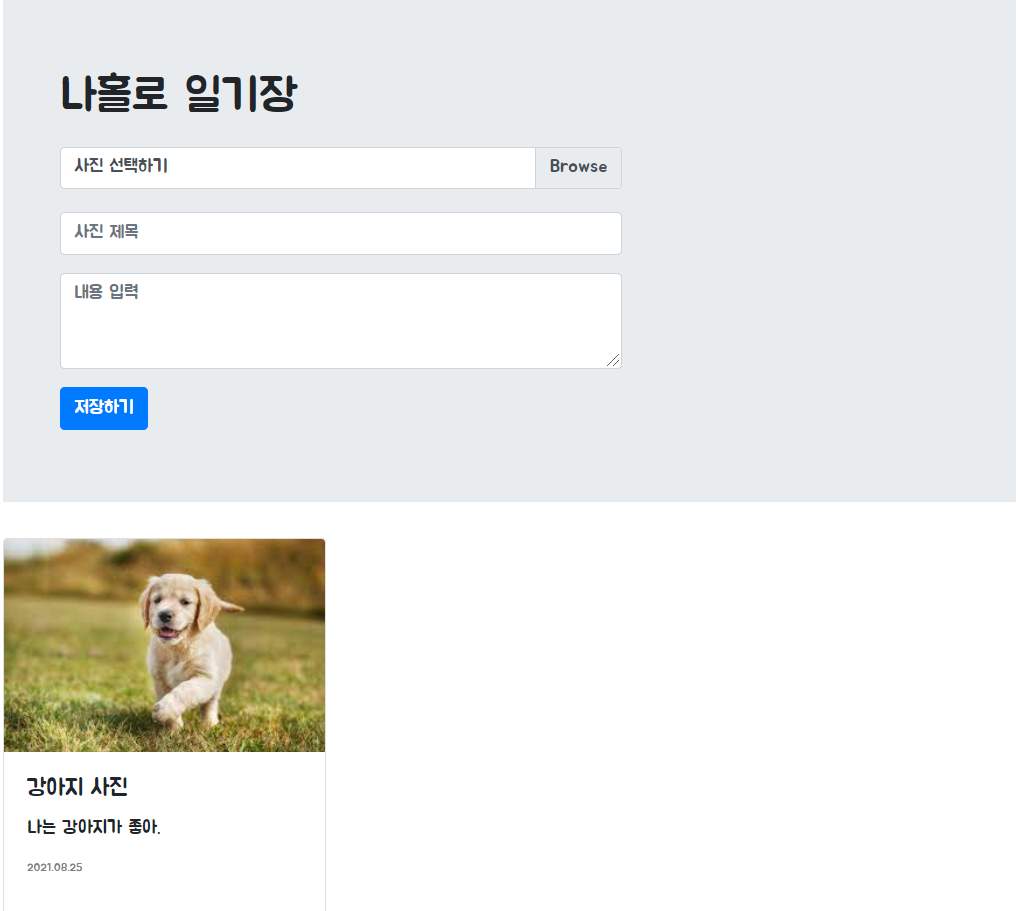
 완성 페이지 모습
순서.
1. 생김새(부트스트랩)
(https://getbootstrap.com/docs/5.1/getting-started/introduction/)
- 필요한 부분을 가져다 사용하면 매우 유용함.
2. 연결
- 포스팅 API
(1) 클라이언트에서 줄 데이터 : 제목, 코멘트
(2) 서버에서 할 일 : 코멘트를 DB에 저장
(3) 서버에서 줄 것 : 잘 저장되었다는 메시지 - 리스팅 API
(1) 클라이언트에서 줄 데이터 : 없음
(2) 서버에서 할 일 : 제목, 코멘트를 DB에서 모두 추출
(3) 서버에서 줄 것 : 제목, 코멘트 꾸러미(리스트 형태) - 서버-클라이언트 연결 코드 만들기
✔ API는 은행창구와 같은 것!

같은 예금 창구에서도 개인 고객이냐 기업 고객이냐에 따라
가져와야 하는 것 / 처리해주는 것이 다른 것처럼,
클라이언트가 요청 할 때에도, "타입"이라는 것이 존재.

* GET -> 통상적으로! 데이터 조회(Read)를 요청할 때
	 예) 영화 목록 조회
* POST -> 통상적으로! 데이터 생성(Create), 변경(Update), 삭제(Delete)를 요청할 때
예) 회원가입, 회원탈퇴, 비밀번호 수정- 기본 flask 코드
from flask import Flask, render_template, jsonify, request
app = Flask(__name__)

@app.route('/')
def home():
    return render_template('index.html')

if __name__ == '__main__':
app.run('0.0.0.0', port=5000, debug=True- GET 요청 - Javascript 로딩 후 실행
$(document).ready(function () {
		alert('안녕!')
})- GET 요청 - Ajax 코드
$.ajax({
    type: "GET",
    url: "/diary?sample_give=샘플데이터",
    data: {},
    success: function(response){
       alert(response['msg'])
    }
})- GET 요청 - API 코드
@app.route('/diary', methods=['GET'])
def show_diary():
    sample_receive = request.args.get('sample_give')
    print(sample_receive)
return jsonify({'msg': 'GET 연결 완료!'})- POST 요청 - Ajax 코드
$.ajax({
    type: "POST",
    url: "/diary",
    data: { sample_give:'샘플데이터' },
    success: function(response){
        alert(response['msg'])
    }
})- POST 요청 - API 코드
@app.route('/diary', methods=['POST'])
def save_diary():
    sample_receive = request.form['sample_give']
    print(sample_receive)
    return jsonify({'msg': 'POST 요청 완료!'})
3. 포스팅 API 만들기
- 클라이언트와 서버 확인하기
- 서버 만들기
1) 클라이언트가 준 title, content 가져오기
2) DB에 정보 삽입하기
3) 성공 메시지 반환하기 - 클라이언트 만들기
1) title, content 서버에 넘기기
2) 받은 msg를 alert로 띄우고 새로고침 하기 - 완성 확인하기
1) 내용, 제목이 잘 저장되었는지 확인!
2) DB에도 잘 들어갔는지 확인!
4. 리스팅 API 만들기
- 클라이언트와 서버 확인하기
- 서버 만들기
1) 클라이언트에서 받을 것 없음.
2) DB예서 title, content를 리스트로 가져오기
3) 가져온 리스트를 클라이언트에 보내주기 - 클라이언트 만들기
1) 서버에 요청(데이터 줄 것 없음)
2) 받은 데이터로 카드를 만들어 붙여주기 - 완성 확인하기
1) 카드가 잘 붙는지 확인
5. 생김새
- 파일업로드 - 프론트엔드 만들기
1) 카드에 이미지 넣기
2) 폼 부분에 파일 업로드 넣기
3) 파일 업로드에 파일이 들어가게 만들기 - 파일 업로드 라이브러리
<script src="https://cdn.jsdelivr.net/npm/bs-custom-file-input/dist/bs-custom-file-input.js"></script>- 파일업로드 코드
bsCustomFileInput.init()6. 준비
- 파일업로드 진행할 순서
1) 서버 쪽에서 파일 받기 코드 먼저 작성
2) 클라이언트 쪽에서 파일 보내기 코드 작성
3) 잘 저장되나 확인
4) 파일 이름 변경해주기(날짜, 시간으로 - 겹치지 않게!) - 서버 쪽 파일 받기, 클라이언트 보내기 - 한방에
1) 서버 쪽 받기 코드
file = request.files["file_give"]
save_to = 'static/mypicture.jpg'
file.save(save_to)
2) 클라이언트 쪽 보내기 코드
function posting() {
   let title = $('#title').val()
   let content = $("#content").val()

   let file = $('#file')[0].files[0]
   let form_data = new FormData()

   form_data.append("file_give", file)
   form_data.append("title_give", title)
   form_data.append("content_give", content)

   $.ajax({
       type: "POST",
       url: "/diary",
       data: form_data,
       cache: false,
       contentType: false,
       processData: false,
       success: function (response) {
           alert(response["msg"])
           window.location.reload()
       }
   });
}
7. 서버
- 파일 이름 변경해주고 저장하기
1) 일단, 확장자를 빼내기
extension = file.filename.split('.')[-1]2) 새로운 이름을 만들어주기
today = datetime.now()
mytime = today.strftime('%Y-%m-%d-%H-%M-%S')

filename = f'file-{mytime}'
3) 새로운 이름으로 저장하기
save_to = f'static/{filename}.{extension}'
file.save(save_to)
4) 변경된 파일 이름을 db에도 저장하기
doc = {
    'title':title_receive,
    'content':content_receive,
    'file':f'{filename}.{extension}',
}
db.diary.insert_one(doc)
8. 클라이언트
- 카드에 만들어 붙여보기
function listing() {
    $.ajax({
        type: "GET",
        url: "/listing",
        data: {},
        success: function (response) {
            if (response["result"] == "success") {
                let articles = response['articles']
                for (let i = 0; i < articles.length; i++) {
                    let title = articles[i]['title']
                    let content = articles[i]['content']
                    let file = articles[i]['file']

                    let temp_html = `<div class="card">
                                        <img src="../static/${file}" class="card-img-top">
                                        <div class="card-body">
                                            <h5 class="card-title">${title}</h5>
                                            <p class="card-text">${content}</p>
                                        </div>
                                    </div>`

                    $('#cards-box').append(temp_html)
                }
            }
        }
    });
}
9. AWS - EC2 접속하기
- EC2 서버 접속하기
- AWS에서 포트를 열어주기
10. AWS - EC2 세팅하기
- filezila로 접속하기
- EC2 세팅하기
1) git bash에서 차례대로 입력
sudo chmod 755 initial_ec2.sh./initial_ec2.sh11. AWS - 배포하기
- filezile에 파일 업로드
- git에서 명령어 실행
# 아래의 명령어로 실행하면 된다
nohup python app.py &- 종료할 때에는
# 아래 명령어로 미리 pid 값(프로세스 번호)을 본다
ps -ef | grep 'app.py'

# 아래 명령어로 특정 프로세스를 죽인다
kill -9 [pid값]
개발 시작