
패스트캠퍼스 메가바이트스쿨 프론트엔드 개발자 과정의 첫 토이 프로젝트는 금융앱 만들기였다.
대충 아래와 같은...
대충 자바스크립트와 CSS로 슬라이드와 슬라이드 그리고 슬라이드를 만드는...
그런데 JSON 파일 데이터를 추출하는 건 배운 적이 없는데?

...

도와줘잉
JSON 파일 가져오기
아래의 list.json 파일을 js 파일로 가져와 보자. list.json 파일은 다는 아니고 몇개만 밑에 적어보겠다.(너무 길어)
[
  {
    "date": "2022.05.01",
    "inOut": "in",
    "type": "profit",
    "item": "용돈",
    "price": 300000
  },
  {
    "date": "2022.05.02",
    "inOut": "out",
    "type": "taxi",
    "item": "택시",
    "price": 8900
  },
  {
    "date": "2022.05.03",
    "inOut": "out",
    "type": "edu",
    "item": "교보문고",
    "price": 23000
  },
  {
    "date": "2022.05.04",
    "inOut": "out",
    "type": "eatout",
    "item": "스타벅스신사역점",
    "price": 18000
  },
  {
    "date": "2022.05.05",
    "inOut": "out",
    "type": "eatout",
    "item": "씨유화곡미라클점",
    "price": 3000
  },
  {
    "date": "2022.05.06",
    "inOut": "out",
    "type": "daily",
    "item": "다이소",
    "price": 12000
  },
  {
    "date": "2022.05.07",
    "inOut": "out",
    "type": "eatout",
    "item": "비트박스(강남점)",
    "price": 15000
  },
  {
    "date": "2022.05.08",
    "inOut": "out",
    "type": "eatout",
    "item": "매드클라운포갈릭(강남점)",
    "price": 230000
  }
]
위의 파일을 js 파일로 가져와보자.
fetch("./json/list.json")
.then((res) => {
  return res.json()
})
.then((obj) => {
  List(obj);
})
먼저 fetch에 url로 요청을 보내 바로 뒤에오는 응답에 대해 json()을 해줘야 한다.
fetch 를 실행하면, 원격 저장소의 최신 이력을 확인할 수 있다. 사실 경로를 보면 fetch 필요없다. import 쓰면 됨. 그러나 이번 토이 프로젝트에서 제공된 json 파일은 원격 저장소 주소로 요청을 보내는 것이었다.
이제 url로 요청을 한 뒤 .then을 이용해 바로 뒤 응답에 대해 json()을 해서 정보를 가져올 수 있지만, 이대론 가져온 정보를 바로 쓸 순 없다. 한번 더 .then을 사용해야 제대로된 정보를 가져올 수 있다.
받아온 정보를 이제 우리가 만들 List() 함수에 담아주면 json 정보를 사용할 수 있다.
HTML & CSS 구조 파악하기
우리가 만들어야할 리스트의 구조는 다음과 같다.
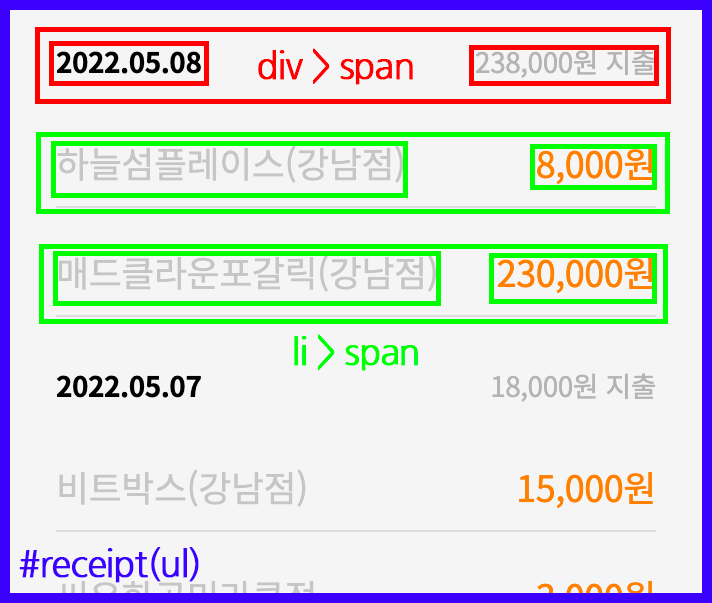
HTML에서 id 값을 "receipt"로 가지고 있는 ul 태그에 div 태그와 li 태그가 있다. 그리고 해당 태그 안에는 각각 span 태그 두 개가 위치하고 있다. HTML 코드로 표현하면 아래와 같다.
<ul id="receipt">
  <div>
    <span>2022.05.08</span>
    <span>238,000원 지출</span>
  </div>
  <li>
    <span>하늘섬플레이스(강남점)</span>
    <span>8,000원</span>
  </li>
  <li>
    <span>매드클라운포갈릭(강남점)</span>
    <span>23,000원</span>
  </li>
</ul>
ul 태그 내부에 span 태그들을 div로 감싼 형태로 한 것은 CSS 상에서 편의를 위한 것이다. 이렇게 표현했지만 ul 태그를 제외하고 전부 javascript에서 만들기 때문에 실제로 HTML 상 코드는 아래와 같다.
<ul id="receipt"></ul>날짜 출력하기
funciton List(obj) {
  // ...
}
위와 같은 List() 함수가 실행되면, 먼저 예시처럼 "2022.05.08"과 같은 날짜 데이터를 출력한다. 그리고 해당 날짜 데이터를 기준으로 결내 내역 중 지출 가격을 모두 더해 따로 출력한다. 또 날짜 데이터를 기준으로 각각 결제 장소와 결제 가격을 출력하는데, 소득이 발생했을 경우 지출과 다른 색으로 출력할 수 있도록 할 것이다.
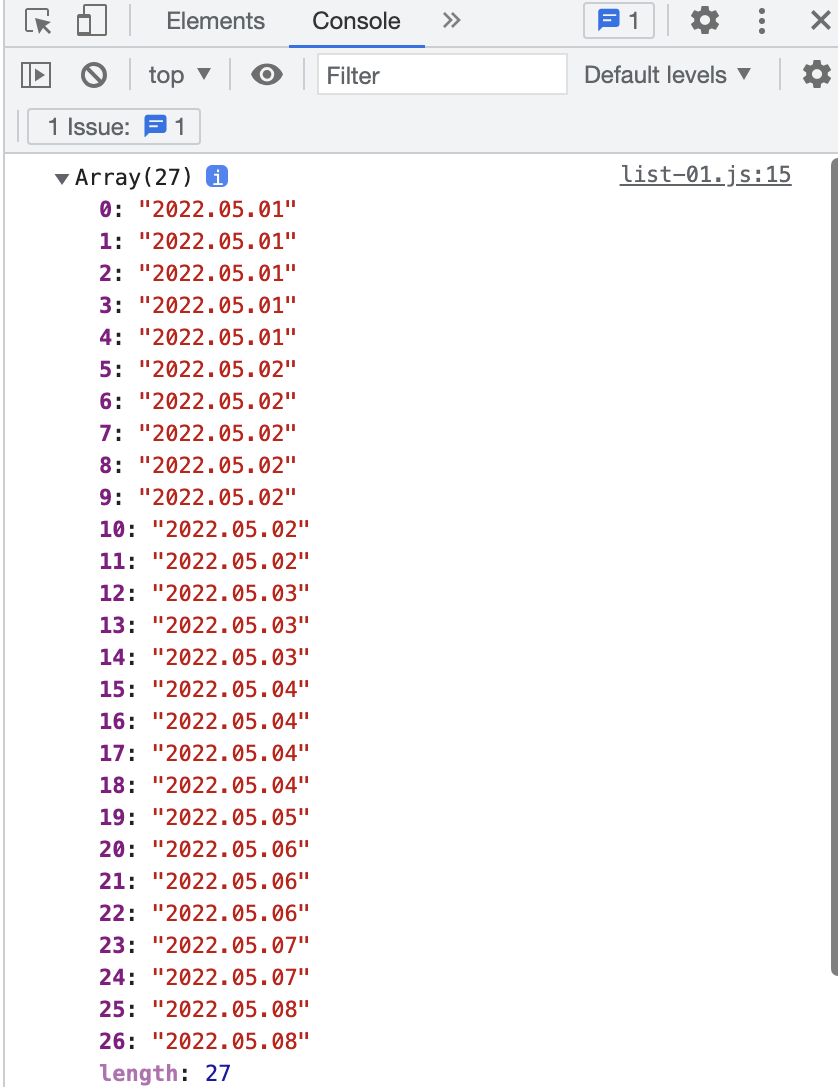
먼저 날짜 데이터를 추출해보자
const date = obj.map(v => v.date);
    const arr = new Array(date);
    const arrZero = arr[0];
    const arrUni = arrZero.filter((val, idx) => {
      return arrZero.indexOf(val) === idx;
    })
    const arrReverse = arrUni.reverse();
    for (let i = 0; i < arrReverse.length; i++) {
      const D = arrReverse[i];

      const ulEl = document.querySelector('#receipt');
      const dataWrap = document.createElement('div');
      const dateName = document.createElement('span');

      dateName.className = "dateName";
      dateName.textContent = D;

      ulEl.appendChild(dataWrap);
      dataWrap.appendChild(dateName);
}
먼저 map()을 통해 list.json에서 날짜(date)만 추출해 그것을 new Array(date)를 통해 배열로 만들어주자. 이렇게 하면 arr은 우리가 원하는 날짜 배열을 한번 더 감싼 형태로 값을 내보내준다. 즉 우리가 원하는 값은 arr[0]에 있다.
이것을 filter()와 indexOf() 메서드를 이용해 중복된 날짜 데이터들을 정리해주자.
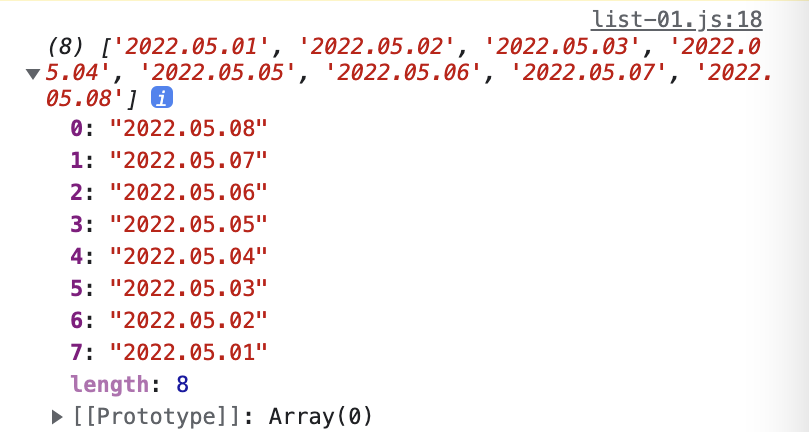
위와 같이 출력된 날짜 데이터를 for 구문으로 돌리면 되겠지만, 문제는 우리가 표현할 리스트가 최신 날짜 순으로 되어있다. reverse() 메서드를 이용해 배열을 거꾸로 바꿔주자. 다음 for 구문을 통해 이것을 배열의 길이 값까지 반복시켜주자.
이 다음 div 태그와 span 태그를 만들고, span 태그에 textContent 내용을 for 구문을 반복시켜 추출한 값으로 지정해주자.
마지막으로 appendChild로 HTMl의 ul 태그 내부에 이때까지 만든 코드들을 붙여주자. 이렇게 하면 json 파일에 들어있는 날짜 5월 1일부터 8일까지가 하나 하나 리스트에 출력될 것이다.
일별 지출 금액 출력하기
const ulEl = document.querySelector('#receipt');
const dataWrap = document.createElement('div');
const plusPrice = document.createElement('span');
plusPrice.className ="plusPrice";

const DPrice = obj.map(
        v => v.date === D && v.inOut === 'out' ? v.price : null)
        .reduce((a, b) => {return a + b}, 0);

const changeD1Price = DPrice.toString().replace(/\B(?=(\d{3})+(?!\d))/g, ',');

plusPrice.textContent = `${changeD1Price}원 지출`;

ulEl.appendChild(dataWrap);
dataWrap.appendChild(plusPrice);
먼저 map을 통해 json 파일 중 가격(price) 값을 가져올 것인데, 삼항연산자를 이용해서 날짜(date) 값이 똑같은 경우와 지출여부(inOut)가 'out'일 경우만 가져오도록 한다. 그리고 그것을 reduce() 메서드를 통해 더해주면 지출 값이 나온다.
이것을 아래와 같은 코드에 붙여 작성하면 값의 세자리마다 콤마를 찍어 출력할 수 있다.
.toString().replace(/\B(?=(\d{3})+(?!\d))/g, ',');그리고 그것을 백틱을 이용해 '원 지출'이라는 텍스트를 붙여 출력해주자.
결제 내역 출력하기
for (let i = 0; i < obj.length; i++) {
  const date = obj[i].date;
  const inOut = obj[i].inOut;
  const item = obj[i].item;
  const price = obj[i].price;
  const changePrice = price.toString().replace(/\B(?=(\d{3})+(?!\d))/g, ',');

  if (date === D) {
    const liItem = document.createElement('span');
    const liPrice = document.createElement('span');
    const listWrap = document.createElement('li');
    liItem.textContent = `${item}`;

    if (inOut === 'out') {
      liPrice.classList.add('out');
      liPrice.textContent = `${changePrice}원`;
    } else {
      liPrice.classList.add('in');
      liPrice.textContent = `${changePrice}원`;
    }

    ulEl.appendChild(listWrap);
    listWrap.appendChild(liItem);
    listWrap.appendChild(liPrice);
  }
}
for 구문을 이용해서 json 파일 배열의 길이만큼 반복해주자. 반복한 값 중 위의 for 구문을 통해 반복되고 있는 날짜(D)와 일치 할 때만 결제 장소(item)를 출력하게 하자. 그리고 그 중에서 지출여부(inOut)이 'out'일 경우 해당 span에 클래스 이름에 'out'을 더해주고, 'in'일 경우 'in'을 더해주면서 각각 결제금액을 출력하게 하자. 여기서 추가한 'in'과 'out'은 CSS 상에서 색상을 다르게 나타게 할 것이다.
위의 코드를 모두 합치면 다음과 같다.
fetch("./json/list-01.json")
.then((res) => {
  return res.json()
})
.then((obj) => {
  List(obj);
})

  function List(obj) {

    // 날짜 배열 추출
    const date = obj.map(v => v.date);
    const arr = new Array(date);
    const arrZero = arr[0];
    const arrUni = arrZero.filter((val, idx) => {
      return arrZero.indexOf(val) === idx;
    })
    const arrReverse = arrUni.reverse();
    for (let i = 0; i < arrSorts.length; i++) {
      const D = arrReverse[i]; // 날짜 추출

      // 지출 합산 & 날짜 표시 추출
      const ulEl = document.querySelector('#receipt');
      const dataWrap = document.createElement('div');
      const dateName = document.createElement('span');

      // 날짜 표시
      dateName.className = "dateName";
      dateName.textContent = D;

      // 지출 합산
      const plusPrice = document.createElement('span');
      plusPrice.className ="plusPrice";

      const DPrice = obj.map(
        v => v.date === D && v.inOut === 'out' ? v.price : null)
        .reduce((a, b) => {return a + b}, 0
      );

      const changeD1Price = DPrice.toString().replace(/\B(?=(\d{3})+(?!\d))/g, ',');

      plusPrice.textContent = `${changeD1Price}원 지출`;

      ulEl.appendChild(dataWrap);
      dataWrap.appendChild(dateName);
      dataWrap.appendChild(plusPrice);

      // 결제 내역 추출
      for (let i = 0; i < obj.length; i++) {
        const date = obj[i].date;
        const inOut = obj[i].inOut;
        const item = obj[i].item;
        const price = obj[i].price;
        const changePrice = price.toString().replace(/\B(?=(\d{3})+(?!\d))/g, ',');

        if (date === D) {
          const liItem = document.createElement('div');
          const liPrice = document.createElement('div');
          const listWrap = document.createElement('li');

          liItem.textContent = `${item}`;

          if (inOut === 'out') {
            liPrice.classList.add('out');

            liPrice.textContent = `${changePrice}원`;
          } else {
            liPrice.classList.add('in');
            liPrice.textContent = `${changePrice}원`;
          }

          ulEl.appendChild(listWrap);
          listWrap.appendChild(liItem);
          listWrap.appendChild(liPrice);
        }
      }
    }
  }
출력 결과
끝.

json파일에 데이터 가져오는 방법을 찾고있었는데 잘 보고 갑니다!! 감사합니다