
swiftUI의 Navigation과 List를 사용하여 List의 요소들을 클릭해주면 각각의 페이지로 이동하는 것을 구현해봤습니다.
ContentView.swift 파일을 열어서 List에서 사용할 데이터를 임의로 선언해 줍니다.
struct Item : Identifiable {
    var id = UUID();
    var name : String;
    var imageName : String;
}

var loveList : [Item] = [
    Item(name: "고양이", imageName: "powerplug.fill"),
    Item(name: "강아지", imageName: "person.crop.circle.badge.clock.fill"),
    Item(name: "개구리", imageName: "map.circle.fill")
]

var hateList : [Item] = [
    Item(name: "원숭이", imageName: "powerplug.fill"),
    Item(name: "거미", imageName: "person.crop.circle.badge.clock.fill"),
]
구조체 안에서 선언한 id의 UUID는 자동으로 id의 값을 정해줍니다.
id는 나열을 할때에 필수적으로 들어가야하는 요소입니다.
이제 List를 이용하여 데이터를 나열해줍니다.
struct ContentView: View {

   var body: some View {
            List{
                ForEach(loveList){ item in
                    HStack{
                        Image(systemName: item.imageName)
                        Text(item.name)
                    }
                }

                ForEach(hateList){ item in
                    HStack{
                        Image(systemName: item.imageName)
                        Text(item.name)
                    }
                }
            }
}
출력 화면
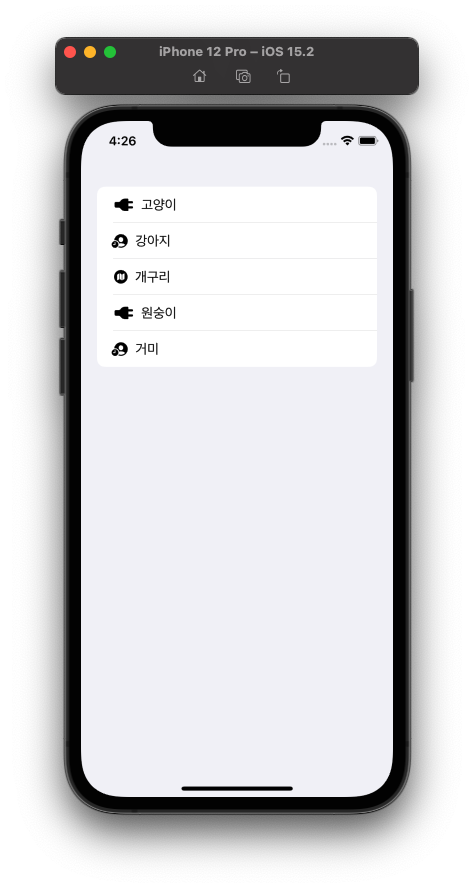
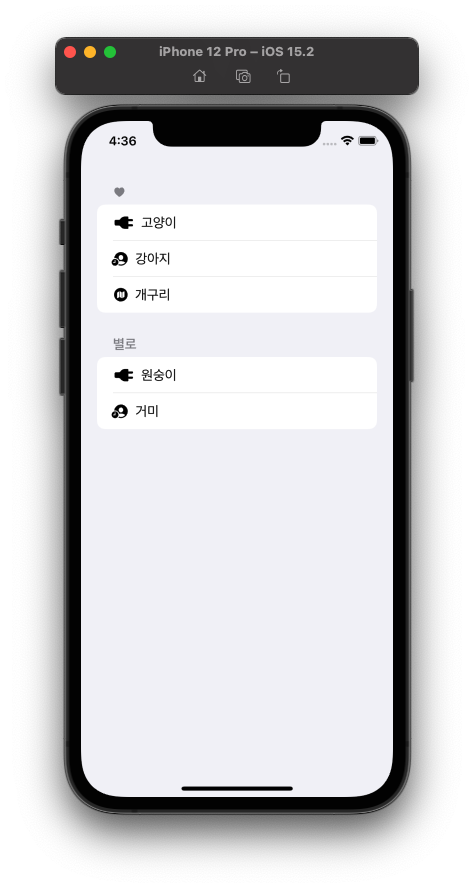
서로 다른 배열을 나열하였지만 구분이 어디까지인지 알아볼수 없기에 Section을 사용하여 구분해줍니다.
struct ContentView: View {

    var body: some View {
            List{
                Section(header: Image(systemName: "heart.fill")){
                    ForEach(loveList){ item in
                        HStack{
                            Image(systemName: item.imageName)
                            Text(item.name)
                        }
                    }}
                Section(header: Text("별로").font(.headline)){
                    ForEach(hateList){ item in
                        HStack{
                            Image(systemName: item.imageName)
                            Text(item.name)
                        }
                    }}
            }}
 }
이제 각각의 Item을 선택하였을때 페이지 이동을 하기 위해서는 Navigation을 이용해야합니다.
Navigation을 사용하기 위해서는 맨 상위 뷰를 NAvigationView로 감싸줘야합니다.
struct ContentView: View {

    var body: some View {
        NavigationView{
            List{
                	.
                	.
                	.
                }
          }}
}
그리고 각각의 요소들을 정의하는 곳에서 NavigationLink를 사용하면 됩니다.
struct ContentView: View {

    var body: some View {
        NavigationView{
            List{
                Section(header: Image(systemName: "heart.fill")){
                    ForEach(loveList){ item in
                        NavigationLink(destination: Text(item.name)){
                            Image(systemName: item.imageName)
                            Text(item.name)
                        }}}
                Section(header: Text("별로").font(.headline)){
                    ForEach(hateList){ item in
                        NavigationLink(destination: Text(item.name)){
                            Image(systemName: item.imageName)
                            Text(item.name)
                        }}}
            }
            .navigationBarTitle(Text("동물들"))
        }
    }}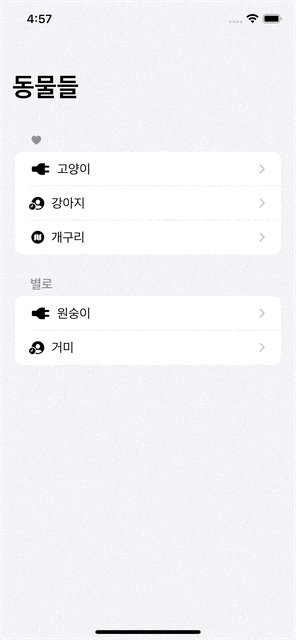
이렇게 각각의 페이지로 이동하는 것을 확인하였습니다.
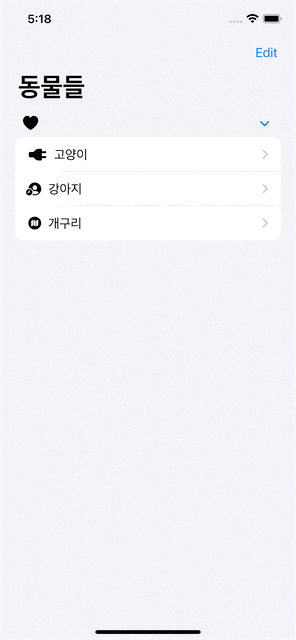
그 외 부가적인 기능으로는 드레그하면 삭제하는 버튼이 나오거나
List를 재정렬 할 수 있는 기능을 제공해줍니다.
 NavigationView{
            List{
                Section(header: Image(systemName: "heart.fill")){
                    ForEach(loveList){ item in
                        NavigationLink(destination: Text(item.name)){
                            Image(systemName: item.imageName)
                            Text(item.name)
                        }}
                    .onDelete(perform : self.deleteItem)
                    .onMove(perform: moveItem)
                }
            }
            .navigationBarTitle(Text("동물들"))
            .navigationBarItems(trailing: EditButton())
        }
    }

    func moveItem(from source: IndexSet, to destination : Int){
       //배열을 재정렬하는 코드
    }

    func deleteItem(at offsets : IndexSet) {
      //선택한 부분을 배열에서 삭제하는 코드
    }
}
오늘은 여기까지 🥺

스탯 올리는 중