📄 Exception/File/Log Handling
✏️ Exception Handling
사용자의 모든 반응을 예상하여 프로그램을 만드는 것은 생각보다 쉬운일이 아니다. 그렇지만 예상치 못한 반응으로 프로그램이 비정상적으로 작동되는것을 막기위해서 예외(Exception) 핸들링 이 필요하다.
- 예상 가능한 예외
- 발생 여부를 사전에 인지할 수 있는 예외
- 사용자의 잘못된 입력, 파일 호출시 파일 없음
- 개발자가 반드시 명시적으로 정의
- 예상 불가능한 예외
- 인터프리터 과정에서 발생하는 예외
- 개발자의 실수로 인해 발생
- ZeroDivisionError, IndexError..
- 수행불가시 인터프리터가 자동호출
파이썬에서는 예외처리를 위해 try~except~finally ,try~except~else 구문을 제공해준다.
for i in range(10):
    try:
        result=10/i
    except ZeroDivisionError as e:
        print('Not divided by 0')
    else:
        print('예외가 발생하지 않았을 때 동작합니다')
    finally:
        print('예외 발생 여부와 상관없이 무조건 실행됩니다.')
    print('--------------------------------------------------')
만약 사용자의 반응이 프로그램에 큰 악영향을 끼칠수 있을경우 프로그램의 작동을 멈추는 것이 최선의 선택일수도 있다. raise 와 assert 를 통해 예외를 발생시킬 수 있다.
user_input=input('음이 아닌 정수를 입력해주세요 : ')
for digit in user_input:
    if digit not in '0123456789':
    	raise ValueError('음이 아닌 정수를 입력해주세요)
def append_int(src,data):
    assert isinstance(src,list) # list가 아니면 예외
    assert isinstance(data,int) # int가 아니면 예외
    src.append(data)
✏️ File Handling
기본적으로 파일은 text 파일 과 binary 파일 로 나뉜다. 물론 모든 text 파일도 실제로는 binary 파일이지만 ASCII/UNICODE 등 인코딩 형식에 따라 문자열집합으로 변환되어 사람이 읽을수 있다.
| Binary 파일 | Text 파일 |
|---|---|
| 컴퓨터만 이해할 수 있는 형태인 이진법 형식으로 저장된 파일 | 인간도 이해할 수 있는 문자열 형식으로 저장된 파일 |
| 일반적으로 메모장으로 열면 내용이 깨져보인다 | 메모장으로 열면 확인 가능 |
| 엑셀파일,워드파일 등 | 메모장에 저장된 파일, HTML 파일, 파이썬 코드파일 등 |
파이썬에서는 기본적으로 다음과 같이 파일핸들링이 이루어진다.
| 파일모드 | 설명 |
|---|---|
| r | 읽기모드 - 파일을 읽기만 할 때 사용 (디폴트) |
| w | 쓰기모드 - 파일에 내용을 쓸 때 사용(내용이 있을경우 지우고 새로쓴다) |
| a | 추가모드 - 파일의 마지막에 새로운 내용을 추가 시킬때 사용 |
| t | 텍스트파일 - 텍스트 문자 기록에 사용 (디폴트) |
| b | 바이너리파일 - 바이트 단위 데이터 기록에 사용 |
f=open('boostcamp.txt','r')
contents=f.read() # 모든 데이터를 문자열로 읽어옵니다.
print(contents)
f.close() # 파일을 닫아줘야합니다.

#################################
# 파일을 닫는게 귀찮다면 with를 이용합시다.
with open('boostcamp.txt','r') as f:
    line=f.readline() # 데이터를 한줄씩 읽어온다. (readline)
    print(line)

#################################

with open('boostcamp.txt','r') as f:
    lines=f.readlines() # 모든 데이터를 list로 반환한다. (readlines)
    print(lines)

#################################
# encoding 규칙은 상황에 맞게 정합니다.
with open('boostcamp.txt','a',encoding='utf-8') as f:
    for i in range(1,6):
	f.write(f'{i}번째 학습정리입니다.') # 데이터를 파일에 저장합니다.
with 블록
- 파일을 다룰 때 with 블록을 통해 명시적으로
close()메소드를 호출하지 않고도 파일을 닫을 수 있다. - 파일 객체는 내부적으로
__enter__(),__exit__()가 구현되어 있다. - with 블록이 자동으로 블록을 종료할 때
__exit__()메소드를 호출하여 파일을 close 시키게 된다.
os 모듈
- 파일을 복사하거나
- 디렉터리를 생성하거나
- 특정 디렉터리 내의 파일 목록을 구할 때 보통 사용
import os

try :
    os.mkdir("folder") # 폴더 만들기
except FileExistsError as e:
    print("Already created") # 이미 폴더 있을경우 예외처리

os.path.exists("folder") # 현재 경로에 folder 이름의 폴더가 있는지 반환
os.path.isfile("file.py") # 현재 경로에 file.py 이름의 파일이 있는지 반환
import os
## 특정 디렉토리 아래의 모든 파일의 절대 경로 목록(list)을 리턴하는 함수
def allfiles(path):
res = []
# os.walk는 특정 디렉토리 아래의 모든 디렉토리와 파일의 목록을 얻어 올 수 있도록 도와준다.
# for문 안에서 3개의 아이템으로 구성된 튜플로 분해가 가능한데
# root : 어떤 디렉토리인지
# dirs : root 아래의 디렉토리 목록
# files : root 아래의 파일 목록
# 모든 목록은 리스트 형태로 반환
for root, dirs, files in os.walk(path):
rootpath = os.path.join(os.path.abspath(path), root)
for file in files:
filepath = os.path.join(rootpath, file)
res.append(filepath)
return resshell util 모듈
- DOS에서 사용하던 명령어를 python에서 사용하게 해주는 것과 같은 기능
import shutil

source - "sample.txt"
dest = os.path.join("folder", "file.py")

shutil.copy(source, dest) # 파일 복사(sample.txt -> file.py로 복사)
pathlib module
-
python 3.4 부터 공식 빌트인 모듈로 추가
-
OS 와 상관없이 경로를 나타내고, 다룰 수 잇는 클래스를 정의
- 위의 예제들을 살펴보면 파일 핸들링을 위해서는 file path를 다뤄야 한다. 그런데 운영체제에 따라 path 표현방식이 달라 문제가 생기는 경우가 있다. 그래서 최근에는 pathlib 모듈을 사용하여 path 자체를 객체로 사용하여 다루기도 한다.
-
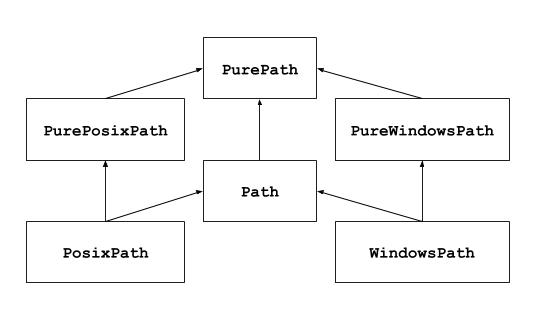
크게 두개의 클래스로 구성
-
PurePath
실제 파일 I/O와 관계없이 순수한 경로 연산만 담당
-
Path
Concret Path라고도 부르며 시스템 I/O 연산까지 수행
PurePath를 상속받아 구현됬기 때문에 PurePath가 제공하는 속성과 메소드 사용가능
-

# path를 객체로 다룰 수 있음
import os
from pathlib import Path

file_path = './path/to/file'

# 기존 (os.path)
if os.path.exists(file_path):
  # do something

# pathlib 사용
p = Path(file_path)
if p.exists():
  # do something
import os
from pathlib import Path
dir_name = 'dir'
sub_dir_name = 'sub_dir_name'
file_name = 'file'
# 기존 (os.path)
file = os.path.join(dir_name, sub_dir_name, file_name)
# pathlib
dir = Path(dir_name)
file = dir / sub_dir_name / file_name
# 나누기 연산자인 슬래시(/) 가 경로 구분 문자로 사용된다는 점을 착안하여 나누기 연산자로 path를 연결하게 함# 파일 오픈
from pathlib import Path
filename = 'text.txt'
# without pathlib
file = open(filename, 'r')
# with pathlib
path = Path(filename)
file = path.open('r')# 파일 읽고 쓰기 - 파일을 열고 닫을 필요가 없음
from pathlib import Path
filename = 'text.txt'
# without pathlib
file = open(filename, 'r')
r = file.read()
file.close()
# without pathlib2
with open(filename, 'r') as f:
r = f.read()
# with pathlib
path = Path(filename)
r = path.read_text()# glob 패턴을 사용하여 파일/ 디렉토리를 리스팅 할 수 있음
from pathlib import Path
path = Path('.')
files = path.glob('*')
# <generator object Path.glob at 0x7f0ff370a360>
list(files)
# [PosixPath('.git'), PosixPath('.gitconfig'), PosixPath('.vimrc'), PosixPath('.zshrc'), PosixPath('pre-commit')]
# path.rglob(*)도 동일하다
list(path.glob('**/*'))
# [PosixPath('.git/COMMIT_EDITMSG'), PosixPath('.git/config'), PosixPath('.git/description'), PosixPath('.git/HEAD'), PosixPath('.git/hooks'), PosixPath('.git/index'), PosixPath('.git/info'), PosixPath('.git/logs'), PosixPath('.git/objects'), PosixPath('.git/refs')]
# path가 가리키는 폴더를 리스팅 할때는 glob('*') 대신 iterdir을 사용할 수 있다.
list(path.iterdir())
# [PosixPath('.git'), PosixPath('.gitconfig'), PosixPath('.vimrc'), PosixPath('.zshrc'), PosixPath('pre-commit')]
log 파일 만들기 -os 예제
import os

if not os.path.isdir("log") : # 로그 폴더가 없다면
    os.mkdir("log") # 폴더 만들기
if not os.path.exits("log/count_log.txt") : # 로그 폴더 안에 count_log.txt 가 없을 경우
    f= open("log/count_log.txt", "w", encoding="utf-8")
    # count_log.txt 쓰기 모드로 열기(인코딩 utf-8)
    # 파일을 쓰기 모드로 열면 해당 파일이 이미 존재할 경우 있던 내용이 모두 사라지고,
    # 파일이 존재하지 않으면 새로운 파일이 생성됨.
    f.write("Log starts\n")
    f.close()

with open("log/count_log.txt", 'a', encoding="utf8") as f : # count_log.txt 추가모드로 열기
    import random, datetime
    for i in range(1, 11) :
        stamp = str(datetime.datetime.now()) # 현재 시간
        value = random.random() * 10000000 # 0~1 사이 실수 랜덤 추출
        log_line = stamp + "\t" + str(value) + "created log" + "\n" # 쓰여진 로그 만들기
        f.write(log_line) # 파일에 적기
pickle
- 일반적으로 텍스트를 파일로 저장할 때는 파일 입출력을 이용하지만, 리스트나 클래스 같은 객체의 경우 데이터를 저장하거나 불러올 수 없다. 그래서 파이썬에서는 이와 같은 텍스트 이외의 데이터를 파일로 저장하기 위해
pickle모듈을 제공한다. - data, object 등 실행 중(메모리에 있는) 정보/계산결과(모델) 등을 저장할 떄 쓰임
import pickle

class Multiply:
    def __init__(self,multiplier):
        self.multiplier=multiplier

    def multiply(self,number):
        return number*self.multiplier

calculator=Multiply(5)
print(calculator.multiply(10)) #50

# 객체 저장
with open('multiply_object.pickle','wb') as f:
    pickle.dump(calculator,f) # pickle.dump(data, file) 파일에 데이터 입력

del calculator # 객체 삭제

# 객체 로드
with open('multiply_object.pickle','rb') as f:
    calculator_pickle=pickle.load(f) # pickle.load(file) 한줄씩 파일을 읽어옴(더이상 로드할 데이터 없으면 EOF 에러)
    print(calculator_pickle.multiply(5)) # 25
✏️ Log Handling
프로그램을 개발하면 개발자가 의도한대로 작동하지 않는 경우가 상당히 자주 나온다. 그래서 로그(Log) 는 시스템 발생 장애 및 이상 징후를 모니터링 할 수 있는 좋은 판단 기준이다. 이를 위해 파이썬에서는 logging 모듈을 제공한다.

| Level | 개요 | 예시 |
|---|---|---|
| debug | 개발시 처리 기록을 남겨야하는 로그정보를 남김 | - 다음함수로 A를 호출함 - 변수 A를 무엇으로 변경함 |
| info | 처리가 진행되는 동안의 정보를 알림 | - 서버가 시작되었음 - 서버가 종료됨 - 사용자 A가 프로그램에 접속함 |
| warning | 사용자가 잘못 입력한 정보나 처리는 가능하나, 원래 개발시 의도치 않는 정보가 들어왔을때 알림 | - str 입력을 기대했으나, int가 입력됨 -> str casting 으로 처리함 - 함수에 argument로 이차원 리스트를 기대했으나 일차원리스트가 들어옴 -> 이차원으로 변환후 처리 |
| error | 잘못된 처리로 인해 에러가 났으나, 프로그램은 동작할수있음을 알림 | - 파일에 기록을 해야하는데 파일이 없음 -> Exception 처리 후 사용자에게 알림 - 외부서비스와 연결 불가 |
| critical | 잘못된 처리로 데이터 손실이나 더이상 프로그램이 동작할 수 없음을 알림 | - 잘못된 접근으로 해당 파일이 삭제됨 - 사용자의 의한 강제종료. |
import logging

#Stream(콘솔)에 로그 남기기
logging.debug('debug log')
logging.info('info log')
logging.warning('warning log')
logging.error('error log')
logging.critical('critical log')

# WARNING:root:warning log
# ERROR:root:error log
# CRITICAL:root:critical log
debug level 설정
debug,info level 이 나오지 않는 이유 는 기본적으로 logging의 default level 이 warning 으로 되어 있기 때문이다. 만약 level을 변경하고 싶다면 다음과 같이 설정한다.
import logging

logging.basicConfig(level=logging.DEBUG) # DEBUG level 설정

logging.debug('info log')
logging.info('info log')
logging.warning('info log')
logging.error('info log')
logging.critical('info log')

# DEBUG:root:debug log
# INFO:root:info log
# WARNING:root:warning log
# ERROR:root:error log
# CRITICAL:root:critical log
로그 파일 만들기
만약 로그 형식 변경 과 로그를 파일로 기록 하고 싶다면 다음과 같이 설정한다.
import logging

#logger instance 생성
logger=logging.getLogger()

#logger formatter 생성
#logRecode attributes
formatter=logging.Formatter('[%(asctime)s][%(levelname)s]|[%(filename)s:%(lineno)s]>> %(message)s')

#logger level 셋팅
logger.setLevel(logging.DEBUG)

# file & stream handler 생성
file_handler=logging.FileHandler('logging_example.log') # 로그 파일 핸들러
stream_handler=logging.StreamHandler() # 로그 스트림(콘솔) 핸들러

# handler 에 formatter 설정
file_handler.setFormatter(formatter)
stream_handler.setFormatter(formatter)

# logger instance에 handler 등록, 스트림과 파일에 동시 로그 출력
logger.addHandler(file_handler)
logger.addHandler(stream_handler)

logger.debug('debug_test')
logger.info('info_test')
logger.warning('warning_test')
logger.error('error_test')
logger.critical('critical_test')

# [2021-01-23 00:30:53,444][DEBUG]|[logging_example.py:45]>> debug_test
# [2021-01-23 00:30:53,445][INFO]|[logging_example.py:46]>> info_test
# [2021-01-23 00:30:53,447][WARNING]|[logging_example.py:47]>> warning_test
# [2021-01-23 00:30:53,449][ERROR]|[logging_example.py:48]>> error_test
# [2021-01-23 00:30:53,450][CRITICAL]|[logging_example.py:49]>> critical_test
📄 Configparser & Argparser
✏️ Configparser
프로그램을 만들다보면, 상황에 따라 설정파일의 변동이 있다. 예를들어, 파일들의 주소, 출력파일을 저장할 디렉토리 주소 등이다. 이와 같이 프로그램을 실행시킬때마다 설정을 다르게 해주고 싶을 때 유용한 configparser 모듈이 있다.
- 프로그램의 실행 설정을 file에 저장
- section, key, value 값의 형태로 설정된 설정 파일 사용
- 설정파일을 dict type으로 호출 후 사용
- key:value 혹은 key=value 형식으로 parse
#config.cfg

[SectionOne]
Status:Single
Age:20
Single:True

[SectionTwo]
FavortieColor=Green
#==========================================================================
import configparser

config=configparser.ConfigParser()
config.read('config.cfg') # Config 파일 읽어옵니다.

print(config.sections()) # Config 파일의 섹션 정보를 가져옵니다, ['SectionOne','SectionTwo']

for key in config['SectionOne']: # dict 자료형처럼 사용가능합니다.
    print(key) # status,age,single

print(config['SectionOne']['status']) # 'SectionOne' 에 있는 'status' 값을 가져옵니다. # Single
✏️ Argparser
파이썬 프로그램이나 커맨드라인에서 인자 옵션을 주었던 경험이 있을 것이다. 이와 같이 console 창에서 프로그램 실행시 setting 정보를 저장할수 있도록 도와주는 argparse 모듈이 있다.

#parser_example.py
import argparse

parser=argparse.ArgumentParser(description='Argparser example')

parser.add_argument('-a','--a_value',dest='A_value',help='A integers',type=int)
parser.add_argument('-b','--b_value',dest='B_value',help='B integers',type=int)

args=parser.parse_args()
print(args)
print(args.A_value)
print(args.B_value)
>> parser_example.py -a 4 --b_value 5
Namespace(A_value=4,B_value=5)
4
5
📄 Python data handling
✏️ CSV(Comma seperate Value/ Character-separated values)
-
엑셀 양식의 데이터를 프로그램에 상관없이 쓰기 위한 데이터 형식
-
구분의 종류에 따라 콤마로구분, TSV(tab), SSV(space) 3개가 있다
-
Python에서는 간단히 CSV파일을 처리하기 위해 csv객체를 제공함( import csv )
-
CSV 객체의 활용
-
delimiter (default = ,) : 글자를 나누는 기준
-
lineterminator (default = \r\n) : 줄 바꿈 기준
-
quotechar (default = ") : 문자열을 둘러싸는 신호 문자
-
quoting (default = QUOTE_MINIMAL) : 데이터 나누는 기준이 quotechar에 의해 둘러싸인 레벨
-
✏️ Web
-
WWW (World Wide Web)
-
HTTP protocal: 데이터 송수신
-
HTML 형식: 데이터 표시
-
동작방식
1) 요청 : 웹주소, From, Header 등
2) 처리 : Database 처리 등 요청 대응
3) 응답 : HTML, XML 등으로 결과 반환
4) 렌더링 : HTML, XML 표시
-
-
HTML(Hyper Text Markup Language)
- 웹 상의 정보를 구조적으로 표현
- 제목, 단락, 링크 등 요소 표시를 위해 Tag를 사용
- 모든 HTML은 트리 모양의 포함관계를 가짐
- 일반적으로 html 소스파일을 컴퓨터가 다운로드 후 웹 브라우저가 해석
- 태그 특징을 이용해 정규식으로 파싱 가능
-
정규식 (regular expression)
- 정규 표현식, regexp 또는 regex 등으로 불림
- 복잡한 문자열 패턴을 정의하는 문자 표현 공식
- 특정한 규칙을 가진 문자열의 집합을 추출
- 문법 자체는 매우 방대, 스스로 찾아서 하는 공부 필요
- 필요한 것들은 인터넷 검색을 통해 찾을 수 있음
- regexr.com
-
XML(eXtensible Markup Language)
-
데이터의 구조와 의미를 설명하는 TAG(MarkUp)를 사용하여 표시하는 언어
-
TAG와 TAG사이에 값이 표시되고, 구조적인 정보를 표현할 수 있음
-
HTML과 문법이 비슷, 대표적인 데이터 저장 방식
-
정보의 구조에 대한 정보인 스키마와 DTD 등으로 정보에 대한 정보(메타정보)가 표현되며, 용도에 따라 다양한 형태로 변경가능
-
XML은 컴퓨터(예: PC ↔ 스마트폰)간에 정보를 주고받기 매우 유용한 저장 방식으로 쓰이고 있음
-
XML도 HTML과 같이 구조적 markup 언어
-
정규표현식으로 Parsing이 가능함
-
가장 많이 쓰이는 parser인 beautifulsoup으로 파싱
BeautifulSoup
- HTML, XML등 Markup 언어 Scraping을 위한 대표적인 도구
- lxml 과 html5lib 과 같은 Parser를 사용함
- 속도는 상대적으로 느리나 간편히 사용할 수 있음
-
-
JSON (JavaScript Object Notation)
- javascript의 데이터 객체 표현 방식
- 간결하고 데이터 용량이 작고 code로 전환이 쉬움
- {“key”:”value”} 형태로 dict type과 상호 호환
- import json (json.loads())
