1. 프로젝트 생성
-
Java 17 이상 설치
-
IDE : IntelliJ
-
Project : Gradle - Groovy Project
-
Spring Boot : 3.x.x
※ Spring boot 3.0 선택시 확인 사항
- Java 17 이상을 사용해야 함
- javax 패키지 이름을 jakarta로 변경해야 함
- 오라클과 자바 라이센스 문제로 모든 javax 패키지를 jakarta로 변경
- H2 데이터베이스를 2.1.214 버전 이상 사용
-
Project Metadata
- Group : hello
- Artifact : servlet
- Name : servlet
- Pakage name : hello.servlet
- Packaging : War
- Packaging는 Jar가 아니라 War 선택해야함
- JSP를 실행하기 위해서 필요함
- Java 17 또는 21
-
Dependencies : Spring Web, Lombok
build.gradle
 plugins {
 	id 'org.springframework.boot' version '2.4.3'
 	id 'io.spring.dependency-management' version '1.0.11.RELEASE'
 	id 'java'
 	id 'war'
}

group = 'hello'
version = '0.0.1-SNAPSHOT'
sourceCompatibility = '11'

configurations {
 	compileOnly {
 		extendsFrom annotationProcessor
 	}
}

repositories {
 	mavenCentral()
}

dependencies {
 	implementation 'org.springframework.boot:spring-boot-starter-web'
 	compileOnly 'org.projectlombok:lombok'
 	annotationProcessor 'org.projectlombok:lombok'
 	providedRuntime 'org.springframework.boot:spring-boot-starter-tomcat'
 	testImplementation 'org.springframework.boot:spring-boot-starter-test'
}

test {
 	useJUnitPlatform()
}-
동작확인
- 기본 메인 클래스 실행(
ServletApplication.main()) - http://localhost:8080 호출해서 Whitelabel Error Page가 나오면 정상 동작
- 기본 메인 클래스 실행(
-
롬복 적용
- Preferences plugin lombok 검색 실행 (재시작)
- Preferences Annotation Processors 검색 Enable annotation processing 체크 (재시작)
- 임의의 테스트 클래스를 만들고 @Getter, @Setter 확인
-
서버 요청은 Postman으로 진행 예정
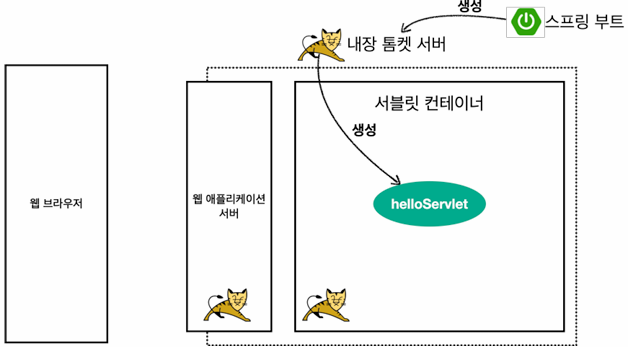
2. Hello 서블릿
- 스프링 부트 환경에서 서블릿 등록
- 서블릿은 톰캣 같은 웹 애플리케이션 서버를 직접 설치하고, 그 위에 서블릿 코드를 클래스 파일로 빌드해서 올린 다음, 톰캣 서비스를 실행하면 됨
- 하지만 이 과정은 매우 번거로움
- 스프링 부트는 톰캣 서버를 내장하고 있으므로, 톰캣 서버 설치 없이 편하게 서블릿 코드를 실행할 수 있음
스프링 부트 서블릿 환경 구성
@ServletComponentScan- 스프링 부트는 서블릿을 직접 등록해서 사용할 수 있도록 @ServletComponentScan을 지원함
hello.servlet.ServletApplication
package hello.servlet;

import org.springframework.boot.SpringApplication;
import org.springframework.boot.autoconfigure.SpringBootApplication;
import org.springframework.boot.web.servlet.ServletComponentScan;

@ServletComponentScan //서블릿 자동 등록
@SpringBootApplication
public class ServletApplication {

 	public static void main(String[] args) {

        SpringApplication.run(ServletApplication.class, args);
	}
}- 서블릿 등록하기
hello.servlet.basic.HelloServlet
package hello.servlet.basic;

import javax.servlet.ServletException;
import javax.servlet.annotation.WebServlet;
import javax.servlet.http.HttpServlet;
import javax.servlet.http.HttpServletRequest;
import javax.servlet.http.HttpServletResponse;
import java.io.IOException;

@WebServlet(name = "helloServlet", urlPatterns = "/hello")
public class HelloServlet extends HttpServlet {

    @Override
	protected void service(HttpServletRequest request, HttpServletResponse response) throws ServletException, IOException {

    	System.out.println("HelloServlet.service");
		System.out.println("request = " + request);
 		System.out.println("response = " + response);

 		String username = request.getParameter("username");
		System.out.println("username = " + username);

    	response.setContentType("text/plain");
    	response.setCharacterEncoding("utf-8");
    	response.getWriter().write("hello " + username);
    }
}@WebServlet: 서블릿 애노테이션- name : 서블릿 이름
- urlPatterns : URL 매핑
- HTTP 요청을 통해 매핑된 URL이 호출되면 서블릿 컨테이너는 아래 메서드를 실행함
protected void service(HttpServletRequest request, HttpServletResponse response)- 웹브라우저 실행
- http://localhost:8080/hello?username=world
- 결과: hello world
- 콘솔 실행결과
HelloServlet.service
request = org.apache.catalina.connector.RequestFacade@5e4e72
response = org.apache.catalina.connector.ResponseFacade@37d112b6
username = world
HTTP 요청 메시지 로그로 확인하기
application.properties에 다음 설정 추가
logging.level.org.apache.coyote.http11=debug
- 스프링 부트 3.2부터는 debug 대신에 trace를 사용해야 함- 서버를 다시 시작하고 요청해보면 서버가 받은 HTTP 요청 메시지를 출력하는 것을 확인할 수 있음
 ...o.a.coyote.http11.Http11InputBuffer: Received [GET /hello?username=servlet
HTTP/1.1
Host: localhost:8080
Connection: keep-alive
Cache-Control: max-age=0
sec-ch-ua: "Chromium";v="88", "Google Chrome";v="88", ";Not A Brand";v="99"
sec-ch-ua-mobile: ?0
Upgrade-Insecure-Requests: 1
User-Agent: Mozilla/5.0 (Macintosh; Intel Mac OS X 11_2_1) AppleWebKit/537.36
(KHTML, like Gecko) Chrome/88.0.4324.150 Safari/537.36
Accept: text/html,application/xhtml+xml,application/xml;q=0.9,image/avif,image/
webp,image/apng,*/*;q=0.8,application/signed-exchange;v=b3;q=0.9
Sec-Fetch-Site: same-origin
Sec-Fetch-Mode: navigate
Sec-Fetch-User: ?1
Sec-Fetch-Dest: document
Referer: http://localhost:8080/basic.html
Accept-Encoding: gzip, deflate, br
Accept-Language: ko,en-US;q=0.9,en;q=0.8,ko-KR;q=0.7

]
참고) 운영 서버에 이렇게 모든 요청 정보를 다 남기면 성능 저하가 발생할 수 있음
- 개발 단계에서만 적용해야 함
서블릿 컨테이너 동작 방식 설명
내장 톰캣 서버 생성
HTTP 요청, HTTP 응답 메시지

웹 애플리케이션 서버의 요청 응답 구조
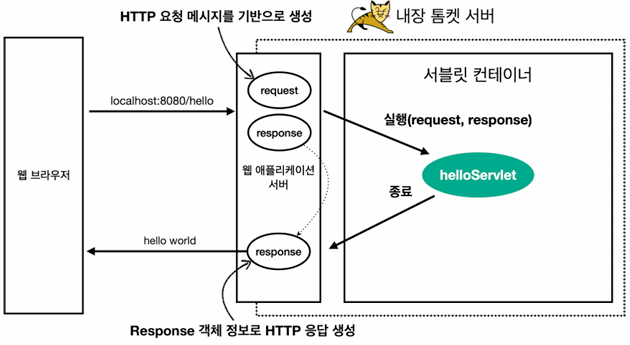
- HTTP 응답에서 Content-Length는 웹 애플리케이션 서버가 자동으로 생성해줌
Welcome 페이지 추가
- 개발할 내용을 편리하게 참고할 수 있도록 welcome 페이지 생성
webapp경로에index.html을 두면 http://localhost:8080 호출시index.html페이지가 열림
main/webapp/index.html
<!DOCTYPE html>
<html>
<head>
    <meta charset="UTF-8">
    <title>Title</title>
</head>
<body>
<ul>
    <li><a href="basic.html">서블릿 basic</a></li>
</ul>
</body>
</html>
main/webapp/basic.html
 <!DOCTYPE html>
 <html>
 <head>
    <meta charset="UTF-8">
    <title>Title</title>
 </head>
 <body>
 <ul>
    <li>hello 서블릿
        <ul>
            <li><a
이다.
 href="/hello?username=servlet">hello 서블릿 호출</a></li>
        </ul>
    </li>
    <li>HttpServletRequest
        <ul>
            <li><a
href="/request-header">기본 사용법, Header 조회</a></li>
            <li>HTTP 요청 메시지 바디 조회
                <ul>
                    <li><a
href="/request-param?username=hello&age=20">GET - 쿼리
파라미터</a></li>
 li>
                    <li><a
href="/basic/hello-form.html">POST - HTML Form</a></
                    <li>HTTP API - MessageBody -> Postman 테스트</li>
                </ul>
            </li>
        </ul>
    </li>
    <li>HttpServletResponse
        <ul>
            <li><a
href="/response-header">기본 사용법, Header 조회</a></li>
            <li>HTTP 응답 메시지 바디 조회
                <ul>
                    <li><a
href="/response-html">HTML 응답</a></li>
                    <li><a
                </ul>
            </li>
        </ul>
    </li>
 </ul>
 </body>
 </html>
3. HttpSevletRequest - 개요
HttpServletRequest 역할
- HTTP 요청 메시지를 개발자가 직접 파싱해서 사용해도 됨
- 하지만 매우 불편할 것임
- 서블릿은 개발자가 HTTP 요청 메시지를 편리하게 사용할 수 있도록 개발자 대신에 HTTP 요청 메시지를 파싱함
- 그리고 그 결과를
HttpServletRequest객체에 담아서 제공함
- 그리고 그 결과를
HttpServletRequest를 사용하면 다음과 같은 HTTP 요청 메시지를 편리하게 조회할 수 있음
HTTP 요청 메시지
POST /save HTTP/1.1
Host: localhost:8080
Content-Type: application/x-www-form-urlencoded
username=kim&age=20-
START LINE
- HTTP 메소드
- URL
- 쿼리 스트링
- 스키마, 프로토콜
-
헤더
- 헤더 조회
-
바디
- form 파라미터 형식 조회
- message body 데이터 직접 조회
-
HttpServletRequest객체는 추가로 여러가지 부가기능도 함께 제공함
임시 저장소 기능
- 해당 HTTP 요청이 시작부터 끝날 때까지 유지되는 임시 저장소 기능
- 저장 : request.setAtrribute(name, value)
- 조회 : request.getAttribute(name)
세션 관리 기능
- request.getSession(create: true)
- HttpServletRequest, HttpServletResponse를 사용할 때 가장 중요한 점은 이 객체들이 HTTP 요청 메시지, HTTP 응답 메시지를 편리하게 사용하도록 도와주는 객체라는 점임
- 따라서 이 기능에 대해서 깊이있는 이해를 하려면 HTTP 스펙이 제공하는 요청, 응답 메시지 자체를 이해해야 함
4. HttpServletRequest - 기본 사용법
- HttpServletRequest가 제공하는 기본 기능
hello.servlet.basic.request.RequestHeaderServlet
package hello.servlet.basic.request;

import javax.servlet.ServletException;
import javax.servlet.annotation.WebServlet;
import javax.servlet.http.*;
import java.io.IOException;

//http://localhost:8080/request-header?username=hello
@WebServlet(name = "requestHeaderServlet", urlPatterns = "/request-header")
public class RequestHeaderServlet extends HttpServlet {

    @Override
 	protected void service(HttpServletRequest request, HttpServletResponse response) throws ServletException, IOException {

 		printStartLine(request);
 		printHeaders(request);
 		printHeaderUtils(request);
 		printEtc(request);
        response.getWriter().write("ok");
   	}
}
start-line 정보
//start line 정보
private void printStartLine(HttpServletRequest request) {

 	System.out.println("--- REQUEST-LINE - start ---");
 	System.out.println("request.getMethod() = " + request.getMethod()); //GET
 	System.out.println("request.getProtocol() = " + request.getProtocol()); //HTTP/1.1
 	System.out.println("request.getScheme() = " + request.getScheme()); //http
	// http://localhost:8080/request-header
 	System.out.println("request.getRequestURL() = " + request.getRequestURL());
 	// /request-header
 	System.out.println("request.getRequestURI() = " + request.getRequestURI());
 	//username=hi
 	System.out.println("request.getQueryString() = " + request.getQueryString());
 	System.out.println("request.isSecure() = " + request.isSecure()); //https 사용 유무
	System.out.println("--- REQUEST-LINE - end ---");
 	System.out.println();
}
결과
--- REQUEST-LINE - start --
request.getMethod() = GET
request.getProtocol() = HTTP/1.1
request.getScheme() = http
request.getRequestURL() = http://localhost:8080/request-header
request.getRequestURI() = /request-header
request.getQueryString() = username=hello
request.isSecure() = false
--- REQUEST-LINE - end --
헤더 정보
//Header 모든 정보
private void printHeaders(HttpServletRequest request) {

 	System.out.println("--- Headers - start ---");

 /*
    Enumeration<String> headerNames = request.getHeaderNames();
    while (headerNames.hasMoreElements()) {
        String headerName = headerNames.nextElement();
        System.out.println(headerName + ": " + request.getHeader(headerName));
    }
*/
    request.getHeaderNames().asIterator()
            .forEachRemaining(headerName -> System.out.println(headerName + ": "
								+ request.getHeader(headerName)));
 	System.out.println("--- Headers - end ---");
 	System.out.println();
}
결과
--- Headers - start --
host: localhost:8080
Connection: keep-alive
cache-control: max-age=0
sec-ch-ua: "Chromium";v="88", "Google Chrome";v="88", ";Not A Brand";v="99"
sec-ch-ua-mobile: ?0
upgrade-insecure-requests: 1
user-agent: Mozilla/5.0 (Macintosh; Intel Mac OS X 11_2_0) AppleWebKit/537.36
(KHTML, like Gecko) Chrome/88.0.4324.150 Safari/537.36
accept: text/html,application/xhtml+xml,application/xml;q=0.9,image/avif,image/
webp,image/apng,*/*;q=0.8,application/signed-exchange;v=b3;q=0.9
sec-fetch-site: none
sec-fetch-mode: navigate
sec-fetch-user: ?1
sec-fetch-dest: document
accept-encoding: gzip, deflate, br
accept-language: ko,en-US;q=0.9,en;q=0.8,ko-KR;q=0.7
--- Headers - end -
Header 편리한 조회
//Header 편리한 조회
private void printHeaderUtils(HttpServletRequest request) {

	System.out.println("--- Header 편의 조회 start ---");
 	System.out.println("[Host 편의 조회]");
 	System.out.println("request.getServerName() = " + request.getServerName()); //Host 헤더
	System.out.println("request.getServerPort() = " + request.getServerPort()); //Host 헤더
	System.out.println();

 	System.out.println("[Accept-Language 편의 조회]");
    request.getLocales().asIterator()
            .forEachRemaining(locale -> System.out.println("locale = " + locale));
 	System.out.println("request.getLocale() = " + request.getLocale());
 	System.out.println();

 	System.out.println("[cookie 편의 조회]");
 	if (request.getCookies() != null) {
 		for (Cookie cookie : request.getCookies()) {
 			System.out.println(cookie.getName() + ": " + cookie.getValue());
        }
    }
 	System.out.println();

 	System.out.println("[Content 편의 조회]");
 	System.out.println("request.getContentType() = " + request.getContentType());
	System.out.println("request.getContentLength() = " + request.getContentLength());
 	System.out.println("request.getCharacterEncoding() = " + request.getCharacterEncoding());

 	System.out.println("--- Header 편의 조회 end ---");
 	System.out.println();
}
결과
--- Header 편의 조회 start --
[Host 편의 조회]
request.getServerName() = localhost
request.getServerPort() = 8080

[Accept-Language 편의 조회]
locale = ko
locale = en_US
locale = en
locale = ko_KR
request.getLocale() = ko

[cookie 편의 조회]

[Content 편의 조회]
request.getContentType() = null
request.getContentLength() = -1
request.getCharacterEncoding() = UTF-8
--- header 편의 조회 end ---
기타 정보
- 기타 정보는 HTTP 메시지의 정보는 아님
//기타 정보
private void printEtc(HttpServletRequest request) {

 	System.out.println("--- 기타 조회 start ---");
 	System.out.println("[Remote 정보]");
 	System.out.println("request.getRemoteHost() = " + request.getRemoteHost());

 	System.out.println("request.getRemoteAddr() = " + request.getRemoteAddr());
 	System.out.println("request.getRemotePort() = " + request.getRemotePort());
 	System.out.println();

 	System.out.println("[Local 정보]");
 	System.out.println("request.getLocalName() = " + request.getLocalName());
 	System.out.println("request.getLocalAddr() = " + request.getLocalAddr());
 	System.out.println("request.getLocalPort() = " + request.getLocalPort());

 	System.out.println("--- 기타 조회 end ---");
 	System.out.println();
}
결과
--- 기타 조회 start --
[Remote 정보]
request.getRemoteHost() = 0:0:0:0:0:0:0:1
request.getRemoteAddr() = 0:0:0:0:0:0:0:1
request.getRemotePort() = 54305

[Local 정보]
request.getLocalName() = localhost
request.getLocalAddr() = 0:0:0:0:0:0:0:1
request.getLocalPort() = 8080
--- 기타 조회 end ---
- 참고) 로컬에서 테스트하면 IPv6 정보가 나오는데, IPv4 정보를 보고 싶으면 다음 옵션을 VM options에 넣어주면 됨
-Djava.net.preferIPv4Stack=true

Backend development