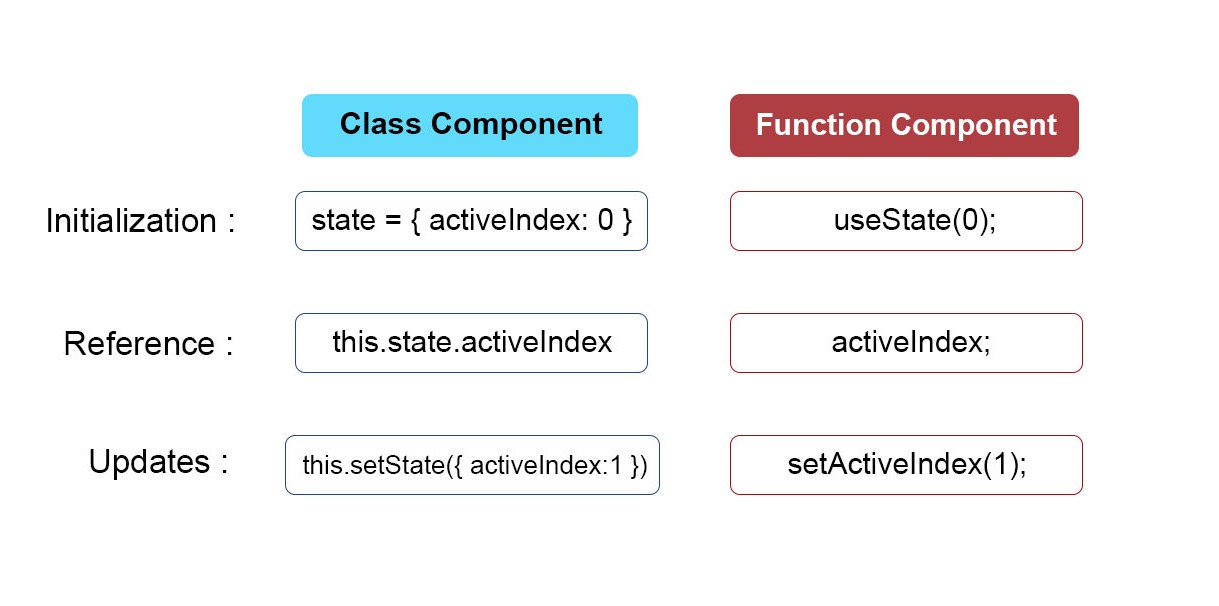
시작전 위의 그림으로 class component와 function component의 사용을 비교해보면 Hooks에 대한 이해가 더 빠를것이다.
한가지 참고해야 할 점은, state system에서는 두가지를 한꺼번에 업데이트할때 state = { activeIndex: 0,term:'' } 이렇게 한줄로 할 수 있지만, hook system에서는 const [activeIndex, setActiveIndex] = useState(0); const [term, setTerm] = useState(''); 이렇게 새로 적어야한다.

React Hook 들의 목적은 재사용가능한 코드를 만드는데에 도움을 주는것! ✨
Hooks System
useState : functional component안에서 state를 사용할 수 있는 접근권한을 준다.
useEffect : class component의 lifecycle method와 같은 역할을 한다.
useRef : ref를 만들수 있게 해준다.
(위의 세가지는 모두 function들이다.)
invoke 방법 2가지
1. import React, { useState } from 'react';
2. const [state, useState] = React.useState([])
useState
버튼을 클릭할때마다 숫자가 1씩 카운트 되게 하기
const {useState} = React;

export default function App() {
	const [count, setCount] = useState(0);

  	const onButtonClick = () => {
      setCount(count + 1);
    }

    return (
      <div>
      	<button onClick={onButtonClick}>Click me</button>
      <h1>Current count :{count} </h1>
      </div>
      )
}
이 코드는 아래와 같이 바꿀 수도 있다. 둘다 같은 기능
export default function App() {
    const [count, setCount] = useState(0);

    return (
        <div>
            <button onClick={() => {setCount(count+1);
            }}>Click Me!</button>

            <h1>Current Count:{count}</h1>
        </div>
    );
}-
여기에서 [count, setCount] 는
array 안에 있는 element들을 쉽게 가져올 수 있는 short cut이라고 생각하면 된다.
count는 우리가 계속 tracking하는 state로, 계속해서 값이 변한다.
setCount는 function으로 우리가 state를 update하기 위해 부른다. -
null 은 이 state를 위한 initial value이다. (가장 처음에만 null이고 업데이트를 하게되는 두번째부터는 더이상 null이 아닌 업데이트한 값으로 바뀐다.)
-
useState with object
import React, { useState } from 'react';

const UseStateObject = () => {
	const [person, setPerson] = useState({
    name: 'peter',
      age: 24,
      message: 'random message'
    });

const changeMessage = () => {
	setPerson({...person, message: 'hello world'}) // 모든 person을 불러온다음, 그중에서 message키의 value만 바꿔준다.
};

  return (
    <>
    <h3>{person.name}<h3>
    <h3>{person.age}<h3>
    <h3>{person.message}<h3>
    <button onclick={changeMessage}>
     change message
    </button>
    </>
  );
};
useEffect
- 컴포넌트 바깥에서 작동하는 것들은 useEffect를 사용한다.
- by default runs after every re-render -> 이걸 막기 위해 두번째 argument로 [] 등을 넣어준다.
- class component에 Lifecycle method가 있다면, function component에는 useEffect가 있다. mount+undate를 합쳐놓은 것이 useEffect다.
import React, { useState, useEffect } from 'react';

const Search = () => {
  const [term, setTerm] = useState('');

  useEffect(() => {
    console.log('heyheyhey');
  }, );
//여기에서 두번째 argument로 들어가는 것이 '언제' 코드가 실행되는지를 컨트롤 한다.

  return (
   )
}
- 두번째 인자에 들어갈 수 있는 것은 3가지가 있다.
- []: 우리가 쓴 arrow function을 (첫번째 인자를) component가 맨 처음 render될때만 실행
- 아무것도 안들어가는 것: 맨 처음 render될때 + 그 후로 매번 re-render될때 실행
- [term] : 맨 처음 render 될때 + array안에 있는 data값이 변경될 때만 실행
useEffect에서는 async를 사용할 수 없다. -> 대신 사용할 수 있는 방법 3가지가 있음
1번: 임시 변수 선언 <- react에서 가장 추천하는 방식
useEffect(() => {
	const search = async () => {
    	await axios.get('https://api.github.com/users');
    };
    search();
}, [term]);
또 다른 방식
import React, { useState, useEffect } from 'react';
const UseEffectApi = () => {
  const [user, setUsers] = useState([]);

  const getUsers = async() => {
      const response = await getch('https://api.github.com/users');
      const users = await response.json();
      setUsers(users);
  };

  useEffect(()=> {
  	getUsers();
  },[])

  return (
    {users.map((user)=> {

  }}
  )
};
2번: 1번에서 const를 지우고 ()를 더하기 (1번과 기능은 완전히 같음, 좀 더 코드가 심플할 뿐)
useEffect(() => {
	(async () => {
    	await axios.get('https://api.github.com/users');
    })();
}, [term]);
3번: promise 이용
useEffect(() => {
	axios.get('https://api.github.com/users')
  		.then((response) => {
    		console.log(response.data);
    });
}, [term]);
useRef
- useState와 거의 비슷하다. 마찬가지로 value값을 보관하는데에 쓰인다.
- 하지만 re-render을 triger하는게없다.
- DOM element를 targeting 하는데에 많이 사용한다.
import React, { useRef } from 'react';

const UseRef = () => {
 const refContainer = useRef(null);

  const handleSubmit = (e) => {
  e.preventDefault();
  console.log(refContainer.current.value);
  };

  return (
    <>
     <form onSubmit={handleSubmit}
	<input type="text" ref={refContainer}/>
        <button type="submit">submit</button>
     </form>
    </>
    )
}
이제 input창에 글자를 치고 submit버튼을 누를때마다 value값이 refContainer에 저장된다.
useReducer
- 규모가 큰 어플리케이션을 만들때 사용하면 유용한 후크. 복잡한 state logic을 사용할때 structure을 더해준다.
- callback대신 dispatch를 pass한다.
기본문법
const [state, dispatch] = useReducer(reducer, );
첫번째 argument reducer은 action을 dispatch할때 실행되는 코드(state를 manipulate한다)
두번째 argument defaultState는 initial state로, 따로 변수로 선언하지 않고 ()안에서 object형태로 선언해도 된다.
import React, { useState, useReducer } from 'react';

const reducer = (state, action) => {
  if (action.type === 'ADD_ITEM') {
    const newPeople = [...state.people, action.payload];
    return {
      ...state,
      people: newPeople,
      isModalOpen: true,
      modalContent: 'item added',
    };
  }
  if (action.type === 'NO_VALUE') {
    return { ...state, isModalOpen: true, modalContent: 'please enter value' };
  }
  if (action.type === 'CLOSE_MODAL') {
    return { ...state, isModalOpen: false };
  }
  if (action.type === 'REMOVE_ITEM') {
    const newPeople = state.people.filter(
      (person) => person.id !== action.payload
    );
    return { ...state, people: newPeople };
  }
  throw new Error('no matching action type');
};

const defaultState = {
  people: [],
  isModalOpen: false,
  modalContent: '',
};

const Index = () => {
  const [name, setName] = useState('');
  const [state, dispatch] = useReducer(reducer, defaultState);
  const handleSubmit = (e) => {
    e.preventDefault();
    if (name) {
      const newItem = { id: new Date().getTime().toString(), name };
      dispatch({ type: 'ADD_ITEM', payload: newItem });
      setName('');
    } else {
      dispatch({ type: 'NO_VALUE' });
    }
  };

  const closeModal = () => {
    dispatch({ type: 'CLOSE_MODAL' });
  };

  return (
    <>
      {state.isModalOpen && (
        <Modal closeModal={closeModal} modalContent={state.modalContent} />
      )}
      <form onSubmit={handleSubmit} className='form'>
        <div>
          <input
            type='text'
            value={name}
            onChange={(e) => setName(e.target.value)}
          />
        </div>
        <button type='submit'>add </button>
      </form>
      {state.people.map((person) => {
        return (
          <div key={person.id} className='item'>
            <h4>{person.name}</h4>
            <button
              onClick={() =>
                dispatch({ type: 'REMOVE_ITEM', payload: person.id })
              }
            >
              remove
            </button>
          </div>
        )})};
    </>
  )};

export default Index;
- state 를 컨트롤하기 위해서는 우선 dispatch를 해야한다.
dispatch ({ type: 'TESTING' }) 이런식으로 항상 object를 pass하며, 그 안의 property는 항상 type이다. 이게 action이 된다.
type의 value는 대문자로 쓰는게 convention이다. - 한번 action에 dispatch를 하게되면 -> 가장 윗줄의 reducer 변수로 가서 그 안의 state를 return하게 된다.
여기서 state는 업데이트 전의 것, action은 우리가 뭘 하고싶은지를 말한다 (= 여기서는 'TESTING'이 action) - dispatch에 새로운 property를 더하고싶을때마다 payload property를 사용해서 더할수 있다.
