
오늘은 UICollectionViewCompositionalLayout을 사용해서 CollectionView의 Section마다 서로 다른 레이아웃을 구성해보도록 하겠습니다.
UICollectionViewCompositionalLayout
애플 공식문서에서는 다음과 같이 설명하고 있습니다.
높은 적응력과 유연한 시각적 배치로 항목을 결합할 수 있는 레이아웃 객체
CompositionalLayout은 CollectionView 레이아웃의 한 유형입니다. 이것은 유연하고 빠르게 구성할 수 있도록 설계되어 각각의 작은 구성 요소를 전체 레이아웃으로 결합하거나 합성하여 콘텐츠에 대한 모든 종류의 시각적 배열을 구축할 수 있습니다.
CompositionalLayout은 레이아웃을 별개의 시각적 Group 으로 분할하는 하나 이상의 Section으로 구성됩니다. 각 Section은 표시하려는 데이터의 최소 단위인 개별 항목 Group으로 구성됩니다. Group은 항목을 가로 행, 세로 열 또는 커스텀 배치도 가능합니다.
쉽게 말해서 CollectionView가 여러 개의 Section으로 구성되어 있고, Section마다 서로 다른 레이아웃을 표시하기 위해서 UICollectionViewCompositionalLayout을 사용할 수 있습니다.
이것은 iOS 13부터 사용할 수 있습니다.
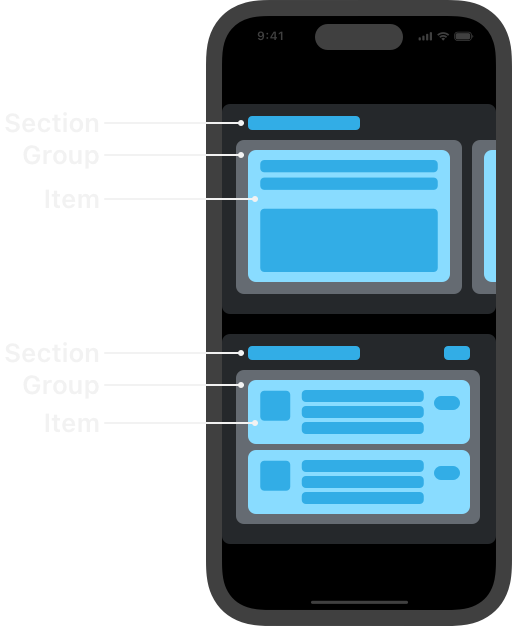
위 그림을 보면, CollectionView는 여러 개의 Section을 가질 수 있고, Section 안에는 분할 된 여러 개의 Group과 Group 안에는 Item이 있습니다.
이론은 여기까지하고 바로 예제 진행하겠습니다.
예제
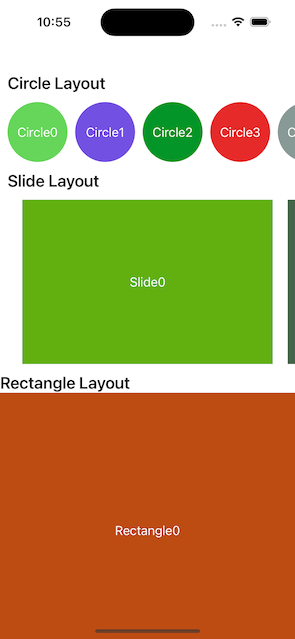
위와 같은 UI를 CollectionView 하나만 사용해서 구현하고 싶을 때, CompositionalLayout을 사용하면 됩니다.
총 3개의 Section이 있고, Section마다 서로 다른 레이아웃을 구성하고 있습니다.
그리고 각각의 Section은 Header를 가지고 있습니다.
우선 Header는 제쳐두고, 3개의 섹션으로 나누고 각각 레이아웃을 배치하는 코드를 작성해볼게요.
enum HomeSection {
    case circle([String])
    case slideRectangle([String])
    case rectangle([String])
}
섹션을 구분 위한 열거형을 정의합니다.
각각의 섹션에 데이터를 뿌려주기 위해서 연관값으로 문자열 배열 데이터를 가집니다.
final class RectangleCell: UICollectionViewCell {

    private let label: UILabel = {
        let label = UILabel()
        label.textColor = .white
        label.textAlignment = .center
        return label
    }()

    static let identifier = "RectangleCell"

    override init(frame: CGRect) {
        super.init(frame: frame)
        layout()
    }

    required init?(coder: NSCoder) {
        fatalError("init(coder:) has not been implemented")
    }

    private func layout() {
        self.contentView.backgroundColor = UIColor(
          red: CGFloat(drand48()),
          green: CGFloat(drand48()),
          blue: CGFloat(drand48()),
          alpha: 1.0
        )

        contentView.addSubview(label)
        label.snp.makeConstraints { make in
            make.edges.equalToSuperview()
        }
    }

    func bind(text: String) {
        label.text = text
    }

}
Slide와 Rectangle 섹션에서 사용할 Cell입니다.
CircleCell은 cornerRadius를 설정하는 것 제외하고는 위와 동일하기 때문에 따로 첨부하지 않겠습니다.
class CompositionalLayoutViewController: UIViewController {

    private lazy var collectionView: UICollectionView = {
        let cv = UICollectionView(frame: .zero, collectionViewLayout: self.makeFlowLayout())
        cv.dataSource = self
        cv.register(SectionHeader.self, forSupplementaryViewOfKind: SectionHeader.elementKind, withReuseIdentifier: SectionHeader.identifier)
        cv.register(RectangleCell.self, forCellWithReuseIdentifier: RectangleCell.identifier)
        cv.register(CircleCell.self, forCellWithReuseIdentifier: CircleCell.identifier)
        return cv
    }()

    private var dataSource: [HomeSection] = [
        HomeSection.circle((0...10).map { "Circle\($0)" }),
        HomeSection.slideRectangle((0...10).map { "Slide\($0)" }),
        HomeSection.rectangle((0...10).map { "Rectangle\($0)" }),
    ]

    override func viewDidLoad() {
        super.viewDidLoad()

        layout()
    }

    private func layout() {
        view.backgroundColor = .white

        view.addSubview(collectionView)
        collectionView.snp.makeConstraints { make in
            make.top.equalTo(view.safeAreaLayoutGuide)
            make.left.right.bottom.equalToSuperview()
        }

    }
}
collectionView를 배치하고, 각 섹션에 뿌려주기 위한 데이터를 임의로 생성해서 dataSource라는 변수에 저장했습니다.
여기까지 하면, makeFlowLayout()에서 에러가 발생하죠.
이 함수로 CompositionalLayout을 만들겁니다.
dataSource도 구현해주지 않았으니 먼저 구현해줍시다.
//MARK: - DataSource
extension CompositionalLayoutViewController: UICollectionViewDataSource {
    func numberOfSections(in collectionView: UICollectionView) -> Int {
        return dataSource.count
    }

    func collectionView(_ collectionView: UICollectionView, numberOfItemsInSection section: Int) -> Int {
        switch dataSource[section] {
        case .circle(let data):
            return data.count
        case .slideRectangle(let data):
            return data.count
        case .rectangle(let data):
            return data.count
        }
    }

    func collectionView(_ collectionView: UICollectionView, cellForItemAt indexPath: IndexPath) -> UICollectionViewCell {
        switch dataSource[indexPath.section] {
        case .circle(let data):
            let cell = collectionView.dequeueReusableCell(withReuseIdentifier: CircleCell.identifier, for: indexPath) as! CircleCell
            cell.bind(text: data[indexPath.row])
            return cell
        case .slideRectangle(let data):
            let cell = collectionView.dequeueReusableCell(withReuseIdentifier: RectangleCell.identifier, for: indexPath) as! RectangleCell
            cell.bind(text: data[indexPath.row])
            return cell
        case .rectangle(let data):
            let cell = collectionView.dequeueReusableCell(withReuseIdentifier: RectangleCell.identifier, for: indexPath) as! RectangleCell
            cell.bind(text: data[indexPath.row])
            return cell
        }
    }
섹션에 따라 분기처리해주는 것 말고, 단일 섹션으로 CollectionView를 구현하는 것과 다르지 않습니다.
//MARK: - Make CollectionView Compositional Layout
extension CompositionalLayoutViewController {

    private func makeFlowLayout() -> UICollectionViewCompositionalLayout {
        return UICollectionViewCompositionalLayout { section, ev -> NSCollectionLayoutSection? in
            // section에 따라 서로 다른 layout 구성
            switch self.dataSource[section] {
            case .circle:
                return self.makeCircleSectionLayout()
            case .slideRectangle:
                return self.makeSlideRectangleLayout()
            case .rectangle:
                return self.makeRectangleSectionLayout()
            }

        }
    }

    private func makeCircleSectionLayout() -> NSCollectionLayoutSection? {
        // item
        let itemSize = NSCollectionLayoutSize(
            widthDimension: .absolute(80),
            heightDimension: .fractionalHeight(1))
        let item = NSCollectionLayoutItem(layoutSize: itemSize)

        // group
        let groupSize = NSCollectionLayoutSize(
            widthDimension: .absolute(90),
            heightDimension: .estimated(80))
        let group = NSCollectionLayoutGroup.horizontal(layoutSize: groupSize, subitems: [item])

        // section
        let section = NSCollectionLayoutSection(group: group)
        section.orthogonalScrollingBehavior = .continuous // 수평 스크롤
        section.contentInsets = NSDirectionalEdgeInsets(
            top: 12,
            leading: 10,
            bottom: 12,
            trailing: 10)


        return section
    }

    private func makeSlideRectangleLayout() -> NSCollectionLayoutSection? {
        // item
        let itemSize = NSCollectionLayoutSize(
            widthDimension: .fractionalWidth(1),
            heightDimension: .fractionalHeight(1))
        let item = NSCollectionLayoutItem(layoutSize: itemSize)
        item.contentInsets = .init(
            top: 0,
            leading: 10,
            bottom: 0,
            trailing: 10)

        // group
        let groupSize = NSCollectionLayoutSize(
            widthDimension: .fractionalWidth(0.9),
            heightDimension: .fractionalHeight(0.3))
        let group = NSCollectionLayoutGroup.horizontal(layoutSize: groupSize, subitems: [item])

        // section
        let section = NSCollectionLayoutSection(group: group)
        section.orthogonalScrollingBehavior = .groupPagingCentered
        section.contentInsets = NSDirectionalEdgeInsets(
            top: 12,
            leading: 10,
            bottom: 12,
            trailing: 10)

    }

    private func makeRectangleSectionLayout() -> NSCollectionLayoutSection? {
        // item
        let itemSize = NSCollectionLayoutSize(
            widthDimension: .fractionalWidth(1),
            heightDimension: .fractionalHeight(1))
        let item = NSCollectionLayoutItem(layoutSize: itemSize)
        item.contentInsets = NSDirectionalEdgeInsets(
            top: 0,
            leading: 0,
            bottom: 10,
            trailing: 0)

        // group
        let groupSize = NSCollectionLayoutSize(
            widthDimension: .fractionalWidth(1),
            heightDimension: .fractionalHeight(0.5))

        let group = NSCollectionLayoutGroup.horizontal(layoutSize: groupSize, subitems: [item])

        // section
        let section = NSCollectionLayoutSection(group: group)
        item.contentInsets = NSDirectionalEdgeInsets(
            top: 0,
            leading: 10,
            bottom: 12,
            trailing: 10)


        return section
    }
처음 보면, 굉장히 난해한 코드로 보일 수 있습니다만... 알고보면 어려운 건 없고, 그냥 item, group의 size를 지정하고, item을 group에 넣어주고, 그 group을 통해 section을 생성하는 코드입니다.
여기서 layoutSize를 지정하는 방법으로는 3가지가 있습니다.
- fractional : 화면 비율로 지정
- estimated : 추정 값, 실제 크기는 콘텐츠가 렌더링될 때 결정
- absolute : 절대값
저는 코드 가독성을 위해 섹션마다 섹션 생성 함수를 분리해서 작성했습니다
지금까지의 코드를 실행해보면, 3개의 섹션으로 나뉘고, 섹션마다 서로 다른 레이아웃으로 구성된 UI가 나옵니다!
이제 각 Section에 Header를 넣어볼게요!
import UIKit

final class SectionHeader: UICollectionReusableView {

    private let sectionLabel: UILabel = {
        let label = UILabel()
        label.font = .boldSystemFont(ofSize: 22)
        label.textColor = .black
        return label
    }()

    static let elementKind = "SectionHeader"
    static let identifier = "SectionHeader"

    override init(frame: CGRect) {
        super.init(frame: frame)

        layout()
    }

    required init?(coder: NSCoder) {
        fatalError("init(coder:) has not been implemented")
    }

    private func layout() {
        addSubview(sectionLabel)
        sectionLabel.snp.makeConstraints { make in
            make.edges.equalToSuperview()
        }
    }

    func bind(sectionTitle: String) {
        sectionLabel.text = sectionTitle
    }

}
Header는 UICollectionReusableView를 상속받아서 구현합니다.
저는 UILabel 하나만 배치해줬어요
cv.register(SectionHeader.self, forSupplementaryViewOfKind: SectionHeader.elementKind, withReuseIdentifier: SectionHeader.identifier)collectionView 선언하는 곳에 header를 register 해주세요.
private func makeHeaderView() -> NSCollectionLayoutBoundarySupplementaryItem {
        let headerSize = NSCollectionLayoutSize(
            widthDimension: .fractionalWidth(1),
            heightDimension: .estimated(50))
        let header = NSCollectionLayoutBoundarySupplementaryItem(
            layoutSize: headerSize,
            elementKind: SectionHeader.elementKind,
            alignment: .top)

        return header
    }
Group, Item과 마찬가지로 header도 LayoutSize를 지정해서 만들어줍니다!
// header
let header = makeHeaderView()
section.boundarySupplementaryItems = [header]
각 섹션을 정의하는 부분에서 위와 같이 header를 넣어주면 됩니다!
    func collectionView(_ collectionView: UICollectionView, viewForSupplementaryElementOfKind kind: String, at indexPath: IndexPath) -> UICollectionReusableView {
        switch kind {
        case SectionHeader.elementKind:
            let header = collectionView.dequeueReusableSupplementaryView(ofKind: kind, withReuseIdentifier: SectionHeader.identifier, for: indexPath) as! SectionHeader

            switch dataSource[indexPath.section] {
            case .circle:
                header.bind(sectionTitle: "Circle Layout")
            case .rectangle:
                header.bind(sectionTitle: "Rectangle Layout")
            case .slideRectangle:
                header.bind(sectionTitle: "Slide Layout")
            }

            return header
        default:
            return UICollectionReusableView()
        }
    }
Header도 Cell과 마찬가지로 재사용되기 때문에 DataSource의 메서드를 구현해줘야합니다.
이제 코드 돌려보면, 원하던 UI가 나올겁니다.
굉장히 복잡한 것 같지만, 이 코드에 익숙해지면, 추가적인 Section을 구현한다하더라도 거의 복붙이기 때문에 약간 복잡한 것 같으면서 유연한 구조인 것 같아요.
