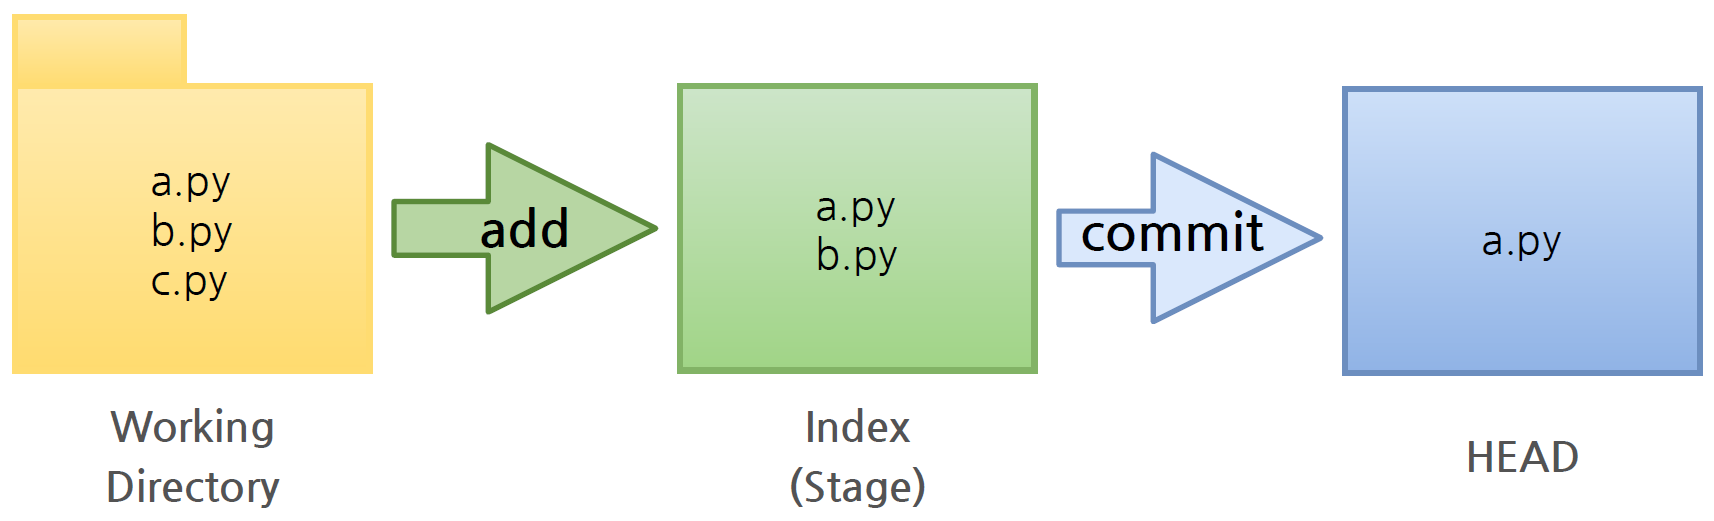
로컬 저장소
Local Repository는 Git이 관리하는 3가지 단계로 구성되어 있다.
-
Working Directory (작업공간) - 실제 소스 파일, 생성한 파일들이 존재
-
Index (Stage) - Staging area(준비영역)의 역할, git add한 파일들이 존재(아직 version은 없음)
-
HEAD - 최종 확정본, git commit한 파일들이 존재(commit한 순간 version이 매겨진다.)
💡 로컬 저장소 생성
Local Repository를 생성한 후 Remote Repository와 연동한다.
❗ Working Directory
1. Workspace 생성
$ mkdir <workspace_name>2. Working Directory 생성
- Workspace로 이동한 뒤 Working Directory를 생성한다.
  $ cd <workspace_name>
  <workspace_name> % mkdir <project_name>
3. Repository 생성
- 생성한 프로젝트 폴더로 이동한 뒤 해당 위치에서 Git을 초기화하는 명령어를 사용하면 해당 폴더는 Working Directory로 인식되어 Git이 관리하기 시작한다.
  <workspace_name> % cd <project_name>
  <project_name> % git init
4. .git 폴더 생성 확인
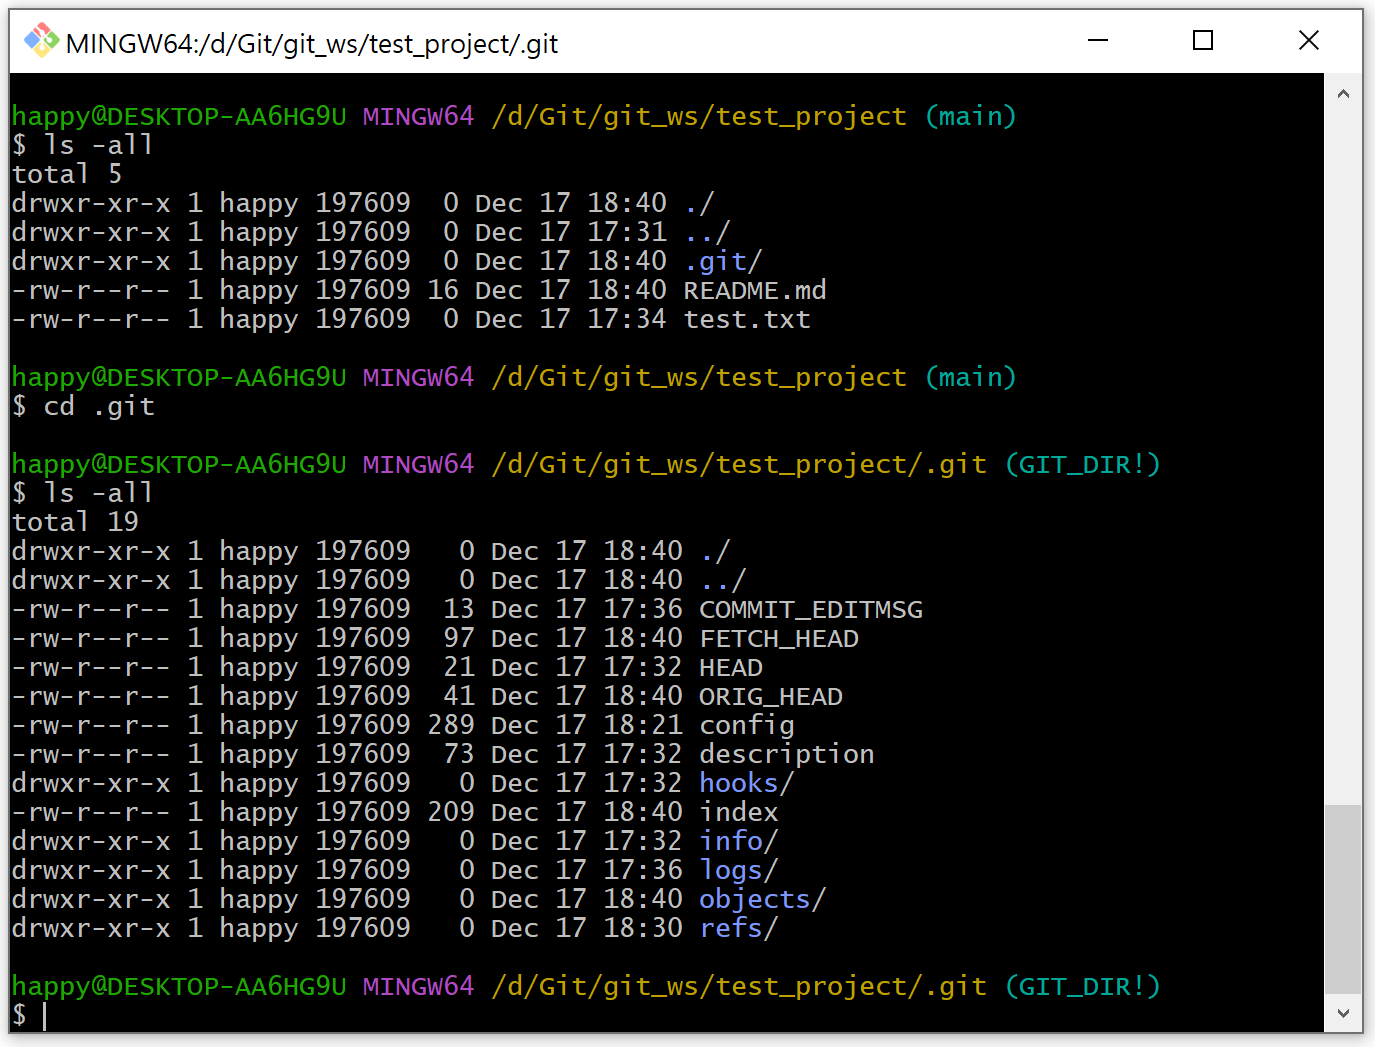
.git으로 이동해서 파일을 살펴보면 Git 관련 파일들이 생성된 것을 확인할 수 있다.
  <project_name> % ls -all
  <project_name> % cd .git
  .git % ls -all
5. 파일 생성
- Working Directory에 파일 생성
이때 touch 명령어를 사용하면 빈 파일이 생성된다.
  <project_name> % touch <file_name_extension>
  <project_name> % ls
6. Git 상태 확인
- git status로 파일 상태를 자주 확인해주는 것이 좋다.
<project_name> % git status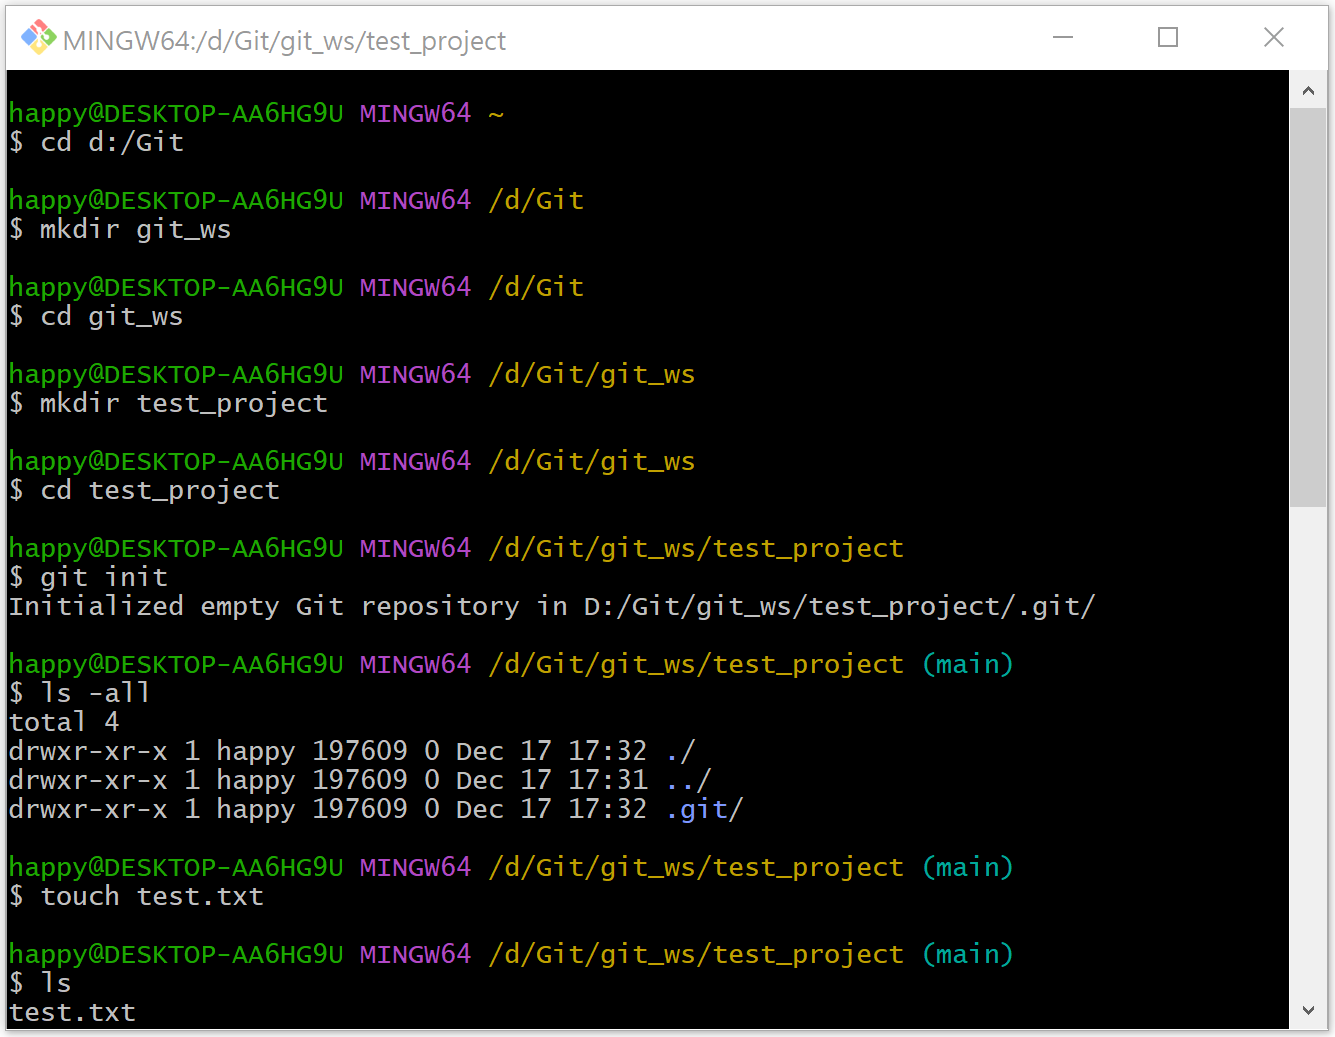
❗ Index (Stage)
7. Git ADD
- Working Directory에서 변경된 파일을 Index(Stage)에 추가한다.
  <project_name> % git add <file_name_extension> or <folder_name>
  <project_name> % git status
❗ HEAD
8. Git Commit
-
Index(Stage)에 추가된 변경사항을 HEAD에 반영한다.
-
-m 은 message를 의미하며 의미있는 내용을 사용하는 것이 좋다.
  <project_name> % git commit -m “-message-” <file_name_extension>
<project_name> % git status 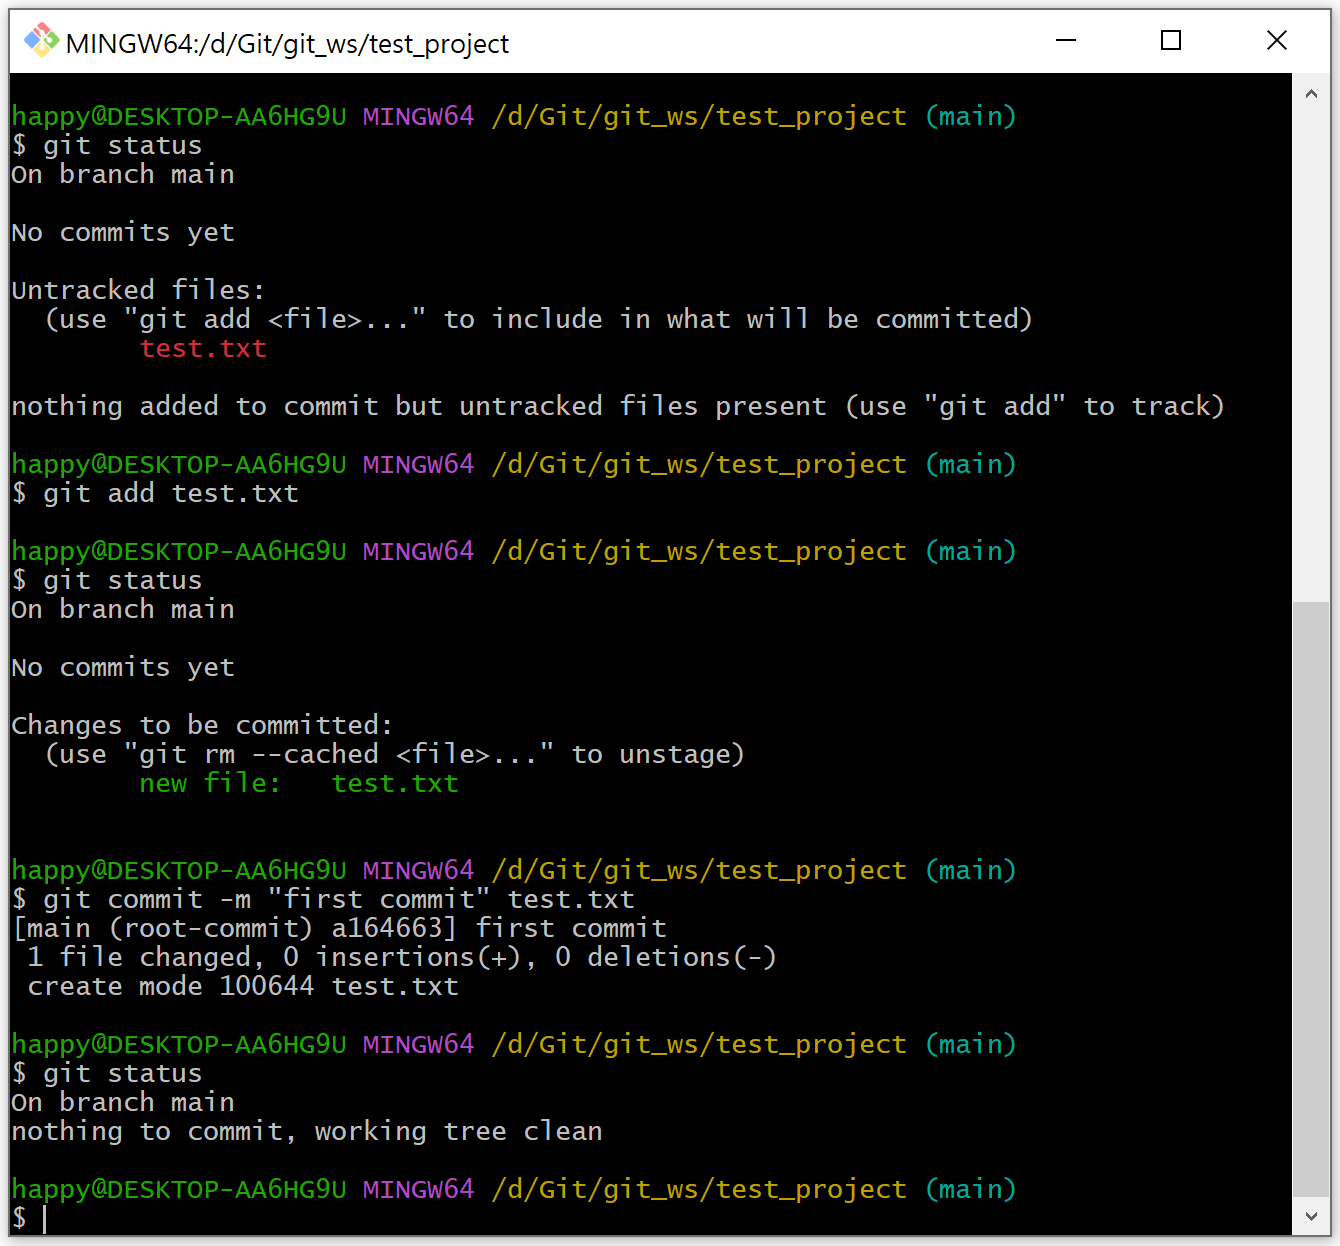
💡 원격 저장소와 연결
Local Repository 생성 후 비어있는 Remote Repository와 연결한다.
  $ git remote add origin <username+token+remote_repository_https>
$ git remote -v-
Remote Repository 이름은 Local Repository(Project폴더) 이름과 동일하게 생성한다.
-
Remote Repository 접속 시 비밀번호 대신 Token을 사용하므로 GitHub에서 토큰을 먼저 생성한다.
-
git push 를 하면 내가 Local Repository에서 git commit해 놓은 파일만 Remote Repository에 올라가게 된다.
  $ git push origin main
$ git status- Remote Repository에 변경 내용이 있을 경우 git pull 로 변경 내용을 Local Repository로 가져와 Sync를 맞춘다.
  $ git pull origin main
  $ git status
원격 저장소
Remote Repository는 Github Site에서 Create repository 번튼을 클릭해서 생성할 수 있다.
💡 원격 저장소 생성
-
Add a README file과 Add .gitignore(python) 선택 후 Create repository
-
Default Branch는 ‘main’
- view all branches에서 ‘main’ 이라는 이름은 수정 가능하다.
- Settings >> repositories에서 Default Branch 이름을 설정할 수 있다.
💡 Git Clone
Local Repository가 없는 상태에서 Remote Repository를 Local로 복제한다.
-
Git Clone 하나로 Local Repository를 생성하는 모든 과정을 다 할 수 있다.
- 프로젝트 폴더 만들고
+Git Init으로 해당 폴더 초기화 하고
+Remote Repository를 등록하고
+Remote Repository의 내용을 Pull하는
모든 과정을 Git Clone으로 할 수 있다.
- 프로젝트 폴더 만들고
-
Git Clone을 할 때 <username>과 <token>을 함께 등록해준다.
$ git clone <username+token+remote_repository_https>