
- 프로젝트를 진행하다 보면 인증사용자 정보(username, password)만 가지고 할 수 있는게 많지 않다.
- 사용자의 추가정보(이메일, 연락처, 추가 권한들...)까지 사용자 정보에 저장할 수 있다면 좀 더 많은 일을 할 수 있을 것이다.
- 이를 해결할 수 있는 방법에는 2가지가 있다.
방법
방법1) 직접 UserDetailsService를 구현한다.
방법2) 직접 AuthenticationProvider를 구현한다.
이 게시글에서는 UserDetailsService를 구현하는 방법에 대해 다룬다.
1. UserDetailsService 구현
- UserDetailsService: authentication-provider(인증을 위임받아 담당하는 제공자) 안에서 내부적으로 '진짜' 인증처리를 담당하는 객체이다.
- 메서드: UserDetails loadUserByUsername(String username)
- 리턴타입: UserDetails
- 원하는 객체 VO를 User라는 인터페이스로 만들어서 UserDetails 타입으로 만들어 사용
- User 클래스를 상속하는 형태가 일반적으로 가장 많이 사용되는 방법이다.
2. 실습
2-1. 로그인 시 인증 정보 받아오기
- 로그인한 인증 객체를 받아오는 Principal
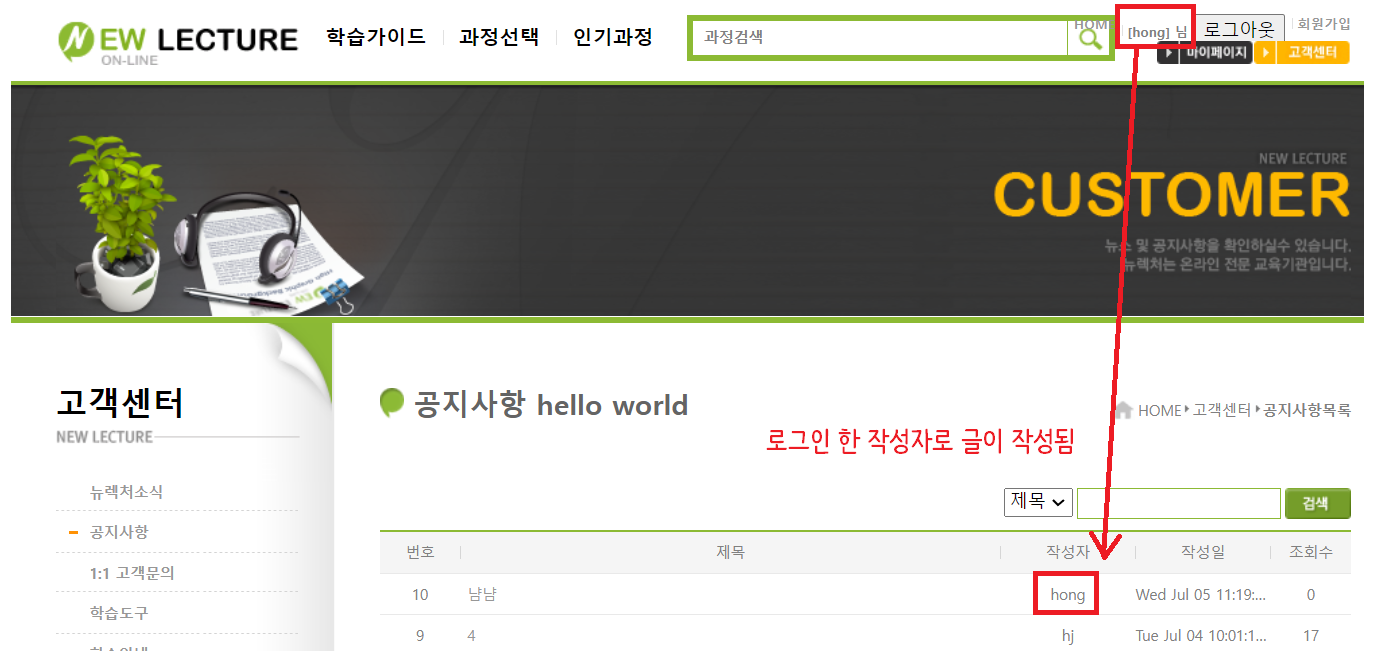
- 로그인한 사용자 이름으로 글이 작성되게 해보자.
- Customercontroller에서 글을 작성하는 부분(noticeReg)에 인증받은 로그인한 정보를 얻어오는 인터페이스 Principal을 매개변수로 추가해준다.
//새 글
	//@RequestMapping(value="/noticeReg.htm", method=RequestMethod.POST)
	@PostMapping("/noticeReg.htm")
	public String noticeReg(
			NoticeVO notice
			, HttpServletRequest request
			, Principal principal//인증받은 로그인한 정보를 얻어오는 인터페이스 Principal
			) throws Exception{
		//책 pg 358 커맨드 객체 NoticeVO notice 사용

		//1. 첨부파일 유무확인
		CommonsMultipartFile multipartFile = notice.getFile();
		//2. 첨부파일 저장
		String uploadRealPath = null;
		if(!multipartFile.isEmpty()) {
			//HttpServletRequest request 매개변수 위에 추가해준다.
			uploadRealPath = request.getServletContext().getRealPath("/customer/upload"); //upload 폴더에 저장

			File saveDir = new File(uploadRealPath);
			if(!saveDir.exists())saveDir.mkdirs(); //저장하고자 하는 경로가 없다면 새로 폴더를 만들겠다는 뜻

			System.out.println("uploadRealPath:" + uploadRealPath);

			String originalFilename = multipartFile.getOriginalFilename(); //서버에 올릴 때 원래 파일명
			String filesystemName =  getFileNameCheck(uploadRealPath, originalFilename); //getFileNameCheck()함수
			//filesystemName은 물리적 이름(실제 업로드 되는 이름), originalFilename은 원래 사용자가 올릴 떄의 이름

			File dest = new File(uploadRealPath, filesystemName);
			multipartFile.transferTo(dest); //실제 서버에 파일이 업로드 된다.

			notice.setFilesrc(filesystemName); //DB에 물리적인 이름으로 저장되도록 함

}//if- 로그인 인증(세션) 얻어오도록 다음과 같은 코드를 아래(위 코드의 //if 아래)에 추가해준다.
notice.setWriter(principal.getName());- 다음과 같은 로그인 한 작성자로 글이 작성됨을 확인할 수 있다.
2-2. 권한 정보를 등록하는 객체 생성
- 권한 정보를 담은 VO 객체 생성을 위해 org.doit.ik.domain 아래에 AuthVO.java 클래스 추가
@Data
public class AuthVO {
	private String username;
	private String authority;
}- MemberVO.java 생성
@Data
@AllArgsConstructor
@NoArgsConstructor
public class MemberVO {
	//member 테이블의 컬럼과 이름을 일치
	//fields
	private String id;
	private String pwd;
	private String name;
	private String gender;
	private String birth;
	private String is_lunar;
	private String cphone;
	private String email;
	private String habit;
	private Date regdate;

	//트랜젝션 처리 테스트 위해 point 컬럼 추가 -> 필드 추가, getter setter 추가
	private int point;

	private boolean enabled;
	private List<AuthVO> authList; //회원이 어떤 권한을 가졌는지 list
}- 권한 정보를 읽어오는 Mapper 등록이 필요하다.
- MemberMapper.java 수정
public interface MemberMapper {
	//회원정보 얻어오는 메서드
	public MemberVO getMember(String id) throws ClassNotFoundException, SQLException;

	//회원가입 메서드
	public int insert(MemberVO member) throws ClassNotFoundException, SQLException;

	//회원정보 + 권한정보 얻어오는 메서드
	public MemberVO read(String userid);
}- MemberMapper.xml 수정
resultMap 사용하기
- Map 형태로 데이터를 collection 해 담으면 편리하다.
- ★ResultMap을 사용해서 인증 정보를 한 번에 Map에 담는다.★
<resultMap type="org.doit.ik.domain.MemberVO" id="memberMap">
<id property="id" column="id" />
<result property="id" column="id" />
<result property="pwd" column="pwd" />
<result property="name" column="name" />
<result property="regdate" column="regdate" />
<collection property="authList" resultMap="authMap"></collection>
</resultMap>
<resultMap type="org.doit.ik.domain.AuthVO" id="authMap">
<result property="username" column="username" />
<result property="authority" column="authority" />
</resultMap>


<select id="read" resultMap="memberMap">
 SELECT id, pwd, name, enabled, regdate, authority
 FROM member m LEFT JOIN member_authorities auth ON m.id = auth.username
 WHERE m.id = #{userid}
</select>
2-3. UserDetailsService 직접 구현하기
- org.doit.ik.security 패키지에 CustomUserDetailsService.java 만들기
package org.doit.ik.security;

@Component("customUserDetailsService")
@Log4j
public class CustomUserDetailsService implements UserDetailsService{

@Setter(onMethod = @__({@Autowired}))
private MemberMapper memberMapper; //Mapper객체 얻어옴

  @Override
  public UserDetails loadUserByUsername(String username) throws UsernameNotFoundException {
	log.warn("Load user by Username:" + username);
	//VO 객체에는 회원정보 + 권한정보(authList)가 들어있다.
	MemberVO vo = this.memberMapper.read(username);
	log.warn("Queried by Member mapper:" + vo);

//리턴타입이 UserDetails 이기 때문에 VO 객체를 바로 넣을 수는 없다.
//User 인터페이스를 구현한 CustomUser를 만들어 변환해 넣어주자.

	return vo == null? null : new CustomUser(vo);
//User라는 인터페이스를 상속받은 CustomUser 안에 vo를 넣어서 return 해 줌
//이걸 UserDetails로 return 하면 자동으로 업캐스팅 된다.
	}
}- org.doit.ik.security.damin 패키지 아래에 CustomUser.java 클래스 생성
- CustomUser는 VO객체를 바로 loadUserByUsername(리턴타입: UserDetails)에 넣어줄 수 없어서 User 인터페이스를 구현하도록 해 변환해 넣어주기 위해 생성하였다.
package org.doit.ik.security.damin;

//VO 객체를 담기 위해 만든 클래스이기 때문에 User를 extend함, 이것이 principal 객체와 같다고 생각할 수 있다.
@Getter
public class CustomUser extends User {
private static final long serialVersionUID = 8215844917794450806L;

private MemberVO member; // 회원+권한 정보 = principal.member

public CustomUser(String username, String password, Collection<? extends GrantedAuthority> authorities) {
	super(username, password, authorities);
}

//VO 객체: 회원정보 + 권한정보(authList)를 가짐
public CustomUser(MemberVO vo) {
	super( //여기서 부모클래스는 User이다
		vo.getId()
		, vo.getPwd()
		// 권한 정보 읽어와서 위의 private MemberVO member;에 넣어준다.
		, vo.getAuthList().stream().map( auth->new SimpleGrantedAuthority( auth.getAuthority() ) ).collect( Collectors.toList() )
//원래 들어있는 것은 List<AuthVO>타입이었는데 이를 Collection<> 타입으로 바꾸기 위한 코드
//위의 생성자에서 Collection 타입을 매개변수로 달라고 했기에 변환해주는 것이다.
	);
	this.member = vo;
	}
}- security-context.xml 수정
- memberVO 객체에 우리가 원하는 정보가 이미 담겨서 오므로 이전에 JDBC 연결해주는 부분을 주석처리 해주고, authentication-provider user-service-ref에 customUserDetailsService 객체(로그인 인증 정보가 담겨있음)를 추가해준다.
<security:authentication-manager>
	<security:authentication-provider user-service-ref="customUserDetailsService">
<!-- JDBC 연결
	<security:jdbc-user-service data-source-ref="dataSource"
	users-by-username-query="SELECT id AS username ,pwd AS password ,enabled FROM MEMBER WHERE id= ? "
	authorities-by-username-query="SELECT username AS userid, authority AS auth FROM member_authorities WHERE username = ?  "
/>  -->
	<security:password-encoder ref="bCryptPasswordEncoder"/>
	</security:authentication-provider>
</security:authentication-manager>
2-4. 로그인 시 인증받은 회원정보 + 권한 정보 확인하기
- noticeReg.jsp 수정
- 로그인 시 인증받은 회원정보 및 권한 정보를 가시적으로 확인하기 위해 다음과 같은 코드를 noticeReg.jsp에 추가해준다.
<div>
  <ol>
     <li>principal : <sec:authentication property="principal"/></li>
     <!-- CustomUser의 member 필드 -->
     <li>MemberVO : <sec:authentication property="principal.member"/></li>
     <li>사용자 ID : <sec:authentication property="principal.member.id"/></li>
     <li>사용자 이름 : <sec:authentication property="principal.member.name"/></li>
     <li>사용자 권한 목록 : <sec:authentication property="principal.member.authList"/></li>
  </ol>
</div>- noticeReg.jsp 전문
<%@ page language="java" contentType="text/html; charset=UTF-8" pageEncoding="UTF-8"%>
<%@ taglib prefix="sec" uri="http://www.springframework.org/security/tags" %>
<div id="content">
<h2>공지사항</h2>
<h3 class="hidden">방문페이지위치</h3>
<ul id="breadscrumb" class="block_hlist">
<li>HOME</li>
<li>
고객센터
</li>
<li>
공지사항등록
</li>
</ul>
<form action="/customer/noticeReg.htm?${_csrf.parameterName}=${_csrf.token}" method="post" enctype="multipart/form-data">
<div id="notice-article-detail" class="article-detail margin-large" >
<dl class="article-detail-row">
<dt class="article-detail-title">
제목
</dt>
<dd class="article-detail-data">
<input name="title"/>
</dd>
</dl>
<dl class="article-detail-row">
<dt class="article-detail-title">
첨부파일
</dt>
<dd class="article-detail-data">
<input type="file" id="txtFile" name="file"/>
</dd>
</dl>
<div class="article-content" >
<textarea id="txtContent" class="txtContent" name="content"></textarea>
</div>
</div>
<p class="article-comment margin-small">
<input class="btn-save button" type="submit" value="저장" />
<a class="btn-cancel button" href="notice.htm">취소</a>
</p>
<!-- <input type="hidden" name="${ _csrf.parameterName }" value="${ _csrf.token }"> -->
</form>
<div>
<ol>
<li>principal : <sec:authentication property="principal"/></li>
<!-- CustomUser의 member 필드 -->
<li>MemberVO : <sec:authentication property="principal.member"/></li>
<li>사용자 ID : <sec:authentication property="principal.member.id"/></li>
<li>사용자 이름 : <sec:authentication property="principal.member.name"/></li>
<li>사용자 권한 목록 : <sec:authentication property="principal.member.authList"/></li>
</ol>
</div>
</div>
2-5. 본인이 작성한 글만 수정/삭제할 수 있게 하기
- 글 작성자가 아닌 사람이 글 상세보기를 눌렀을 때의 화면에서 수정, 삭제 버튼은 보이지 않고 목록버튼만 보이도록 해보자.
- noticeDetail.jsp 수정
- jstl 사용 위해 윗부분에 태그 추가
<%@ taglib prefix="sec" uri="http://www.springframework.org/security/tags" %>- authentication property 설정
<sec:authorize access="isAuthenticated()">
<sec:authentication property="principal" var="pinfo"/>
	<c:if test="${pinfo.member.id eq notice.writer}">
		<a class="btn-edit button" href="noticeEdit.htm?seq=${notice.seq}">수정</a>
		<a class="btn-del button" href="noticeDel.htm?seq=${ notice.seq }&filesrc=${ notice.filesrc }&${_csrf.parameterName}=${_csrf.token}">삭제</a>
	</c:if>
</sec:authorize> - noticeDetail.jsp 전문
<%@ page language="java" contentType="text/html; charset=UTF-8" pageEncoding="UTF-8"%>
<%@ taglib prefix="sec" uri="http://www.springframework.org/security/tags" %>
<%@ taglib prefix="c" uri="http://java.sun.com/jsp/jstl/core" %>
<script src="https://ajax.googleapis.com/ajax/libs/jquery/3.7.0/jquery.min.js"></script>


				<div id="content">
					<h2>공지사항</h2>
					<h3 class="hidden">방문페이지위치</h3>
					<ul id="breadscrumb" class="block_hlist">
						<li id="home">
							<a href="">HOME</a>
						</li>
						<li>
							<a href="">고객센터</a>
						</li>
						<li>
							<a href="">공지사항</a>
						</li>
					</ul>

					<div id="notice-article-detail" class="article-detail margin-large" >
						<dl class="article-detail-row">
							<dt class="article-detail-title">
								제목
							</dt>
							<dd class="article-detail-data">
								${notice.title}
							</dd>
						</dl>
						<dl class="article-detail-row">
							<dt class="article-detail-title">
								작성일
							</dt>
							<dd class="article-detail-data">
								${notice.regdate}
							</dd>
						</dl>
						<dl class="article-detail-row half-row">
							<dt class="article-detail-title">
								작성자
							</dt>
							<dd class="article-detail-data half-data" >
								${notice.writer}
							</dd>
						</dl>
						<dl class="article-detail-row half-row">
							<dt class="article-detail-title">
								조회수
							</dt>
							<dd class="article-detail-data half-data">
								${notice.hit}
							</dd>
						</dl>
						<dl class="article-detail-row">
							<dt class="article-detail-title">
								첨부파일
							</dt>
							<dd class="article-detail-data">
							<%-- 	<a href="upload/${notice.filesrc}">${notice.filesrc}</a> --%>
						<a href="download.htm?dir=customer/upload&file=${notice.filesrc}">${notice.filesrc}</a>
							</dd>
						</dl>

						<div class="article-content" >
								${notice.content}
						</div>
					</div>
					<p class="article-comment margin-small">
						<a class="btn-list button" href="notice.htm">목록</a>
			<sec:authorize access="isAuthenticated()">
						<sec:authentication property="principal" var="pinfo"/>
						<c:if test="${pinfo.member.id eq notice.writer}">

						<a class="btn-edit button" href="noticeEdit.htm?seq=${notice.seq}">수정</a>
				<!-- <a class="btn-del button" href="noticeDel.htm?seq=${notice.seq}">삭제</a> -->
				<a class="btn-del button" href="noticeDel.htm?seq=${ notice.seq }&filesrc=${ notice.filesrc }&${_csrf.parameterName}=${_csrf.token}">삭제</a>

						</c:if>
		 </sec:authorize>
		<script>
		$(".btn-del.button").on("click", function(event) {
			if(!confirm("정말 삭제할까요?")){
				event.preventDefault();
			}
		});
		</script>
					</p>
					<div class="margin-small" style="border-top: 1px solid #dfdfdf;">
						<dl class="article-detail-row">
							<dt class="article-detail-title">
								▲ 다음글
							</dt>
							<dd class="article-detail-data">
								다음 글이 없습니다.
							</dd>
						</dl>
						<dl class="article-detail-row">
							<dt class="article-detail-title">
								▼ 이전글
							</dt>
							<dd class="article-detail-data">
								제 12회 창업스쿨
							</dd>
						</dl>
					</div>
</div> 
개발 공부중