인증, 인가의 개념과 Spring security 사용 예시에 대해 알아보자.
1. 인증, 인가?
- 인증(Authentication)처리: 현재 사용자가 누구인지 확인하는 과정, 일반적인 웹 어플리케이션은 아이디/암호를 이용해 인증을 처리한다.
- 인가(Authorization)처리: 현재 사용자가 특정 대상(URL, 기능 등)을 사용(접근)할 권한이 있는지 검사한다.
- UI 처리: 권한이 없는 사용자가 접근했을 때, 알맞은 에러 화면을 보여주거나 로그인 폼과 같이 인증을 위한 화면으로 이동시킨다.
2. Spring security
- 스프링 시큐리티는 보편적인 인증, 인가, UI처리 및 암호화 처리에 대한 기본 구현을 제공하고 있으며, 일부 변경할 수 있는 확장 지점을 제공한다. (커스터마이징 가능)
- 스프링 버젼과 스프링 시큐리티 버젼을 맞추어 주어야 한다. (dependencyManagement 태그 사용 시 좀 더 쉽게 맞출 수 있음)
2-1. Spring security 사용 시 가장 먼저 필요한 것
- 메이븐 의존 추가
- security 사용을 위해서는 모듈이 필요하다. 아래와 같은 코드를 pom.xml에 추가해 메이븐 의존을 설정해준다.
		<dependency>
			<groupId>org.springframework.security</groupId>
			<artifactId>spring-security-web</artifactId>
			<version>${org.springframework-version}</version>
		</dependency>

		<dependency>
			<groupId>org.springframework.security</groupId>
			<artifactId>spring-security-config</artifactId>
			<version>${org.springframework-version}</version>
		</dependency>

		<dependency>
			<groupId>org.springframework.security</groupId>
			<artifactId>spring-security-core</artifactId>
			<version>${org.springframework-version}</version>
		</dependency>

		<!-- https://mvnrepository.com/artifact/org.springframework.security/spring-security-taglibs -->
		<dependency>
			<groupId>org.springframework.security</groupId>
			<artifactId>spring-security-taglibs</artifactId>
			<version>${org.springframework-version}</version>
</dependency>- security-context.xml 생성 및 최소 설정 추가
- authentication-manager: 인증관리자로, 로그인을 했는지, 인증을 했는지 확인해주는 태그
	<security:http> <!-- 기본값: use-expressions="true" -->
	   <security:form-login/>
	</security:http>

	<security:authentication-manager>
</security:authentication-manager>- 경로 설정
- web.xml에서 다음과 같은 코드에 의해 시작 시 security-context를 거쳐 서버를 시작한다.
      <param-value>
         /WEB-INF/spring/root-context.xml
         /WEB-INF/spring/security-context.xml
</param-value>- 필터 설정
- web.xml에서 다음과 같이 springSecurityFilterChain 필터를 설정해준다.
 <filter>
      <filter-name>springSecurityFilterChain</filter-name>
      <filter-class>org.springframework.web.filter.DelegatingFilterProxy</filter-class>
   </filter>
   <filter-mapping>
      <filter-name>springSecurityFilterChain</filter-name>
      <url-pattern>/*</url-pattern>
</filter-mapping>- security-context.xml 설정 -> #3 예시로 이동
2-2. 개요
- 인증(Authentication)과 권한(=인가)(Authorization)
- 스프링 시큐리티 구조
(1) AuthenticationManager(인증관리자): 가장 중요한 역할, 다양한 방식의 인증을 처리할 수 있도록 구조 설계됨
(2) ProviderManager 제공관리자 - 인증처리를 AuthenticationProvoider 객체를 이용해서 처리를 위임하는 역할.(인터페이스)
(3) AuthenticationProvoider 인증제공자 - 실제 인증 작업을 진행(처리)하는 역할(인터페이스)
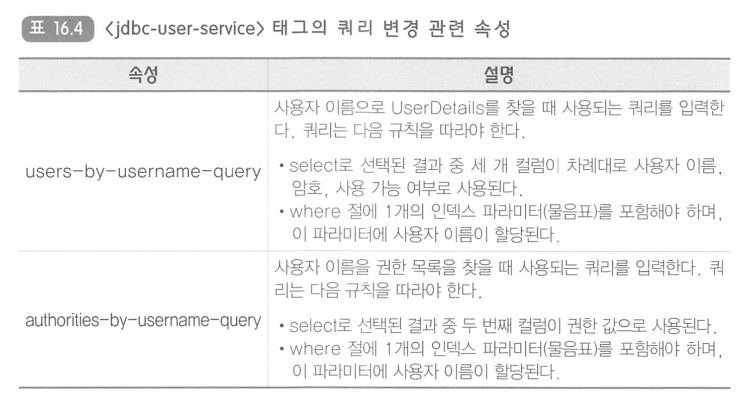
(4) UserDetailsService 사용자상세서비스 - 인증된 실제 사용자의 정보와 권한 정보를 처리해서 반환하는 객체(인터페이스)
- (3) 또는 (4)를 개발자가 직접 구현하는 경우가 있다.
- 대부분 (4)를 직접 구현하는데, 새로운 프로토콜이나 인증 구현 방식을 직접 구현하고자 하는 경우에는 (3)을 구현한다.
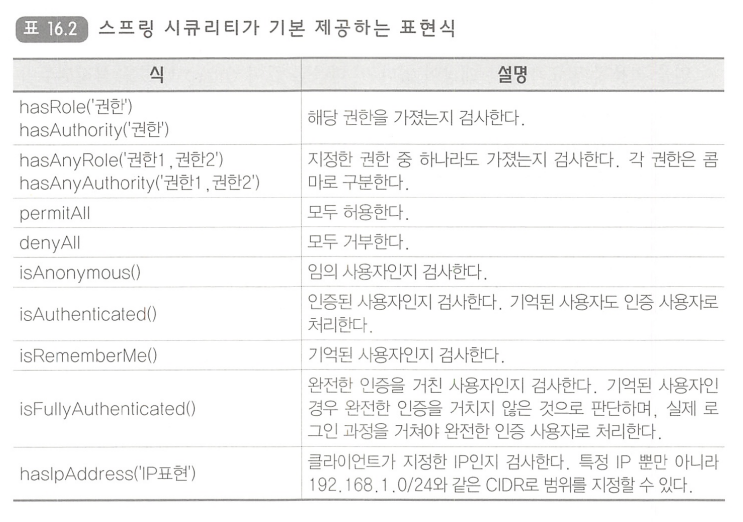
2-3. 웹 요청 인가 표현식
- hasRole(), hasAuthority() - 해당 권한이 있으면 true
- hasAnyRole(), hasAnyAuthority() - 여러 권한 중에 하나라도 해당 권한이 있으면 true
- principal - 현재 사용자 정보를 의미
- permitAll - 모든 사용자에게 허용
- denyAll - 모든 사용자에게 거부
- isAnomymous() - 익명의 사용자의 경우( 로그인을 하지 않은 경우도 해당 )
- isAuthenticated() - 인증된 사용면 true
- isFullyAuthenticated() - Remember-me로 인증된 것이 아닌 인증된 사용의 경우 true
-
기본 예시
-
접근 제한 설정
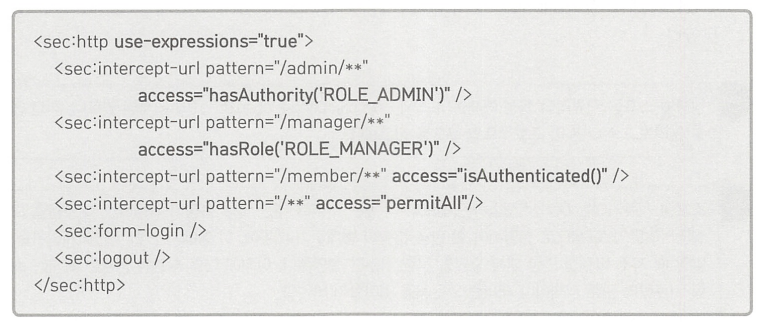
- intercept-url ( pattern, access 속성 ) 사용
- intercept : 위에서부터 아래로 차례로 순서대로 걸린다. 제한하기 위한 요청.
 <http>
      <intercept-url pattern="url패턴"  access="권한 체크(권한명, 표현식)" />
</http>- access 속성을 표현식을 사용하지 않을 경우에는 다음과 같이 설정한다.
<http use-expressions=false> 3. 실습
- 다음과 같이 스프링 시큐리티를 설계할 수 있다.
3-1. 설계하기
- 조건
- 게시판 글크기는 인증(로그인) 해야지만 사용가능
- 게시글 작성자는 인증받은 ID로 사용가능
- 게시글 수정/삭제는 작성자 확인 후 가능
- 그 외는 인증받지 않아도 모두가 사용가능
- security-context.xml
- spring-security 버전을 잘 맞춰준다.
xsi:schemaLocation="
	http://www.springframework.org/schema/security
	http://www.springframework.org/schema/security/spring-security-4.2.xsd
	http://www.springframework.org/schema/beans
http://www.springframework.org/schema/beans/spring-beans-4.3.xsd">- css, js, image는 보안 필터 체인을 적용하지 않는다.
<!-- css, js, image는 접근 제어 대상이 아니기에 보안필터 체인을 적용하지 않는다. -->
<security:http pattern="/static/**" security="none"/>
<security:http pattern="/design/**" security="none"/>
<security:http pattern="/css/**" security="none"/>
<security:http pattern="/js/**" security="none"/> - 사용자 단계에 따라 권한을 부여한다.
<security:http>
<!-- 접근 허용 정책  -->
	<security:intercept-url pattern="/customer/noticeReg.htm" access="isAuthenticated()"/> <!-- 접근 권한을 설정하는 태그 -->
	<security:intercept-url pattern="/customer/noticeDel.htm" access="hasRole('ROLE_ADMIN')"/>
	<security:intercept-url pattern="/**" access="permitAll"/>

<!-- 에러 메세지 화면으로 이동하게 하는 코드(접근 금지에 대한 특정 페이지로 이동하도록 지정) -->
<!-- <security:access-denied-handler error-page ="/common/accessError.htm"/>  -->

<security:form-login/>
</security:http>

<!-- 인 메모리 방식으로 사용자 계정 + 역할(권한) 설정  -->
<security:authentication-manager>
	<security:authentication-provider>
		<security:user-service>
			<security:user name="hong" authorities="ROLE_USER"  password="{noop}1234" />
			<security:user name="admin" authorities="ROLE_USER, ROLE_MANAGER, ROLE_ADMIN" password="{noop}11234"/>
				<!-- 한 사람이 여러개의 역할을 맡을 수 있다. -->
		</security:user-service>
	</security:authentication-provider>
</security:authentication-manager>
500 오류: There is no PasswordEncoder mapped for the id "null"
- 스프링 시큐리티 버젼 5부터반드시 PasswordEncoder 지정이 필요하다. 만약 PasswordEncoder 지정없이 임시로 사용하고자 한다면 {noop} 문자열을 password앞에 추가해야 한다.
<security:user name="hong" authorities="ROLE_USER" password="{noop}1234" />
3-2. 개발자가 보여주고 싶은 커스텀 에러 페이지 만들기
- 403 forbidden 오류가 발생할 때 특정 페이지로 이동 시킬 수 있다.
- security-context.xml 에 코드 추가
- 접근 금지에 대한 특정 페이지로 이동하도록 지정
<!-- 에러 메세지 화면으로 이동하게 하는 코드(접근 금지에 대한 특정 페이지로 이동하도록 지정) -->
<security:access-denied-handler error-page ="/common/accessError.htm"/>- CommonController 추가
- /common/accessError 요청 시 원하는 에러 페이지로 이동하도록 함
package org.doit.ik.controller;

@Controller
@RequestMapping("/common/*")
@Log4j
public class CommonController {

   //  /common/accessError.htm
   @GetMapping("/accessError.htm")
   public String accessDenied(Model model, Authentication auth) throws Exception{
      log.info("> /common/accessError.htm... GET");
      model.addAttribute("msg", "Access Denied");
      return "/common/accessError";
   }


} // class- 파일 추가
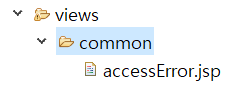
- accessError.jsp 로 내가 원하는 403 에러페이지 생성
<body>
	<div>
		<h1> My Access Denied Page </h1>
		<h2><c:out value="${SPRING_SECURITY_403_EXCEPTION.getMessage()}"/></h2>
		<h2><c:out value="${msg}"/></h2>
		기타오류 설명 부분
	</div>
</body>- 그런데 접근이 제한된 경우 다양한 처리를 하고 싶다면 AccessDeniedHandler 인터페이스를 구현하는 것이 좋다.
3-2-1. AccessDeniedHandler 사용해 접근이 제한된 경우 다양하게 처리하기
- org.doit.ik.security 패키지에 CustomAccessDeniedHandler 생성
@Component("customAccessDeniedHandler")
@Log4j
public class CustomAccessDeniedHandler implements AccessDeniedHandler {

	@Override
	public void handle(HttpServletRequest request, HttpServletResponse response,
			AccessDeniedException accessDeniedException) throws IOException, ServletException {
		log.error("Access Denied Handler");
		log.error("Redirect");

		response.sendRedirect("/common/accessError.htm");
	}
}- security-context.xml에 코드 추가
<security:access-denied-handler ref = "customAccessDeniedHandler"/>3-3. 사용자 로그인 페이지 사용하기
- 스프링 시큐리티가 제공하는 로그인 페이지가 아닌 사용자 로그인 페이지를 사용하도록 설정해보자.
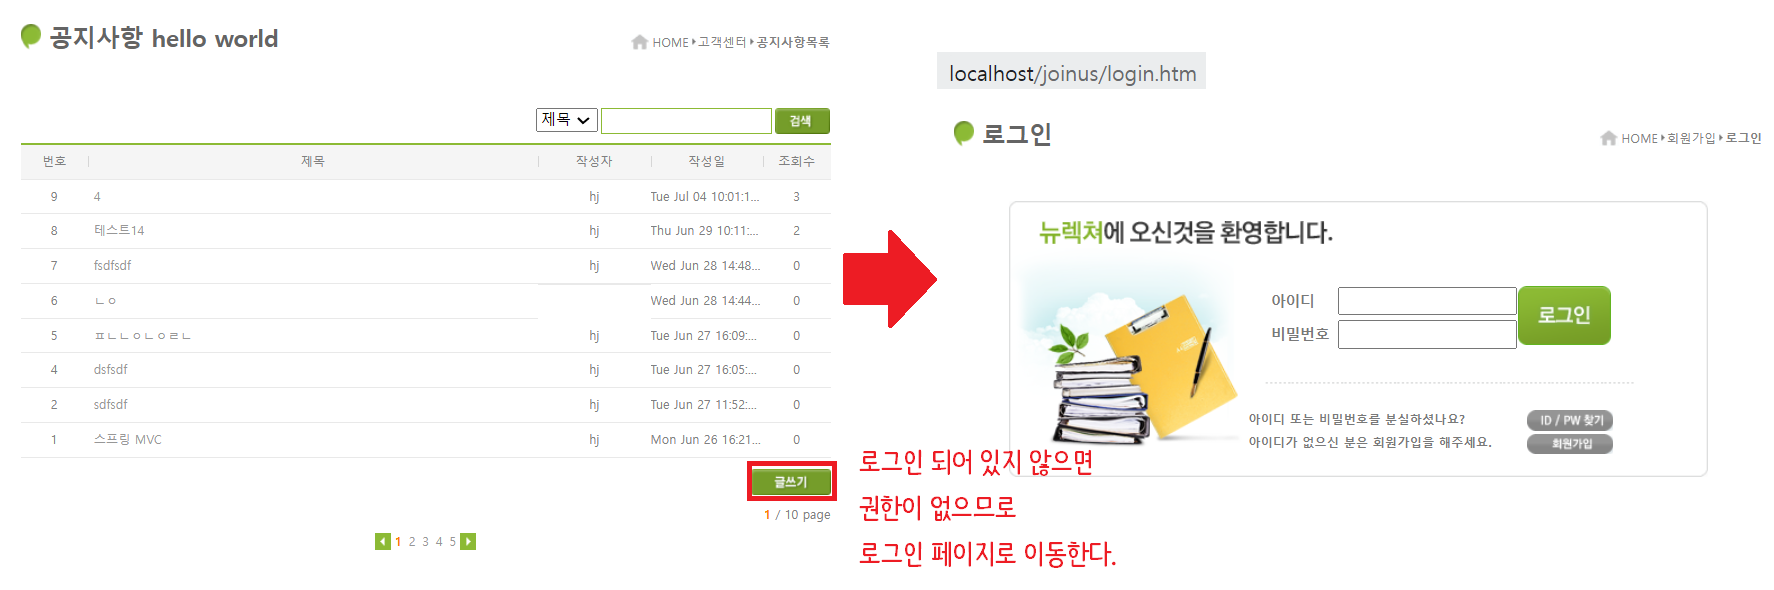
- security-context.xml에 코드 추가
- 사용자 정의 로그인 페이지 등록 속성을 준다.
<security:form-login login-page = "/joinus/login.htm"/>- login-page 속성의 URL은 반드시 GET 방식 요청이어야 한다.
- JoinController.java
	@GetMapping("/login.htm")
	public String login() throws Exception{
		return "joinus.login";
}- login.jsp
- security-context.xml에 등록된 아이디, 비밀번호값과 맵핑해주려면 다음을 꼭 지켜주어야 한다.
(1) 반드시 form 태그 action은 /login, method는 post방식
<form action="/login" method="post"> (2) input 태그에서 아이디의 name 속성은 반드시 UserName
<input name="username" class="text" id="id" />(3) input 태그에서 비밀번호의 name 속성은 반드시 Password
<input type="password" name="password" class="text" id="pwd"/>(4) token 값 가지고 넘어가도록 CSRF 속성 준다.
<input type="hidden" name="${_csrf.parameterName }" value="${_csrf.token }">- header.jsp에 로그인 처리 위해 태그 추가
- jstl 태그 추가
<%@ taglib prefix="sec" uri="http://www.springframework.org/security/tags" %>- <sec:authorize access="isAnonymous()">는 미인증 시 true 값이 나온다.
- principal = spring security 에서 제공하는 인증받은 정보를 가진 객체
- username은 로그인 시 아이디를 의미한다.
<li>
	<sec:authorize access="isAnonymous()">
		<a href="${pageContext.request.contextPath}/joinus/login.htm">로그인</a>
	</sec:authorize>
	<sec:authorize access="isAuthenticated()">
	<form action="${  pageContext.request.contextPath   }/joinus/logout.htm" method="post">
    [<sec:authentication property="principal.username"/>] 님
    <input type="hidden" name="${_csrf.parameterName }" value="${_csrf.token }">
    <button>로그아웃</button>
    </form>
	</sec:authorize>
</li> - security-context.xml 에 로그아웃 시 코드 추가
- invalidate-session: 로그아웃 시 모든 세션 삭제
<security:logout logout-url="joinus/logout.htm"
logout-success-url="/" invalidate-session="true"/>
CSRF 토큰값을 넘기고 싶지 않은 경우!
- security-context.xml에 아래 코드를 추가하면 된다.
<!-- CSRF 토큰 사용하지 않겠다는 의미 -->
<security:csrf disabled="true"/>
3-4. 로그인 성공 후 특정한 동작을 하도록 제어하고 싶은 경우
- 만약 로그인 성공 후 특정 페이지로 이동하거나, 별도의 쿠키 등을 생성해 처리하고 싶은 경우
- AuthenticationSuccessHandler 인터페이스를 구현해 설정할 수 있다.
- org.doit.ik.security 패키지 안에 CustomLoginSuccessHandler 생성 후 AuthenticationSuccessHandler implement
@Component("customLoginSuccessHandler")
@Log4j
public class CustomLoginSuccessHandler implements AuthenticationSuccessHandler{@Override

	public void onAuthenticationSuccess(
			HttpServletRequest request
			, HttpServletResponse response,
			Authentication authentication //인증받은 사용자의 정보
			) throws IOException, ServletException {

	log.warn("> Login Success...");

	List<String> roleNames = new ArrayList<String>();
	authentication.getAuthorities().forEach( auth ->  {
		roleNames.add(auth.getAuthority()); //권한 정보를 가진 집합 안에서 권한을 읽어와서 add
	});

	log.warn("> ROLE NAMES : " + roleNames );
	//권한에 따라 로그인 시 redirect 되는 곳을 정해줌
	if ( roleNames.contains("ROLE_ADMIN")) {
		response.sendRedirect("/");
		return;
	} else if( roleNames.contains("ROLE_MANAGER")){
		response.sendRedirect("/customer/notice.htm");
		return;
	} else if( roleNames.contains("ROLE_USER")){
		response.sendRedirect("/customer/notice.htm");
		return;
	}
}
}- security-context.xml 수정
- 로그인이 성공한 후에 customLoginSuccessHandler의 일을 하도록함
<security:form-login
	login-page = "/joinus/login.htm"
	authentication-success-handler-ref="customLoginSuccessHandler"
    default-target-url="/index.htm"
/>
3-5. 로그인 실패 시
- security-context.xml 수정
- 로그인 실패 시 url 설정
<!-- <security:form-login/>  -->
<security:form-login
	login-page = "/joinus/login.htm"
	authentication-success-handler-ref="customLoginSuccessHandler"
	default-target-url="/index.htm"
	authentication-failure-url="/joinus/login.htm?error=true"
/>- login.jsp 에 코드 추가
<c:if test="${param.error eq 'true'}">
	<div>
		<strong style="color: red">아이디 또는 패스워드가 일치하지 않습니다.</strong><br />
		<c:if test="${ SPRING_SECURITY_LAST_EXCEPTION  != null}">
        Message : <c:out value="${SPRING_SECURITY_LAST_EXCEPTION.message}" />
        </c:if>
			</div>
</c:if>- 참고
- pg 688 사용자 권한에 따라 다른 내용을 보여주는 코딩
- p712 HTTPS 및 포트 매핑 설정하기
4. DB와 연결해 스프링 시큐리티, 인증 권한 처리 시

사용자 정보 및 사용자 권한 정보를 담은 테이블 2개가 있어야 한다.
- 사용자 및 권한 매핑 DB 테이블 생성
- users 테이블: username, password, enabled 컬럼 필요
- authorities 테이블: username, authority 컬럼 필요

개발 공부중