
Spring으로 파일을 업로드하는 방법에 대해 알아보자.
1. 파일업로드
1-1. 반드시 지켜야 할 것
- 인코딩 설정 변경
- HTML 폼의 enctype 속성 바꿔주기
기본설정: enctype="application/x-www-form-urlencoded" 에서 바꿔주기 => enctype="multipart/form-data"
- 스트림 기반의 전송 방식 변경
- method = "post"로 설정
- 멀티파트 지원 기능 사용(MultipartResolver 갹체 필요)
- MultipartResolver: 멀티파트 형식으로 데이터가 전송된 경우 해당 데이터를 스프링 MVC에서 사용할 수 있도록 변환해주는 역할을 함
- 이 MultipartResolver를 스프링 설정 파일에 등록해야 한다.
- 그러면 @RequesteParam 애노테이션을 이용해서 멀티파트로 전송된 파라미터 값과 파일데이터를 사용할 수 있다.
스프링이 기본으로 제공하는 MultipartResolver 2가지
- 아래 두가지 MultipartResolver 구현체 중 하나를 스프링 Bean으로 등록해주면 MultipartResolver 사용이 가능하다.
★ 주의: 스프링 Bean의 이름은 반드시 'multipartResolver'로 지정해주어야 함
① o.s.web.multipart.commons.CommonsMultipartResolver
- Commons FileUpload API를 이용해 멀티파트 데이터 처리
② o.s.web.multipart.support.StandardServletMultipartResolver
- 서블릿 3.0의 Part를 이용해 멀티파트 데이터 처리
1-2. Commons FileUpload 이용 시
- Commons FileUpload 라이브러리를 클래스패스에 추가(Maven 사용 시 pom.xml의 dependencies 태그 안에 추가)
<!-- fileupload -->
<!-- https://mvnrepository.com/artifact/commons-fileupload/commons-fileupload -->
      <dependency>
          <groupId>commons-fileupload</groupId>
          <artifactId>commons-fileupload</artifactId>
          <version>1.3</version>
</dependency>- Bean 등록(servlet-context.xml 파일 수정)
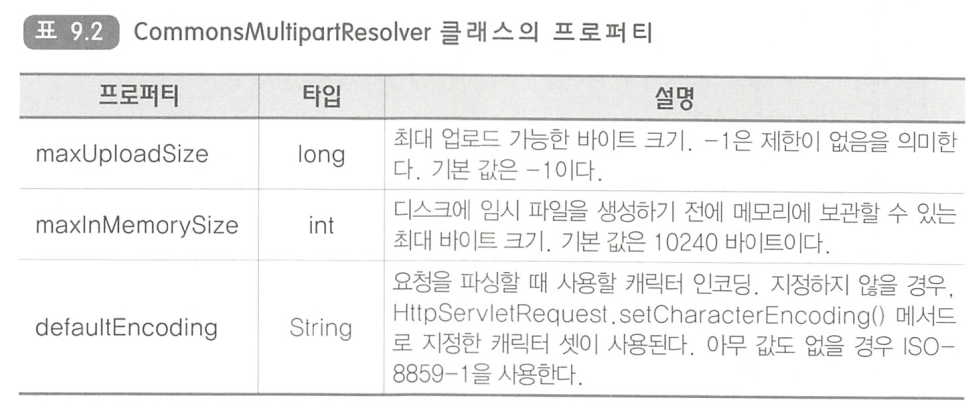
<bean id="multipartResolver" class="org.springframework.web.multipart.commons.CommonsMultipartResolver"/>- 프로퍼티
1-3. 서블릿 3.0의 파일 업로드 기능 사용 시
- 참고: StandardServletMultipartResolver는 서블릿 3 버전 이상만 지원한다.
- 필요 설정
- DispatcherServlet이 서블릿 3의 Multipart를 처리하도록 설정
- StandardServletMultipartResolver 클래스를 MultipartResolver로 설정
- web.xml에 multipart-config 태그 설정
<!-- pg 439 파일 업로드 방법 2번째 -->
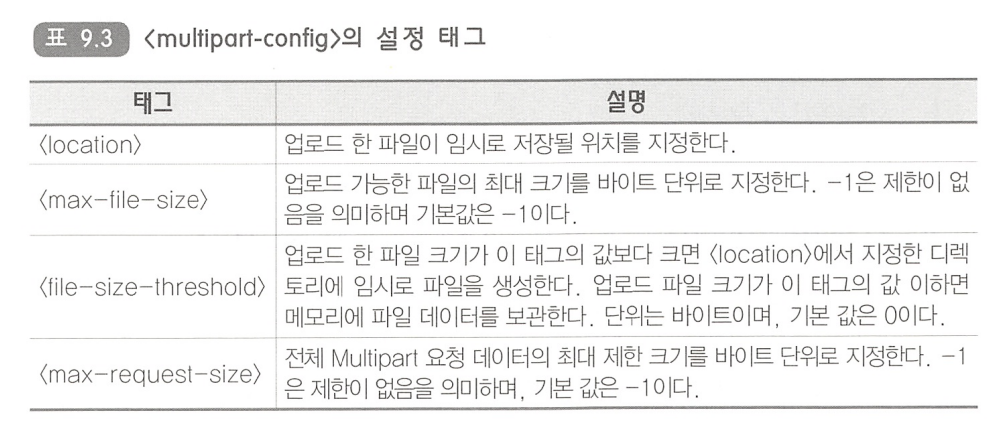
<multipart-config>
<location>C:\\temp</location>
<max-file-size>20971520</max-file-size> 1MB * 20
<max-request-size>41943040</max-request-size>40MB
<file-size-threshold>20971520</file-size-threshold> 20MB
</multipart-config>- 설정 태그 목록(필요한 것 골라서 사용하면 된다.)
- Bean 등록(StandardServletMultipartResolver를 빈으로 등록)
<bean id="multipartResolver" class="org.springframework.web.multipart.support.StandardServletMultipartResolver"/>2. 업로드한 파일 접근
- 파일 데이터에 접근할 수 있는 방법에는 5가지가 있다.
2-1. MultipartFile 인터페이스 사용
- 업로드한 파일 정보 및 데이터를 읽을 수 있다.
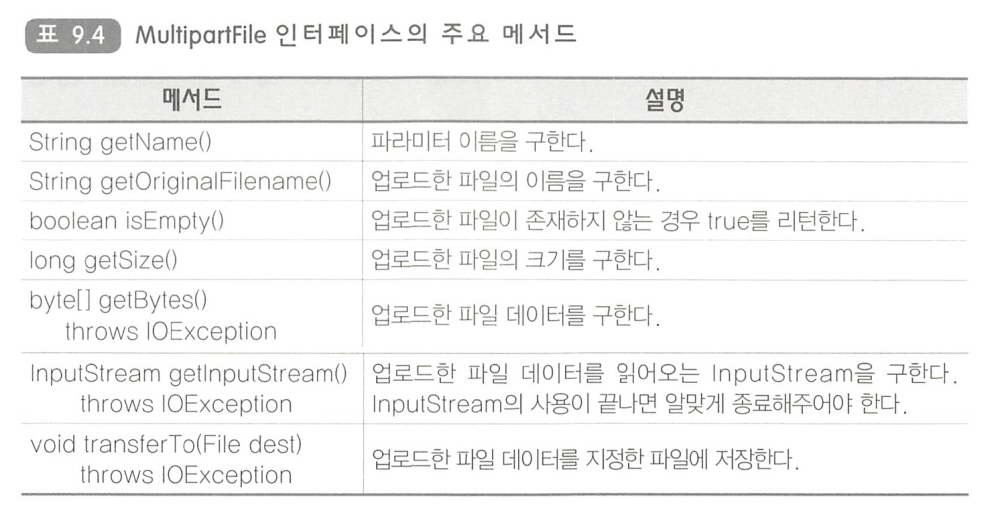
- 가장 단순한 방법: MultipartFile.getBytes() 메서드 이용해 바이트 배열 구한 뒤 파일이나 DB에 저장
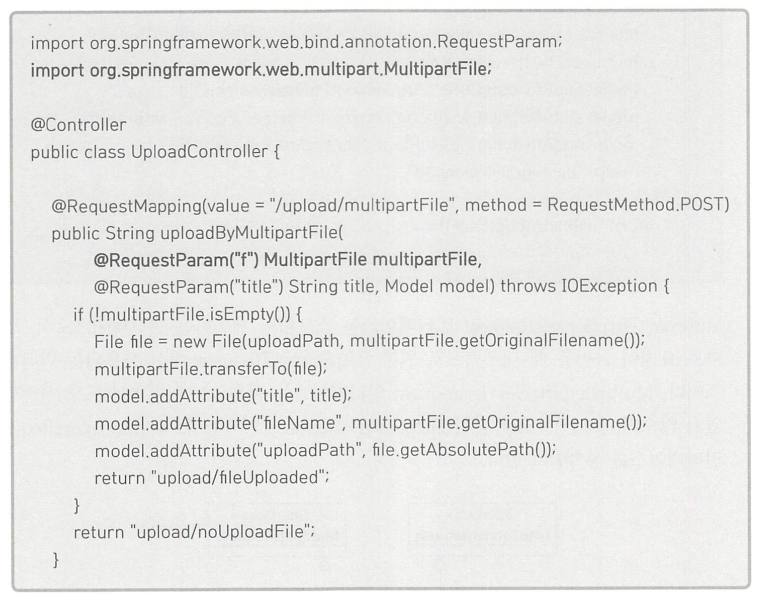
2-2. @RequestParam 애노테이션을 이용한 업로드 파일 접근
- @RequestParam 애노테이션이 적용된 MultipartFile 타입의 파라미터를 사용해 파일 접근
- 아래 HTML 코드에서 파일은 f 파라미터를 통해 전달된다.
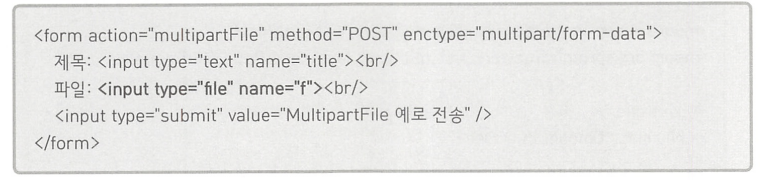
- 이 때 @RequestParam 애노테이션과 MultipartFile 타입의 파라미터를 이용해 업로드한 파일 데이터를 전달받을 수 있다.
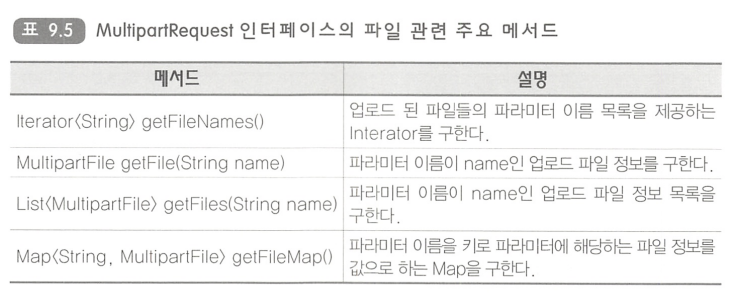
2-3. MultipartHttpServletRequest를 이용한 업로드 파일 접근
- 스프링이 제공하는 MultipartHttpServletRequest 인터페이스는 멀티파트 요청이 들어올 때 내부적으로 원본 HttpServletRequest 대신 사용되는 인터페이스로 HttpServletRequest와 MultipartRequest 인터페이스를 상속 받는다.
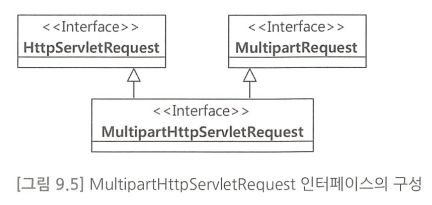
- 따라서 getParameter()나 getHeader()와 같은 메서드와 멀티파트 관련 메서드 사용이 가능하다.
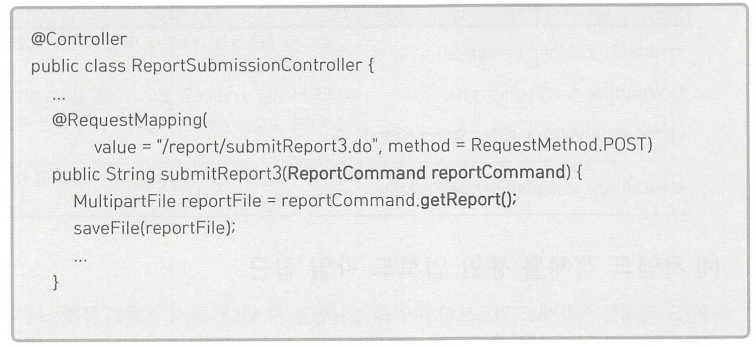
2-4. 커맨드 객체를 통한 업로드 파일 접근
- 커맨드 클래스에 파라미터와 동일한 이름의 MultipartFile 타입 프로퍼티를 추가해주면 커맨드 객체를 이용해 업로드한 파일에 접근할 수 있다.
- 예시) 업로드 파일의 파라미터 이름이 "report"인 경우 다음과 같이 "report" 프로퍼티를 커맨드 클래스에 추가해줌

- 이제 커맨드 객체를 통해 업로드한 파일 정보를 전달받을 수 있다.
3. 실습
3-1. 파일 업로드 해보기
- pom.xml에 의존 추가
		<!-- fileupload -->
      <!-- https://mvnrepository.com/artifact/commons-fileupload/commons-fileupload -->
      <dependency>
          <groupId>commons-fileupload</groupId>
          <artifactId>commons-fileupload</artifactId>
          <version>1.3</version>
      </dependency>

      <!-- spring io 파일입출력 시 필요-->
      <dependency>
         <groupId>commons-io</groupId>
         <artifactId>commons-io</artifactId>
         <version>1.4</version>
      </dependency>

      <!-- cglib -->
      <!-- https://mvnrepository.com/artifact/cglib/cglib -->
      <dependency>
         <groupId>cglib</groupId>
         <artifactId>cglib</artifactId>
         <version>2.2</version>
      </dependency>

      <!-- tomcat-dbcp 사용 시 필요-->
      <!-- https://mvnrepository.com/artifact/org.apache.tomcat/tomcat-dbcp -->
      <dependency>
         <groupId>org.apache.tomcat</groupId>
         <artifactId>tomcat-dbcp</artifactId>
         <version>8.5.84</version>
</dependency>- servlet-context.xml에 multipartResolver 사용을 위한 코드 추가
<!-- p 439 -->
<!-- 반드시 이름은  multipartResolver 으로 설정 -->
<beans:bean id="multipartResolver" class="org.springframework.web.multipart.commons.CommonsMultipartResolver">
<beans:property name="maxUploadSize" value="-1"></beans:property>
<beans:property name="maxInMemorySize" value="1024"></beans:property>
<beans:property name="defaultEncoding" value="ISO-8859-1"></beans:property>
</beans:bean> - NoticeVO.java에 파일 변수 선언
private CommonsMultipartFile file;- noticeReg.jsp 의 Form 태그 method 속성 및 enctype 확인
<form action="" method="post" enctype="multipart/form-data">
- noticeReg.jsp 에서 파일 input태그의 name 속성과 NoticeVO.java에서 선언한 변수명이 동일하도록 설정
<input type="file" id="txtFile" name="file"/>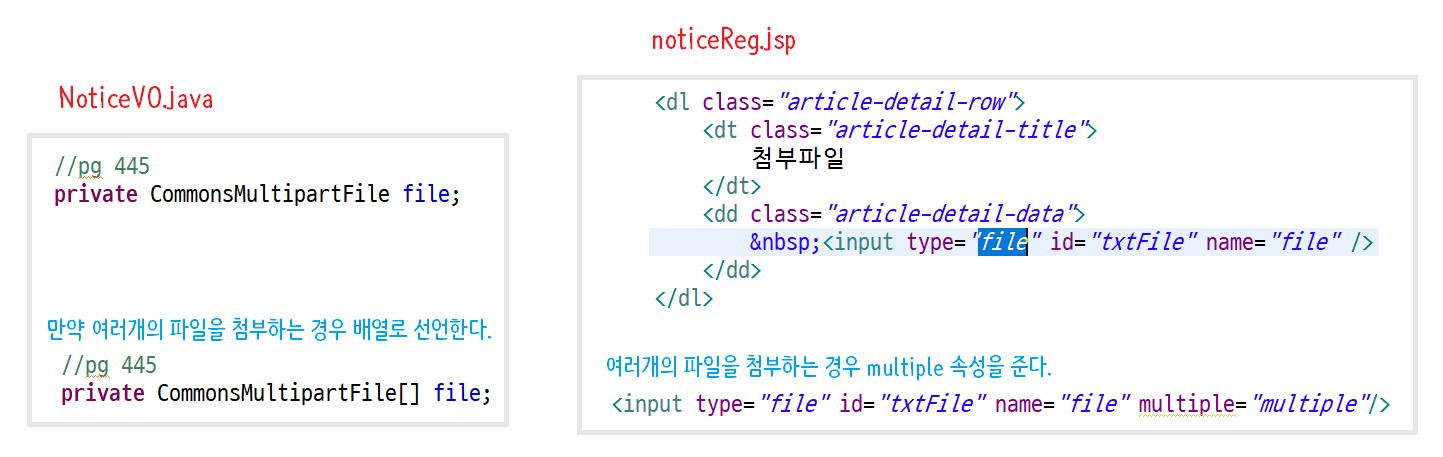
- CustomerController.java에 코드 추가
- 파일의 물리이름이 중복되지 않도록 getFileNameCheck() 함수를 선언해준다.
- 새로운 글을 작성 시 파일을 첨부하는 것이므로 '새 글' 부분에 코드를 추가해 준다.
//getFileNameCheck() 함수
// 저장되는 파일명이 중복되는지 여부를 확인하고, 중복된다면 index를 붙여주는 함수
// 서버에 업로드 되는 폴더에 해당 파일이 저장될 이름(물리적 이름)을 확인해서 중복되면 잘라서 index를 붙임
   private String getFileNameCheck(String uploadRealPath, String originalFilename) {
      int index = 1;
      while( true ) {
         File f = new File(uploadRealPath, originalFilename);
         if( !f.exists() ) return originalFilename;
         // upload 폴더에 originalFilename 파일이 존재한다는 의미         a.txt (4자리)
         String fileName = originalFilename.substring(0, originalFilename.length() - 4 );  //   a
         String ext =  originalFilename.substring(originalFilename.length() - 4 );  // .txt
         // asdfasf-3.txt
         originalFilename = fileName+"-"+(index)+ext;

         index++;
      } // while
   }

	//새 글
	//@RequestMapping(value="/noticeReg.htm", method=RequestMethod.POST)
	@PostMapping("/noticeReg.htm")
	public String noticeReg(NoticeVO notice, HttpServletRequest request) throws Exception{
		//책 pg 358 커맨드 객체 NoticeVO notice 사용

		//1. 첨부파일 유무확인
		CommonsMultipartFile multipartFile = notice.getFile();
		//2. 첨부파일 저장
		String uploadRealPath = null;
		if(!multipartFile.isEmpty()) {
			//HttpServletRequest request 매개변수 위에 추가해준다.
			uploadRealPath = request.getServletContext().getRealPath("/customet/upload"); //upload 폴더에 저장

			File saveDir = new File(uploadRealPath);
			if(!saveDir.exists())saveDir.mkdirs(); //저장하고자 하는 경로가 없다면 새로 폴더를 만들겠다는 뜻

			System.out.println("uploadRealPath:" + uploadRealPath);

			String originalFilename = multipartFile.getOriginalFilename(); //서버에 올릴 때 원래 파일명
			String filesystemName =  getFileNameCheck(uploadRealPath, originalFilename); //getFileNameCheck()함수
			//filesystemName은 물리적 이름(실제 업로드 되는 이름), originalFilename은 원래 사용자가 올릴 떄의 이름

			File dest = new File(uploadRealPath, filesystemName);
			multipartFile.transferTo(dest); //실제 서버에 파일이 업로드 된다.

			notice.setFilesrc(filesystemName); //DB에 물리적인 이름으로 저장되도록 함

}//if- 여기서 파일을 업로드 하면 다음과 같이 NullPointException이 발생한다.
NullPointException
- 위 단계까지 완료 한 뒤 이제 파일 업로드를 하면 NullPointException 에러가 발생한다.
- web.xml에서 다음 태그를 주석처리 해준다.
- Why? 우리는 Commons FileUpload 방식을 사용하고 있는데 태그는 StandardServletMultipartResolver 방식이기 때문.
- 중간에 StandardServletMultipartResolver가 먼저 파일을 가져가기 때문에 NullPointException이 발생하는 것!
      <!-- pg 439 파일 업로드 방법 2번째 -->
   <!--  <multipart-config>
         <location>C:\\temp</location>
         <max-file-size>20971520</max-file-size> 1MB * 20
         <max-request-size>41943040</max-request-size>40MB
         <file-size-threshold>20971520</file-size-threshold> 20MB
      </multipart-config>  -->
- 이제 다시 파일을 업로드 해보자.
403 error!
- 위 단계까지 완료 한 뒤 이제 파일 업로드를 하면 403 에러가 발생한다.(Spring Security 사용 시)
- multipart/form-data로 전송할 경우 action경로 뒤에 csrf토큰을 입력해주어야 한다.
- jsp 파일의 form 태그를 다음과 같이 변경해주면 403 에러 해결 완료!
<form action="/customer/noticeReg.htm?${_csrf.parameterName}=${_csrf.token}" method="post" enctype="multipart/form-data">
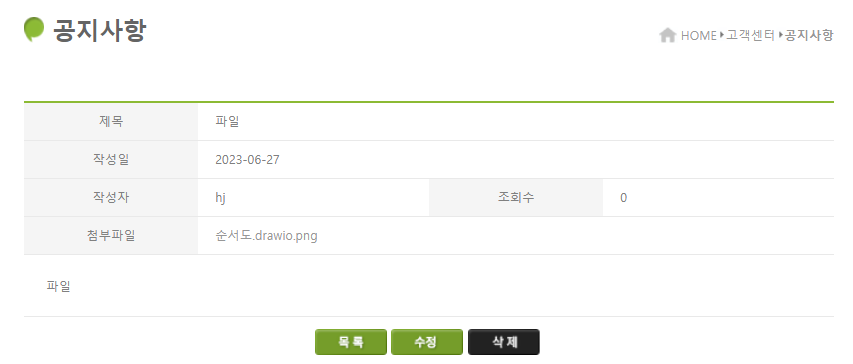
-
그러면 이제 다음과 같이 첨부파일이 잘 등록된 것을 확인할 수 있다.
-
만약 첨부파일을 클릭했을 때 바로 다운로드 되는 것이 아닌 새 창으로 띄우고 싶다면 noticeDetail.jsp 에서 첨부파일이 등록되는 부분의 코드를 수정해주면 된다.
<dl class="article-detail-row">
	<dt class="article-detail-title">
	첨부파일
	</dt>
		<dd class="article-detail-data">
			<a href="upload/${notice.filesrc}">${notice.filesrc}</a>
		</dd>
</dl>
3-2. 실습 - 파일 삭제
- noticeDetail.jsp
- 삭제 버튼에 파일을 같이 가지고 넘어오도록 코드를 수정해준다.
<!-- <a class="btn-del button" href="noticeDel.htm?seq=${notice.seq}">삭제</a> -->
<a class="btn-del button" href="noticeDel.htm?seq=${ notice.seq }&filesrc=${ notice.filesrc }&${_csrf.parameterName}=${_csrf.token}">삭제</a>- CustomerController.java 코드 수정
- 사진 파일 삭제할 수 있도록 글 삭제 코드를 수정해준다.
	//첨부파일이 있다면 넘어오게끔 ?seq=1&filesrc=사진파일.png
	 //글 삭제
	  @GetMapping("/noticeDel.htm")
	  public String noticeDel(
			  @RequestParam("seq") String seq
			  ,@RequestParam("filesrc") String delFilesrc
			  ,HttpServletRequest request) throws Exception {
		  //1. 실제 업로드 경로에서 파일을 삭제
		  String uploadRealPath = request.getServletContext().getRealPath("/customer/upload");

		  File delFile = new File(uploadRealPath, delFilesrc);
		  if(delFile.exists())delFile.delete();

		  //2. DB에서 테이블 레코드 삭제
		  int deleteCount = this.noticeDao.delete(seq);
		  if(deleteCount==1) {
			  return "redirect:notice.htm";
		  } else return "redirect:noticeDetail.htm?seq=" + seq + "&error";
	  }
3-3. 실습 - 파일 수정
- noticeEdit.jsp 코드 수정
- form 태그 수정(토큰값, method, enctype 추가)
<form action="/customer/noticeEdit.htm?${_csrf.parameterName}=${_csrf.token}" method="post" enctype="multipart/form-data">- 첨부파일명 보이게 코드 수정
<dl class="article-detail-row">
<dt class="article-detail-title">
첨부파일
</dt>
<dd class="article-detail-data">
<input type="file" id="txtFile" name="file" />
<!-- 해당 공지사항 글의 첨부파일명을 출력 -->
<input type= "text" name="o_filesrc" value="${notice.filesrc}"></input>
</dd>
</dl>- 수정 버튼 submit으로 변경
<button class="btn-save button" type="submit">수정</button>- CustomerController.java 수정
- 글 수정하는 부분 코드를 수정한다.
	//글 수정 제출
	@RequestMapping(value = {"/noticeEdit.htm"}, method = RequestMethod.POST)
	public String noticeEdit(
			NoticeVO notice
			, @RequestParam("o_filesrc") String oFilesrc
			, HttpServletRequest request) throws Exception {
		//1. 첨부파일 유무확인
		CommonsMultipartFile multipartFile = notice.getFile();
		//2. 첨부파일 저장
		String uploadRealPath = null;
		if(!multipartFile.isEmpty()) {
			uploadRealPath = request.getServletContext().getRealPath("/customer/upload"); //upload 폴더에 저장

			File delFile = new File(uploadRealPath, oFilesrc);
			if(delFile.exists()){
				delFile.delete(); //수정하고자 하는 글에 파일이 이미 존재한다면 파일 삭제
			}

			// 여기서 이미 이전에 있던 파일은 삭제된 상태

			String originalFilename = multipartFile.getOriginalFilename(); //서버에 올릴 때 원래 파일명
			String filesystemName =  getFileNameCheck(uploadRealPath, originalFilename); //getFileNameCheck()함수
			//filesystemName은 물리적 이름(실제 업로드 되는 이름), originalFilename은 원래 사용자가 올릴 떄의 이름

			File dest = new File(uploadRealPath, filesystemName);
			multipartFile.transferTo(dest); //실제 서버에 파일이 업로드 된다.

			notice.setFilesrc(filesystemName);
			//기존에 있던 파일 그대로 유지할거면 DB에 물리적인 이름 그대로 저장되도록 함
		} else {
			notice.setFilesrc(oFilesrc); //새로 파일 올릴거라면 새로운 파일명으로 저장되도록 함
		}

		//2. 수정 제출
		int updatecount = this.noticeDao.update(notice);
		if(updatecount ==1) {
			return "redirect:noticeDetail.htm?seq=" + notice.getSeq(); //redirect: == response.sendRedirect()
		}else
		return "redirect:notice.htm";
	}

	//글 수정 ?seq=1
	@GetMapping("/noticeEdit.htm")
	public String noticeEdit(@RequestParam("seq") String seq, Model model) throws Exception{
		NoticeVO notice = this.noticeDao.getNotice(seq);
		model.addAttribute("notice", notice);
		return "noticeEdit.jsp";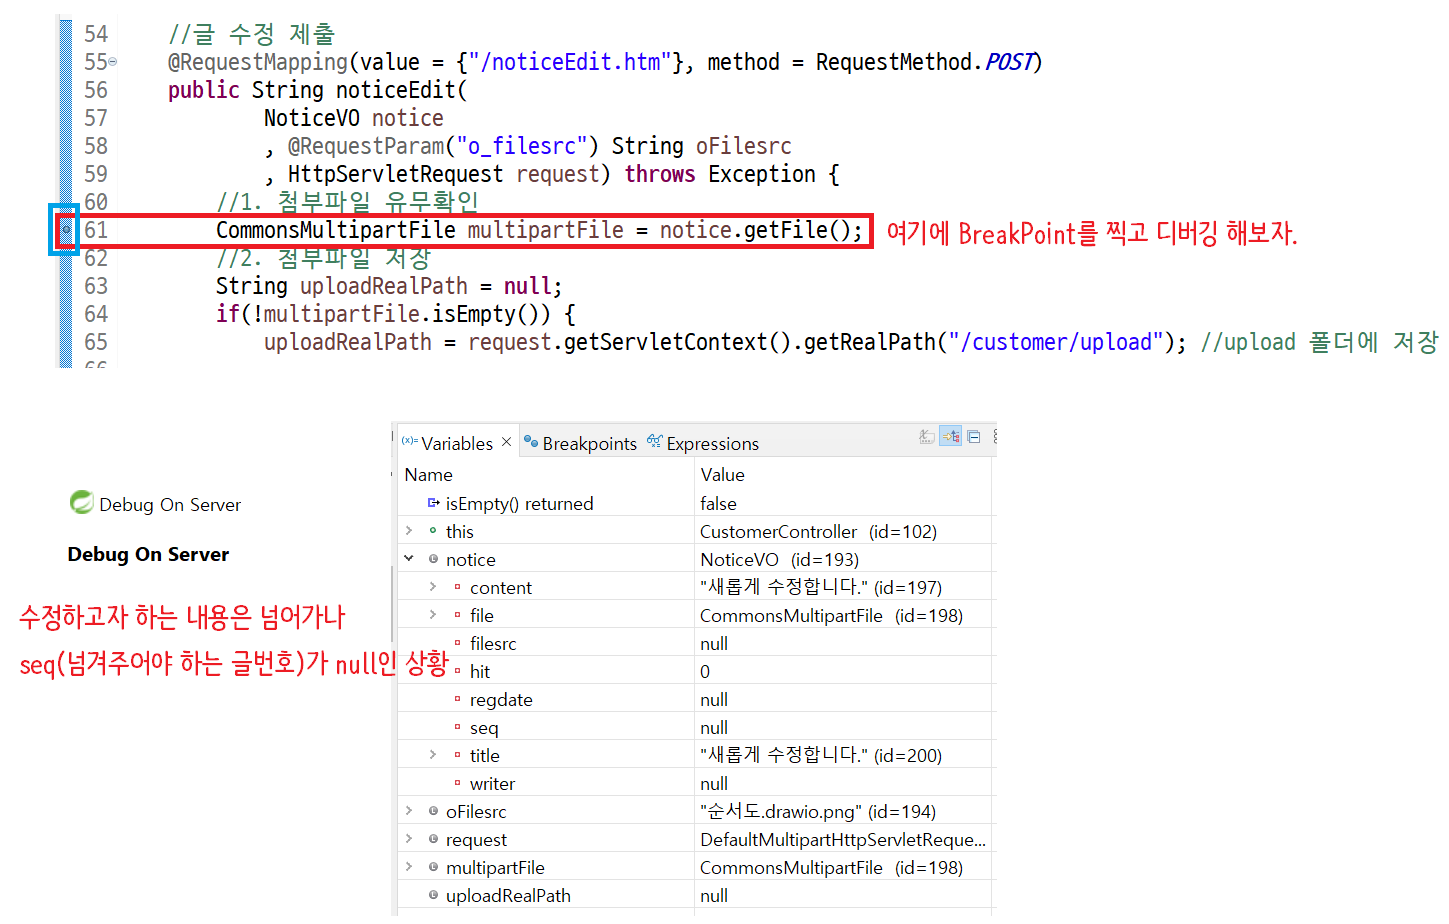
}- 그런데 코드를 수정해도 제목, 글, 첨부파일이 제대로 수정되지 않는 문제가 발생했다.
디버깅
- action 속성값이 없어야 url이 seq를 포함해 그대로 넘어가는데, form 태그를 수정하며 seq값이 같이 넘어가지 못한 상황
- form 태그에 seq를 추가해주는 방법과 form 태그 안에 hidden 속성으로 seq를 넘겨주는 방법 두가지가 있다.
- 이렇게 form 태그를 수정해주거나(noticeEdit.jsp)
<form action="/customer/noticeEdit.htm?seq=${ param.seq }&${_csrf.parameterName}=${_csrf.token}" method="post" enctype="multipart/form-data">
- 혹은 form 태그가 닫히기 전에 input 태그를 hidden 속성으로 추가(noticeEdit.jsp)
<input type="hidden" name="seq" value="${ param.seq }"/>
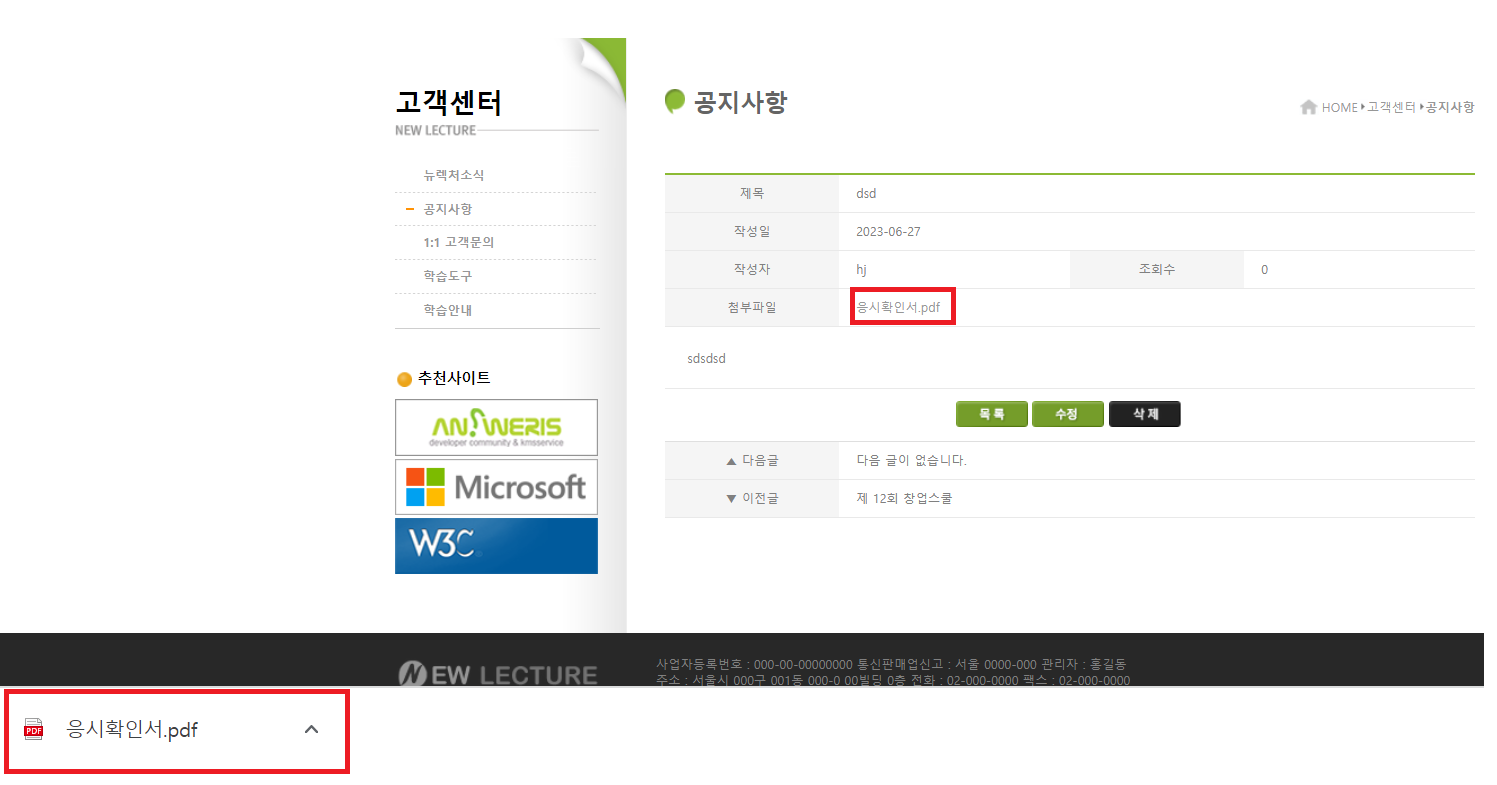
3-4. 실습 - 첨부파일 클릭 시 다운로드 되게 하기
- 첨부파일을 클릭하면 Stream을 이용해 다운로드가 되도록 해보자.
- noticeDetail.jsp 코드 수정
- 첨부파일 다운로드도 컨트롤러를 거치도록 코드를 수정하자.
<dl class="article-detail-row">
	<dt class="article-detail-title">
	첨부파일
	</dt>
		<dd class="article-detail-data">
<%-- <a href="upload/${notice.filesrc}">${notice.filesrc}</a> --%>
<a href="download.htm?dir=customer/upload&file=${notice.filesrc}">${notice.filesrc}</a>
		</dd>
</dl>- CustomerController.java 에 코드 추가
	// ?dir=customer/upload&file=${ notice.filesrc  }
    @RequestMapping( "/customer/download.htm")
    public void download(
          @RequestParam("dir")   String d
          , @RequestParam("file") String fname
          , HttpServletResponse response
          , HttpServletRequest request
          ) throws Exception{

       response.setHeader("Content-Disposition","attachment;filename="+ new String(fname.getBytes(), "ISO8859_1"));

       String fullPath = request.getServletContext().getRealPath(   d + "/" + fname);

       FileInputStream fin = new FileInputStream(fullPath);
       ServletOutputStream sout = response.getOutputStream();
       byte[] buf = new byte[1024];
       int size = 0;
       while((size = fin.read(buf, 0, 1024)) != -1) {
          sout.write(buf, 0, size);
       }
       fin.close();
       sout.close();

    }
개발 공부중