Test 코드 작성에 앞서 -
환경 설정 변경
테스트는 서비스에 활용되는 DB가 아닌 TEST용 DB를 사용하는 것이 좋다.
따라서, 테스트와 서비스 상황을 구분해서 환경 설정을 따로 해주도록 하자.
config.py
환경설정을 좀 더 깔끔하게 해보고 싶어서 pydantic의 BaseSettings로 바꿔봤다. 이를 사용하기 위해서는 라이브러리를 하나 더 설치해줘야 한다.
pip install pydantic-settingsfrom pydantic_settings import BaseSettings
from typing import ClassVar
from functools import lru_cache
class BaseConfig(BaseSettings):
# DB
DB_USERNAME: str
DB_HOST: str
DB_PASSWORD: str
DB_PORT: int
# CRED
SECRET_KEY: str
ALGORITHM: str
# PAPAGO
CLIENT_ID: str
CLIENT_SECRET: str
# Test Config
TESTING: ClassVar[bool] = False
class Config:
extra = "ignore"
env_file = ".env"
env_file_encoding = "utf-8"
class testSettings(BaseConfig):
TESTING: ClassVar[bool] = True
DB_TEST_NAME: str
class Settings(BaseConfig):
TESTING: ClassVar[bool] = False
DB_NAME: str
class isMain(BaseSettings):
IS_MAIN: bool
class Config:
extra = "ignore"
env_file = ".env"
env_file_encoding = "utf-8"
@lru_cache
def get_settings():
if is_main.IS_MAIN:
return Settings()
else:
return testSettings()
is_main = isMain()
settings = get_settings()
-
테스트 환경에서 사용할 testSettings, 서비스 환경에서 사용할 Settings로 나눴다.
-
.env 파일에 IS_MAIN이라는 환경변수를 추가해서 IS_MAIN이 true인 경우에만 Settings를 사용한다.
-
class Config에서 extra = "ignore"를 설정해주지 않으면 에러가 나니 꼭 추가해주도록 하자.
-
만약 테스트와 서비스 환경이 데이터베이스 이름뿐 아니라 다른 것도 상이하다면 묶어둔 BaseConfig에서 분리해서 작성해줘야 한다.
Pytest
pip install pytest-asyncio pytest-covPytest 라이브러리는 말 그대로 Python 코드를 테스트해보기 위한 라이브러리이다. 우리는 비동기식으로 테스트 코드를 실행하고 html로 정리된 테스트 결과를 보기 위해서 위의 두 라이브러리를 설치하도록 하겠다.
Pytest를 설치하고 나면 pytest 명령어를 콘솔에서 사용할 수 있는데, 명령어를 실행했을 때 test_*.py를 수집해서 안의 코드들을 테스트하게 된다.
Test
FASTAPI에서 TestClient를 제공해주지만, 필자가 알고 있는 지식(?)으로는 비동기 방식으로 지원해주지 않기 때문에 httpx로 AsyncClient를 생성해서 비동기 방식으로 테스트를 진행하겠다.
Test 코드
conftest.py
import bcrypt
import pytest_asyncio
import json
from httpx import AsyncClient

from app import main, models
from app.database import engine, get_db
from app.config import settings


@pytest_asyncio.fixture(scope="session")
def app():
    if not settings.TESTING:
        raise SystemError("TESTING environment must be set true")

    return main.app

@pytest_asyncio.fixture
async def session():
    db = next(get_db())
    try:
        yield db
    finally:
        db.close()


@pytest_asyncio.fixture
async def client(app):
    async with AsyncClient(app=app, base_url="http://test/v2") as ac:
        models.Base.metadata.drop_all(bind=engine)
        models.Base.metadata.create_all(bind=engine)

yield ac-
FIXTURE란 Pytest에서 반복적으로 생성되어야 하는 아이템을 매개변수로 불러와 생성할 수 있게 해주는 일종의 모듈이라고 볼 수 있다.
-
FIXTURE에서 FIXTURE를 불러와서 다른 FIXTURE를 만들 수도 있다.
-
위 세 개의 FIXTURE로 만들어놓은 API와 데이터베이스를 연결하고, client를 통해서 API에 접근할 수 있게 작성하였다.
test_user.py
conftest.py에 유저를 DB에 등록하는 FIXTURE를 생성하자.
@pytest_asyncio.fixture
def user(session) -> models.User:
    salt_value = bcrypt.gensalt()
    pw = bcrypt.hashpw("testpw".encode(), salt_value)
    row = models.User(password=pw, email="test@sample.com")
    session.add(row)
    session.commit()
    return row
import pytest
import json


# 유저 생성 테스트
@pytest.mark.asyncio
async def test_add_user(client):
    body = {"email": "sample@sample.com", "password": "samplepw"}
    r = await client.post("/users/register", data=json.dumps(body))
    data = r.json()

    assert r.status_code == 201
    assert data.get("email") == body["email"]

# 유저 생성 에러 테스트 (너무 긴 이메일)
@pytest.mark.asyncio
async def test_add_user_failed_by_long_email(client):
    body = {"email": "longlonglonglonglonglonglonglonglongmail@sample.com", "password": "samplepw"}
    r = await client.post("/users/register", data=json.dumps(body))

    assert r.status_code == 422

# 유저 이메일 중복 확인 에러 테스트 (중복 이메일)
@pytest.mark.asyncio
async def test_email_duplicated_exist(client, user):
    email = "test@sample.com"
    r = await client.get(f"/users/duplicated?email={email}")
    data = r.json()

    assert r.status_code == 200
    assert data.get("duplicated")
    assert email == user.email

# 유저 이메일 중복 확인 테스트
@pytest.mark.asyncio
async def test_email_duplicated_no_exist(client):
    email = "noexist@sample.com"
    r = await client.get(f"/users/duplicated?email={email}")
    data = r.json()

    assert r.status_code == 200
    assert not data.get("duplicated")

# 유저 로그인 테스트
@pytest.mark.asyncio
async def test_login_user(client, user):
    body = {"email": user.email, "password": "testpw"}
    r = await client.post("/users/login", data=json.dumps(body))
    data = r.json()

    assert r.status_code == 200
    assert data.get("user_id") == user.id

# 유저 로그인 에러 테스트 (잘못된 패스워드)
@pytest.mark.asyncio
async def test_login_user_invalid_pw(client, user):
    body = {"email": user.email, "password": "wrongpw"}
    r = await client.post("/users/login", data=json.dumps(body))
    data = r.json()

    assert r.status_code == 403
    assert data.get("detail") == "Incorrect Password"

# 유저 로그인 에러 테스트 (잘못된 이메일)
@pytest.mark.asyncio
async def test_login_user_invalid_email(client):
    body = {"email": "noemail", "password": "testpw"}
    r = await client.post("/users/login", data=json.dumps(body))
    data = r.json()

    assert r.status_code == 403
    assert data.get("detail") == "No Email Found"
함수 두 개를 가져와서 찬찬히 살펴보도록 하자.
# 유저 이메일 중복 확인 테스트
@pytest.mark.asyncio
async def test_email_duplicated_no_exist(client):
    email = "noexist@sample.com"
    r = await client.get(f"/users/duplicated?email={email}")
    data = r.json()

    assert r.status_code == 200
    assert not data.get("duplicated")

# 유저 이메일 중복 확인 에러 테스트 (중복 이메일)
@pytest.mark.asyncio
async def test_email_duplicated_exist(client, user):
    email = "test@sample.com"
    r = await client.get(f"/users/duplicated?email={email}")
    data = r.json()

    assert r.status_code == 200
    assert data.get("duplicated")
assert email == user.email-
유저 이메일 중복 확인 테스트 (에러X)
이 코드는 이메일이 중복인지 아닌지 확인하는 엔드포인트의 테스트 코드다.
Fixture를 client만 받아왔으므로 User 테이블에는 어떠한 데이터도 들어있지 않을 것이므로, 어떠한 email을 검사하더라도 통과할 것이다.
따라서, status_code는 성공이므로 200, 반환값은 duplicated가 아니어야 한다. 이를 assert 함수를 통해서 검증하는 것. -
유저 이메일 중복 확인 테스트 (중복 이메일)
여기서는 user Fixture도 받아오게 되는데, 이러면 User 테이블에 Fixture에서 생성한 유저 데이터가 삽입되어 있는 상태이다. Fixture에서 생성한 유저의 이메일이 "test@sample.com"이므로 이와 같은 이메일로 엔드포인트에 접근해서 일부러 실패하는 것!
test_translate.py
우리는 번역 작업을 로그인 시에만 가능하게 설정해놨으므로, 토큰 값도 같이 보내줘야한다. 따라서 conftest.py에 token을 반환해주는 FIXTURE를 추가하도록 하자.
@pytest_asyncio.fixture
async def token(client, user) -> str:
    body = {"email": user.email, "password": "testpw"}
    r = await client.post("/users/login", data=json.dumps(body))
    return r.headers.get("access_token")
import pytest
import json


@pytest.mark.asyncio
async def test_translate(client, token):
    body = {"dialect": "밥 뭇나?"}
    headers = {"Authorization": f"Bearer {token}"}
    r = await client.post("/AI", data=json.dumps(body), headers=headers)
    data = r.json()

    assert r.status_code == 200
    assert data.get("dialect") == body["dialect"]
test_item.py
생성된 TsItem을 삭제하는 엔드포인트를 테스트해보기 위해서 데이터베이스에 Item을 삽입하는 FIXTURE와 다른 토큰을 생성하는 user2, token2 FIXTURE를 만들어주자.
@pytest_asyncio.fixture def item(session, user) -> models.TsItem: row = models.TsItem( dialect="dialect", standard="standard", english="english", chinese="chinese", japanese="japanese", owner_id=user.id, ) session.add(row) session.commit() return row@pytest_asyncio.fixture def user2(session) -> models.User: salt_value = bcrypt.gensalt() pw = bcrypt.hashpw("testpw".encode(), salt_value) row = models.User(password=pw, email="test2@sample.com") session.add(row) session.commit() return row@pytest_asyncio.fixture async def token2(client, user2) -> str: body = {"email": user2.email, "password": "testpw"} r = await client.post("/users/login", data=json.dumps(body)) return r.headers.get("access_token")
import pytest
import json


@pytest.mark.asyncio
async def test_add_item(client, token):
    body = {
        "dialect": "dialect",
        "standard": "standard",
        "english": "english",
        "chinese": "chinese",
        "japanese": "japanese",
    }
    headers = {"Authorization": f"Bearer {token}"}

    r = await client.post("/items", data=json.dumps(body), headers=headers)
    data = r.json()

    assert r.status_code == 201
    assert data.get("dialect") == body["dialect"]
    assert data.get("standard") == body["standard"]
    assert data.get("english") == body["english"]
    assert data.get("chinese") == body["chinese"]
    assert data.get("japanese") == body["japanese"]


@pytest.mark.asyncio
async def test_add_item_failed_by_long_text(client, token):
    body = {
        "dialect": "a" * 256,
        "standard": "standard",
        "english": "english",
        "chinese": "chinese",
        "japanese": "japanese",
    }
    headers = {"Authorization": f"Bearer {token}"}

    r = await client.post("/items", data=json.dumps(body), headers=headers)

    assert r.status_code == 422


@pytest.mark.asyncio
async def test_get_items(client, item):
    r = await client.get("/items")
    data = r.json()

    assert r.status_code == 200
    assert data[0].get("id") == item.id


@pytest.mark.asyncio
async def test_delete_item(client, item, token):
    headers = {"Authorization": f"Bearer {token}"}

    r = await client.delete(f"/items/{item.id}", headers=headers)

    assert r.status_code == 202


@pytest.mark.asyncio
async def test_delete_item_failed_by_invaild_id(client, item, token):
    headers = {"Authorization": f"Bearer {token}"}

    r = await client.delete(f"/items/{item.id+1}", headers=headers)
    data = r.json()

    assert r.status_code == 400
    assert data.get("detail") == "No Item Found"


@pytest.mark.asyncio
async def test_delete_item_failed_by_wrong_user(client, item, token2):
    headers = {"Authorization": f"Bearer {token2}"}

    r = await client.delete(f"/items/{item.id}", headers=headers)
    data = r.json()

    assert r.status_code == 403
    assert data.get("detail") == "It's not owner"
test_guestbook.py
방명록을 생성하는 Fixture도 추가해주자.
@pytest_asyncio.fixture
def guestbook(session, user) -> models.GuestBook:
    row = models.GuestBook(message="test", message_owner="test_owner", owner_id=user.id)
    session.add(row)
    session.commit()
    return row
import pytest
import json


@pytest.mark.asyncio
async def test_add_guestbook(client, token):
    body = {"message": "test", "message_owner": "testowner"}
    headers = {"Authorization": f"Bearer {token}"}

    r = await client.post("/guestbooks", data=json.dumps(body), headers=headers)
    data = r.json()

    assert r.status_code == 201
    assert data.get("message") == body["message"]


@pytest.mark.asyncio
async def test_add_guestbook_failed_by_long_owner(client, token):
    body = {"message": "test", "message_owner": "a" * 25}
    headers = {"Authorization": f"Bearer {token}"}

    r = await client.post("/guestbooks", data=json.dumps(body), headers=headers)

    assert r.status_code == 422


@pytest.mark.asyncio
async def test_get_guestbooks(client, guestbook):
    r = await client.get("/guestbooks")
    data = r.json()

    assert r.status_code == 200
    assert data[0].get("id") == guestbook.id


@pytest.mark.asyncio
async def test_update_guestbook(client, token, guestbook):
    body = {"message": "modified_message"}
    headers = {"Authorization": f"Bearer {token}"}

    r = await client.put(f"/guestbooks/{guestbook.id}", data=json.dumps(body), headers=headers)
    data = r.json()

    assert r.status_code == 202
    assert data.get("message") == body["message"]


@pytest.mark.asyncio
async def test_update_guestbook_failed_by_invalid_id(client, token, guestbook):
    body = {"message": "modified_message"}
    headers = {"Authorization": f"Bearer {token}"}

    r = await client.put(f"/guestbooks/{guestbook.id+1}", data=json.dumps(body), headers=headers)
    data = r.json()

    assert r.status_code == 400
    assert data.get("detail") == "Guestbook Not Found"


@pytest.mark.asyncio
async def test_update_guestbook_failed_by_wrong_user(client, token2, guestbook):
    body = {"message": "modified_message"}
    headers = {"Authorization": f"Bearer {token2}"}

    r = await client.put(f"/guestbooks/{guestbook.id}", data=json.dumps(body), headers=headers)
    data = r.json()

    assert r.status_code == 403
    assert data.get("detail") == "It's not owner"
Test 결과
Test 시작에 앞서 -
최상위폴더
ㄴ .coveragerc
ㄴ pytet.ini
테스트에서 제외하고 싶은 파일이 있다면?
# .coveragerc

[run]
omit =
    app/config.py
이곳에 스크립트 파일을 추가해주면 테스트에서 제외된다!
테스트 설정
# pytest.ini

[pytest]
addopts = --cov=app --cov-report term --cov-report html-
--cov=app
테스트를 진행할 범위를 지정하는 곳이다. -
--cov-report term
pytest를 실행하는 터미널에서 결과를 출력하게 해주는 옵션이다. -
--cov-report html
테스트를 완료한 뒤 결과보고서를 html 형식으로 저장하겠다는 옵션이다. 이 html 보고서는 htmlcov 폴더에 저장되어 있다.
Test 실행
가상환경을 activate하고 pytest -sv를 입력해주자.
여기서 -sv 옵션은 테스트 진행 중 더 상세한 정보를 표기해준다.
Terminal
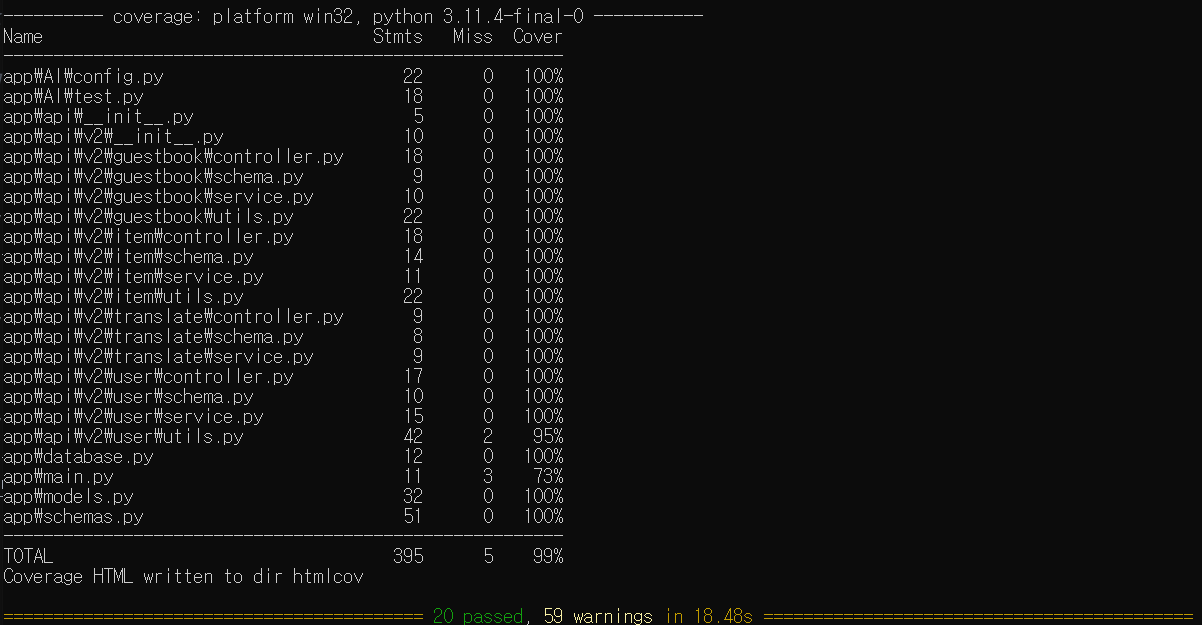
- 터미널에서 테스트 결과를 띄워주는 모습이다. 커버리지를 최대한 높여보고자 테스트 코드를 작성했기 때문에 꽤나 퍼센테이지가 높은 것을 볼 수 있다 ㅎㅎ.
HtmlCov
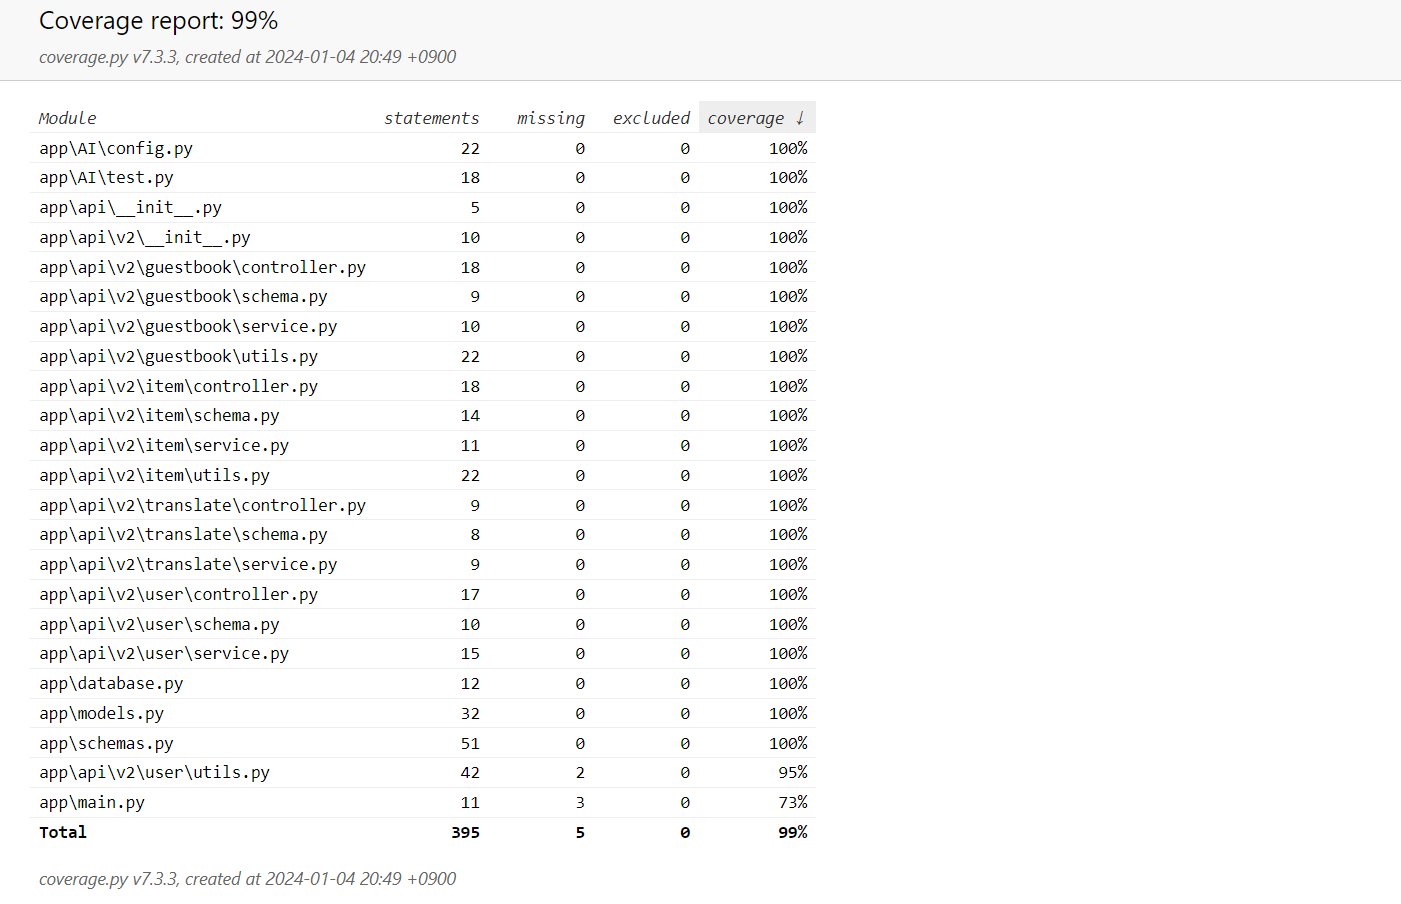
htmlcov 폴더의 index.html로 들어가보면 이런 화면이 나온다. 확실히 터미널보다 한 눈에 들어오는 것을 볼 수 있다.
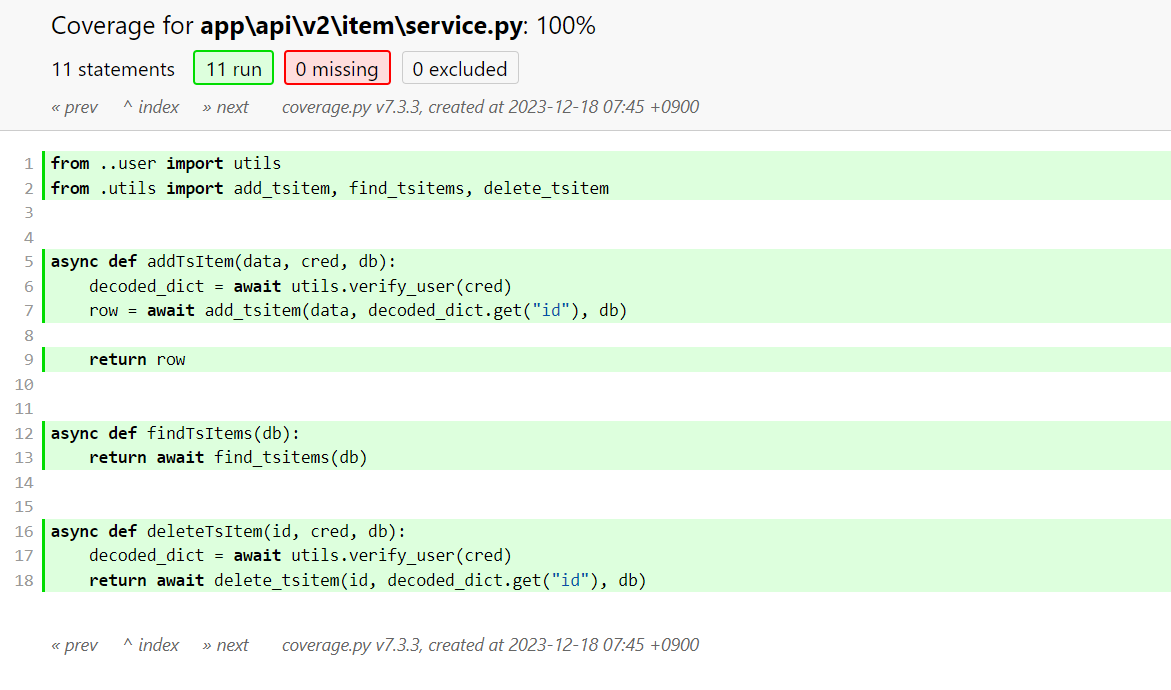
- 그리고 터미널과 다르게 Html로 커버리지 레포트를 받으면 좋은 점이 첫 index 화면에서 스크립트 이름을 클릭하면 어떤 코드가 커버되었고 어떤 코드가 안 되었는지 시각적으로 쉽게 확인할 수 있다.
여기까지 해서 캡스톤 디자인 프로젝트 테스트 코드까지 모두 작성해보았다. 다음 포스트에서 이번 프로젝트를 회고해보면서 시리즈를 마치도록 하겠다.
