들어가며
3편에서는 Decorator와 Parameter를 정리했다. 이번 글에서는 Story가 렌더링된 후 사용자 행동을 시뮬레이션하는 Play Function과 이를 활용한 인터랙션 테스트를 다룬다.
Play Function이란?
공식 문서의 Play function 페이지에 이런 설명이 나온다.
Play functions are small snippets of code executed after the story renders. They enable you to interact with your components and test scenarios that otherwise require user intervention.
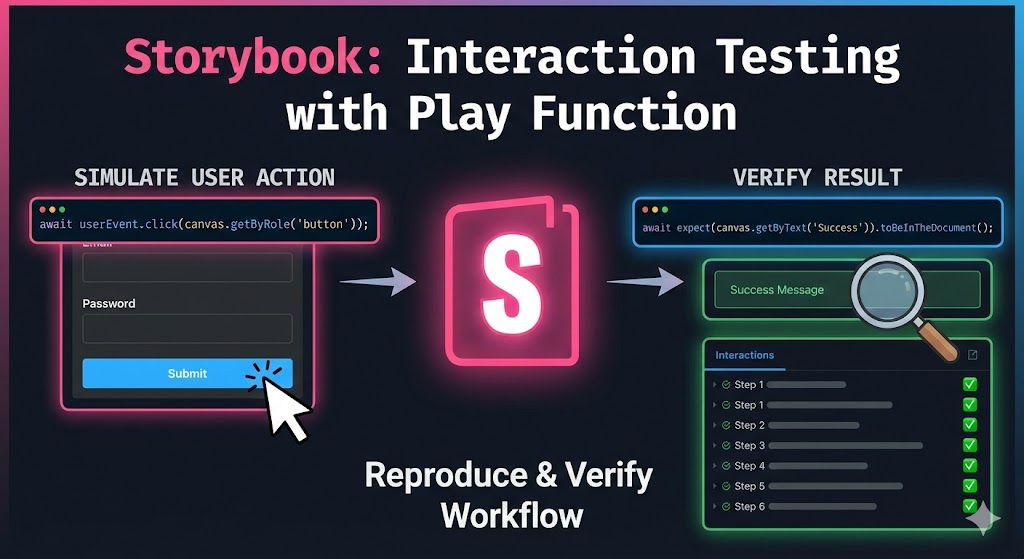
Play function은 Story가 렌더링된 후에 실행되는 코드 조각이다. 클릭, 타이핑, 폼 제출 같은 사용자 행동을 코드로 시뮬레이션하고, 그 결과를 검증할 수 있다.
지금까지 작성한 Story는 "이 props를 주면 이렇게 보인다"를 정의하는 것이었다. Play function을 사용하면 여기에 "이렇게 조작하면 이렇게 동작한다"까지 정의할 수 있다.
첫 번째 Play Function 작성해보기
공식 문서의 등록 폼 예제를 보자.
import type { Meta, StoryObj } from '@storybook/nextjs';
import { RegistrationForm } from './RegistrationForm';

const meta = {
  component: RegistrationForm,
} satisfies Meta<typeof RegistrationForm>;

export default meta;
type Story = StoryObj<typeof meta>;

export const FilledForm: Story = {
  play: async ({ canvas, userEvent }) => {
    const emailInput = canvas.getByLabelText('email', {
      selector: 'input',
    });

    await userEvent.type(emailInput, 'example-email@email.com', {
      delay: 100,
    });

    const passwordInput = canvas.getByLabelText('password', {
      selector: 'input',
    });

    await userEvent.type(passwordInput, 'ExamplePassword', {
      delay: 100,
    });

    const submitButton = canvas.getByRole('button');
    await userEvent.click(submitButton);
  },
};
Storybook이 Story를 렌더링한 후, play function에 정의된 단계를 순서대로 실행한다. 이메일 입력 → 비밀번호 입력 → 제출 버튼 클릭. 이 과정이 Interactions 패널에 단계별로 표시된다.
Play Function의 핵심 API
Play function에서 사용하는 주요 API를 하나씩 정리해보자.
canvas — DOM 쿼리
canvas는 play function의 파라미터로 전달되는 객체로, 렌더링된 Story의 DOM을 쿼리할 수 있다. Testing Library의 쿼리 메서드를 그대로 제공한다.
자주 쓰이는 쿼리 메서드를 정리하면 이렇다.
| 메서드 | 설명 |
|---|---|
| getByRole | 접근성 역할(role)로 요소를 찾는다 |
| getByLabelText | 연결된 label 텍스트로 요소를 찾는다 |
| getByText | 포함된 텍스트로 요소를 찾는다 |
| getByTestId | data-testid 속성으로 요소를 찾는다 |
| getByPlaceholderText | placeholder 값으로 요소를 찾는다 |
공식 문서에서는 실제 사용자가 UI를 인식하는 방식과 유사한 순서로 쿼리하는 것을 권장한다. getByRole → getByLabelText → getByText → ... → getByTestId 순으로, getByTestId는 다른 방법으로 찾을 수 없을 때 최후의 수단으로 사용하라는 것이다.
// 접근성 역할로 찾기 (권장)
canvas.getByRole('button', { name: 'Submit' });

// 텍스트로 찾기
canvas.getByText('An example heading');

// data-testid로 찾기 (최후의 수단)
canvas.getByTestId('email');getBy는 요소를 찾지 못하면 에러를 던진다. 요소가 없을 수도 있는 경우에는 queryBy를 사용하면 null을 반환한다. 비동기적으로 나타나는 요소는 findBy를 사용하면 요소가 나타날 때까지 기다려준다.
userEvent — 사용자 행동 시뮬레이션
userEvent도 play function의 파라미터로 전달된다. 사용자의 행동을 시뮬레이션하는 유틸리티다.
| 메서드 | 설명 |
|---|---|
| click | 요소를 클릭한다 |
| dblClick | 요소를 더블클릭한다 |
| type | input이나 textarea에 텍스트를 입력한다 |
| clear | input이나 textarea의 텍스트를 지운다 |
| hover | 요소 위에 마우스를 올린다 |
| tab | Tab 키를 누른다 |
| keyboard | 키보드 이벤트를 시뮬레이션한다 |
| selectOptions | select 요소에서 옵션을 선택한다 |
중요한 점은 userEvent 메서드는 반드시 await해야 한다는 것이다. await하지 않으면 Interactions 패널에서 제대로 로깅되지 않고 디버깅도 어려워진다.
// 올바른 사용
await userEvent.click(canvas.getByRole('button'));

// await 빠뜨리면 안 된다
userEvent.click(canvas.getByRole('button'));
expect — 결과 검증
요소를 찾고 행동을 시뮬레이션한 후, 그 결과를 검증한다. expect는 storybook/test 모듈에서 import한다.
import { expect } from 'storybook/test';자주 쓰이는 assertion 메서드를 정리하면 이렇다.
| 메서드 | 설명 |
|---|---|
toBeInTheDocument() | 요소가 DOM에 존재하는지 확인 |
toBeVisible() | 요소가 사용자에게 보이는지 확인 |
toBeDisabled() | 요소가 비활성화 상태인지 확인 |
toHaveValue() | input 요소의 값을 확인 |
toHaveBeenCalled() | 스파이 함수가 호출되었는지 확인 |
toHaveBeenCalledWith() | 스파이 함수가 특정 인자로 호출되었는지 확인 |
expect도 play function 안에서 반드시 await해야 한다.
인터랙션 테스트 작성하기
위의 API들을 조합하면 본격적인 인터랙션 테스트가 된다. 공식 문서의 LoginForm 예제를 보자.
import type { Meta, StoryObj } from '@storybook/nextjs';
import { expect } from 'storybook/test';
import { LoginForm } from './LoginForm';

const meta = {
  component: LoginForm,
} satisfies Meta<typeof LoginForm>;
export default meta;

type Story = StoryObj<typeof meta>;

export const EmptyForm: Story = {};

export const FilledForm: Story = {
  play: async ({ canvas, userEvent }) => {
    await userEvent.type(canvas.getByTestId('email'), 'email@provider.com');
    await userEvent.type(canvas.getByTestId('password'), 'a-random-password');
    await userEvent.click(canvas.getByRole('button'));

    await expect(
      canvas.getByText(
        'Everything is perfect. Your account is ready and we should probably get you started!',
      ),
    ).toBeInTheDocument();
  },
};EmptyForm은 play function이 없는 렌더 테스트다. 컴포넌트가 에러 없이 렌더링되는지만 확인한다. FilledForm은 이메일/비밀번호 입력 → 제출 → 성공 메시지 확인까지 검증하는 인터랙션 테스트다.
fn()으로 콜백 스파이하기
컴포넌트가 특정 함수를 호출하는지 확인하고 싶을 때가 있다. 예를 들어 "제출 버튼을 클릭하면 onSubmit이 호출되는가?"를 테스트하려면, fn() 유틸리티로 스파이 함수를 만들면 된다.
import type { Meta, StoryObj } from '@storybook/nextjs';
import { expect, fn } from 'storybook/test';
import { Form } from './Form';

const meta = {
  component: Form,
  args: {
    onSubmit: fn(),
  },
} satisfies Meta<typeof Form>;
export default meta;

type Story = StoryObj<typeof meta>;

export const Submitted: Story = {
  play: async ({ args, canvas, userEvent, step }) => {
    await step('Enter credentials', async () => {
      await userEvent.type(canvas.getByTestId('email'), 'hi@example.com');
      await userEvent.type(canvas.getByTestId('password'), 'supersecret');
    });

    await step('Submit form', async () => {
      await userEvent.click(canvas.getByRole('button'));
    });

    await expect(args.onSubmit).toHaveBeenCalled();
  },
};
여기서 눈여겨볼 부분이 두 가지 있다.
fn() — 스파이 함수
fn()은 storybook/test에서 제공하는 유틸리티로, 호출 여부와 인자를 추적할 수 있는 스파이 함수를 만든다. meta의 args에 onSubmit: fn()으로 정의하면, 컴포넌트가 onSubmit을 호출할 때마다 기록된다. 그 후 expect(args.onSubmit).toHaveBeenCalled()로 호출 여부를 검증할 수 있다.
step() — 테스트 단계 구분
step 함수는 play function의 파라미터로 전달된다. 테스트를 논리적 단계로 그룹화할 수 있다. 위 예제에서는 "Enter credentials"와 "Submit form"으로 나뉘어 있다. Interactions 패널에서 이 단계별로 접혀서 표시되므로, 복잡한 테스트도 가독성 있게 관리할 수 있다.
Play Function 조합하기
2편에서 args를 스프레드로 재사용했듯이, play function도 다른 Story의 play function을 호출해서 조합할 수 있다.
import type { Meta, StoryObj } from '@storybook/nextjs';
import { MyComponent } from './MyComponent';

const meta = {
  component: MyComponent,
} satisfies Meta<typeof meta>;
export default meta;

type Story = StoryObj<typeof meta>;

export const FirstStory: Story = {
  play: async ({ canvas, userEvent }) => {
    await userEvent.type(canvas.getByTestId('an-element'), 'example-value');
  },
};

export const SecondStory: Story = {
  play: async ({ canvas, userEvent }) => {
    await userEvent.type(canvas.getByTestId('other-element'), 'another value');
  },
};

export const CombinedStories: Story = {
  play: async ({ context, canvas, userEvent }) => {
    await FirstStory.play(context);
    await SecondStory.play(context);
    await userEvent.type(canvas.getByTestId('another-element'), 'random value');
  },
};CombinedStories는 FirstStory와 SecondStory의 play function을 먼저 실행한 후, 추가적인 인터랙션을 수행한다. 이렇게 하면 단계별 워크플로우를 Story 단위로 쪼개서 관리하고, 필요할 때 조합해서 전체 흐름을 테스트할 수 있다.
canvas 바깥의 요소 쿼리하기
모달이나 다이얼로그처럼 Story의 루트 요소 바깥에 렌더링되는 컴포넌트도 있다. 이런 경우 canvas로는 찾을 수 없다. 이때 storybook/test의 screen 객체를 사용하면 document 전체에서 요소를 쿼리할 수 있다.
import type { Meta, StoryObj } from '@storybook/nextjs';
import { screen } from 'storybook/test';
import { Dialog } from './Dialog';

const meta = {
  component: Dialog,
} satisfies Meta<typeof Dialog>;
export default meta;

type Story = StoryObj<typeof meta>;

export const Open: Story = {
  play: async ({ canvas, userEvent }) => {
    await userEvent.click(canvas.getByRole('button', { name: 'Open dialog' }));

    const dialog = screen.getByRole('dialog');
    await expect(dialog).toBeVisible();
  },
};canvas는 Story 내부만 쿼리하고, screen은 document 전체를 쿼리한다. 기본적으로는 canvas를 사용하되, Portal 등으로 Story 바깥에 렌더링되는 요소를 찾을 때 screen을 사용한다.
Interactions 패널로 디버깅하기
Play function을 작성하면 Storybook UI의 Interactions 패널에서 각 단계를 확인할 수 있다. 이 패널에서는:
- 각 인터랙션 단계가 순서대로 표시된다
- 각 단계를 클릭하면 해당 시점의 UI 상태를 확인할 수 있다
- 실패한 assertion이 있으면 어떤 단계에서 실패했는지 바로 보여준다
step()으로 그룹화한 단계는 접었다 펼 수 있다
이게 Play function의 큰 장점이다. Jest나 Vitest로 터미널에서 테스트하면 실패 시 에러 메시지만 볼 수 있지만, Storybook에서는 실제 브라우저에서 컴포넌트를 보면서 디버깅할 수 있다.
정리
- Play function: Story가 렌더링된 후 실행되는 코드다. 사용자 행동을 시뮬레이션하고 결과를 검증할 수 있다.
- canvas / userEvent / expect: DOM 쿼리, 행동 시뮬레이션, 결과 검증의 3단계로 인터랙션 테스트를 작성한다. 모두
await해야 한다. - fn(): 콜백 함수의 호출 여부를 추적하는 스파이 함수를 만든다.
- step(): 테스트를 논리적 단계로 그룹화해서
Interactions패널의 가독성을 높인다. - Play function 조합: 다른 Story의 play function을 호출해서 워크플로우를 단계별로 관리할 수 있다.