아무리 봐도 무슨 말인지 잘 모르겠으니 천천히 살펴보자.
1. Mounting
컴포넌트를 실행했다는 말은 컴포넌트가 Mount되었다는 말과 같다.
컴포넌트를 실행(mount)하면 컴포넌트는 context, defaultProps와 state를 저장한다.
- Props와 state는 앞에서 정리를 했으니 뭔지는 알겠다. 그러면 context는 뭘까?
:: 여러 단계의 컴포넌트를 거쳐 Props를 전달할 때, context를 이용하면 각각의 컴포넌트에 일일이 Props를 전달하지 않고도 컴포넌트들이 값을 공유할 수 있다고 한다. 어떤 느낌인지는 알겠지만 정확히 이해하기에는 아직 내 수준이 미치지 못하는 것 같다.
그러니 자세한 설명은 React 공식사이트의 링크로 대체하겠다.
마운팅 과정에 대한 이해를 돕기 위해 코드를 가져왔다.
코드가 와닿지 않는다면 직접 갖고 놀면서 콘솔창을 참고하자.
class Counter extends Component {
  state = {
    number: 0
  }

  constructor(props) {
    super(props);
    console.log('constructor');
  }

  componentWillMount() {
    console.log('componentWillMount (deprecated)');
  }

  componentDidMount() {
    console.log('componentDidMount');
  }

  handleIncrease = () => {
    const { number } = this.state;
    this.setState({
      number: number + 1
    });
  }

  render() {
    console.log('render');
    return (
      <>
        <div>값: {this.state.number}</div>
        <button onClick={this.handleIncrease}>+</button>
      </>
    );
  }
}
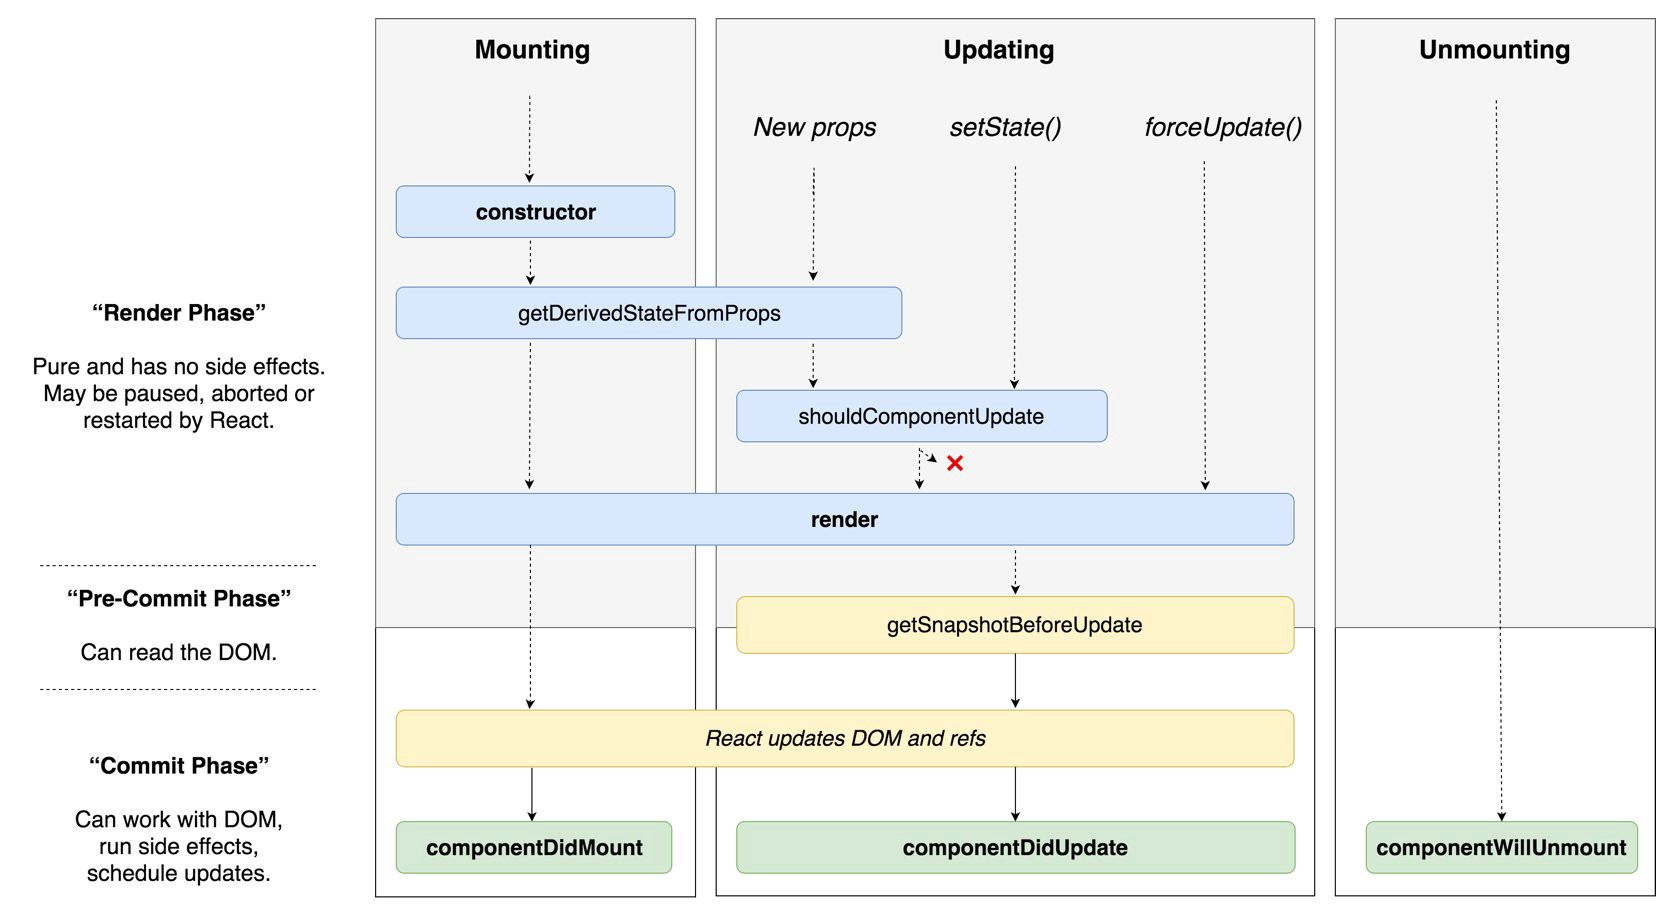
코드를 찍어보면 constructor → componentWillMount → render → componentDidMount 순서로 콘솔창에 작성되는 것을 볼 수 있다.
- 중간정리
:: Counter 컴포넌트를 실행하면 아래의 순서대로 행동한다.
⓵ context, defaultProps와 state를 저장
⓶ componentWillMount 메소드 호출 (deprecated)
⓷ render 메소드 호출
⓸ componentDidMount 메소드 호출
** 부연설명
⓵ render가 끝나면 브라우저에 출력이 된다. 아래처럼 debugger를 입력해보면 브라우저에 출력은 되지만 componentDidMount는 작성되지 않은 것을 확인할 수 있다.
(render 단계에서 debugger를 입력할 경우 브라우저에 출력되지 않는다.)
componentDidMount() {
  debugger;
  console.log('componentDidMount');
}
⓶ componentDidMount 메소드에서는 주로 DOM을 사용해야 하는 외부 라이브러리를 연동하거나 백엔드에 데이터를 요청하는 작업을 진행한다.
⓷ componentWillMount 단계에서는 아직 mount중이라 props와 state를 수정하면 안된다.
⓸ ⓶과 ⓷은 지금 당장은 와닿지 않더라도 나중을 위해 기억해두자.
2. Updating
Mounting과정에 대해 조금 이해가 됐다면 이번에는 Updating으로 가보자.
아직 Props가 updating 과정에 대해서는 명확히 이해하지 못했으니 오늘은 state의 updating 과정에 대해서만 설명하려고 한다. Props에 대한 설명은 제로초 사이트를 참고하자.
Updating 과정에서는 shouldComponentUpdate, componentWillUpdate와 componentDidUpdate 메소드가 동작한다.
class Counter extends Component {
  state = {
    number: 0
  }

  constructor(props) {
    super(props);
    console.log('constructor');
  }

  componentWillMount() {
    console.log('componentWillMount (deprecated)');
  }

  componentDidMount() {
    console.log('componentDidMount');
  }

  shouldComponentUpdate() {
    console.log('shouldComponentUpdate');
  }

  componentWillUpdate() {
    console.log('componentWillUpdate');
  }

  componentDidUpdate() {
    console.log('componentDidUpdate');
  }

  handleIncrease = () => {
    const { number } = this.state;
    this.setState({
      number: number + 1
    });
  }

  render() {
    console.log('render');
    return (
      <>
        <div>값: {this.state.number}</div>
        <button onClick={this.handleIncrease}>+</button>
      </>
    );
  }
}
버튼을 클릭한 후에 콘솔창을 살펴보면 componentDidMount 이후로 shouldComponentUpdate → componentWillUpdate → render → componentDidUpdate가 출력되는 모습을 볼 수 있다.
- 중간정리
:: Counter 컴포넌트의 state에 변경사항이 생길 경우 아래의 순서대로 행동한다.
⓵ shouldComponentUpdate 메소드 호출
⓶ componentWillUpdate 메소드 호출 (deprecated)
⓷ render 메소드 호출
⓸ componentDidUpdate가 메소드 호출
Mounting 때와 마찬가지로 render 단계가 끝나면 브라우저에 출력이 된다. 이번에는 직접 debugger를 입력해서 확인해보자.
그리고 주로 성능 최적화는 shouldcomponentUpdate에서 이루어진다. 아직 render 전이라 false를 return하면 render를 취소할 수 있기때문이다.
3. Unmounting
Unmounting과정이 없다면?
setInterval로 1초당 리렌더링되는 코드가, 삭제되기 전까지 끊임없이 동작되는 끔찍한 모습을 볼 수 있다.
Unmounting과정에서는 componentWillUnmount 메소드가 동작한다. componentWillMount에서는 연결했던 이벤트 리스너를 제거하는 등의 활동을 주로 한다(고 한다).
끝.
라이프 사이클을 정리하며 소소하게,
라이프 사이클이 무엇인지 조금은 알 것 같지만 활용 방안에 대해서는 전혀 감이 안잡히는걸 보면 제대로 이해하기까지 노력과 시간이 더 필요한 것 같다. 위코드 프로젝트가 끝나고 시간이 지나 리액트를 다시 한 번 정리할 때, 오늘 이해하지 못한 부분들에 대해 명확하게 설명할 수 있도록 끝까지 물고 늘어져야지.
잊지 않도록 충실히 기록해놔야겠다.
자료 출처: 제로초
코드 출처: VELOPERT.LOG

택준님 화이팅👏👏