Project Overview
1. What is Virtual Machine (VM)?
- 실재하는 컴퓨터 상에 소프트웨어로 논리적으로 만들어낸 컴퓨터
- 하나의 물리자원(컴퓨터)위에 하나의 환경(OS)만 있는것을 효율화하고자 가상화 층을 만들고 그 위에 OS를 새로 설치하는 기법 (하나의 컴퓨터로 서로 다른 운영체제를 실행하고자 할때 소프트웨어로 하드웨어 기능을 시뮬레이션하여 실행한다.).
- 쉽게 말해, 현재 내가 쓰고 있는 컴퓨터의 OS가 윈도우인데, 이 컴퓨터에서 리눅스도 동시에 쓰고 싶다면 가상머신을 이용하면 된다.
2. Choice of OS (why did you choose Debian)?
- 리눅스 초보 사용자에게는 접근하기 쉬운 Debian이 더 용이함.
3. Centos vs Debian?
Centos ( Community Enterprise Operating System )
- Red Hat이 공개한 RHEL (Red Hat Enterprise Linux) 을 그대로 가져와서 Red Hat의 브랜드와 로고만 제거하고 배포한 배포본.
- 무료로 사용 가능 하나, 문제 발생시 회사가 아닌 커뮤니티를 통해 지원이 되므로 패치가 느리다.
- 서버용 운영체제로 인기가 매우 높다.
Debian
- 온라인 커뮤니티에서 제작하여 레드햇보다 더 먼저 배포되어 시장을 선점함.
- 무료 개인사용자 서버용으로 인기가 매우 높다.
- 넓은 유저층을 갖고 있는 데비안 계열은, 사용법이 온라인 웹사이트나 커뮤니티에 자세히 기술되어 있어 진입장벽이 낮아 초보 리눅스 유저들이 접근하기 쉬운 OS임.
4. Debian - Apt / Aptitude / APPArmor ?
Apt vs Aptitude
1) Apt (low-level 패키지 매니저)
- apt는 다른 하이레벨 패키지 매니저에 의해 사용될 수 있음.
2) Aptitude (High-level 패키지 매니저)
- aptitude는 사용하지 않는 패키지를 자동적으로 제거해준다. 반면 apt는 추가적 옵션이 필요함(ex. auto-remove)
- aptitude는 why와 why-not 커맨드를 통해 특정 패키지를 설치할때 어떤것이 요구되고, 어떤것과 충돌하는지 확인할 수 있다.
- 설치, 제거,업데이트 과정에서 충돌이 있는 경우 다른 대안을 제시해줌. apt는 그냥 안된다고만 함.
3) APPArmor
앱아머는 정책파일을 통해 어떤 어플리케이션이 어떤 파일/경로에 접근 가능한지 허용해준다. enforce모드와 complain모드 두가지가 존재함.
- enforce모드 : 허가되지 않은 파일에 접근하는것을 거부하는 모드
- complain모드 : 실질적으로 보안을 제공하는것은 아님. 대신 어플리케이션이 해야 할 행동이 아닌 다른 행동을 하는 경우에 앱아머는 로그를 남겨준다.
Apparmor 확인
$sudo aa-statusAppArmor (Mandatory Access Control Framework)
When enabled, AppArmor confines programs according to a set of rules that specify what files a given program can access. This proactive approach helps protect the system against both known and unknown vulnerabilities.
5. Script must display all information all every 5 min.
crontab -e : script확인 및 수정가능혹, crontab 수정 불가할시, monitoring.sh의 권한을 실행 및 작성 가능하도록 바꾼다.
$sudo chmod 755 monitoring.sh
주어진 주제에서는 10분마다 script가 display되도록 요구했다.
*/10 * * * */home/ytak/monitoring.sh | wall(defense중) 하기와 같이 5분마다 script가 display되도록 수정하면 된다.
*/5 * * * */home/ytak/monitoring.sh | wall Wall command in Linux
Wall command in Linux system is used to write a message to all users. This command displays a message, or the contents of a file, or otherwise its standard input, on the terminals of all currently logged in users.
Simple setup
1. Ensure that the machine does not have a graphical environment at launch. A password will be requested before attempting to connect to this machine. Connect with a user which is not a root.
2. Pay attention to the password chosen, it must follow the rules imposed in the subject :
Password policy
- Your password has to expire every 30days
- The minimum number of days allowed before the modification of a password will be set to 2.
- The user has to receive a warning message 7 days before their password expires.
- Your password must be at least 10 characters long. It must contain an uppercase letter and a number. Also, it must not contain more than 3 consecutive identical characters
- The password must not include the name of the user
- The following rule does not apply to the root password. The password must have at least 7 characters that are not part of the former password.
- Of course, your root password has to comply with this policy.
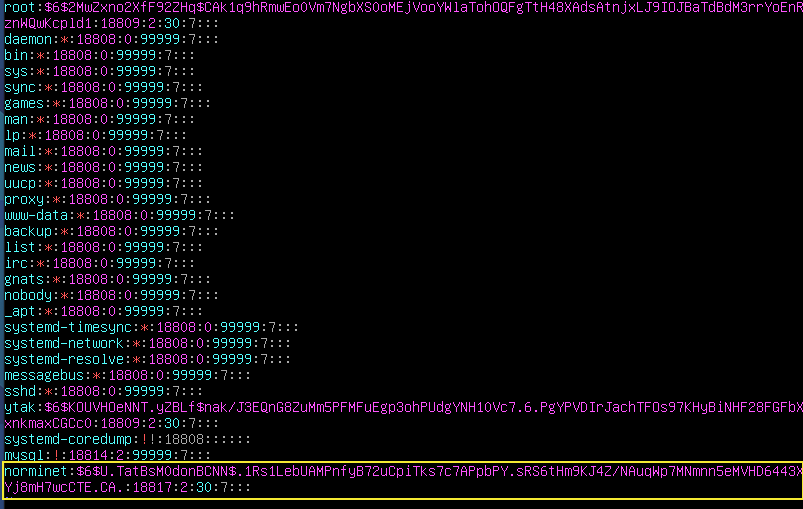
< Passowrd period >
$ sudo vi /etc/login.defs : 비밀번호 정책 설정 및 확인 가능.PASS_MAX_DAYS 30 : 비밀번호 최대 사용기간. 최대 30일동안 유효.
PASS_MIN_DAYS 2 : 비밀번호 최소 사용기간. 최소 2일동안 사용. 2일 이후에 비밀번호 변경 가능
PASS_WARN_AGE 7 : 경고 메세지 기간 설정. 비밀번호 만료 7일전부터 경고 메세지 출력
PASS_MIN_LEN 10 : 비밀번호 최소 길이는 10자. $ sudo vi /etc/shadow : root 와 ytak에서 비밀번호가 변경 된 것 확인 가능 (2 : 30: 7 로 확인 가능). shadow 파일에서는 비밀번호 관련 설정들이 저장됨. 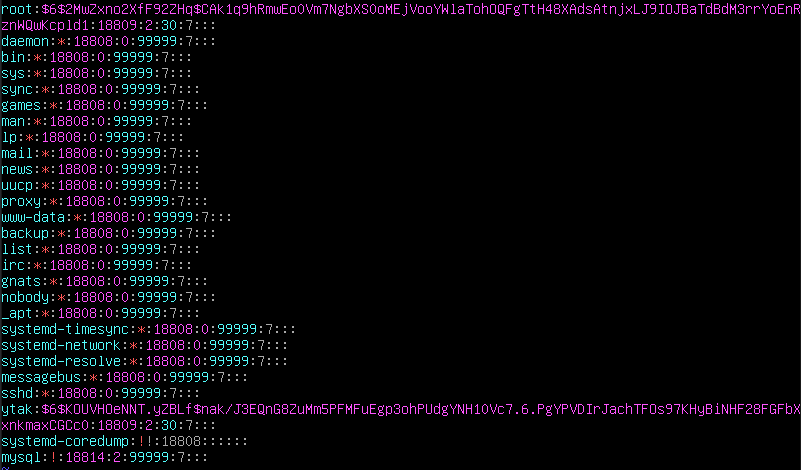
< Password rules >
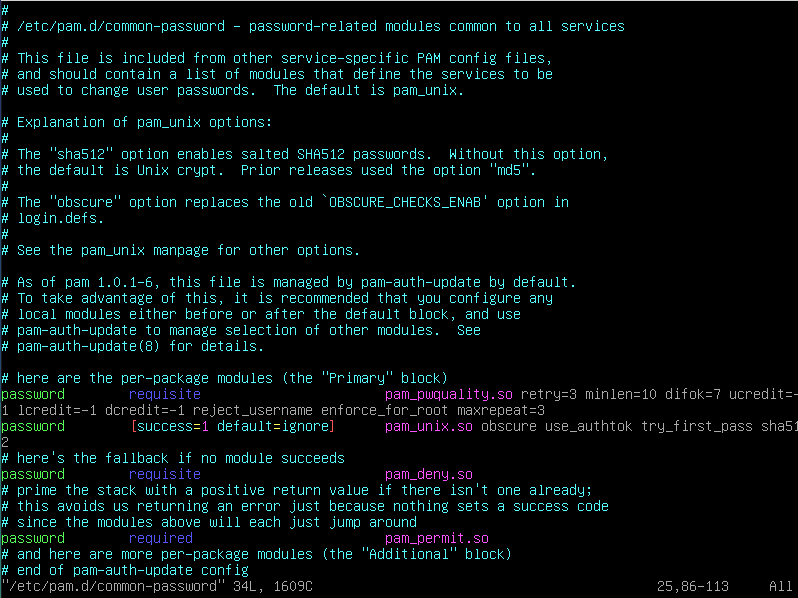
하기 커맨드를 통해 비밀번호 정책 설정 가능.
$ sudo vi /etc/pam.d/common-passwordpassword requisite pam_pwquality.so retry=3 minlen=10 difok=7 ucredit=-1 lcredit=-1 dcredit=-1 reject_username enforce_for_root maxrepeat=3retry=3
- 비밀번호 입력 횟수 설정
- 최대 3회 입력 가능
minlen=10
- 비밀번호 최소 길이
- 최소 10글자
difok=7
- 이전 비밀번호와 달라야 하는 문자 수
- 이전의 비밀번호와 비교했을 때 최소 7글자는 달라야 함
- root의 경우 이전 비밀번호를 저장하지 않기 때문에 root에는 적용되지 않음
ucredit=-1
- 대문자 제한
- -1 : 최소 한 글자 이상
lcredit=-1
- 소문자 제한
- -1 : 최소 한 글자 이상
dcredit=-1
- 숫자 제한
- -1 : 최소 한 글자 이상
reject_username
- 유저 이름이 그대로 또는 뒤집혀서 비밀번호에 입력될 수 없음
enforce_for_root
- 해당 비밀번호 정책을 root에도 적용
maxrepeat=3
- 중복 글자 제한
- 최대 3글자까지 중복 가능
- 비밀번호 정책의 경우 정책 설정 이후에 생성된 유저나 비밀번호에 대해서만 적용된다.
그렇기 때문에 기존 유저와 root에 대해
- 강화된 비밀번호로 변경
- 비밀번호 기간 적용
두 가지 사항을 적용 시켜야 한다.
3. Check that the UFW service is started
$ sudo ufw status verbose : check rules in details
$sudo ufw status numbered : verify the numbered ufw rules
$sudo ufw delete <rules to be deleted> : to delete ufw rules
4. Check that the SSH service is started
$sudo systemctl status ssh : openssh 실행 여부와 사용 포트를 확인 할 수 있음.
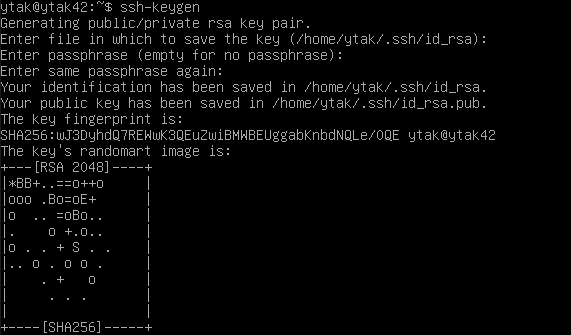
$ ssh-keygen : ssh key 확인가능
5. Check that chosen Operating System (Debian or Centos)
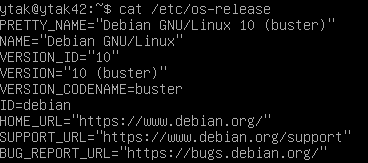
$ cat /etc/os-release : verify the chosen OS
User
1. User with the login of the evalutated student is present on the virtual machine
내 id 확인가능
$ whoami2. Check that it (login of evlauated student) has been added and it belongs to the "sudo" and "user42" groups.
user id 및 속해있는 group 확인 가능
$ id <user id>
UID and GID in Linux
Unix-like Operating Systems identify a user by a value called a user identifier(UID) AND Identify group by a group identifer (GID), are used to determine which system resources a user or group can access.
(유닉스 OS 시스템에서는 user를 UID 또는 GID로 나누어 구분하여, 접근 권한을 결정한다.)
UID (User Identifier)
UID is a number assigned by Linux to each user on the system. This number is used to identify the user to the system and to determine which system resources the user can access.
- UID 0 (zero) is reserved for the root.
- UIDs 1–99 are reserved for other predefined accounts.
- UID 100–999 are reserved by system for administrative and system accounts/groups.
- UID 1000–10000 are occupied by applications account.
- UID 10000+ are used for user accounts
GID (Group Identifier): Groups in Linux are defined by GIDs(group IDs).
- GID 0 (zero) is reserved for the root group.
- GID 1–99 are reserved for the system and application use.
- GID 100+ allocated for the user’s group.
3. Create a new user and assign it a password of your choice, respecting the subject rules. You must now explain to you how he was able to set up the rules requested in the subejct on their virtual machine. Normally there should be one or two modified files.
1. Create a new user
-
$sudo -v: to check your sudo rights, if no error messages appear, you're good to go. -
$sudo adduser <username>: Assign a newuser.
2. Create a new group and assign a user
-
c $sudo groupadd <groupname>: Add a group -
$sudo usermod -aG <groupname> <username>: Assign a user to the group -
$sudo id <username>: Check the new username hasbeen assigned to new groupname correctly.
3. Verify the one or two modified files
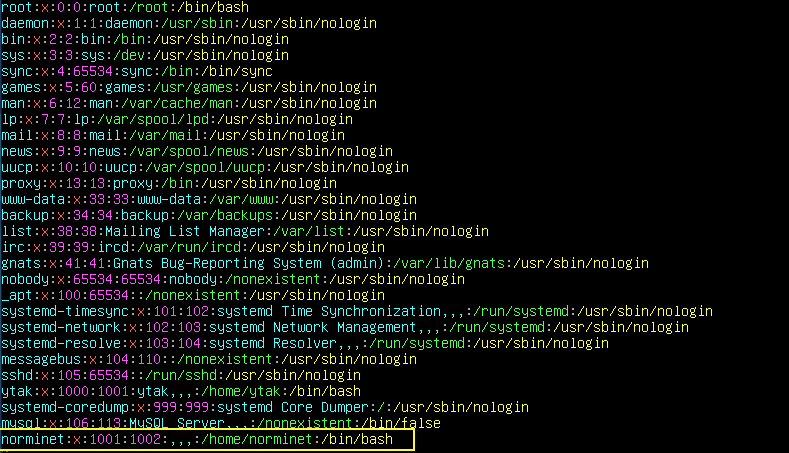
$sudo vi /etc/shadow: 새로 추가된 user의 비밀번호 설정을 확인 할 수 있다.
$sudo vi /etc/passwd: 새로 추가된 user의 주소 확인 가능
4. Delete the user and the group
$sudo deluser <username>: Delete the user$sudo groupdel <groupname>: Delete the group$getent group | grep <groupname to be found>: 그룹 현황 확인 가능
5. Advantages and disadvantages of password policy.
- Advantages : 비밀번호 정책으로 인해, 강력한 비밀번호 생성가능 (보안성 강화)
- Disavantages : 30일 주기로 비밀번호를 바꿔야 하는 불편함, 이전과는 같은 비밀번호를 생성 할 수 없음.
Hostname and partitions
- Check that the hostname of the machine is correctly formatted as follows: login42
$ hostnamectl
- Modify this hostname by replacing login with yours, then restart the machine.
$ sudo hostnamectl set-hostname <new hostname> : 호스트이름 변경
$ sudo reboot : 시스템 재부팅
- You can now restore the machine to the original hostname
$ sudo hostnamectl set-hostname <original hostname> : 기존 호스트이름으로 변경.
$ sudo reboot : 시스템 재부팅
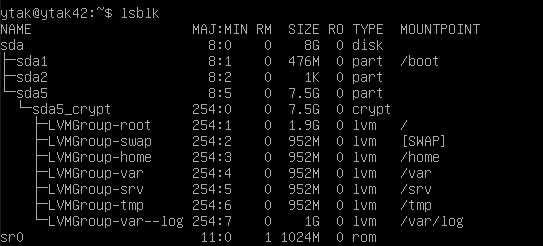
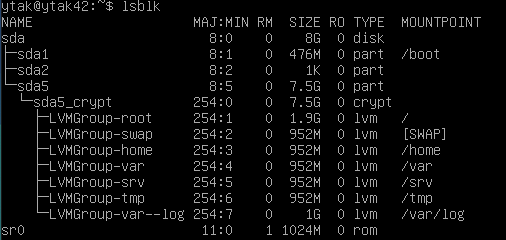
- How to view the partitions for the virtual machine and compare the output with the example given in the subject and explain how LVM wroks and what it is all about.
$ lsblk
Details of partitions
- Root : Superior category. A 12-20 GB partition for the OS. Non-swap partition where the file system foes and required to boot a Linux system.
-
Swap : When the system runs out of RAM, the operating system moves inactive pages from RAM into this partition. To store idle processes when the physical RAM is low (실제 물리적인 램이 부족할때 대신 사용됨).
-
home : Holds user and configuration files separate from the operating system files. A (사용자계정 파티션)
-
var : Standard subdirectroy of the root directroy that containes files to which the system writes data during the course of its operation (로그파일 파티션, 시스템 log파일이 저장됨).
-
srv : Contains site-specific data which is served by this system. The /srv/ directory contains site-specific data served by your system running Red Hat Enterprise Linux. This directory gives users the location of data files for a particular service, such as FTP, WWW, or CVS. Data that only pertains to a specific user should go in the /home/ directory (프로토콜 -http/https 이용하여 외부사용자의 공유를 위해 사용됨).
-
tmp : Global temporary directories. Web browsers periodically write data to the tmp directory during page views and downloads (임시파일들을 저장하거나 시스템에서 임시로 작업을 진행할때 사용하는 파티션).
-
var/log : 프로그램 로그파일들이 따로 저장되는 디렉토리
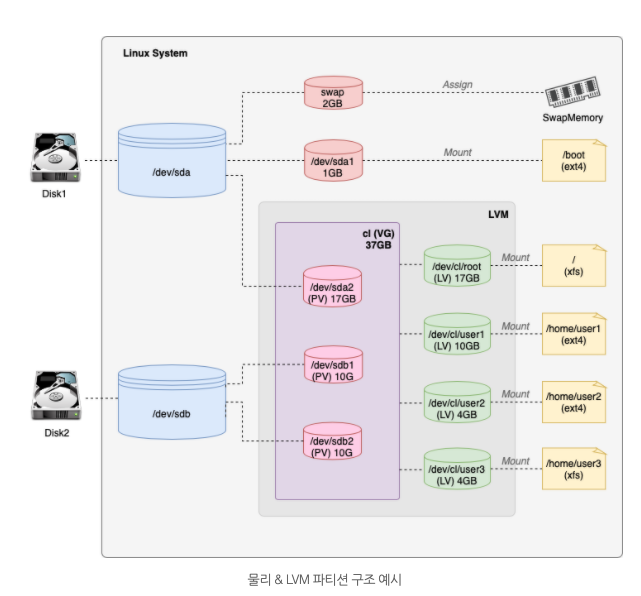
Logical Volume Manager (LVM)
- Allows for very flexible disk space management
- It provides features like ability to add disk space to a logical volume and its filesystem whie that filesystem is mounted and active and it allows for the collection of multiple physical hard drives and paritioning into a single volume group which can be divided into logical volumes.
- Also, allows reducing the amount of disk space allocated to a logical volume.
- LVM(Logical Volume Manager)는 리눅스 안에서 하나의 디스크를 여러 파티션으로 분할해서 파일 시스템을 이용해 특정 디렉터리와 연결시켜 사용한다.
- 파티션을 논리적인 개념인 볼륨으로 나눠서 더 유동적으로 디스크의 용량을 관리할 수도 있다
- 작은 용량의 하드디스크 여러 개를 큰 용량의 하드디스크 1개처럼 사용한다 (즉, 여러개의 디스크 공간을 합쳐서 하나인양 사용하기 위해).
- 사용하기 애매한 공간의 디스크 파티션(짜투리)들을 활용하기 위해 사용한다.
- 기존에 사용중인 디스크의 공간을 확장하기 위해 사용한다.
- 서버를 운영하면서 대용량의 별도 저장 공간이 필요할때 활용한다 (용량이 목적).
LVM 은 크게 3가지 영역으로 구분됨.
-
Physical Volume(PV) : 리눅스 시스템에 존재하는 물리 파티션 공간임. LVM의 PV로 귀속되면 해당 공간에 여유 공간이 충분해도 물리적으로 파티셔닝 할 수 없음.
-
Volume Group (VG) : PV로 등록된 파티션을 다시 하나의 그룹으로 묶을 수 있음. 이 그룹이 바로 VG임. VG로 묶인 PV파티션은 동일 VG 내에서 모든 용량이 통합됨. 또 다시 논리 파티션으로 나눌때에는 VG에서 전체 가용 공간을 판단하여 할당하게 됨.
-
Logical Volume (LV) : VG는 다시 자신이 관리중인 PV에서 논리적으로 공간을 분할 할 수 있음. 이렇게 분할된 파티션을 LV라고 함.
이렇게 LV로 나뉜 파티션은 최종적으로 파일 시스템을 할당받고 특정 디렉토리에 마운트 될 수 있음.
파티션은 물리 공간에서 나뉜 각각의 저장공간인 반면, 볼륨의 경우 파티션을 포함한 물리 저장 공간까지 모두 아우르는 개념.
파티션이란 ?
-
파티셔닝 :
하나의 물리 저장 장치를 시스템 내부에서 여러 디스크 공간으로 나누는 작업을 일컬음.
물리적으로 나뉜 공간을 primary, 논리적으로 나뉜 공간을 Extended 라고 부름. -
파티션 :
하드디스크 용량을 사용자가 필요에 따라 논리적으로 나눈 구역. 하나의 디스크는 여러개의 파티션을 나눌 수 있음. LVM이라고 부르는 파일 시스템을 통해 하나의 물리 공간을 논리적으로 쪼개어 사용함. 이렇게 나뉜 각각의 저장 공간을 파티션이라고 부름.
파티션은 고정적이고 물리적인 개념이 강하며, 한 번 크기를 설정하면 변경하거나 추가하기 힘들고 OS는 각 파티션을 별도의 디스크 처럼 인식한다. -
Primary 파티션 (주 파티션)
1) 파티션 정보를 포함하는 파티션 테이블에는 파티션 정보를 4개 밖에 저장 할수 밖에 없는 제한이 있으며, 이 4개의 파티션을 Primary 파티션 (주 파티션)이라고 부른다.
2) 4개 이상의 파티션을 사용해야 할 때는 하나의 확장 파티션을 설정하며 확장 파티션 안에 여러개의 논리 파티션을 분할하여 데이터 저장.
-
Extended 파티션 (확장 파티션)
1) 하나의 물리적 디스크에 1개만 생성 가능, 주 파티션내에 생성. 파티션 번호는 1~4번이 할당.
2) 데이터 저장 영역을 위한것이 아니라 논리 파티션을 생성
3) Extended 파티션은 Primary 파티션 가운데 한개만 쓸 수 있음.
4) Extended 파티션에는 사용자가 원하는 만큼의 Logical 파티션을 만들 수 있음.
-
Logical 파티션 (논리 파티션)
1) 확장 파티션 내에 생성
2) 12개 이상 생성하지 않는것을 권고하며 5번 이후의 파티션 번호가 붙여짐. -
마운트 (mount)
파티셔닝 된 물리 혹은 논리 공간은 특정 디렉토리에 연결되어 보이는데, 이것을 흔히 마운트 되었다고 표현한다. 즉, 특정 파일 시스템으로 마운트 된 파티션이 특정 디렉토리에 마운트 됨으로써, 사용자는 그 디렉토리를 통해 디스크의 파티션과 상호작용 할 수 있게 됨.
하드디스크, 플로피 디스크와 같은 저장 장치를 사용할 수 있도록 설정하는 작업.
볼륨이란 ?
- 파일 시스템으로 포맷된 디스크 상의 저장영역.
- 볼륨은 디스크, SSD, DVD 등의 물리 저장공간 까지 포괄적으로 볼륨이라고 불리며, 또 각각의 파티션 자체가 곧 볼륨이다.
- 볼륨은 디스크의 단일 파티션에 상주하게 되며, 파티션보다 논리적으로 유동적이다.
- 우리는 하나의 디스크를 여러 개의 파티션으로 나누어 사용한다. 이때 볼륨은 파티션마다 하나씩 존재하기도 하고, 여러 파티션에 하나만 존재할 수도 있다.
리눅스에서 디스크를 사용하는 가장 기본적인 방법은 디스크를 파티션으로 나누어 각각의 디렉터리에 파일 시스템으로 마운트 한 뒤 지정된 위치에 데이터를 저장해서 사용하는 것이다.
(디스크 → 파티션 → 볼륨그룹 → 논리그룹 → 파일시스템(/home))
Sudo 사용의 필요성 및 장점
-
root권한을 최소화 시키는것이 보안의 첫걸음이며, sudo사용은 보안의 기본이라 할 수 있다.
-
root password를 효율적으로 관리 할 수 있다. 한명이 아닌 여러명의 관리자에 의해 시스템이 운영될 경우에 여러사람이 root패스워드를 공유하면 root 패스워드 정기적인 변경이 어려워짐은 물론, root 패스워드가 외부로 노출될 확률이 높아진다. sudo를 써서 root권한을 사용하는 시간을 최소화하는것은 위협요소로부터 안전한 작업 또는 운영을 하는데 있어서 매우 큰 장점이다.
-
log 추적이 쉬워진다. su root할 경우가 많아지게 되면, su root가 되어 무슨 작업을 했는지 일일히 확인하는것이 불가능 하다. 심지어 시스템의 일부가 손상되어도 그 사실을 눈치채지 못할 수 있다. sudo를 쓰게 되면 command단위의 loggin이 가능하므로 정확한 기록을 확인할 수 있게 된다.
-
관리의 권한과 책임이 명확해진다. root 권한을 여러 사람이 공유할때, 어떤 작업이 누구에 의해 행해졌는지는 매우 불분명하다. sudo를 써서 작업한다면 누가 어떤 작업을 했는지가 명확하다.
Sudo 사용법
- sudo가 설치되어 있다면, sudoers 파일에 원하는 사용자를 등록시킬 수 있다.
- 문법체크를 해주는 $visudo를 쓰는것을 권장함.
1. Check that the "Sudo" program is properly installed on the Virtual Machine
$dpkg -l sudo sudo 설치 여부 확인
2. The evaluated student should now show assigning your new user to the "sudo" group.
-
sudo adduser <new username>new user 생성 -
sudo usermod -aG sudo <new username>sudo그룹에 new user 할당 -
getent group커맨드로 그룹 현황 확인 해 볼것
deluser <user> <group>to remove user from a group
3. The student must first explain the value and operation of sudo using examples of their choice.
=> show how sudo works
4. Verify that the " /var/log/sudo/" folder exists and has at least one file. Check the contents of the files in this folder and you should see a history of the commands used with sudo.
su -root계정으로 로그인cd /var/log/sudo/00/00으로 접근ls로 들어있는 log 파일들을 확인
5. Run a command via sudo. See if the file(s) in the "/var/log/sudo" folder have been updated.
sudo ls 등 sudo와 관련된 아무 커맨드나 확인하고, 새로운 log 파일이 생겼는지 확인한다.
UFW (Uncomplicated FireWall)
UFW is a program for managing a netfilter firewall designed to be easy to use.
1. Check that the "UFW" program is properly installed on the virtual machine. Check that it is working properly.
sudo ufw status verbose : ufw 상태 상세 확인
2. Should explain what UFW is and the value of using it.
UFW이란, 데비안 계열 빛 다양한 리눅스 환경에서 작동되는 사용하기 쉬운 방화벽 관리 프로그램이다. UFW는 사용하기 쉽게 설계된 넷필터 (리눅스 커널 내부의 네트워크 관련 프레임 워크) 방화벽을 관리하는 프로그램이다. 간단한 명령 및 명령수가 적은 명령줄 인터페이스를 사용하는것이 특징이며, 프로그램 구성에는 iptables을 사용한다. ufw는 기본적으로 8.04 LTS 이후의 모든 데비안 및 우분투에서 사용할 수 있다.
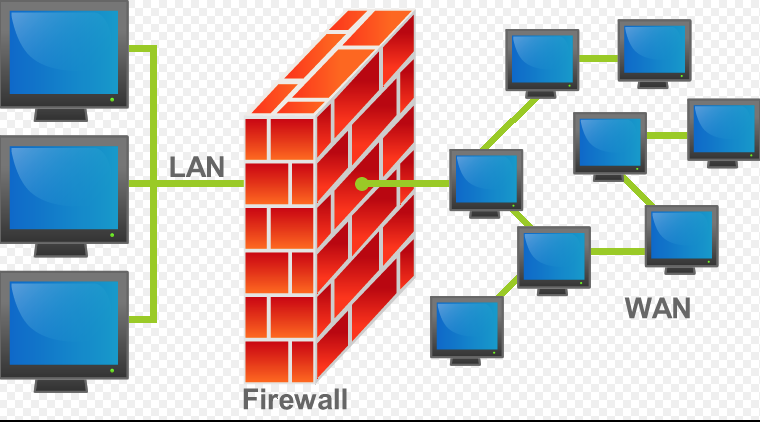
방화벽 / Firewall이란?
방화벽 또는 Firewall은 네트워크를 통해 들어오는 트래픽(패킷)을 모니터링하고 제어하는 보안 시스템이다. 학교에서 사용하는 내부 네트워크 보안 규칙 설정 뿐만아니라. 외부 접속을 통한 데이터의 안전상태를 검열 혹은 수정하는 장치이다.
3. List the active rules in UFW. A rule must exist for port 4242.
sudo ufw status numbered : verify the rule numbered
4. Add a new rule to open port 8080. Check that this one has been added by listing the active rules. After, delete this new rule.
sudo ufw allow 8080 : add 8080 port
sudo ufw delete <Number of the rules to be deleted> : delete the rule
SSH
-
Check that the SSH service is properly installed on the virtual machine and check that is working properly.
systemctl status ssh: check the status of ssh -
You must be able to explain basically what SSH (Secure Shell) is and the value of using it.
SSH란?
SSH란 Secure Shell의 줄임말로, 두 컴퓨터 간 통신을 보안적으로 안전하게 할 수 있게 해주는 하나의 protocol이다.
인터넷 연결만 되어있어도 내 컴퓨터의 terminal을 통해 다른 지역에 있는 컴퓨터 혹은 서버를 관리할 수 있게 해주고, 파일도 공유 할 수 있다.
대표적인 사용의 예)
- 데이터 전송
- 원격 제어
- protocol이란, 서로 다른 통신 장비 간 주고 받는 데이터의 양식과 규칙이다.
예시) HTTP, HTTPS, FTP
SSH란 Secure Shell Protocol, 즉 네트워크 프로토콜 중 하나로 컴퓨터와 컴퓨터가 같은 public network를 통해 서로 통신을 할때 보안적으로 안전하게 통신을 하기 위해 사용하는 프로토콜이다.
대표적인 사용의 예는 하기와 같다.
- SSH (Secure Shell) is a network protocol that gives users, particularly system administrators, a secure way to access a computer over an unsercured network. In addition to providing secure network services, SSH refers to the suite of utilities that implement the SSH protocol. Secure Shell provides strong password authentication and public key authentication, as well as encrypted data communications between two computers connecting over an open network, such as the internet.
3. Verify that the SSH service only uses port 4242
=> 보너스를 했기 때문에, port4242 와 port80 (wordpress 연결)이 떠야함.
4. You should use SSH in order to log in with the newly created user. To do this, you can use a key or a simple password. It will depend on the student being evaluated. Of course, you have to make sure that you can't use SSH with the "root" user as stated in the subject.
Script monitoring
1. The operation of its script by displaying its code
#!/bin/bash

printf "#Architecture: "
 uname -a

printf "#CPU physical : "
 nproc --all

printf "#vCPU : "
 cat /proc/cpuinfo | grep processor | wc -l

printf "#Memory Usage: "
 free -m | grep Mem |awk '{printf"%d/%dMB (%.2f%%)\n", $3, $2, $3/$2 * 100}'

printf "#Disk Usage: "
 df -BM -a | grep /dev/mapper/ | awk '{sum+=$3}END{print sum}' | tr -d '\n'
printf "/"
 df -H  -a | grep /dev/mapper/LVMGroup-root | awk '{sum+=$2}END{printf sum}' | tr -d '\n'
printf "Gb ("
 df -BM -a | grep /dev/mapper/ | awk '{sum1+=$3 ; sum2+=$4} END {printf "%d", sum1 / sum2 * 100}' | tr -d '\n'
printf "%%)\n"

printf "#CPU load: "
 mpstat | grep all | awk '{printf "%.2f%%\n", 100-$13}'

printf "#Last boot: "
 who -b | sed 's/^ *system boot //g'

printf "#LVM use: "
if [ "$(lsblk | grep lvm | wc -l)" -gt 0 ] ; then printf "yes\n" ; else printf "no\n" ; fi

printf "#Connexions TCP : "
 ss | grep -i  tcp | wc -l | tr -d  '\n'
printf " ESTABLISHED\n"

printf "#User log: "
who | wc -l

printf "#Network: IP "
 /sbin/ifconfig | grep broadcast | sed 's/inet//g' | sed 's/netmask.*//g' | sed 's/ //g' | tr -d '\n'
printf " ("
 /sbin/ifconfig | grep ether | sed 's/.*ether //g' | sed 's/ .*//g' | tr -d '\n'

printf ")\n"

printf "#Sudo : "
 cat /var/log/auth.log | grep -a sudo | grep -a 'COMMAND=' | wc -l | tr -d '\n'
printf " cmd\n"

exit 0
Cron
2. What is "cron"?
-
A time-based job scheduler in Unix-like computer operating systes.
-
The cron daemon is a long-running process that executes commands at specific dates and times (to run schedule tasks).Cron wakes up every minutes and checks schedule tasks in cron table.
-
crontab : crontab is a table where we can schedule such kind of repeated tasks.
3. How the evaluated student set up her script so that it runs every 10 minutes when the server starts up.
crontab -e
*/10 * * * */home/ytak/monitoring.sh | wall
=> set up the script at every 10 min
4. The evaluated student should ensure that this script runs every 30s. You can run whatever you want to make sure the script runs with dynamic values correctly, and the student evaluated should make the script stop running when the server starts up, but without modifying the script. To check this point, you will have to restart the server one last time, At startup, it will be necessary to check that the script still exists in the same place, that its rights have remained unchanged, and that it has not been modified.
crontab -e
*/1 * * * */home/ytak/monitoring.sh | wall
*/1 * * * * sleep 30; /home/ytak/monitoring.sh | wall
=> Using sleep30s, the monitoring.sh should run every 30 seconds.
Bonus
- Setting up partitions is worth 2 points (need to corresponded to the paritions with the subejct)
- Setting up WordPress, only with the services required by the subject, is worth 2 points.
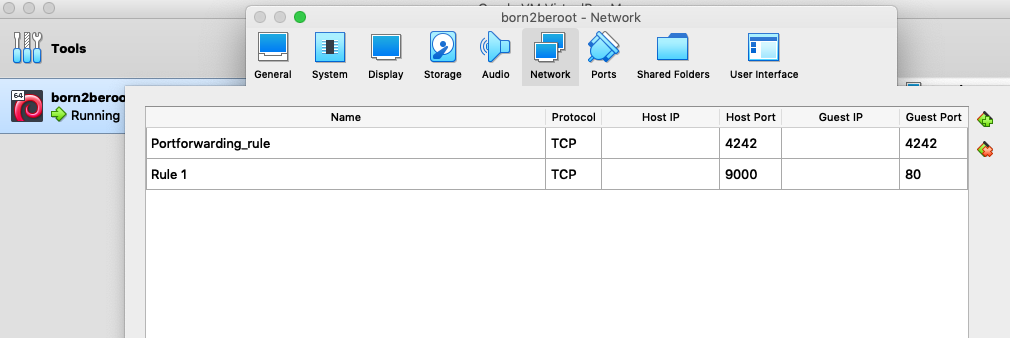
http://127.0.0.1:9000/ : php 연결 확인
http://127.0.0.1:9000/h2s : 연결된 wp 사이트 확인. Lighttpd를 설치할때 syntax를 h2s로 설정함.
(Host Port:9000 , Guest port :80)
포트 포워딩 (port forwarding)
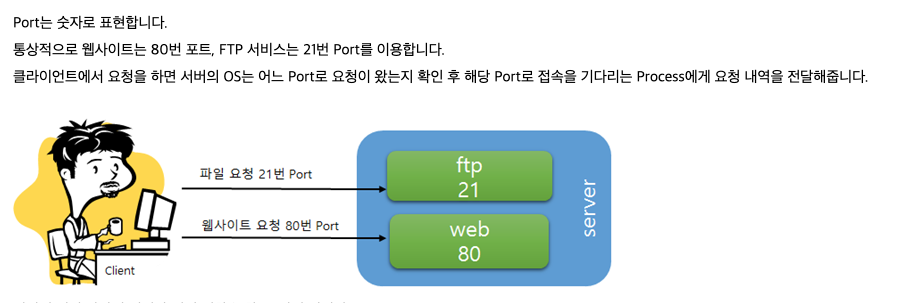
port란?
- 인터넷을 사용하는 프로그램은 서버와 통신을 하게 된다. 컴퓨터의 lan선은 하나인데 통신을 필요로 하는 프로그램이 다수일때 이 다수의 프로그램을 구별할 수 있는 번호가 port이다.
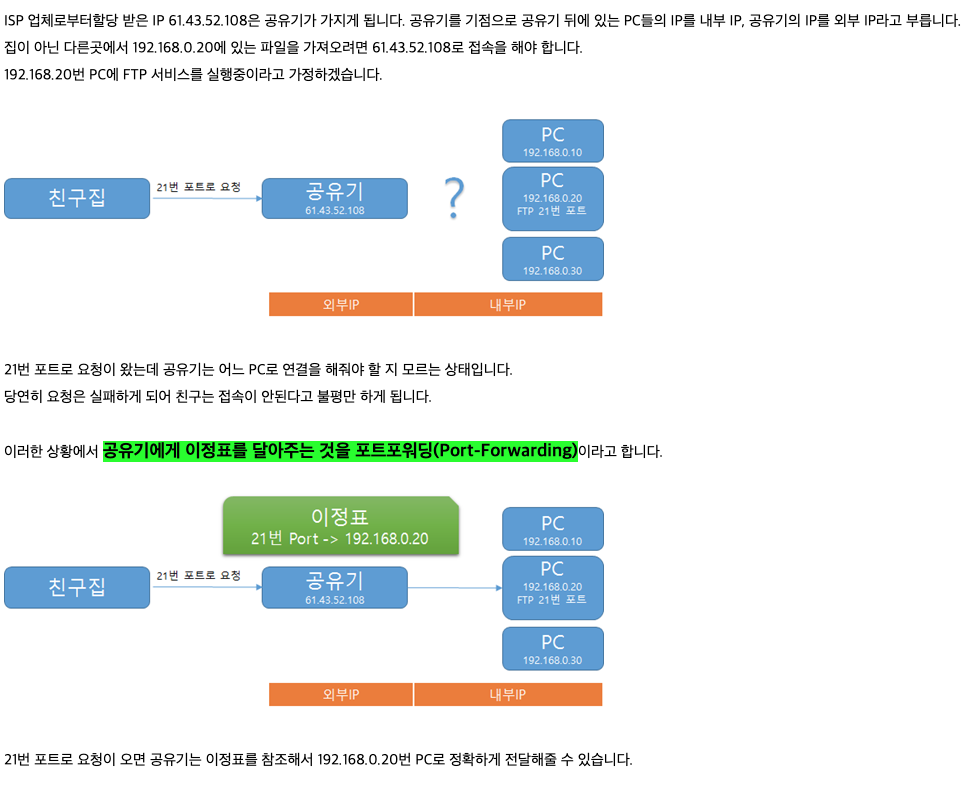
포트포워딩(port forwarding)이란?
- 포트 포워딩이란, 컴퓨터 네트워크에서 패킷이 라우터나 방화벽 같은 네트워크 게이트웨이를 통과하는 동안 네트워크 주소를 변환해주는것을 의미한다. 특정 호스트의 IP와 서비스포트로 전달해 주기 위해 필요한 기능이 포트 포워딩.
- 쉽게 말해, 외부에서 접속이 가능하도록 하는것.
- The free choice service is worth 1 point. For the free choice service, the evaluated student has to give you a simple explanation about how it works and why they think it is useful(Please note that NGINX and Apache2 are prohibited).
PHP 란 (Hypertext preprocessor 서버측 스크립트)
- PHP는 서버 측에서 실행되는 프로그래밍 언어로 HTML을 프로그래밍적으로 생성해주고, 데이터베이스와 상호작용 하면서 데이터를 저장하고 표현한다. 동적으로 웹페이지를 만들어주는 역할을 한다.
- 동적 웹 페이지를 위해 사용되는 PHP는 스크립트 형식으로 되어있어 작성된 HTML코드 안에 추가해주면 서버에서 PHP 코드를 해석해서 웹 페이지를 생성한다.
- PHP는 웹을 위해서 만들어졌고, 웹프로그래밍을 위한 높은 생산성을 제공하는 언어이다.
- 특히 서버에 직접 설치해서 운영할 수 있는 설치형 웹애플리케이션(워드프레스..) 과반이 PHP로 만들어졌다.
- 데이터베이스 연동을 편리하게 할 수 있다. 처리속도가 빠르다.
- 거의 모든 운영체제에 구현이 가능. 코드 작성이 쉽고 문법이 간단하다. 스크립트 언어 이기 때문에 HTML 문서 내부에 입력하여 실행 할 수 있는 편리한 언어이다.
- PHP는 서버에 배포하는게 간편하며, 초보자에게 쉽다.
- 프로그램 코드가 보여지지 않기에 자바스크립트에 비해 보안성이 뛰어나다.
- 웹 브라우저의 버전과 종류에 영향을 받지 않는다.
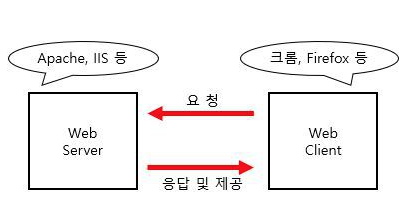
Web server (웹 서버)?
- 웹 서버는 우리가 인터넷에서 흔히 사용하는 웹 페이지가 들어있는 파일을 사용자에게 제공해주는 서버 프로그램 (시스템 소프트웨어라고 불린다).
- 웹 서버의 주된 역할은 사용자가 요청한 페이지를 전달하는것.
< 웹 서버의 사용 >
- 사용자 -> 웹 브라우저 -> HTTP 프로토콜 -> 웹서버
- 웹서버 (HTML문서) -> 웹 브라우저 -> 사용자.
Apache 웹 서버 vs Ngnix 웹서버
Apache(아파치) 웹서버란 ?
- 오픈 소스로 공개되며 자유 소프트 웨어로 무료로 사용 가능함.
- 리눅스나 윈도우 등 거의 모든 운영체제에서 사용 할 수 있으며 구축이 쉽다.
- 다양한 모듈을 제공하며, 보안 수준이 높다.
- 강력한 커뮤니티로 인한 방대한 자료가 있다.
Nginx 웹서버란 ?
- 최소한의 리소스로 많은 수의 동시 사용자를 처리해야 하는 대 규모 웹 트래픽 처리 상황이 발생할때 고효율을 발휘한다.
- 오픈소스로 무료이며, Apache에 비해 가볍다.
출처 :
0) 가상머신이란
https://joyfuls.tistory.com/48
1) 리눅스 종류
https://coding-factory.tistory.com/318
2) Apparmor 정의
https://wiki.debian.org/AppArmor
3) 전반적인 info
https://tbonelee.tistory.com/m/16
4) Wall linux command
https://www.geeksforgeeks.org/wall-command-in-linux-with-examples/
5) UID and GID in Linux
https://medium.com/@gggauravgandhi/uid-user-identifier-and-gid-group-identifier-in-linux121ea68bf510#:~:text=Identifier%20in%20Linux-,Gaurav%20Gandhi,user%20or%20group%20can%20access
6) How to add and delete users on Debian 10
https://devconnected.com/how-to-add-and-delete-users-on-debian-10-buster/
7) How to delete Group in Linux
https://linuxize.com/post/how-to-delete-group-in-linux/
8) 파티션 정보
https://www.lifewire.com/do-you-need-home-partition-2202048
https://web.mit.edu/rhel-doc/4/RH-DOCS/rhel-rg-en-4/s1-filesystem-fhs.html
https://letitkang.tistory.com/88
https://new-ngmon.tistory.com/23
9) LVM 정보
https://mamu2830.blogspot.com/2019/12/lvmpv-vg-lv-pe-lvm.html
https://velog.io/@welloff_jj/Born2beRoot-%EB%AD%90%EA%B0%80-%EB%AD%94%EC%A7%80-%EB%AA%A8%EB%A5%B4%EA%B2%A0%EC%A7%80%EB%A7%8C-%EC%95%84%EB%AC%B4%ED%8A%BC-%EC%A0%95%EB%A6%AC%ED%95%98%EB%8A%94-%EA%B8%80
https://itguava.tistory.com/100
https://velog.io/@dogfootbirdfoot/Born2beRoot2
10) Firewall 정보
https://ko.wikipedia.org/wiki/%EB%B0%A9%ED%99%94%EB%B2%BD_(%EB%84%A4%ED%8A%B8%EC%9B%8C%ED%82%B9)#/media/%ED%8C%8C%EC%9D%BC:Firewall.png
#/media/%ED%8C%8C%EC%9D%BC:Firewall.png)
11) SSH 정보
https://searchsecurity.techtarget.com/definition/Secure-Shell
12) How to use cron
https://opensource.com/article/17/11/how-use-cron-linux
13) Port forwarding 정보
https://storytown.tistory.com/14#:~:text=21%EB%B2%88%20%ED%8F%AC%ED%8A%B8%EB%A1%9C%20%EC%9A%94%EC%B2%AD,Port%2DForwarding%EC%9D%B4%EB%9D%BC%EA%B3%A0%20%ED%95%A9%EB%8B%88%EB%8B%A4.
14)Install Wordpress on Lighttpd
https://www.how2shout.com/linux/install-wordpress-on-lighttpd-web-server-ubuntu/
15) PHP 정보
https://server-talk.tistory.com/25
https://choseongho93.tistory.com/61
16) 웹서버 정보
https://doorbw.tistory.com/29
https://wiseworld.tistory.com/75
