1. 프록시
다른 객체에 대한 액세스를 제어할 수 있는 패턴
Subject라고 하는 다른 객체에 대한 액세스를 제어하는 객체
=> 객체의 여러 기본동작을 다른동작을 할 수 있게 도와주는 걸 말합니다.
- 데이터 검증: 프록시가 입력을 subject에 전달하기 전에 입력의 유효성을 검사합니다.
- 보안 : 프록시는 클라이언트가 작업을 수행할 권한이 있는지 확인하고, 권한이 있는 경우에만 요청을 Subject에 전달합니다.
- 캐싱 : 데이터가 아직 캐시에 없는 경우에 프록시 작업이 Subject에 실행되도록 프록시는 내부에 캐시를 유지
- 느린 초기화 : Subject를 생성하는데 많은 비용이 드는 경우, 프록시는 실제로 필요할 때까지 이르 ㄹ지연 시킴
- 기록 : 메서드 호출과 관련 매개 변수를 가로채서 발생시 이를 기록
- 원격 객체 : 프록시는 원격 개체를 가져와서 로컬로 표시할 수 있습니다
(1) 프록시 구현
class StackCalculator {
  constructor () {
    this.stack = []
  }
  putValue (value) {
    this.stack.push(value)
  }
  getValue (value) {
    return this.stack.pop()
  }
  peekValue () {
    return this.stack[this.stack.length -1]
  }
  clear () {
    this.stack = []
  }
  divide() {
    const divisor = this.getValue()
    const dividend = this.getValue()
    const result = dividend / divisor
    this.putValue(result)
    return result
  }
  multiply() {
    const multiplicand = this.getValue()
    const multiplier = this.getValue()
    const result = multiplicand * multiplier
    this.putValue(result)
    return result
  }
}
위와 같은 계산기가 있다고 생각해봅시다
A. 객체 컴포지션
컴포지션은 기능을 확장해서 객체를 다른 객체와 결합하는 기술을 말합니다.
class SafeCalculator {
	constructor (calculator) {
    	this.calculator = calculator
    }
  divide () {
    const divisor = this.calculator.peekValue()
    if (divisor === 0) {
      throw Error ('Division by 0')
    }
    return this.calculator.divie()
  }
  putValue (value) {
    return this.calculator.putValue(value)
  }
  getValue (value)
    return this.calculator.getValue()
  ...
}

const calculator = new StackCalculator()
const SafeCalculator = new SafeCalculator(calculator)

calculator.putValue(3)
calculator.putValue(2)
calculator.multiply() //6

SafeCalculator.putValue(2)
SafeCalculator.multipy() // 12
safeCalculato 객체는 calculator 인스턴스의 '프록시'입니다.
safeCalculator에서 multyply함수를 호출하면 calculator 동일한 함수를 호출합니다.
이는 인스턴스 변수나 클로저 변수의 형태로 프록시 내부에 저장도 가능합니다.
SafeCalculator.multyply 했을 때 값이 12가 출력이 된다는 말은 calculator의 6을 가져왔기 떄문에 가능한 것입니다.
calculator 위에 safecalculator 를 덧씌우는 이미지입니다. 기존 calculaotr 함수를 사용하면서, 일부는 변형하여 사용할 수 있습니다.
객체 리터럴과 팩토리 함수를 사용하여 위의 프록시를 구현할 수 있습니다.
function createSafeCalculator (calculaotr) {
  return {
    divie() {
      const divisor = calculaotr.peekValue()
      if (divisor === 0) {
        throw Error('Division by 0')
      }
      return calculaotr.divide()
    },
    putValue (value) {
      return calculaotr.putValue(value)
    },
    getValue (value) {
      return calculaotr.getValue(value)
    },
    peekValue (value) {
      return calculaotr.peekValue(value)
    }
    ...
  }
}
B. 객체 확장
객체가 가진 몇몇 함수를 프록시하는 가장 간단하고 일반적 방법입니다.
function patchToSafeCalculator (calculator) {
  const divideOrig = calculator.divide
  calculator.divide = () => {
    const divisor = calculator.peekValue()
    if (divisor === 0) {
      throw Error ('Division by 0')
    }
    return divideOrig.apply(calculator)
  }
  return calculator
}
이 방법은 위임된 함수를 구현할 필요가 없어서 편리합니다. 하지만 대상 객체를 직접 변경할 수 있어 위험합니다.
C. 내장 프록시 객체
프록시 객체를 만드는 다른 방법으로 ES2015에서 도입된 프록시 객체가 있습니다
const proxy = new Proxy(target, handler)
- target : 프록시가 적용될 객체
- handler : 프록시의 동작을 정의하는 객체
const safeCalculatorHandler = {
  get : (target, property) => {
    if (property === 'divide') {
      return function() {
        const divisor = target.peekValue()
        if (divisor === 0) {
          throw Error('Divison by 0')
        }
        return target.divide()
      }
    }
    return target[property]
  }
}

const calculator = new StackCalculator()
const safeCalculator = new Proxy(
  calculator,
  safeCalculatorHandler
)
프록시 객체는 원 객체의 프로토타입 상속합니다. 그리고 변경할려는 부분만 프록시하기 쉽고 원 객체의 변경을 방지할 수 있습니다
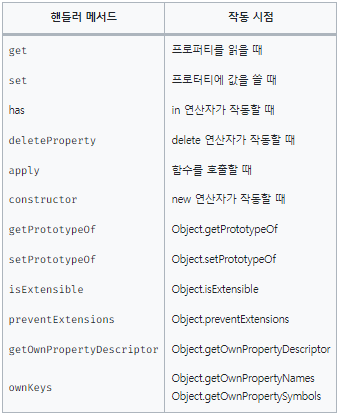
get말고도 다른 값을 사용하여 동작을 가로챌 수 있습니다.
D. 사용
쓰기 가능한 로깅 스트림
export function createLoggingWritealbe (writeable) {
  return new Proxy (writeable, {
    get (target, propKey, receiver) {
      if (propKey === 'write') {
        return function (...args) {
          const chunk = args
          return writeable.wirte(...args)
        }
      }
      return target[propKey]
      }
  })
}
프록시를 변경한 옵저버
변경 옵저버 패턴은 객체가 하나 이상의 옵저버에게 상태 변경을 알리는 디자인 패턴으로, 변경 사항이 발생하는 즉시 '반응'할 수 있습니다.
export function createObservable (target, observer) {
  const observable = new Proxy(target, {
    set (obj, prop, value) {
      if (value !== obj[prop]) {
        const prev = obj[prop]
        obj[prop] = value
        observer({ prop, prev, curr: value})
      }
      return true
    }
  })
  return observable
}
현재의 값을 새 값과 비교하고 다른 경우 대상 객체가 변경되고 관찰자에게 알림이 전송이됩니다. 관찰자를 호출하면서 변경과 관련된 정보가 포함된 객체 리터럴을 전달합니다.
2. 데코레이터
기존 객체의 동작을 동적으로 증대시키는 것으로 구성된 구조적 디자인 패턴
(1) 데코레이터 구현 기법
A. 컴포지션
데코레이트되는 컴포넌트는 일반적으로 이를 상속한 새로운 객체로 감싸집니다.
데코레티어는 기존 함수들을 컴포넌트에 위임하면서 새로운 함수를 정의합니다
class EnhanceCaculator {
    constructor (calculator) {
        this.calculator = calculator
    }
    add () { // 새로운 함수
        const addend2 = this.getValue()
        const addend1 = this.getValue()

        const result = addend1 + addend2
        this.putValue(result)
        return result
    }
    divide () { // 수정된 함수
        const divisor = this.calculator.peekValue()
        if (divisor === 0) {
            throw new Error('Division')
        }
        return this.calculator.divide()
    }
    putValue (value) { // 위임된 함수
        return this.calculator.putValue(value)
    }
    getValue (value) {
        return this.calculator.getValue()
    }
    peekValue () {
        return this.calculator.peekValue()
    }
    clear () {
        return this.calculator.clear()
    }
    multiply () {
        return this.calculator.multiply()
    }
}
const calculator = new StackCalculator()
const enhanceCalculator = new EnhanceCaculator(calculator)
enhanceCalculator.putValue(4)
enhanceCalculator.putValue(3)
console.log(enhanceCalculator.add()) // 7
B. 객체 확장
데코레이트되는 객체에 직접 새 함수를 정의해서 데코레이트를 수행할 수도 있습니다.
function patchCalculator(calculator) {
  calculator.add = function () {
    const addend2 = calculator.getValue()
    const addend1 = calculator.getValue()
    const result = addend1 + addend2
    calculator.putValue(result)
    return result
  }
  const divideOrig = calculator.divide
  calculator.dive = () => {
    const divisor = calculator.peekValue()
    if (divisor === 0) {
      throw Error('Division by 0')
    }
    return divideOrig.apply(calculator)
  }
  return calculator
}

const calculator = new StackCalculator()
const enhancedCalculator = patchCalculator(calculator)
patchCalculator는 원래 계산기 객체를 변형한 후 반환합니다.
C. Proxy 객체를 이용한 데코레이팅
const enhancedCalculatorHandler = () => {
  get (target, property) {
    if (property === 'add') {
      return function add () {
        const addend2 = target.getValue()
        const addend1 = target.getValue()
        const result = addend2 + addend1
        target.putValue(result)
        return result
      }
    }
    else if (property === 'divide') {
      return function () {
        const divisor = target.peekValue()
        if (divisor === 0) {
          throw Error('Division by 0')
        }
        return target.divide()
      }
    }
    return target[property]
  }
  const calculaotr = new StackCalculator = new Proxy()
  const enhancedCalculatorHandler = new Proxy(
    calculator,
    enhancedCalculatorHandler
  )
}
(2) LevelUp 데이터베이스 데코레이트
chrome 브라우저에서 IndexedDB를 구현하기 위해 만들어진 것이지만 그 이상의 가치를 가지고 있습니다. LevelDB는 '데이터베이스의 Node.js'라고 정의될 정도입니다.
LevelUP 플러그인 구현
특정 패턴의 객체가 데이터베이스에 저장될 때마다 알림을 받을 수 있도록 하는 LevelUP용 플러그인
export function levelSubscribe(db) {
  db.subscribe = (pattern, listener) => {
    db.on('put', (key, val) => {
      const match = Object.keys(pattern).every(k => (pattern[k] === val[k]))
      if (match) {
        listener(key, val)
      }
    })
  }
}
3. 어댑터
다른 인터페이스로도 객체의 기능을 사용하라 수 있음
(1) 파일시스템 AP로 LevelUP 사용
export function createFSAdapter (db) {
  return ({
    readFile (filename, options, callback) {
      if (typeof options === 'function') {
        callback = options
        options = {}
      }
      else if (typeof options === 'string') {
        options = { encoding : options}
      }
      db.get(resolve(filename), {
        valueEncoding : options.encoding
      }),
      (err, value) => {
        if (err) {
          if (err.type === 'NotFoundError') {
            err = new Error(`ENOENT, open ${filename}`)
            err.code = 'ENOENT'
            err.errno = 34
            err.path = filename
          }
          return callback && callback(err)
        }
        callback && callback(null, value)
      }
    },
    writeFile (filename, contents, options, callback) {
      if (typeof options === 'function') {
        callback = options
        options = {}
      }
      else if (typeof options === 'string') {
        options = { encoding : options}
      }
      db.put(resolve(filename), contents, {
        valueEncoding: options.encoding
      }.valueEncoding, callback)
    }
  })
}
Adapter를 사용하여 수행된 모든 작업은 LevelUP 데이터베이스에서 수행되는 작업으로 전한됩니다.
nanoSQL은 다양한 데이터베이스를 지원하기위해 어댑터 패턴을 많이 사용하는 최신 다중 모델 데이터베이스 추상화 라이브러리