ShotGrid Toolkit 앱에는 tk-multi-workfiles2와 같이 오픈 소스로 공개된 앱과 개발자가 직접 제작한 커스텀 앱이 있다.
이번에는 자체 앱 제작을 위해 ShotGrid에서 지원하는 템플릿인 tk-multi-starterapp을 이용해 직접 앱을 개발하는 방법에 대해 알아보자.
목차
앱 개발 준비
앱을 개발하기 위해서는 ShotGrid에서 지원하는 템플릿을 이용하는 것이 가장 편하고 빠르다.
스타터 앱 포크
ShotGrid에서는 개발자들이 앱 개발을 쉽게 진행할 수 있도록 일종의 템플릿인 tk-multi-starterapp을 지원한다.
먼저, 스타터 앱의 리포지토리를 포크(Fork)하거나 다운로드하자.
필자의 경우 git clone을 통해 해당 리포지토리를 로컬에 복제해서 사용했다.
git clone https://github.com/shotgunsoftware/tk-multi-starterapp구성에 앱 추가
이후 해당 앱을 실행할 엔진의 구성에 앱 정보를 추가한다.
tk-multi-starterapp:
  location:
    type: dev
    path: /path/to/source_code/tk-multi-starterapp
앱 추가에 대한 자세한 내용은 ShotGrid Toolkit에 엔진, 앱 등록하기를 참고
앱 개발
이제 앱 개발을 위한 간단한 준비는 완료되었다. 이제 본격적으로 앱 개발을 해보자.
스타터 앱의 구성
먼저, 스타터 앱이 어떻게 구성되어 있는지 알아야 한다.
아래는 스타터 앱을 구성하는 각 스크립트에 대한 설명이다.
-
app.py- 앱 진입점 및 메뉴 등록은app.py파일에서 찾을 수 있다.
이 파일에서 보통 클래스를 설정하고, 항목을 초기화하고, 메뉴 항목을 등록한다. -
info.yml- 매니페스트 파일이라고도 한다.
앱 설치 시 필요한 다른 모든 설정과 해당하는 기본값(제공할 경우)을 정의한다.
재사용 가능한 앱을 원하고, 앱 자체에서는 어떠한 값도 하드 코딩하고 싶지 않은 경우 대개 이러한 설정이 유용하다. -
python/app/dialog.py- 여기에는 기본 앱 창을 생성하는 로직, 이벤트 콜백 등이 포함된다. -
python/app/ui- 이 폴더에는 자동 생성된 UI 코드 및 리소스 파일이 포함된다.
이 파일을 직접 편집하지 말고, 대신 resources 폴더의 Qt UI 파일을 편집해야 한다. -
resources/- resources 폴더에 있는dialog.ui파일은 사용자가 열어서 앱의 모양을 빠르게 디자인하고 정의하는 데 사용할 수 있는QT Designer파일이다.
변경한 후에는build_resources.sh스크립트를 실행하여 UI 파일을 Python 코드로 변환하고/python/app/ui/dialog.py로 저장해야 한다. -
style.qss- 이 파일에서 UI에 대한 QSS(Qt 스타일 시트)를 정의할 수 있다.
정리하자면,
1. app.py에서 앱을 초기화하거나 메뉴를 등록
2. info.yml에서 앱에 대한 설정을 작성
3. python/app/ui/dialog.py에서 앱의 GUI를 생성
4. python/app/dialog.py에 앱의 주요 로직 및 콜백을 작성
위의 순서대로 앱을 개발해 나가면 된다.
app.py 작성
app.py를 작성하여 앱 초기화 및 엔진에 앱을 추가해야 한다.
예시:
import os
import sys
import sgtk
import traceback

class TestApp(sgtk.platform.Application):
    """
    The app entry point. This class is responsible for intializing and tearing down
    the application, handle menu registration etc.
    """

    def init_app(self):
        """
        Called as the application is being initialized
        """
        try:
            tk_desktop_timecard = self.import_module("tk_test_app")
            # register command
            cb = lambda: tk_desktop_timecard.show_dialog(self)
            menu_caption = "Test App"
            self.engine.register_command(menu_caption, cb)
        except Exception:
            traceback.print_exc()

    def destroy_app(self):
        """
        Tear down the app
        """
        self.log_debug("Destroying tk-test-app")
info.yml 작성
info.yml에 해당 앱에 대한 설정이나 조건을 추가한다.
필자의 경우 간단한 앱을 제작할 예정이라 따로 설정을 추가하지 않았다.
예시:
# expected fields in the configuration file for this engine
configuration:

# this app works in all engines - it does not contain
# any host application specific commands
supported_engines:

# the Shotgun fields that this engine needs in order to operate correctly
requires_shotgun_fields:

# More verbose description of this item
display_name: "Test App"
description: "Test App"

# Required minimum versions for this item to run
requires_shotgun_version:
requires_core_version:
requires_engine_version:

# the frameworks required to run this app
frameworks:
python/app/ui/dialog.py 작성
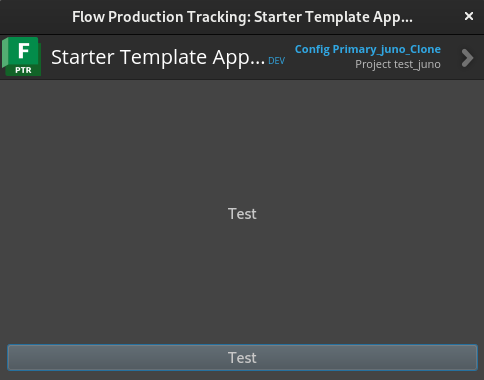
이제 앱의 GUI를 구성하는 스크립트인 python/app/ui/dialog.py를 작성한다.
필자의 경우 간단하게 버튼만 추가해봤다.
from tank.platform.qt import QtCore, QtGui

class Ui_Dialog(object):
    def setupUi(self, Dialog):
        Dialog.setWindowTitle("TestApp")
        Dialog.resize(400, 300)
        self.verticalLayout = QtGui.QVBoxLayout(Dialog)
        self.label = QtGui.QLabel(Dialog)
        self.label.setText("Test")
        self.label.setAlignment(QtCore.Qt.AlignCenter)
        self.verticalLayout.addWidget(self.label)
        self.button_test = QtGui.QPushButton(Dialog)
        self.button_test.setText("Test")
        self.verticalLayout.addWidget(self.button_test)

        Dialog.setLayout(self.verticalLayout)

from . import resources_rc
이후 앱을 실행하면 작성한 GUI가 나타난다.
python/app/dialog.py 작성
이제 UI와 기능을 연결하기 위해 python/app/dialog.py를 작성한다.
필자의 경우 show_dialog를 수정해 앱의 이름을 다르게 변경하고, 버튼을 클릭하면 QLabel의 글자가 바뀌도록 만들어봤다.
import sgtk

from sgtk.platform.qt import QtCore, QtGui
from .ui.dialog import Ui_Dialog

# standard toolkit logger
logger = sgtk.platform.get_logger(__name__)


def show_dialog(app_instance):
    """
    Shows the main dialog window.
    """
    app_instance.engine.show_dialog("Test App", app_instance, AppDialog)


class AppDialog(QtGui.QWidget):
    """
    Main application dialog window
    """

    def __init__(self):
        """
        Constructor
        """
        # first, call the base class and let it do its thing.
        QtGui.QWidget.__init__(self)

        # now load in the UI that was created in the UI designer
        self.ui = Ui_Dialog()
        self.ui.setupUi(self)

        # most of the useful accessors are available through the Application class instance
        # it is often handy to keep a reference to this. You can get it via the following method:
        self._app = sgtk.platform.current_bundle()

        # logging happens via a standard toolkit logger
        logger.info("Launching Starter Application...")

        self.connection()

    def connection(self):
        self.ui.button_test.clicked.connect(self.test)

    def test(self):
        print("Test")
        self.ui.label.setText("Test Clicked")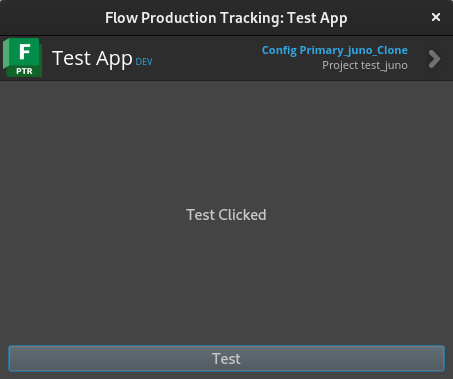
▲상단 앱 이름이 변경되고 버튼-기능이 연결된 모습
ShotGrid Toolkit 앱을 직접 개발하는 간단한 방법을 알아보았다.
필자가 작성한 예시는 정말 간단하게 UI를 작성하고 기능을 연결하는 정도였지만,
개발자의 의도와 목적에 따라 무궁무진하게 발전시킬 수 있으니 ShotGrid Toolkit을 사용 중이라면 꼭 활용해보길 바란다.
