flask 시작하기
시작하기까지의 대략적인 순서는 이렇다 (vs code 기준, 터미널은 bash를 권장)
1) 터미널에서 venv 가상환경 호출
$ python -m venv venv2) vs code의 인터프리터를 venv로 변경
3) 새 터미널을 켜면 이런 결과가 눈에 보인다
$ source c:/Project/sparta_flask/01.prac/venv/Scripts/activate
(venv)
4) 이 상태에서 flask를 설치
$ pip install flask5) 코드 작성 후 [터미널에서 python을 실행]을 선택
from flask import Flask
app = Flask(__name__)

@app.route('/')
def home():
   return 'This is Home!'

if __name__ == '__main__':
   app.run('0.0.0.0',port=5000,debug=True)
6) 실행 후 http://localhost:5000/에 접속하여 결과 확인
경로(URL) 설정
localhost의 기본 경로는 @app.route('/')로 설정되어있는데, / 뒤에 글자를 붙여 새로운 경로를 만들 수 있다.
# http://localhost:5000/mypage
@app.route('/mypage')
def mypage():
   return 'This is My page!'
실행 후, http://localhost:5000/mypage라는 경로로 들어가면 'This is My page!'라는 글자가 보인다.
render_template 사용하기
바로 위 코드의 def mypage(): return 'This is My page!' 부분을 수정하면, 단순 글자 뿐만 아니라 html도 반환할 수 있다. 아래처럼.
# http://localhost:5000/mypage
@app.route('/mypage')
def mypage():
   return '<button>나는 버튼</button>'
그런데 여기서 모든 html 작업할 수는 없으니까, flask의 render_template 기능을 사용해 연결을 시도해보자. import 부분에 render_template를 추가한다.
from flask import Flask, render_template
app = Flask(__name__)
그런 다음,def mypage(): return ~ 부분을 html을 호출하도록 수정한다.
@app.route('/mypage')
def mypage():
   return render_template('index.html')
터미널에서 실행 후, http://localhost:5000/mypage에 접속하여 결과를 확인하면 내가 작성한 html 페이지가 정상적으로 보이는 것을 확인할 수 있다.
GET 요청과 POST 요청이란?
1) GET 요청
- 통상적으로
데이터 조회(= Read)를 요청할 때 사용한다.
- 예) 영화 목록 조회
→ 데이터 전달 : URL 뒤에 물음표?를 붙여key=value로 전달
2) POST 요청
-
통상적으로
데이터 생성(Create),변경(Update),삭제(Delete)를 요청할 때 사용한다. -
예) 회원가입, 회원탈퇴, 비밀번호 수정
→ 데이터 전달 : 바로 보이지 않는HTML
GET 요청 해보기
0) 먼저, GET 요청을 확인할 html 파일의 <head> 부분에는 jquery가 import 되어있어야한다.
<head>
	<script src="https://ajax.googleapis.com/ajax/libs/jquery/3.5.1/jquery.min.js"></script>
<head>
1) GET 요청을 실행할 python 파일에서 request와 jsonify를 추가로 import한다.
from flask import Flask, render_template, request, jsonify2) GET 요청을 실행할 코드를 작성한다.
# '/test' 경로를 통해 'GET' 요청으로 들어온다
@app.route('/test', methods=['GET'])
def test_get():
# 'title_give' 라는 정보가 있으면, title_receive 변수에 저장
title_receive = request.args.get('title_give')
# title_receive를 출력
print(title_receive)
# 성공 여부와 성공 메시지를 return
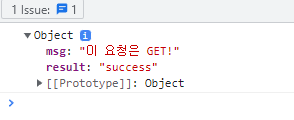
return jsonify({'result':'success', 'msg': '이 요청은 GET!'})3) 0번에서 jquery를 추가해준 html에 GET 요청을 확인할 Fetch 코드를 작성한다.
<head>
	<script>
		function hey(){
			fetch("/test").then(res => res.json()).then(data => {
				console.log(data)
			})
		}
	</script>
</head>
4) 프로젝트를 실행하고 localhost:5000/에 접속하여 [개발자 도구 -> Console]을 확인하면 다음과 같은 실행 결과를 확인할 수 있다.
POST 요청 해보기
0) 바로 위에 있는 'GET 요청 해보기'의 0번과 1번을 참고하여 전처리를 해준다.
1) POST 요청을 실행할 코드를 작성한다.
# '/test' 경로를 통해 'POST' 요청으로 들어온다
@app.route('/test', methods=['POST'])
def test_post():
# 'title_give'라는 데이터가 들어오면
title_receive = request.form['title_give']
# 그 데이터를 출력해본다
print(title_receive)
# 성공 여부와 성공 메시지를 return
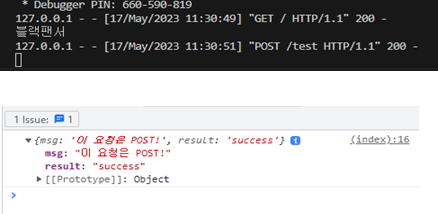
return jsonify({'result':'success', 'msg': '이 요청은 POST!'})2) jquery를 추가해준 html에 POST 요청을 확인할 Fetch 코드를 작성한다.
<head>
	<script>
		function hey() {
      		// formData라는 변수를 통해 데이터를 보낸다
			let formData = new FormData();
            formData.append("title_give", "블랙팬서");

            fetch("/test", { method: "POST", body: formData }).then(res => res.json()).then(data => {
                console.log(data)
            })
        }
    </script>
</head>
4) 프로젝트를 실행하고 localhost:5000/에 접속하여 [개발자 도구 -> Console]을 확인하면 다음과 같은 실행 결과를 확인할 수 있다. (vs code 터미널에서도 "블랙팬서"라고 글자가 뜨는 걸 볼 수 있다)