3-layer 아키텍처를 적용한 버전이다.
아래 웹사이트를 참고했다.
How to Build an Authentication API with JWT Token in Node.js
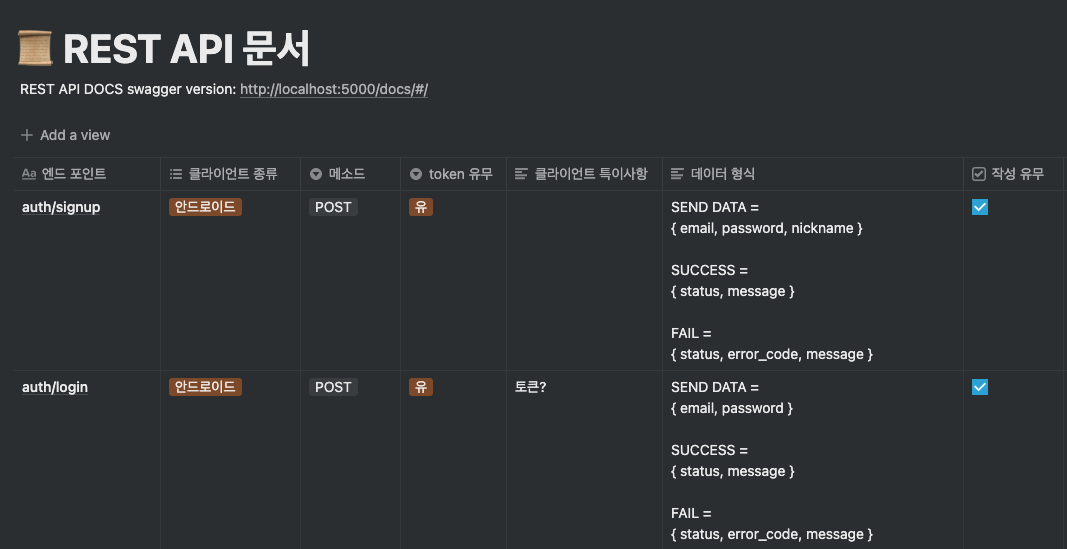
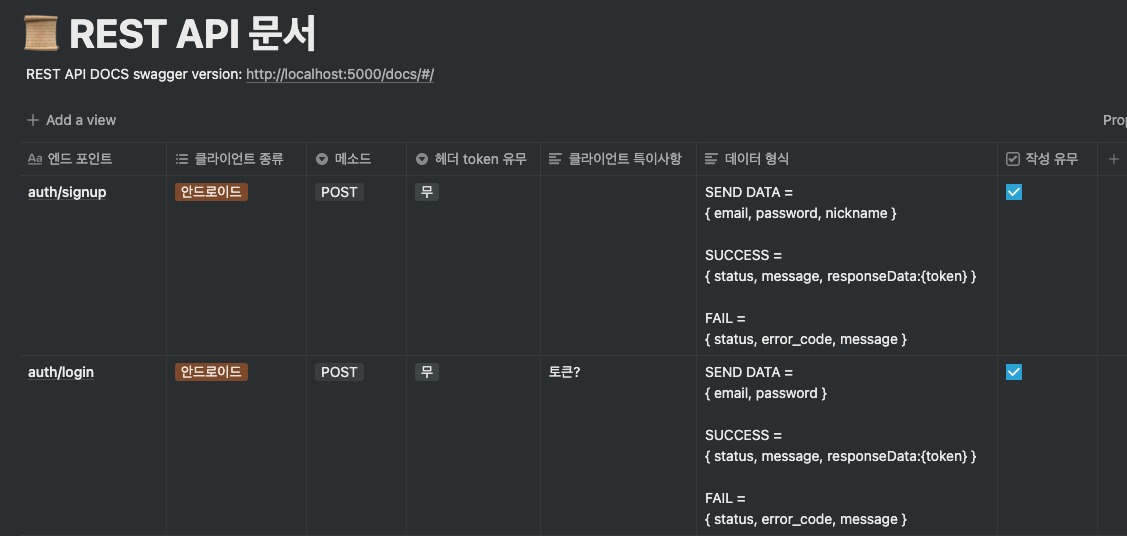
REST API 설계 문서는 다음과 같다(물론 일부다).
회원가입 및 로그인 시 토큰을 보내주는 방식으로 진행했다.

src/app.ts
import * as dotenv from "dotenv";
import express, { Response, Request, NextFunction } from "express";
import cors from "cors";
import indexRouter from "./routes";

dotenv.config();
// * APP VARIABLES
const PORT: number = parseInt(process.env.PORT as string, 10) || 5000;
const HOST: string = process.env.HOST || "localhost";
const app: express.Application = express();

// * APP CONFIGURATION: middleware
app.use(cors());
app.use(express.json());
app.use((req: Request, res: Response, next: NextFunction) => {
    console.log(`Request occur! ${req.method}, ${req.url}`);
    next();
});

// * ROUTER SETTING
app.use(indexRouter);

// 5000 포트로 서버 실행
app.listen(PORT, HOST, async () => {
    console.log(`server on: listening on ${HOST}:${PORT}`);
    // sequelize-db connection test
    await sequelize
        .sync({})
        .then(async () => {
            console.log("seq connection success");
        })
        .catch((e) => {
            console.log("seq ERROR: ", e);
        });
});
src/routes/index.ts
라우터 레이어부터 시작한다.
import { Router } from "express";
import { authRouter } from "./auth";

const router = Router();

/* ROUTE */
router.use("/auth", authRouter);

export default router;
src/routes/auth.ts
auth/login, auth/signup 만들어 준다.
import { Router } from "express";
import authController from "../controllers/auth-controller";

const authRouter = Router();

authRouter.post("/signup", authController.signUp);
authRouter.post("/login", authController.login);

export { authRouter };
src/controllers/auth-controller.ts
컨트롤러 레이어 만들어준다.
여기서는 3-layer 구조처럼, response와 request를 다뤄준다.
import { Response, Request } from "express";

import { loginService, signUpService } from "../services/auth-services";
import { serviceReturnForm } from "../modules/service-modules";

// * CONTROLLER PART
const signUp = async (req: Request, res: Response) => {
    // * Validate user input
    if (!req.body.email || !req.body.password || !req.body.nickname) {
        res.status(400).send({ status: 400, message: "Fail SignUp" });
        return;
    }
    const { email, password, nickname } = req.body;

    const returnData: serviceReturnForm = await signUpService(
        email,
        password,
        nickname
    );
    if (returnData.status == 200) {
        // when successed
        const { status, message, responseData } = returnData;
        res.status(status).send({
            status,
            message,
            responseData,
        });
    } else {
        // when failed
        const { status, message } = returnData;
        res.status(status).send({
            status,
            message,
        });
    }
};

const login = async (req: Request, res: Response) => {
    // * Validate user input
    if (!req.body.email || !req.body.password) {
        res.status(400).send({
            status: 400,
            message: "email and password is both required",
        });
        return;
    }
    const { email, password } = req.body;
    const returnData: serviceReturnForm = await loginService(email, password);
    if (returnData.status == 200) {
        // when successed
        const { status, message, responseData } = returnData;
        res.status(status).send({
            status,
            message,
            responseData,
        });
    } else {
        // when failed
        const { status, message } = returnData;
        res.status(status).send({
            status,
            message,
        });
    }
};

export default {
    signUp: signUp,
    login: login,
};
src/services/auth-services.ts
서비스 레이어를 만들어준다.
여기서는 bcrypt를 사용해 패스워드를 암호화해주었고,
jwt를 이용해서 토큰을 생성해주었다.
일단 디비에 저장하도록 만들어 주었다.
import * as dotenv from "dotenv";
import User from "../models/user.model";
import bcrypt from "bcryptjs";
import jwt from "jsonwebtoken";

import { serviceReturnForm } from "../modules/service-modules";

const signUpService = async (
    email: string,
    password: string,
    nickname: string
) => {
    const returnForm: serviceReturnForm = {
        status: 500,
        message: "server error",
        responseData: {},
    };

    // * Validate if email already exists
    let isEmailExist = false;
    await User.findOne({ where: { email: email } })
        .then((data) => {
            if (data) {
                isEmailExist = true;
                returnForm.status = 400;
                returnForm.message = "Email already exist";
            }
        })
        .catch((e) => {
            console.log(e);
            returnForm.status = 500;
            returnForm.message = "Server Error";
            return;
        });

    // * Create User only when email not exists
    if (!isEmailExist) {
        dotenv.config();
        const TOKEN_KEY = process.env.TOKEN_KEY || "";

        // * Encrypt user password
        let encryptedPassword = await bcrypt.hash(password, 10);
        const token = jwt.sign({ email }, TOKEN_KEY, {
            expiresIn: "20h",
        });

        await new User({
            email: email || "",
            password: encryptedPassword || "",
            nickname: nickname || "",
            android_token: token || "",
        })
            .save()
            .then((data) => {
                returnForm.status = 200;
                returnForm.message = "SignUp Success";
                returnForm.responseData = { token: data.android_token };
            })
            .catch((e) => {
                console.log(e);
                returnForm.status = 500;
                returnForm.message = "Server Error";
            });
    }
    return returnForm;
};

const loginService = async (email: string, password: string) => {
    const returnForm: serviceReturnForm = {
        status: 500,
        message: "server error",
        responseData: {},
    };

    await User.findOne({
        where: {
            email: email,
        },
        attributes: ["id", "password", "android_token"],
    })
        .then(
            async (data) => {
                // * Validate if email already exists
                if (data) {
                    const isPasswordCorrect = await bcrypt.compare(
                        password,
                        data.password
                    );
                    // * Validate if password is correct
                    if (isPasswordCorrect) {
                        returnForm.status = 200;
                        returnForm.message = "Login Success";
                        returnForm.responseData = { token: data.android_token };
                    } else {
                        returnForm.status = 400;
                        returnForm.message = "Wrong password";
                    }
                } else {
                    returnForm.status = 400;
                    returnForm.message = "Wrong email";
                }
            },
            (e) => {
                throw e;
            }
        )
        .catch((e) => {
            console.log(e);
            returnForm.status = 500;
            returnForm.message = "Server Error";
        });
    return returnForm;
};

export { signUpService, loginService };
src/modules/service-modules.ts
서비스 모듈에서 데이터를 리턴할 때 주로 사용하는 형식을 따로 만들어주었다.
자주 쓰이는 만큼, 어차피 재사용할 거니까 따로 빼 두었다.
export interface serviceReturnForm {
    status: number;
    message: string;
    responseData: Object;
}
src/models/index.ts
모델 관련 레이어다.
sequelize를 사용했다.
import { Sequelize } from "sequelize-typescript";
import { config } from "../config/config";

export const sequelize = new Sequelize(
    config.development.database,
    config.development.username,
    config.development.password,
    {
        host: config.development.host,
        dialect: "mysql",
        models: [__dirname + "/**/*.model.ts"],
    }
);
src/models/user.model.ts
import {
    Table,
    Column,
    Model,
    AllowNull,
    Unique,
    DataType,
} from "sequelize-typescript";

@Table({ timestamps: false })
export default class User extends Model {
    /*
        email password nickname rasp_token android_token
    */
    // id는 자동으로 auto_increment, primarykey 설정된 채로 추가됨.

    @AllowNull(false)
    @Unique(true)
    @Column(DataType.STRING)
    public email!: string;

    @AllowNull(false)
    @Column(DataType.STRING)
    public password!: string;

    @AllowNull(false)
    @Column(DataType.STRING)
    public nickname!: string;

    @Unique(true)
    @AllowNull(true)
    @Column(DataType.STRING)
    public rasp_token!: string | null;

    @Unique(true)
    @AllowNull(true)
    @Column(DataType.STRING)
    public android_token!: string | null;
}