node js와 안드로이드(kotlin) 연결하는데 약 12시간 정도 삽질하다가 성공하고 나중에 연결할 때 써먹으려고 쓰는 글.
버전 맞추기
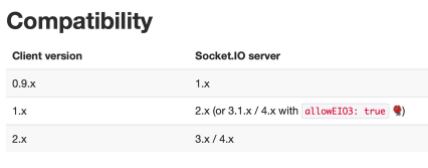
버전 호환 관련
socket.io-client(java)튜토리얼을 보면 아예 아래와 같이 socket.io 서버 라이브러리와 호환 가능한 버전들이 나와 있다.
서버 버전
-
nodejs 서버: package.json
{
    "name": "damda-server",
    "version": "0.0.0",
    "private": true,
    "scripts": {
        "start": "node app.js"
    },
    "dependencies": {
        "cookie-parser": "~1.4.4",
        "debug": "~2.6.9",
        "dotenv": "10.0.0",
        "express": "~4.16.1",
        "http-errors": "~1.6.3",
        "morgan": "~1.9.1",
        "mysql2": "2.2.5",
        "sequelize": "6.6.5",
        **"socket.io": "4.1.3"**
    }
}
"socket.io": "4.1.3" 으로 설치해 줌
안드로이드 버전
-
build.gradle(Module: SocketToy.app)
dependencies { implementation "org.jetbrains.kotlin:kotlin-stdlib:$kotlin_version" implementation 'androidx.core:core-ktx:1.6.0' implementation 'androidx.appcompat:appcompat:1.3.0' implementation 'com.google.android.material:material:1.4.0' implementation 'androidx.constraintlayout:constraintlayout:2.0.4' testImplementation 'junit:junit:4.+' androidTestImplementation 'androidx.test.ext:junit:1.1.3' androidTestImplementation 'androidx.test.espresso:espresso-core:3.4.0' **implementation ('io.socket:socket.io-client:2.0.0') { // excluding org.json which is provided by Android exclude group: 'org.json', module: 'json' }** }socket.io-client을2.0.0으로 설치해 줌
관련 코드
서버
-
app.js
// node_modules 에 있는 express 관련 파일을 가져온다.
const express = require("express");

// express 는 함수이므로, 반환값을 변수에 저장한다.
const app = express();
const http = require("http");
const server = http.createServer(app);
const socketIo = require("socket.io");
const io = socketIo(server);

// db 연결
const { sequelize, User } = require("./models");

sequelize
    .sync()
    .then(() => {
        console.log("DB connection success");
    })
    .catch((err) => {
        console.error(err);
    });

// http request 에러 방지: Origin [링크] is not allowed by Access-Control-Allow-Origin.

var allowCrossDomain = function (req, res, next) {
    // Website you wish to allow to connect
    res.setHeader("Access-Control-Allow-Origin", "*");

    // Request methods you wish to allow
    res.setHeader(
        "Access-Control-Allow-Methods",
        "GET, POST, OPTIONS, PUT, PATCH, DELETE"
    );

    // Request headers you wish to allow
    res.setHeader(
        "Access-Control-Allow-Headers",
        "X-Requested-With,content-type"
    );

    // Set to true if you need the website to include cookies in the requests sent
    // to the API (e.g. in case you use sessions)
    res.setHeader("Access-Control-Allow-Credentials", true);
    next();
};

app.use(express.json());
app.use(express.urlencoded({ extended: true }));
app.use(allowCrossDomain);

// 테스트 코드
app.get("/", (req, res) => {
    console.log("hello this is get api");
    res.status(200).send({ hi: 1 });
});

// 소켓 일단 간단하게
io.on("connection", (socket) => {
    console.log(`Socket connected ${socket.id}`);
    socket.on("roomjoin", (userid) => {
        console.log(userid);
        // socket.join(userid);
    });
    socket.on("message", (obj) => {
        // 클라이언트에서 message라는 이름의 이벤트를 받았을 경우 호출
        console.log("server received data");
        console.log(obj);
    });
    socket.on("disconnect", () => {
        // 클라이언트의 연결이 끊어졌을 때 호출
        console.log(`Socket disconnected : ${socket.id}`);
    });
});

// 3000 포트로 서버 오픈
server.listen(3000, function () {
    console.log("start! express server on port 3000");
});
안드로이드
AndroidManifest.xml 설정해주기
<uses-permission android:name="android.permission.INTERNET" />꼭 해줘야 함.android:usesCleartextTraffic="true"application 안에 넣어줘야 함.<activity android:name=".MainActivity"> ... </activity>부분 넣어주기
-
AndroidManifest.xml
<?xml version="1.0" encoding="utf-8"?>
<manifest xmlns:android="http://schemas.android.com/apk/res/android"
    package="com.example.sockettoy">
    **<uses-permission android:name="android.permission.INTERNET" />**

    <application
        android:allowBackup="true"
        android:icon="@mipmap/ic_launcher"
        android:label="@string/app_name"
        android:roundIcon="@mipmap/ic_launcher_round"
        android:supportsRtl="true"
        android:theme="@style/Theme.SocketToy"
        **android:usesCleartextTraffic="true"**
        >
        **<activity android:name=".MainActivity">
            <intent-filter>
                <action android:name="android.intent.action.MAIN"/>
                <category android:name="android.intent.category.LAUNCHER"/>
            </intent-filter>
        </activity>**
    </application>

</manifest>
SocketApplication.xml: companion object
이 부분 때문에 소켓 연결 실패의 굴레에서 10시간을 굴렀는데, 다음과 같은 과정을 거쳐서 코드를 만져주자.
- socket, companion object로 연결?
대부분 안드-노드 소켓 연결에서 안드를 자바로 구현해서(socket.io-client 공식문서도 자바 위주로 적혀 있다), 그냥lateinit으로mainactivity에서socket으로 선언해주었다(자바에서는static변수로 선언).
그런데 어떤 분이 정리해둔 걸 보고companion object로 작성해 봤더니 정말 잘되었다(아래 코드 참고).
놀랍게도, companion object는 해도 되고 안해도 되는 것이었다. 괜히 욕심 부려서 options 설정해서 socket(uri, options)를 하는 게 문제인 것 같다(물론 내가 잘못 코딩했었겠지만). 일단 안되는 것 같다 싶으면 socket(uri)만 해 보자.
-
삽질 내역
참고로, 해당 이슈에서 companion object로 구현하지 않으면 try catch문으로 에러가 안 잡히고, socket.connected() 를 통해 connect 여부를 확인했다(물론 false로 떴다).
이때 특이했던 건,
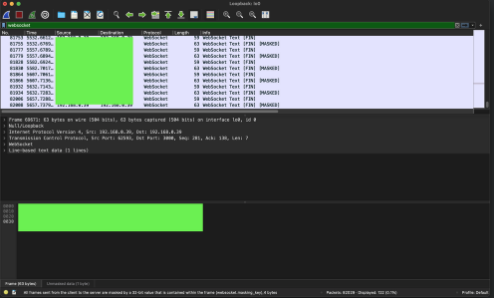
socket.toString()을 호출했을 때 로그에socket@abcdef이렇게 null 값이 아닌 소켓 객체가 적혔다는 것이었다.그래서 서버가 문제인가 싶어서 wireshark를 깔고 WebSocket으로 필터 설정 후 계속 봤는데 아무리 봐도 소켓 연결 시도 자체가 없었다(정적 그자체...).
아래 사진이 wireshark 사진. (react로 socket 커넥트 시도하면 잘 되는 걸 볼 수 있었다.)
그런데 이제 companion object를 설정해주니까 잘 되더라.. 너무 잘 되어서 내 눈을 의심하다가 한번 더 확인하고 엄마한테 쿵쾅쿵쾅 달려가서 자랑했다. 후후.앞서 말했듯이 companion object로 안했던 게 문제가 아니고, 두번째 인자로 잘못된 options를 넣어준게 문제였던 것 같다. 다음에 options 커스텀할 때 이건 시도해 보는 걸로...
- socket(url, opt)에서
[uri]부분은"http://X.X.X.X:3000"꼴로 넣어주는 게 좋다.
AVD 쓰는 경우 localhost로 안 먹히니까 주의해서, 본인이 쓰는 네트워크의 본인 컴퓨터 ip 찾아서 넣어준다.
AVD가 아니라 그냥 연결된 안드로이드라도 당연히 localhost가 안 먹히니까 그 점 유의해서 본인 컴 ip 찾아서 넣어주자.
++ window-안드로이드 디바이스 연결한 경우 uri 찾기
: cmd에서 찾은 [무선 LAN 어댑터 Wi-Fi] 에서 ipv4 주소로 넣어준다.
-
SocketApplication.kt
package com.example.sockettoy

import io.socket.client.IO
import io.socket.client.Socket
import java.net.URISyntaxException

class SocketApplication {
    companion object {
        private lateinit var socket : Socket
        fun get(): Socket {
            try {
								// [uri]부분은 "http://X.X.X.X:3000" 꼴로 넣어주는 게 좋다.
                socket = IO.socket("[uri]")
            } catch (e: URISyntaxException) {
                e.printStackTrace()
            }
            return socket
        }
    }
}
MainActivity.kt 코드 작성
-
MainActivity.kt
package com.example.sockettoy import android.os.Bundle import android.util.Log import android.widget.Button import android.widget.EditText import android.widget.TextView import androidx.appcompat.app.AppCompatActivity import io.socket.client.Socket import io.socket.emitter.Emitter import org.json.JSONObject class MainActivity : AppCompatActivity() { lateinit var mSocket: Socket override fun onCreate(savedInstanceState: Bundle?) { super.onCreate(savedInstanceState) setContentView(R.layout.activity_main) mSocket = SocketApplication.get() mSocket.connect() val edittext: EditText = findViewById<EditText>(R.id.edittext) val sendbutton: Button = findViewById(R.id.sendbutton) sendbutton.setOnClickListener{ mSocket.emit("message", "hello") Log.d("send socket11", edittext.text.toString()) } mSocket.on("get message", onMessage) // mSocket.connect() } var onMessage = Emitter.Listener { args -> val sendtext: TextView = findViewById(R.id.sendtext) as TextView val obj = JSONObject(args[0].toString()) val a = sendtext.text.toString() Log.d("main activity", obj.toString()) Thread(object : Runnable{ override fun run() { runOnUiThread(Runnable { kotlin.run { sendtext.text = a + "\n" + obj.get("name") + ": " + obj.get("message") } }) } }).start() } } -
activity-main.xml
<?xml version="1.0" encoding="utf-8"?>
<androidx.constraintlayout.widget.ConstraintLayout xmlns:android="http://schemas.android.com/apk/res/android"
    xmlns:app="http://schemas.android.com/apk/res-auto"
    xmlns:tools="http://schemas.android.com/tools"
    android:layout_width="match_parent"
    android:layout_height="match_parent"
    tools:context=".MainActivity"
    >

    <TextView
        android:id="@+id/sendtext"
        android:layout_width="wrap_content"
        android:layout_height="wrap_content"
        android:text="Hello World!"
        app:layout_constraintBottom_toTopOf="@+id/edittext"
        app:layout_constraintLeft_toLeftOf="parent"
        app:layout_constraintRight_toRightOf="parent"
        app:layout_constraintTop_toTopOf="parent" />

    <Button
        android:id="@+id/sendbutton"
        android:layout_width="wrap_content"
        android:layout_height="wrap_content"
        android:layout_marginTop="107dp"
        android:text="Button"
        app:layout_constraintBottom_toBottomOf="parent"
        app:layout_constraintEnd_toEndOf="parent"
        app:layout_constraintStart_toStartOf="parent"
        app:layout_constraintTop_toBottomOf="@+id/edittext" />

    <EditText
        android:id="@+id/edittext"
        android:layout_width="wrap_content"
        android:layout_height="wrap_content"
        android:minHeight="48dp"
        android:text="TextView"
        app:layout_constraintBottom_toTopOf="@+id/sendbutton"
        app:layout_constraintEnd_toEndOf="parent"
        app:layout_constraintStart_toStartOf="parent"
        app:layout_constraintTop_toBottomOf="@+id/sendtext" />

</androidx.constraintlayout.widget.ConstraintLayout>
참고한 글들
GitHub - jinusong/Android-Socket: Android Socket 통신을 공부합니다.
Android Node.js Socket.io not connecting
socket.io xhr post error on slow connection (3G mobile network)

좋은 정보 감사합니다.
잘 쓰겠습니다.