1. 숲 보기 (Concept Flow)
1단계: 문제 상황 (The Problem - Tight Coupling)
상황: 리모컨(Invoker)이 다양한 가전기기(Receiver)를 제어해야 하는데, 버튼을 누를 때마다 특정 기기의 메서드를 직접 호출하면 Invoker와 Receiver가 강하게 결합됨. 새로운 기기가 추가되거나 동작이 변경될 때마다 클라이언트 코드를 수정해야 함.
Bad Code Example:
// 버튼의 동작을 변경하려면 매번 이 코드를 수정해야 함!
// Open-Closed Principle 위반
if (command == Slot1On) {
    light.on();  // Light에 대한 직접적인 의존
} else if (command == Slot1Off) {
    light.off();
} else if (command == Slot2On) {
    tv.on();     // TV에 대한 직접적인 의존
} else if (command == Slot2Off) {
    tv.off();
}
// 기기가 추가될 때마다 분기문 증가!
문제점:
- Invoker(리모컨)가 모든 Receiver(Light, TV, Stereo 등)를 직접 알아야 함
- 새 기기 추가 시 클라이언트 코드 수정 필수
- 요청의 큐잉(Queuing), 로깅(Logging), Undo 기능 구현 불가
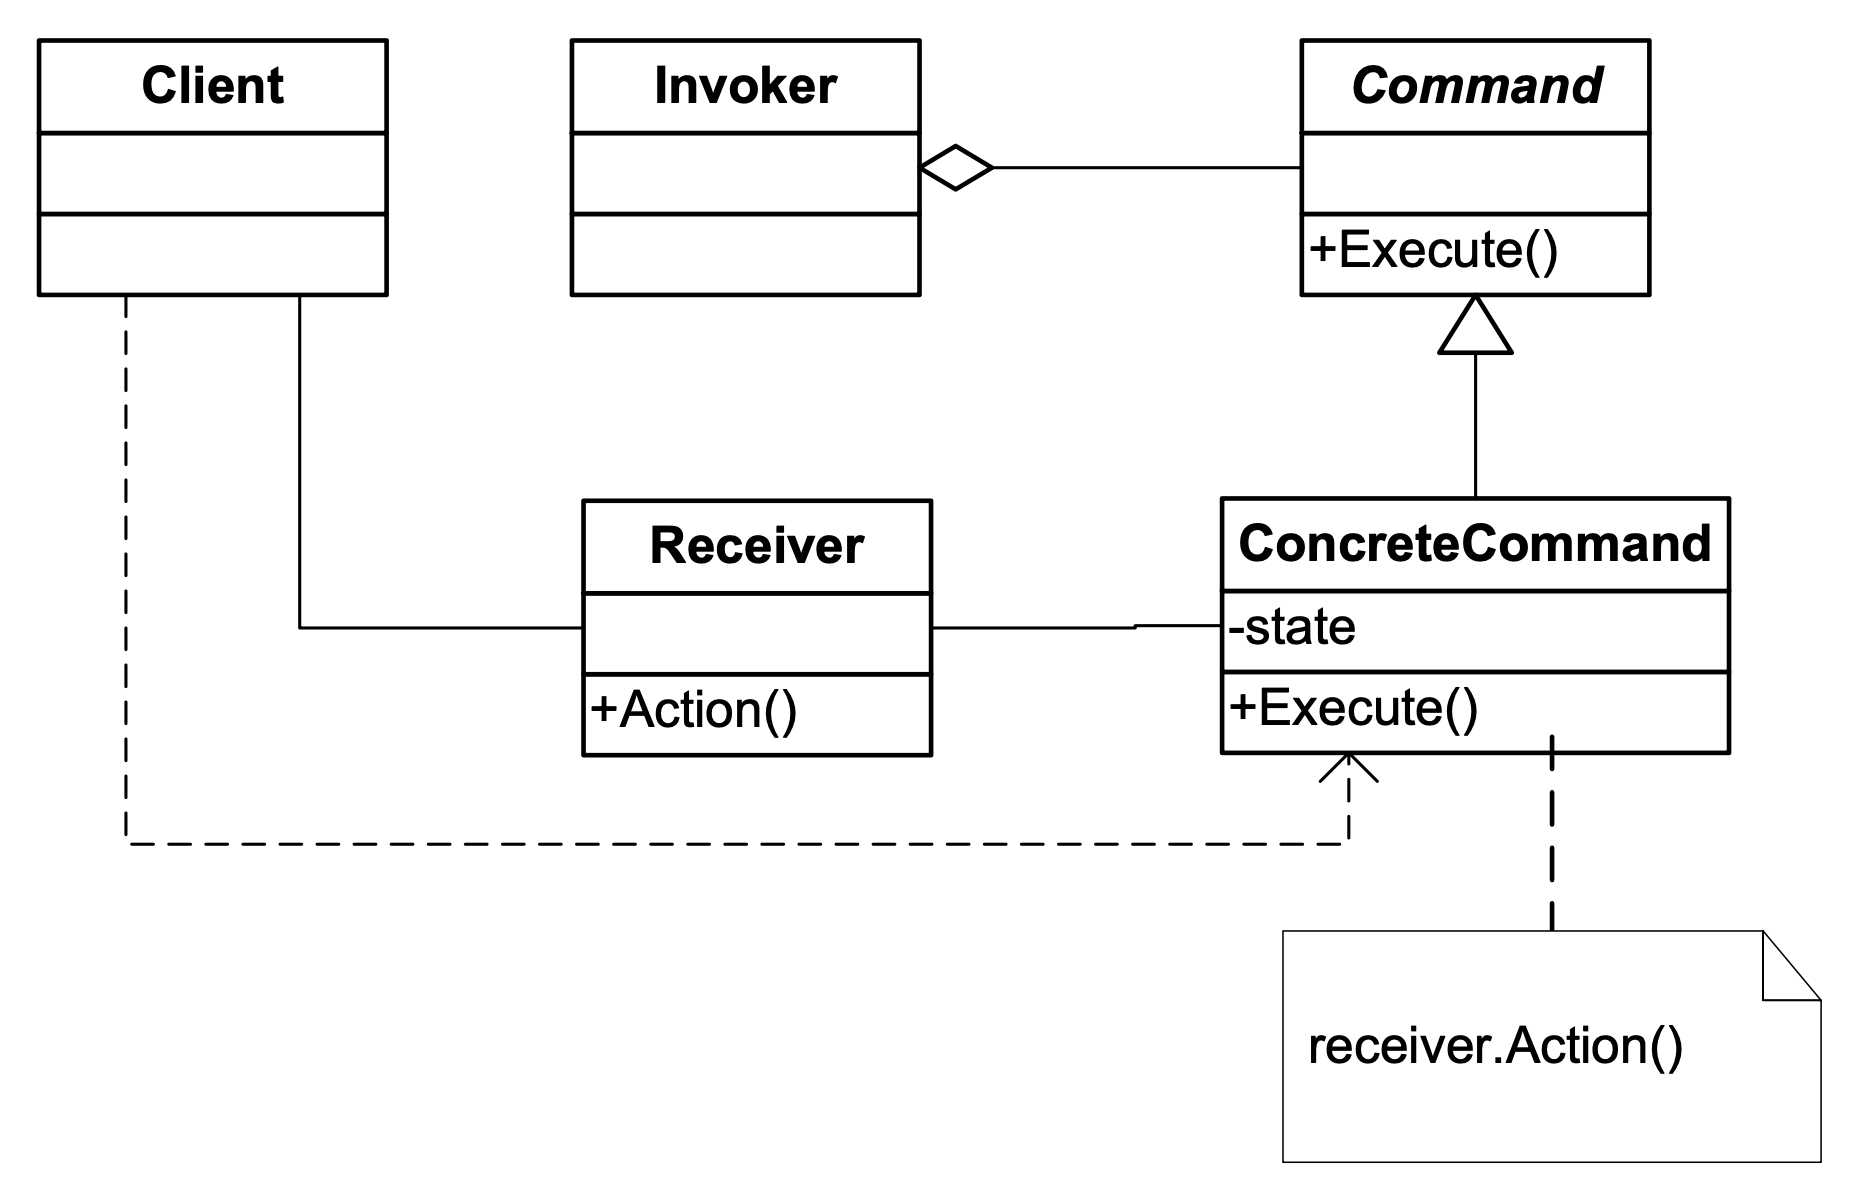
2단계: 해결책 (The Solution - Command Pattern)
접근: 요청(Request) 자체를 객체로 캡슐화하여 Invoker와 Receiver를 분리함.
원리:
1. 모든 명령을 Command 인터페이스로 추상화 (execute() 메서드만 노출)
2. ConcreteCommand가 Receiver를 참조하고, 실제 동작을 Receiver에게 위임(Delegation)
3. Invoker는 Command 인터페이스만 알면 됨 (어떤 Receiver인지 모름)
Good Code Example:
// Command 인터페이스: 모든 명령의 공통 규약
public interface Command {
    public void execute();
    public void undo();  // Undo 지원
}

// ConcreteCommand: 실제 동작을 Receiver에 위임
public class LightOnCommand implements Command {
    Light light;  // Receiver 참조

    public LightOnCommand(Light light) {
        this.light = light;
    }

    public void execute() {
        light.on();  // Receiver에게 위임
    }

    public void undo() {
        light.off();
    }
}

// Invoker: Command만 알면 됨 (Receiver와 완전 분리)
public class SimpleRemoteControl {
    Command slot;

    public void setCommand(Command command) {
        slot = command;  // 어떤 Command든 주입 가능
    }

    public void buttonWasPressed() {
        slot.execute();  // Receiver가 뭔지 모름!
    }
}
Client 사용:
// 런타임에 동적으로 Command 교체 가능
SimpleRemoteControl remote = new SimpleRemoteControl();
Light light = new Light();
remote.setCommand(new LightOnCommand(light));
remote.buttonWasPressed();  // light.on() 실행
3단계: 결과 및 평가 (Pros & Cons)
| 장점 (Pros) | 단점 (Cons) |
|---|---|
| Invoker-Receiver 분리: OCP 준수, 새 Command 추가 시 기존 코드 수정 불필요 | 클래스 수 증가: 각 동작마다 ConcreteCommand 클래스 필요 |
| 요청의 객체화: 큐잉, 로깅, 히스토리 관리 용이 | 간단한 동작도 클래스화: 단순 on/off도 별도 클래스 필요 |
| Undo/Redo 지원: Command에 상태 저장 가능 | |
| MacroCommand: 여러 명령을 하나로 조합 가능 (Composite Pattern 활용) | |
| 런타임 유연성: 실행 시점에 명령 변경 가능 |
2. 키워드 계층 구조도 (Keyword Hierarchy Map with Java)
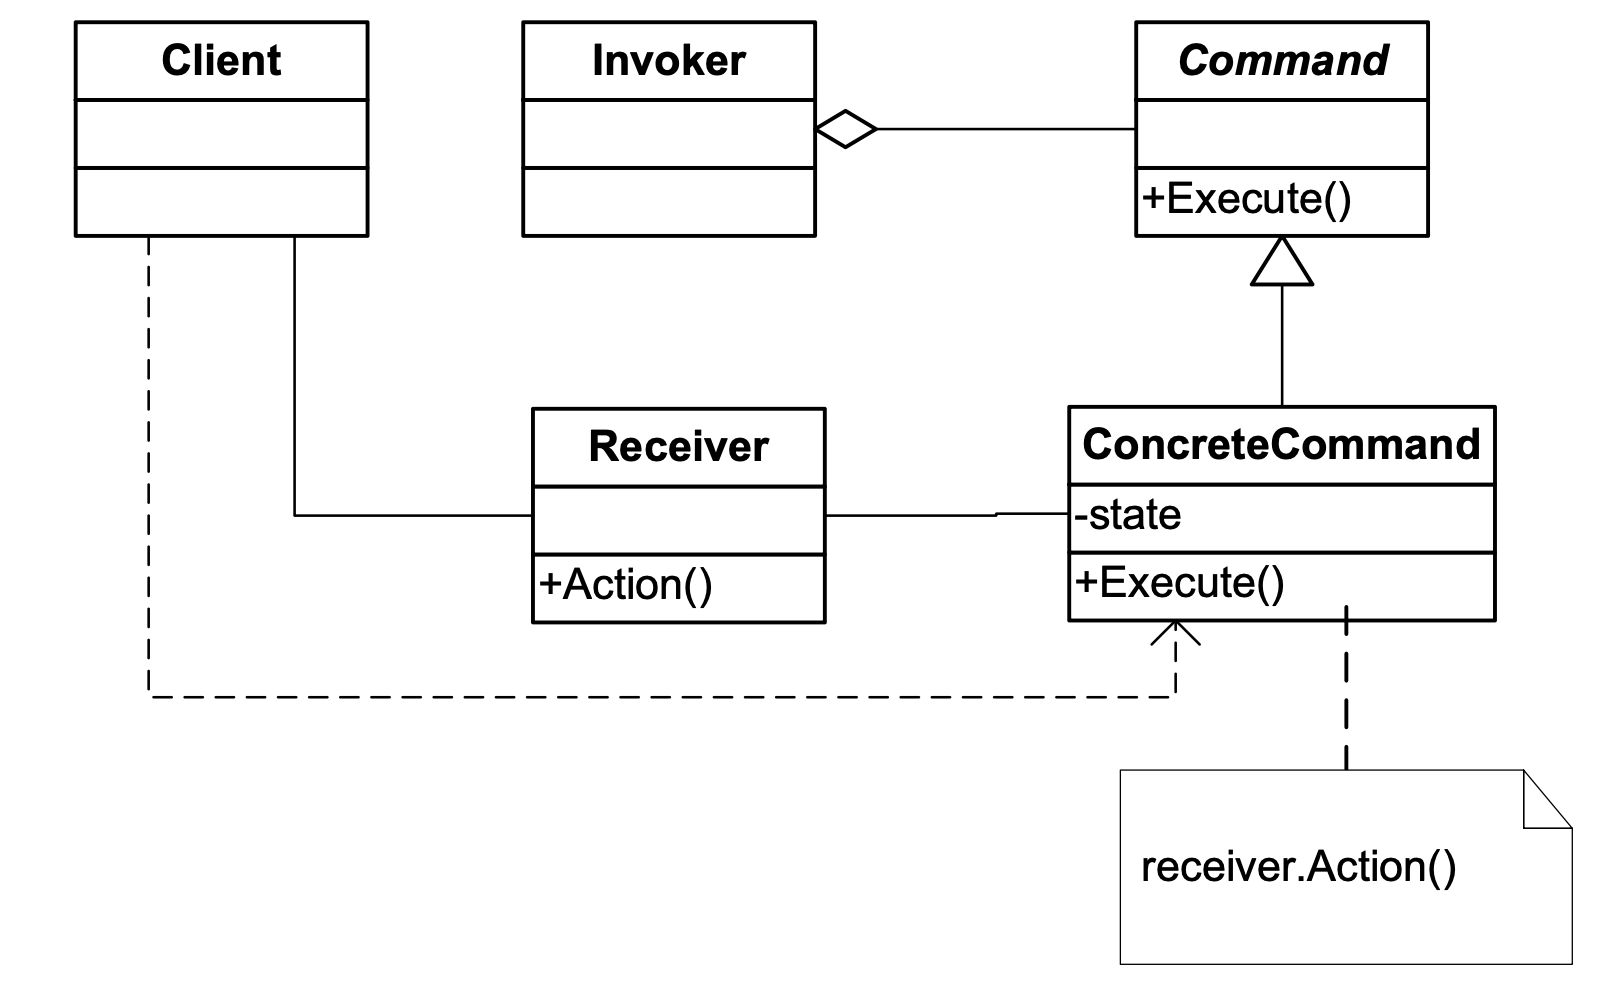
[대주제] Command Pattern의 핵심 구조
-
Command (명령 인터페이스)
- 정의: 모든 명령의 공통 인터페이스.
execute()메서드만 노출하여 Invoker가 Receiver의 세부 사항을 모르도록 함. - Java Code:
public interface Command { public void execute(); public void undo(); // Optional: Undo 지원 시 } - 원리: "캡슐화의 극대화" - 요청을 객체로 만들어 파라미터로 전달, 저장, 조작 가능하게 함.
- 정의: 모든 명령의 공통 인터페이스.
-
ConcreteCommand (구체적 명령)
- 정의: Command를 구현하며, Receiver를 멤버로 가짐.
execute()호출 시 Receiver의 실제 메서드를 호출(위임). - Java Code:
public class LightOnCommand implements Command { Light light; // Receiver 참조 (Has-a 관계) public LightOnCommand(Light light) { this.light = light; } public void execute() { light.on(); // Receiver에게 위임 } public void undo() { light.off(); // 반대 동작 } } - 원리: Receiver와 Action을 바인딩(Binding). Command 객체 자체가 "무엇을 누구에게 할 것인지"를 캡슐화.
- 정의: Command를 구현하며, Receiver를 멤버로 가짐.
-
Invoker (호출자)
- 정의: Command를 저장하고, 특정 시점에
execute()를 호출. Receiver에 대해 전혀 모름. - Java Code:
public class RemoteControl { Command[] onCommands; Command[] offCommands; Command undoCommand; // 마지막 실행 명령 저장 public void setCommand(int slot, Command on, Command off) { onCommands[slot] = on; offCommands[slot] = off; } public void onButtonWasPushed(int slot) { onCommands[slot].execute(); undoCommand = onCommands[slot]; // Undo용 저장 } public void undoButtonWasPushed() { undoCommand.undo(); } } - 원리: 파라미터화(Parameterization) - 어떤 Command든 받아서 실행. 슬롯 기반으로 여러 명령 관리.
- 정의: Command를 저장하고, 특정 시점에
-
Receiver (수신자)
- 정의: 실제 작업을 수행하는 객체. Command 패턴에서는 간접적으로만 호출됨.
- Java Code:
public class Light { String location; public Light(String location) { this.location = location; } public void on() { System.out.println(location + " light is on"); } public void off() { System.out.println(location + " light is off"); } } - 원리: Vendor 클래스처럼 이미 존재하는 클래스. 다양한 인터페이스를 가질 수 있음 (예:
CeilingFan은high(),medium(),low(),off())
-
Client (클라이언트)
- 정의: ConcreteCommand를 생성하고, Receiver를 설정한 뒤, Invoker에 등록.
- Java Code:
public class RemoteLoader {
    public static void main(String[] args) {
        // 1. Invoker 생성
        RemoteControl remote = new RemoteControl();

        // 2. Receiver 생성
        Light livingRoom = new Light("Living Room");

        // 3. Command 생성 (Receiver 바인딩)
        Command lightOn = new LightOnCommand(livingRoom);
        Command lightOff = new LightOffCommand(livingRoom);

        // 4. Invoker에 Command 등록
        remote.setCommand(0, lightOn, lightOff);

        // 5. 실행
        remote.onButtonWasPushed(0);
    }
}
[대주제] 확장 기능
-
Null Object Pattern (NoCommand)
-
정의: 아무 동작도 하지 않는 Command. 슬롯이 비어있을 때 null 체크 대신 사용.
-
Java Code:
public class NoCommand implements Command { public void execute() { } public void undo() { } } // Invoker 초기화 시 for (int i = 0; i < 7; i++) { onCommands[i] = new NoCommand(); offCommands[i] = new NoCommand(); } -
원리: Null 체크 로직 제거, 코드 간결화.
if (command != null)불필요.
-
-
MacroCommand (복합 명령)
- 정의: 여러 Command를 하나로 묶어 순차 실행. Composite Pattern의 일종.
- Java Code:
public class MacroCommand implements Command { Command[] commands; public MacroCommand(Command[] commands) { this.commands = commands; } public void execute() { for (Command cmd : commands) { cmd.execute(); } } // Undo는 역순으로! public void undo() { for (int i = commands.length - 1; i >= 0; i--) { commands[i].undo(); } } } - 사용 예:
Command[] partyOn = {lightOn, stereoOn, tvOn};
MacroCommand partyMacro = new MacroCommand(partyOn);
remote.setCommand(0, partyMacro, partyOff);
-
Active Object Pattern
- 정의: Command를 큐에 넣고, 별도 스레드/루프에서 순차 실행. 비동기 실행 및 멀티스레드 대안.
- Java Code:
class ActiveObjectEngine { LinkedList<Command> commands = new LinkedList<>(); public void addCommand(Command c) { commands.add(c); } public void run() { while (!commands.isEmpty()) { Command c = commands.removeFirst(); c.execute(); // 큐에서 꺼내서 실행 } } } - 원리: Command가 자신을 다시 큐에 추가하여 반복 실행 가능.
SleepCommand처럼 시간 지연 후 다른 Command 실행 예약.
3. Comparative Analysis: 비교 분석
Command vs Strategy
| 구분 | Command | Strategy |
|---|---|---|
| 목적 (Intent) | 요청을 객체로 캡슐화하여 큐잉/로깅/Undo 지원 | 알고리즘 군을 정의하고 교체 가능하게 함 |
| 초점 | 동작(Action)의 캡슐화 | 알고리즘(How)의 캡슐화 |
| Receiver | 별도의 Receiver에게 위임 | Context 자체가 처리하거나 Strategy가 직접 처리 |
| 사용 시점 | 실행 시점 분리, 히스토리 관리 | 런타임에 알고리즘 교체 |
| 예시 | Undo/Redo, 트랜잭션, 매크로 | 정렬 알고리즘, 결제 방식 |
Simple Remote vs Universal Remote
| 구분 | Simple Remote | Universal Remote |
|---|---|---|
| 슬롯 수 | 1개 | 7개 (배열) |
| Command 저장 | 단일 Command 변수 | Command[] 배열 |
| Null 처리 | 필요 시 null 체크 | NoCommand(Null Object) 사용 |
| Undo | 미지원 | undoCommand 변수로 지원 |
| 코드 확장성 | 단순하지만 제한적 | 유연하고 확장 가능 |
MacroCommand의 Undo: 순방향 vs 역방향
| 구분 | execute() | undo() |
|---|---|---|
| 실행 순서 | 0 → 1 → 2 → ... (순방향) | ... → 2 → 1 → 0 (역방향) |
| 이유 | 명령 순서대로 효과 적용 | 실행의 역순으로 되돌려야 원래 상태 복원 |
| 구현 | for (cmd : commands) | ListIterator.previous() 또는 역순 for문 |
// Undo 시 역순 실행 (Iterator 활용)
public void undo() {
    ListIterator<Command> iter = commands.listIterator(commands.size());
    while (iter.hasPrevious()) {
        iter.previous().undo();
    }
}
Active Object vs 멀티스레딩
| 구분 | Active Object | 전통적 멀티스레딩 |
|---|---|---|
| 동시성 모델 | 단일 스레드 + 명령 큐 | 다중 스레드 |
| 동기화 | 불필요 (단일 스레드) | Lock, Synchronized 필요 |
| 복잡도 | 상대적으로 단순 | 데드락, 레이스 컨디션 위험 |
| 적용 | 이벤트 루프, 게임 루프, GUI | CPU 집약적 병렬 처리 |
4. 기말고사 적중 예상 문제
유형 1: OX 퀴즈
문제 1. Command 패턴은 객체의 구조를 다루는 '구조 패턴(Structural Pattern)'에 속한다.
정답: X
해설: Command 패턴은 행동 패턴(Behavioral Pattern)에 속한다. 객체 간의 책임 분배와 통신 방식을 다룬다.
문제 2. Command 패턴에서 Invoker는 Receiver가 어떤 클래스인지, 어떤 메서드를 호출해야 하는지 알아야 한다.
정답: X
해설: Invoker는Command인터페이스의execute()메서드만 알면 된다. Receiver에 대한 정보는 ConcreteCommand가 가지고 있다. 이것이 Invoker-Receiver 분리(Decoupling)의 핵심이다.
문제 3. NoCommand 클래스는 Null Object 패턴의 예시로, 빈 슬롯에서의 null 체크를 제거하기 위해 사용된다.
정답: O
해설:NoCommand는 아무 동작도 하지 않는 Command를 구현하여,if (command != null)같은 null 체크 없이 안전하게execute()를 호출할 수 있게 한다.
유형 2: 정의 문제
문제 4. 다음 설명에 해당하는 디자인 패턴의 이름을 쓰시오.
"요청을 객체로 캡슐화하여, 클라이언트를 다른 요청, 큐, 로그 등으로 파라미터화할 수 있게 한다. 또한 취소 가능한 연산(Undoable Operations)을 지원한다."
정답: Command Pattern
[유형 3: 시나리오 꼬리물기] (1세트 - 4단계)
[상황] 스마트홈 시스템에서 CeilingFan의 속도를 조절하려 한다. 선풍기는 high(), medium(), low(), off() 4단계 속도를 가지며, Undo 시에는 이전 속도 상태로 복원해야 한다.
5-1. 패턴 선택: 이 요구사항에 적합한 패턴은?
정답: Command Pattern
이유: 요청을 객체로 캡슐화하여 Undo 기능을 지원할 수 있고, Invoker(리모컨)와 Receiver(선풍기)를 분리할 수 있다.
5-2. 구조 설계: 클래스 구조를 설명하시오.
정답:
Command인터페이스:execute(),undo()선언CeilingFan(Receiver):high(),medium(),low(),off(),getSpeed()메서드CeilingFanHighCommand,CeilingFanMediumCommand,CeilingFanLowCommand,CeilingFanOffCommand(ConcreteCommands): 각각CeilingFan을 참조하고,prevSpeed상태 저장RemoteControl(Invoker): Command 배열 보유,setCommand(),onButtonWasPushed(),undoButtonWasPushed()
5-3. 구현: CeilingFanHighCommand 클래스의 execute()와 undo() 메서드를 구현하시오.
정답:
public class CeilingFanHighCommand implements Command {
    CeilingFan ceilingFan;
    int prevSpeed;  // 이전 상태 저장

    public CeilingFanHighCommand(CeilingFan ceilingFan) {
        this.ceilingFan = ceilingFan;
    }

    public void execute() {
        prevSpeed = ceilingFan.getSpeed();  // 실행 전 상태 저장
        ceilingFan.high();
    }

    public void undo() {
        // 이전 속도로 복원
        if (prevSpeed == CeilingFan.HIGH) ceilingFan.high();
        else if (prevSpeed == CeilingFan.MEDIUM) ceilingFan.medium();
        else if (prevSpeed == CeilingFan.LOW) ceilingFan.low();
        else ceilingFan.off();
    }
}
5-4. Client 코드: 거실 선풍기를 HIGH로 설정한 뒤, Undo를 수행하는 코드를 작성하시오.
정답:
CeilingFan livingRoomFan = new CeilingFan("Living Room");
Command fanHigh = new CeilingFanHighCommand(livingRoomFan);
remote.setCommand(0, fanHigh, new CeilingFanOffCommand(livingRoomFan));
remote.onButtonWasPushed(0);    // HIGH 실행
remote.undoButtonWasPushed();   // 이전 상태로 복원
유형 4: 필수 개념 심화
문제 6. Active Object 패턴에서 SleepCommand가 execute() 호출 시 자기 자신을 다시 engine.addCommand(this)로 큐에 추가하는 이유와, 최종적으로 wakeupCommand를 추가하는 시점을 설명하시오.
정답:
1. 자기 자신을 다시 큐에 추가하는 이유:
- Active Object는 단일 스레드에서 동작하므로,
Thread.sleep()같은 블로킹 호출을 사용하면 전체 시스템이 멈춤- 대신
SleepCommand는 Non-blocking 방식으로 시간을 체크- 아직
sleepTime이 지나지 않았으면, 자신을 다시 큐에 넣어 다른 Command들이 실행될 기회를 줌- 이를 통해 협력적 멀티태스킹(Cooperative Multitasking)을 구현
2. wakeupCommand 추가 시점:
currentTime - startTime >= sleepTime조건이 만족되면 (지정된 시간이 경과하면)- 자기 자신 대신 wakeupCommand를 큐에 추가하여 "깨어난 후" 수행할 동작을 예약
- 이것이 일종의 콜백(Callback) 메커니즘
핵심 코드:
public void execute() {
    long currentTime = System.currentTimeMillis();
    if (!started) {
        started = true;
        startTime = currentTime;
        engine.addCommand(this);  // 처음: 자신을 큐에 추가
    } else if ((currentTime - startTime) < sleepTime) {
        engine.addCommand(this);  // 시간 안됨: 다시 큐에
    } else {
        engine.addCommand(wakeupCommand);  // 시간 됨: 콜백 실행
    }
}