SDK 버전이 맞지 않거나 dart sdk 경로 설정 법
File -> setting
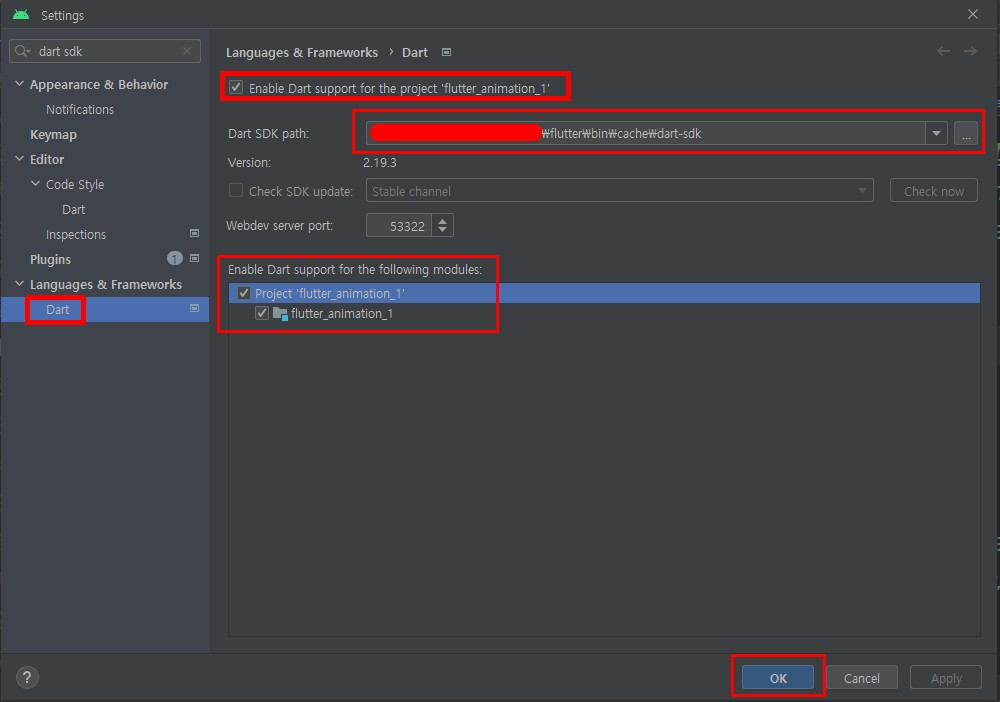
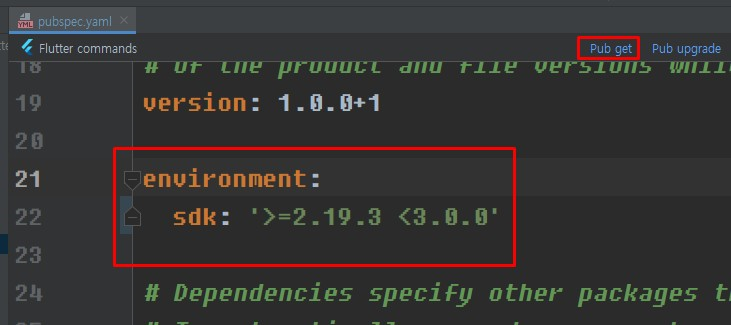
.yaml 파일에서 자신의 sdk 버전으로 수정
애니메이션
SingleTickerProviderStateMixin
: 위젯에 애니메이션이 1개일 경우
TickerProviderStateMixin
: 위젯에 애니메이션이 1개 이상일 경우
플러터는 프레임 60 목표로 만들어진 프레임워크이다.
TickerProviderStateMixin 을 사용하면 프레임 마다 화면을 갱신하도록 만들 수 있다.
애니메이션 사용법
1. 클래스에 SingleTickerProviderStateMixin
2. 애니메이션 / 애니메이션 컨트롤러 정의
3. 애니메이션을 이용하는 위젯으로 애니메이션 사용
iniState
: 상태를 초기화
: 위젯이 빌드 될 때 상태 데이터를 입력 해주기 위해서 사용
상태는 초기값을 설정해줘야함
useState(0); -> state선언 + 초기화
provider -> count = 0;
main.dart 애니메이션 예제
<main.dart>
import 'package:flutter/material.dart';
import 'package:flutter_hooks/flutter_hooks.dart';
void main() {
runApp(const MyApp());
}
class MyApp extends StatelessWidget {
const MyApp({super.key});
// This widget is the root of your application.
Widget build(BuildContext context) {
return MaterialApp(
title: 'Flutter Demo',
theme: ThemeData(
primarySwatch: Colors.blue,
),
home: const AnimatedScreen1(),
);
}
}
class AnimatedScreen1 extends StatefulWidget {
const AnimatedScreen1({Key? key}) : super(key: key);
State<AnimatedScreen1> createState() => _AnimatedScreen1State();
}
class _AnimatedScreen1State extends State<AnimatedScreen1>
with SingleTickerProviderStateMixin {
late AnimationController _animationController;
late Animation<double> _animation;
void initState() {
super.initState();
_animationController =
AnimationController(duration: const Duration(seconds: 2), vsync: this);
_animation =
Tween<double>(begin: 0, end: 1.5).animate(_animationController);
_animationController.forward();
//_animationaontroller.reverse();
}
void dispose() {
_animationController.dispose();
super.dispose();
}
Widget build(BuildContext context) {
return Scaffold(
floatingActionButton: FloatingActionButton(
onPressed: () {
_animationController.reset();
_animationController.forward();
},
child: const Icon(Icons.play_arrow),
),
appBar: AppBar(title: const Text('Animated Screen')),
body: Center(
child: ScaleTransition(
scale: _animation,
child: const Text(
'Hello, world!',
style: TextStyle(fontSize: 50),
),
),
),
);
}
}
// // 훅스 버전도 연결해서 작동시켜보자.
// class AnimatedScreen extends HookWidget {
// const AnimatedScreen({super.key});
// @override
// Widget build(BuildContext context) {
// final animationController =
// useAnimationController(duration: const Duration(seconds: 2));
// final animation = useAnimation(
// Tween<double>(begin: 0, end: 1.5).animate(animationController));
// useEffect(() {
// animationController.forward();
// });
// return Scaffold(
// floatingActionButton: FloatingActionButton(
// onPressed: () {
// animationController.reset();
// animationController.forward();
// },
// child: const Icon(Icons.play_arrow),
// ),
// appBar: AppBar(title: const Text('Animated Screen')),
// body: Center(
// child: Transform.scale(
// scale: animation,
// child: const Text(
// 'Hello, world!',
// style: TextStyle(fontSize: 50),
// ),
// ),
// ),
// );
// }
// }
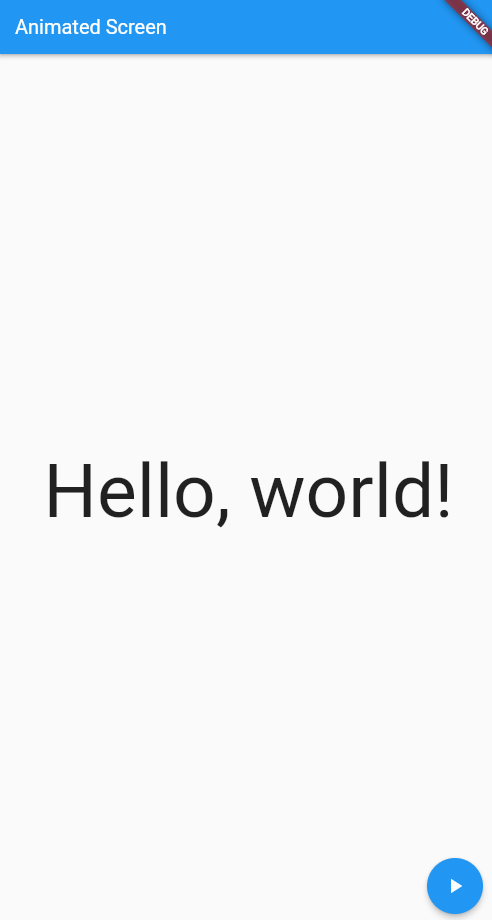
<결과화면>
Navigator
페이지 이동 관련 명령어
push
: 현재페이지 위에 새페이지 올림
pushReplacement
: 현재페이지 없애고 새페이지를 올림
pushAndRemoveUntil
: 새패이지 올리고, 나머지 것들 중에서 조건에 맞는 페이지를 삭제
pop
: 페이지 없애기, 현재 페이지 삭제
popUntil
: 페이지 없애기, 원하는 페이지 나올 때 까지 페이지 삭제
서버 연동
http.get(url) -> 데이터를 가져올때
http.post(url) -> 데이터를 서버에 보낼 때 (로그인 등)
http.put(url) -> 서버의 데이터를 업데이트할 때(개인정보 수정 등)
http.delete(url) -> 서버의 데이터를 삭제할 때(댓글 삭제 등)
http.patch(url) -> put이랑 비슷
put -> 데이터 전체를 바꿀 때
patch -> 데이터 일부만 바꿀 때
JSP 에서는 get / post 두 가지를 주로 쓴다.
post가 put과 delete 역할을 동시에 한다.
patch는 put으로 대체해서 쓰는 경우가 많다.
get -> 서버에 보낼 데이터가 주소에 보임
post -> 서버에 보낼 데이터가 body에 담김
흐름
상태를 만든다
- 통신 전 = 데이터가 없다 = null
- 통신 후 = 데이터가 있을수도 있고 없을수도 있다
페이지가 빌드된다
- 통신을 시작한다
- 통신이 완료되면 상태를 업데이트 한다
페이지가 재빌드된다
<useEffect 함수>
useEffect(
첫번째 매개변수 : 사용할 함수
두번째 매개변수 : 관찰할 상태 리스트
);
특징
- 화면이 빌드 된 후 작동한다.
- 보통 통신 데이터를 받기 위해서 사용한다.
- 두번째 매개변수가 빈 리스트면 페이지에서 딱 1번 실행된다.
- 두번째 매개변수가 상태들을 넣으면 해당 상태가 바뀌면 재실행된다.
- 첫번째 매개변수로 받은 함수는 종료함수를 리턴해야한다.