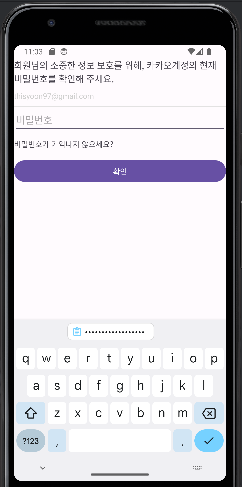
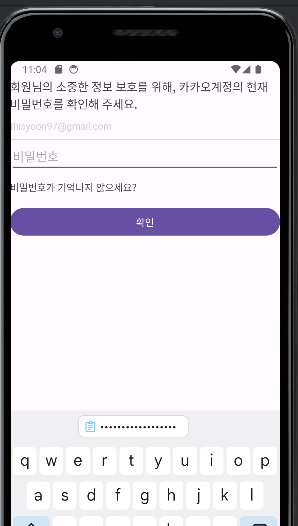
뷰를 이용한 화면 구성 - 카톡 비밀번호 확인 창 만들기
<LinearLayout xmlns:android="http://schemas.android.com/apk/res/android"
    xmlns:app="http://schemas.android.com/apk/res-auto"
    xmlns:tools="http://schemas.android.com/tools"
    android:id="@+id/main"
    android:layout_width="match_parent"
    android:layout_height="match_parent"
    android:orientation="vertical"
    android:padding="16dp"
    tools:context=".MainActivity">

    <TextView
        android:layout_width="match_parent"
        android:layout_height="wrap_content"
        android:text="@string/main_desc"
        android:textSize="17dp" />

    <TextView
        android:layout_width="match_parent"
        android:layout_height="wrap_content"
        android:layout_marginTop="10dp"
        android:text="thisyoon97@gmail.com"
        android:textColor="#CFCFCE" />

    <View
        android:layout_width="match_parent"
        android:layout_height="1dp"
        android:layout_marginTop="10dp"
        android:background="#D4D4D3" />

    <EditText
        android:layout_width="match_parent"
        android:layout_height="wrap_content"
        android:hint="비밀번호"
        android:inputType="textPassword" />

    <TextView
        android:layout_width="match_parent"
        android:layout_height="wrap_content"
        android:layout_marginTop="10dp"
        android:text="@string/password_txt" />

    <Button
        android:layout_width="match_parent"
        android:layout_height="wrap_content"
        android:layout_marginTop="16dp"
        android:text="확인" />
</LinearLayout>
// strings.xml
<resources>
<string name="app_name">Ch6_View</string>
<string name="main_desc">
회원님의 소중한 정보 보호를 위해, 카카오계정의 현재 비밀번호를 확인해 주세요.
</string>
<string name="password_txt">비밀번호가 기억나지 않으세요?</string>
</resources>
XML 레이아웃 구성 요소 설명
<LinearLayout xmlns:android="http://schemas.android.com/apk/res/android"
    xmlns:app="http://schemas.android.com/apk/res-auto"
    xmlns:tools="http://schemas.android.com/tools"
    android:id="@+id/main"
    android:layout_width="match_parent"
    android:layout_height="match_parent"
    android:orientation="vertical"
    android:padding="16dp"
tools:context=".MainActivity">LinearLayout: 세로 방향으로 자식 뷰들을 정렬하며, 전체 화면을 채우도록 설정됩니다.padding속성으로 내부 여백을 추가한다.
    <TextView
        android:layout_width="match_parent"
        android:layout_height="wrap_content"
        android:text="@string/main_desc"
android:textSize="17dp" />TextView(첫 번째):main_desc문자열 리소스를 텍스트로 사용하고, 텍스트 크기를 17dp로 설정한다.layout_width는 부모 뷰에 맞추고,layout_height는 내용에 맞게 조정된다.
    <TextView
        android:layout_width="match_parent"
        android:layout_height="wrap_content"
        android:layout_marginTop="10dp"
        android:text="thisyoon97@gmail.com"
android:textColor="#CFCFCE" />TextView(두 번째): 이메일 주소를 텍스트로 표시하며, 상단에 10dp의 여백을 추가한다. 텍스트 색상은 연한 회색으로 설정된다.
    <View
        android:layout_width="match_parent"
        android:layout_height="1dp"
        android:layout_marginTop="10dp"
android:background="#D4D4D3" />View: 1dp 높이의 얇은 선을 표시하며, 상단에 10dp의 여백을 추가한다. 배경 색상은 연한 회색으로 설정된다.
    <EditText
        android:layout_width="match_parent"
        android:layout_height="wrap_content"
        android:hint="비밀번호"
android:inputType="textPassword" />EditText: 비밀번호 입력 필드를 정의하며,inputType을textPassword로 설정하여 입력된 문자를 숨긴다.hint속성으로 "비밀번호"라는 힌트를 제공한다.
    <TextView
        android:layout_width="match_parent"
        android:layout_height="wrap_content"
        android:layout_marginTop="10dp"
android:text="@string/password_txt" />TextView(세 번째):password_txt문자열 리소스를 텍스트로 사용하며, 상단에 10dp의 여백을 추가한다.
    <Button
        android:layout_width="match_parent"
        android:layout_height="wrap_content"
        android:layout_marginTop="16dp"
        android:text="확인" />
</LinearLayout>Button: "확인"이라는 텍스트를 가진 버튼을 정의하며, 상단에 16dp의 여백을 추가한다. 이는 색상을 지정하지 않았음에도 보라색을 띈다. 이것은 안드로이드의 기본값이기 때문에 그렇다.
이 레이아웃은 세로 방향으로 정렬된 다양한 UI 요소를 포함하여 사용자에게 필요한 입력을 받는 화면을 구성합니다.
밑줄이 2개임
이 XML 레이아웃에서 밑줄이 2개 있는 부분은 다음과 같다.
- 첫 번째 밑줄:
<View
    android:layout_width="match_parent"
    android:layout_height="1dp"
    android:layout_marginTop="10dp"
    android:background="#D4D4D3" />
이 View 요소는 실제로 1dp 높이의 얇은 선을 그린다. 배경색 #D4D4D3을 사용하여 회색 선을 만든다.
- 두 번째 밑줄:
<EditText
    android:layout_width="match_parent"
    android:layout_height="wrap_content"
    android:hint="비밀번호"
    android:inputType="textPassword" />
이 EditText는 비밀번호 입력 필드다. 안드로이드의 기본 스타일에 따라 EditText 아래에 밑줄이 자동으로 표시된다. 이 밑줄은 사용자에게 입력 영역을 시각적으로 나타내는 역할을 한다.
따라서 첫 번째 밑줄은 명시적으로 추가된 구분선이고, 두 번째 밑줄은 EditText의 기본 스타일에 의해 자동으로 생성되는 밑줄이다.

화려한 외면이 아닌 단단한 내면