개요
Hugo로 Github 블로그를 생성하는 내용을 소개하고자 합니다. Ubuntu 20.04.5 LTS 환경에서 진행했습니다.
준비물
- Go 1.18 버전 이상
- gcc 컴파일러
- 블로그 파일을 업로드할 Github 레퍼지토리 (레퍼지토리 이름은 Github_유저명.github.io 형태로 지정해주세요)
설치
1. Hugo 소스 빌드하기
Github에서 Hugo 소스코드를 clone 받아서 go로 빌드합니다.
$ go install -tags extended github.com/gohugoio/hugo@latest
$ hugo version
hugo version 명령으로 버전 내용이 잘 출력되면 Hugo 설치는 마무리 됩니다.
2. Hugo로 블로그 프로젝트 생성하기
hugo 명령으로 새로운 site를 생성합니다.
$ hugo new site hugo_log
Congratulations! Your new Hugo site is created in /home/thouy/test/test_log.

Just a few more steps and you're ready to go:

1. Download a theme into the same-named folder.
   Choose a theme from https://themes.gohugo.io/ or
   create your own with the "hugo new theme <THEMENAME>" command.
2. Perhaps you want to add some content. You can add single files
   with "hugo new <SECTIONNAME>/<FILENAME>.<FORMAT>".
3. Start the built-in live server via "hugo server".

Visit https://gohugo.io/ for quickstart guide and full documentation.
new site 명령이 실행되면 아래 구조와 같은 디렉토리와 파일들이 자동으로 생성됩니다.
example/
├── archetypes/
│   └── default.md
├── assets/
├── content/
├── data/
├── layouts/
├── public/
├── static/
├── themes/
└── config.toml
3. config 디렉토리 생성
설정을 체계적으로 관리하기 위해 config 디렉토리를 세팅합니다. Hugo의 기본 config 디렉토리 구조는 아래와 같습니다. 아래와 같은 구조로 디렉토리와 파일을 세팅합니다.
├── config
│   └── _default
│        ├── config.toml
│        ├── languages.toml
│        ├── menus.en.toml
│        ├── menus.zh.toml
│        └── params.toml
디렉토리 구조를 만들어 설정을 관리하는 목적은 용도별로 설정을 체계적으로 관리하기 위함입니다. 굳이 필요하지 않다면 그냥 config.toml, params,toml, menus.toml 파일을 블로그 루트 디렉토리에 생성하여 사용하셔도 무방합니다.
2. Hugo 테마 설치
https://themes.gohugo.io/ 에서 Hugo 테마를 골라 설치합니다. 이 글에서는 hugo-clarity 테마로 설치를 진행합니다.
맨 처음 생성했던 블로그 소스 루트 디렉토리로 이동하여 hugo-clarity를 git 서브모듈로 등록합니다.
$ cd hugo_log
$ git init
$ git submodule add https://github.com/chipzoller/hugo-clarity themes/hugo-clarity
config 설정하기
1. config.toml
config/_default/config.toml을 열어 항목들을 설정합니다.
baseURL = 'https://thouy.github.io/'
languageCode = 'en-us'
title = 'KMS Dev log'
theme = 'hugo-clarity'
paginate = 10
2. params.toml
config/_default/params.toml을 열어 항목들을 설정합니다.
enableSearch = true
codeLineNumbers = true
codeMaxLines = 15

[author]
name = "Min soo, Kim"
3. menu.toml
config/_default/menu.toml을 열어 항목들을 설정합니다.
[[main]]
  name = "Home"
  url = ""
  weight = -110

[[main]]
  name = "Archives"
  url = "post/rich-content/"
  weight = -109

# Submenus are done this way: parent -> identifier
[[main]]
  name = "Links"
  identifier = "Links"
  weight = -108
[[main]]
  parent = "Links"
  name = "LinkedIn"
  url = "https://www.linkedin.com/"
[[main]]
  parent = "Links"
  name = "Twitter"
  url = "https://twitter.com/"

[[main]]
  name = "About"
  url = "about/"
  weight = -107

# social menu links

[[social]]
  name = "github"
  type = "social"
  weight = 1
  url = "https://github.com/#"
[[social]]
  name = "twitter"
  weight = 2
  url = "https://twitter.com/#"
[[social]]
  name = "linkedin"
  weight = 3
  url = "https://www.linkedin.com/in/#"
더 상세한 설정 내용은 https://gohugo.io/getting-started/configuration/ 를 참고해주세요.
새 포스트 작성하기
블로그 루트 디렉토리에서 아래의 명령으로 새 포스트 문서 마크다운을 생성합니다.
$ hugo new post/hello_world.md명령이 실행되면 content/post 디렉토리 안에 hello_world.md 파일이 생성됩니다.
hello_world.md 파일을 열어 마크다운 문법으로 글을 작성합니다.
---
title: "Hello_world"
date: 2023-01-19T11:37:43+09:00
draft: true
---

## Hello world!!
Hugo server 명령으로 새 포스트가 잘 나오는지 확인합니다. draft: true로 되어 있으므로 -D 플래그를 꼭 넣어서 명령을 실행해줍니다.
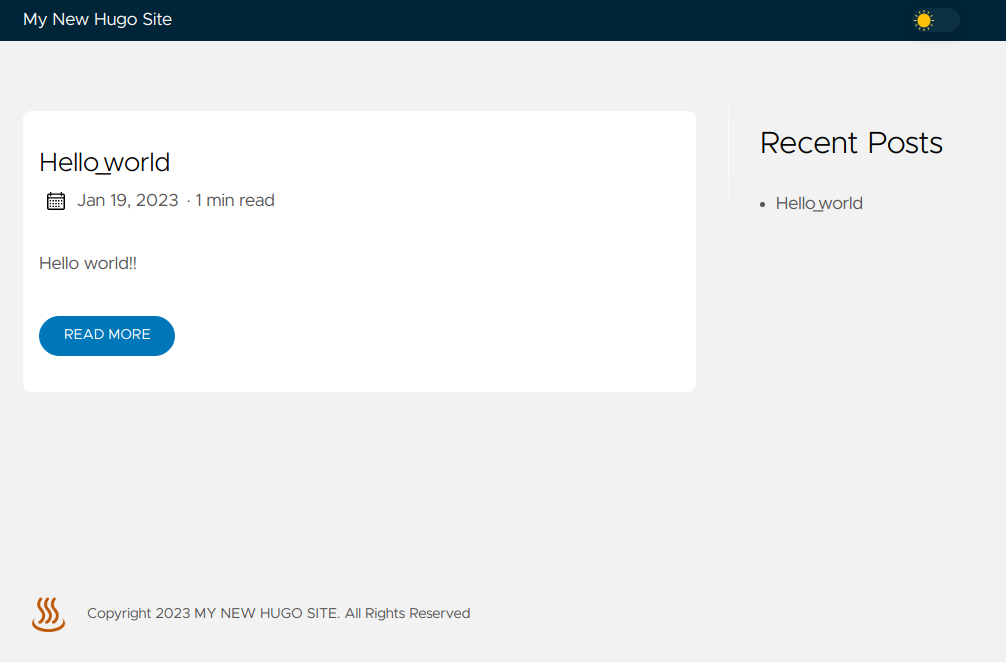
$ hugo server -D브라우저에서 localhost:1313으로 접속하면 아래 화면처럼 새 포스트가 추가된 걸 확인할 수 있습니다.
빌드 및 배포하기
1. 빌드
새 글이 정상적으로 보인다면 이제 빌드를 할 차례입니다.
블로그 루트 디렉토리로 이동하여 아래 명령으로 빌드합니다. draft가 활성화된 상태이기 때문에 -D 플래그를 넣어 빌드합니다.
$ hugo -D
Start building sites …
hugo v0.110.0-e32a493b7826d02763c3b79623952e625402b168+extended linux/amd64 BuildDate=2023-01-17T12:16:09Z VendorInfo=snap:0.110.0

                   | EN
-------------------+-----
  Pages            |  7
  Paginator pages  |  0
  Non-page files   |  0
  Static files     | 57
  Processed images |  0
  Aliases          |  3
  Sitemaps         |  1
  Cleaned          |  0

Total in 61 ms
빌드가 완료되면 public 디렉토리에 html을 포함한 여러가지 파일들이 생성됩니다. 이제 이 파일들을 github에 푸시하여 배포하면 끝납니다. 푸시한 후에 레포지토리명을 브라우저 주소창에 입력하여 접속하면 배포된 블로그를 확인할 수 있습니다.
푸시하면 배포까지는 1분 가량이 시간이 소요되니 1분 후 다시 시도하면 블로그 화면을 보실 수 있습니다.