[1] ajax란?
화면 전환 없이 통신하는 위한 것, 화면 일부분만 바꿈
html과 css는 그대로 두고 데이타만 주고 받음
💡 안드로이드 서버 통신 레거시 방법
서버와 통신하기 위해선 해임달인 URL이 스레드를 여는데 URL은 임포트만 할 수 있음 때문에 HttpURLconection 이 도와 데이터를 주고 받음
ex) 라이브러리 : 위에 걸 해두는 라이브러리들
Volly / OKHttp / Retrofit2
💡 웹에서 HttpURLconection 같은 애
XMLHttpRequest (= HttpURLconection)
=> 내장 라이브러리 fatch
[2] ajax 사용법
1. GET
- XMLHttpRequest() 객체 만들기
- 서버로부터 응답받으면 자동으로 발동하는 콜백 함수 등록
- open 하기 전에 해야한다!
- .open(방식, 경로 url, 동기 : false or 비동기 : true)
ex) xhr.open('GET','./aaa.text', true) - .send()
2. POST
- XMLHttpRequest() 객체 만들기
- 서버로부터 응답받으면 자동으로 발동하는 콜백 함수 등록
- open 하기 전에 해야한다!
- .open(방식, 경로 url, 동기 : false or 비동기 : true)
ex) xhr.open('POST','./aaa.text', true) - 헤더 쓰기 꼭!!!!
xhr.setRequestHeader('Content-Type','application/x-www-form-urlencoded') - .send(보낼 데이타)
xhr.send('title = Hello&msg=Nice to meet you')
<!DOCTYPE html>
<html>
    <head>
        <meta charset="utf-8">
        <title>JS AJAX</title>

        <!-- ajax 는 웹서버 환경에서만 동작함. http로 시작하는 웹주소에서만 동작함 -->

        <script>

            function aaa(){
                //GET방식으로 서버로부터 응답을 요청

                //1.
                var xhr = new XMLHttpRequest(); //비동기 방식

                //2. 서버로부터 응답받으면 자동으로 발동하는 콜백 함수 등록
                xhr.onreadystatechange = function(){

                    //e.innerHTML = xhr.readyState
                    //readyState 는 최대 5번까지 응답 받음
                    //서버 상태가 바뀔 때마다 응답을 보냄
                    //0 : 준비 , 2: 작업 시작, 4: 서버 응답이 완료 된 상태 값

                    // status = 서버의 응답코드 [200 : 성공, 404 - 파일 없음]
                    if(xhr.readyState == 4 && xhr.status == 200) {
                        var e = document.getElementById('target');
                        e.innerHTML = xhr.responseText;
                    }

                }


                //3.
                xhr.open('GET','./aaa.text', true); //(방식, 경로 url, 동기 : false or 비동기 : true)
                //xhr.open('GET','./04_noAjax.html', true);
                //xhr.open('GET','./getText.php?name=sam&msg=Good', true);

                //다른 서버와 통신하고 싶다면? open API 데이터 구현 - 영화진흥위원회, 기상청 정보 등
                //xhr.open('GET','http://www.w3schools.com/XML/cd_catalog.xml', true);
                //CORS policy: No 'Access-Control-Allow-Origin' header is present on the requested resource.
                //서버에 아무나 접근 할수 있을 수도 있어서 막아둠
                //접근하려면 jsp의 redirect처럼 php에  curl가 있어서 php로 올린다음 응답 받는다

                //4.
                xhr.send();
            }

            function bbb(){
                //POST방식으로 서버로부터 응답을 요청

                //1.
                var xhr = new XMLHttpRequest();


                //2.
                xhr.onreadystatechange = function(){
                    if(xhr.readyState == 4 && xhr.status ==200){
                        document.getElementById('target').innerHTML= xhr.responseText;
                    }
                }

                //3.
                xhr.open('POST','./postTest.php', true);

                //4. 헤더 꼭!!직접 써줘야함
                xhr.setRequestHeader('Content-Type', 'application/x-www-form-urlencoded');

                //5.
                xhr.send('title=Hello&msg=Nice to meet you');

            }

        </script>

    </head>

    <body>

        <p>
            <button onclick="aaa()">GET</button>
            <button onclick="bbb()">POST</button>
        </p>

        <hr>

        <!-- 서버의 응답결과를 보여주는 영역 요소 -->
        <div id="target"></div>

    </body>

</html>
[2] open API 받아오기
다른 서버와 통신하고 싶다면? open API 데이터 구현 - 영화진흥위원회, 기상청 정보 등
내 웹에서 바로 openAPI에 접근하면 cross orgin 문제가 날 수 있다 (보안 문제)
때문에 접근하려면 jsp의 redirect처럼 php에 curl가 있어서 php로 올린다음 응답 받는다
<!DOCTYPE html>
<html>
    <head>
        <meta charset="utf-8">
        <title> ajaxOpenAPI </title>
    </head>

    <body>

        <button onclick="clickBtn()">GET OPEN API</button>

        <hr>

        <div id="target"></div>

        <script>

            //cross orgin 문제를 해결하기 위해 중간 php 서버프로그램 이용
            function clickBtn(){
                //1.
                var xhr = new XMLHttpRequest();

                //2. 응답 준비
                xhr.onreadystatechange = function(){
                    if(xhr.readyState == 4 && xhr.status ==200){
                        document.getElementById('target').innerHTML= xhr.responseText;

                        //참고) xml 파싱 방법
                        //1. DOMParser()
                        // var parser = new DOMParser();
                        // var doc = parser.parseFromString(xml, "application/xml");
                        // var title = doc.getElementsByTagName('title')[0].textContent;

                        //2. responseXML
                        // xhr.responseXML --> 이미 xml document로 파싱된 응답결과 받기
                    }
                }

                //3. 요청
                xhr.open('GET','./openAPI_cors.php',true);


                //4.
                xhr.send();
            }

        </script>

    </body>

</html>
<?php
header('Content-Type:application/xml; charset=utf-8');
//curl 라이브러리 이용 [PHP에서 다른서버에 요청을 하는 라이브러리]
//1. curl 초기화 (객체 생성)
$ch = curl_init();
//2. curl로 작업할 요청에 대한 설정 옵션들
//2-1. 요청할 서버 주소 URL
curl_setopt($ch, CURLOPT_URL, "http://kobis.or.kr/kobisopenapi/webservice/rest/boxoffice/searchDailyBoxOfficeList.xml?key=f5eef3421c602c6cb7ea224104795888&targetDt=20230510"); //set option
//2-2. 요청의 응답을 받겠다는 설정
curl_setopt($ch, CURLOPT_RETURNTRANSFER, true);
//3. 설정완료 후 curl 작업 실행\
$result = curl_exec($ch);
if($result) {
echo $result;
} else {
echo "실패" . curl_error($ch) . "<br>";
}
//4. 연결 종료
curl_close($ch);
?>[3] xml 파싱
<!DOCTYPE html>
<html>
    <head>
        <meta charset="utf-8">
        <title> parseXml </title>

        <script>

            //xml 데이터 [특정 형식이 있는 문자열]
            var xml = "<movie><title>아바타</title><genre>SF,어드벤처</genre></movie>";

            //xml을 html에 DOM tree document 객체처럼 변환해주는 기능을 가진 파서이용
            var parser = new DOMParser();
            var doc = parser.parseFromString(xml, "application/xml"); //(파싱해야할 것, 파싱해야할 것의 파일 타입)

            var title = doc.getElementsByTagName('title')[0].textContent; //원래 배열 개수만큼 반복문 돌려야함
            console.log(title);

        </script>

    </head>

    <body>


    </body>

</html>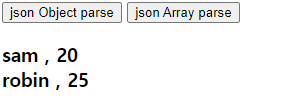
[4] JSON 파싱
<!DOCTYPE html>
<html>
    <head>
        <meta charset="utf-8">
        <title> JS JSON parse </title>
    </head>

    <body>

        <button onclick="aaa()">json Object parse</button>
        <button onclick="bbb()">json Array parse</button>


        <h3 id="hh"></h3>

        <script>

            // JSON 객체(문자열)를 자바스크립트 객체로 변환
            var s='{"name":"sam", "age":20}';

            function aaa(){
                // 객체로 변환
                var person= JSON.parse(s);

                document.getElementById("hh").innerHTML = person.name+ " : " + person.age; //각각의 키값을 변수로 저장
            }

            //json Array 를 자바스크립트 객체로 변환
            var ss='[ {"name":"sam", "age":20}, {"name":"robin", "age":25} ]';
            function bbb(){
                var people= JSON.parse(ss);

                var a="";
                for(var i=0; i<people.length; i++){
                    a += people[i].name +" , ";
                    a += people[i].age +"<br>";
                }

                document.getElementById('hh').innerHTML= a;
            }

        </script>


        <hr>

        <!-- JS 객체를 JSON 문자열 형식으로 변환 -->
        <button onclick="ccc()">object to json</button>
        <button onclick="ddd()">object array to json array</button>

        <h3 id="pp"></h3>

        <script>

            var person = {
                name : "sam",
                age:20
            }

            function ccc(){
                var json = JSON.stringify(person);
                document.getElementById('pp').innerHTML = json;
            }

            //배열로 만들기
            var objArr = [
                {"name":"LISA", "age":20},
                {"name":"JENE", "age":25},
                {"name":"ROSE", "age":25}
            ];

            function ddd(){
                var json = JSON.stringify(objArr);
                document.querySelector("#pp").innerHTML = json;
            }

        </script>

    </body>

</html>
[4] 통신 라이브러리 : fetch
- promiss 기법
- 비동기 작업 끝나면 then() 안의 함수 작업해라~
<!DOCTYPE html>
<html>
    <head>
        <meta charset="utf-8">
        <title> ajax_fetch 통신 라이브러리</title>
    </head>

    <body>

        <button onclick="aaa()">get method test</button>
        <button onclick="bbb()">post method test</button>

        <hr>

        <div id="target"></div>

        <script>

            //GET 방식 연습
            function aaa(){

                var url="./getText.php?name=ROSA&msg=Good";

                //fetch 라이브러리 - promiss 기법
                //비동기 작업 끝나면 then 작업해~

                //응답객체 :response
                fetch(url).then(function(response){

                    //응답 객체가 가지고 온 응답결과를 글씨로 변환하는 작업 필요
                    return response.text(); //비동기 작업임 - 비동기 끝나면 리턴해
                    // = 으로 받으면 바로 작업해야돼서 안됨

                }).then(function(responseText){ // 리턴 된 값 받기
                    document.querySelector('#target').innerHTML= responseText;
                })

            }

            //POST 방식 연습
            function bbb(){

                var url="./postTest.php";

                var data="title=HELO&msg=sdsfd";

                //옵션 생략하면 GET 방식
                fetch(url,{
                    method : 'POST',
                    headers : {'Content-Type':'application/x-www-form-urlencoded; charset=utf-8'},
                    body : data
                }).then(function(response){
                    return response.text();
                    //return response.json(); // cf) 제이슨으로 파싱함
                }).then(function(text){
                    document.querySelector('#target').innerHTML= text;
                })

            }

        </script>

    </body>

</html>
GET.php
<?php
    header('Content-Type:text/html; charset=utf-8');

    $name = $_GET['name'];
    $msg = $_GET['msg'];

    echo "<h2>$name</h2>";
    echo "<p>$msg</p>";


?>
POST.php
<?php
    header('Content-Type:text/html; charset=utf-8');

    $title= $_POST['title'];
    $message= $_POST['msg'];

    echo "<h2>$title $message</h2>";

?>

보조기억장치