1. 프로젝트 구성
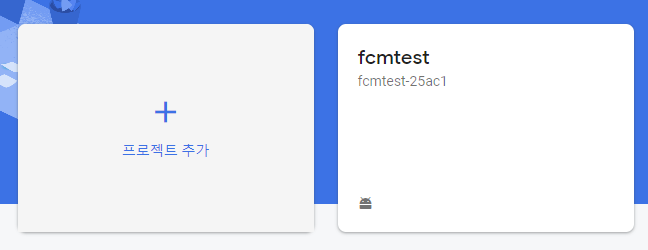
1. 파이어베이스에서 프로젝트 생성 및 안드로이드 스튜디오에 설정
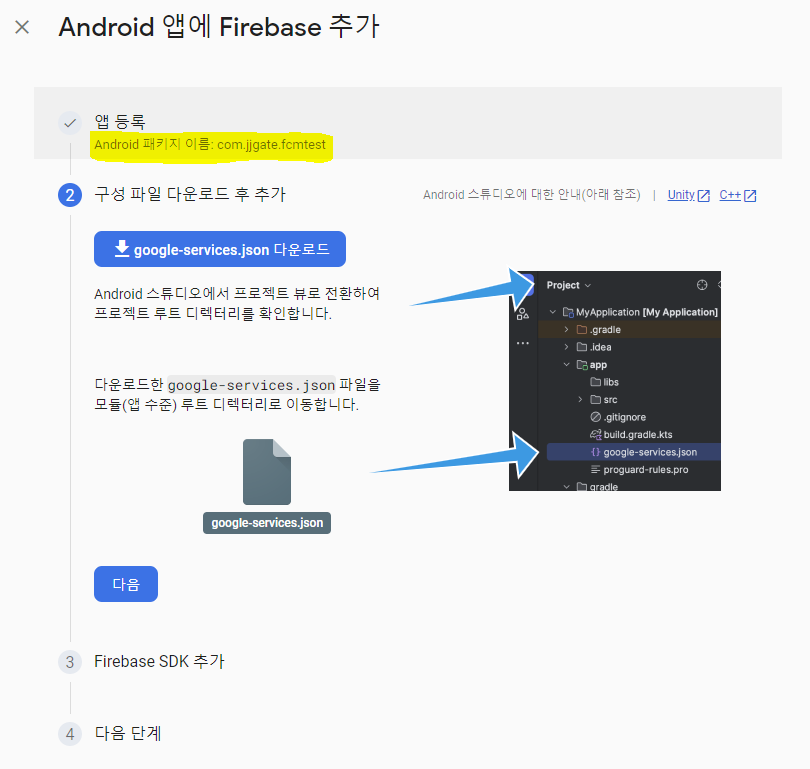
※ 패키지 이름 android studio 에서 만든 프로젝트 이름과 동일해야함
2. Firebase SDK 추가
1) 프로젝트 수준 build.gradle
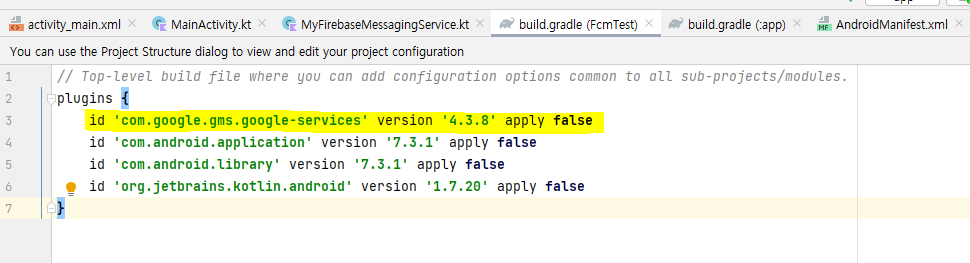
id 'com.google.gms.google-services' version '4.3.8' apply false2) 앱 수준 build.gradle

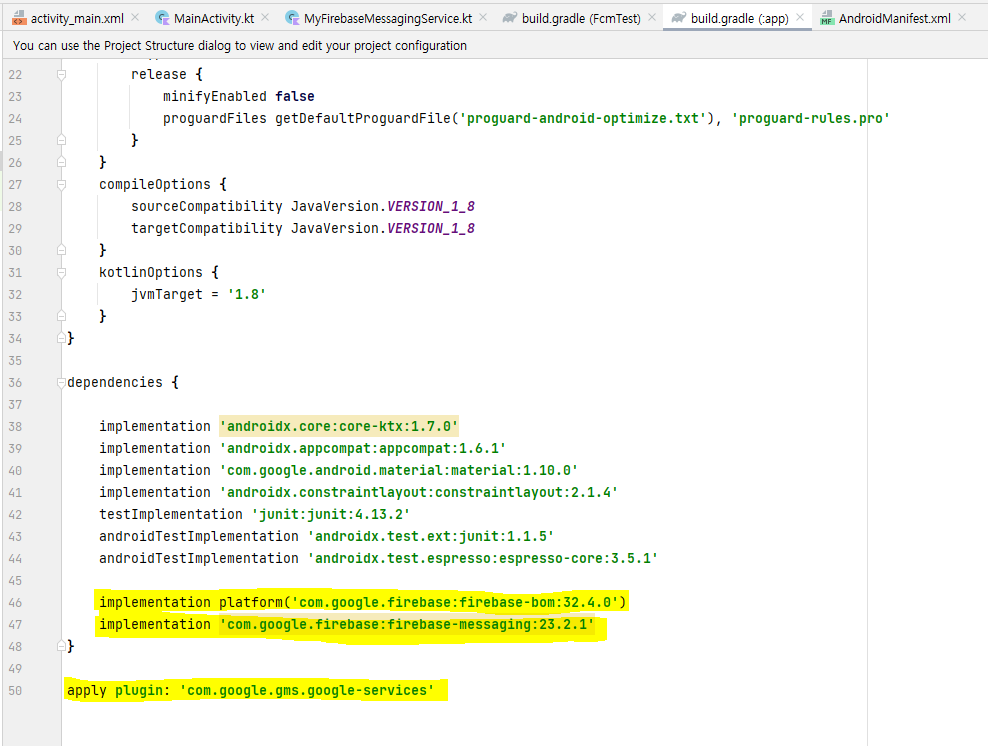
plugins {
	id 'com.google.gms.google-services'
}

dependencies {
	implementation platform('com.google.firebase:firebase-bom:32.4.0')
    implementation 'com.google.firebase:firebase-messaging:23.2.1'

}

apply plugin: 'com.google.gms.google-services'
3) FirebaseMessagingService를 상속받은 MyFirebaseMessagingService.class 작성
package com.jjgate.fcmtest

import android.R
import android.app.NotificationChannel
import android.app.NotificationManager
import android.app.PendingIntent
import android.content.Context
import android.content.Intent
import android.media.RingtoneManager
import android.net.Uri
import android.util.Log
import androidx.core.app.NotificationCompat
import com.google.firebase.messaging.FirebaseMessagingService
import com.google.firebase.messaging.RemoteMessage
import java.net.URLDecoder


class MyFirebaseMessagingService : FirebaseMessagingService() {

    override fun onNewToken(token: String) {
        Log.d("FCMLog", "Refreshed token: " + token);
        // 보통은 기기에 저장...코드 작성
    }

    override fun onMessageReceived(message: RemoteMessage) {

        // notification
        if(message.notification != null) { //포그라운드
            sendNotification(message.notification?.title!!, message.notification?.body!!);
        }

        // data
        if (message.data.isNotEmpty()) { //백그라운드
            message.data["title"]?.let { sendNotification(it, message.data["body"]!!) };
        }
    }

    // FCM 푸시 메시지를 앱에서 알림
    private fun sendNotification(title: String, body: String) {

        Log.d("FCMLog", "호출")

        val intent = Intent(this, MainActivity::class.java)
        intent.addFlags(Intent.FLAG_ACTIVITY_CLEAR_TOP)
        val pendingIntent = PendingIntent.getActivity(
            this,
            0,
            intent,
            PendingIntent.FLAG_ONE_SHOT or PendingIntent.FLAG_IMMUTABLE
        )
        val chId = "myChId"
        val chName = "myChName"
        val soundUri: Uri = RingtoneManager.getDefaultUri(RingtoneManager.TYPE_NOTIFICATION)
        val notiBuilder: NotificationCompat.Builder = NotificationCompat.Builder(this, chId)
            .setSmallIcon(R.mipmap.sym_def_app_icon)
            .setContentTitle(title)
            .setContentText(body)
            .setContentTitle(URLDecoder.decode(title, "UTF-8"))
            .setContentText(URLDecoder.decode(body, "UTF-8"))
            .setAutoCancel(true)
            .setSound(soundUri)
            .setContentIntent(pendingIntent)
        val manager = getSystemService(Context.NOTIFICATION_SERVICE) as NotificationManager
        val channel = NotificationChannel(chId, chName, NotificationManager.IMPORTANCE_HIGH)
        manager.createNotificationChannel(channel)
        manager.notify(0, notiBuilder.build())
    }

}
4) AndroidManifest.xml
인터넷 퍼미션과 작성한 FirebaseMessagingService를 상속받은 MyFirebaseMessagingService.class를 등록한다
- service는 4대 컴포넌트이기떄문에 등록해야함

<uses-permission android:name="android.permission.INTERNET"/>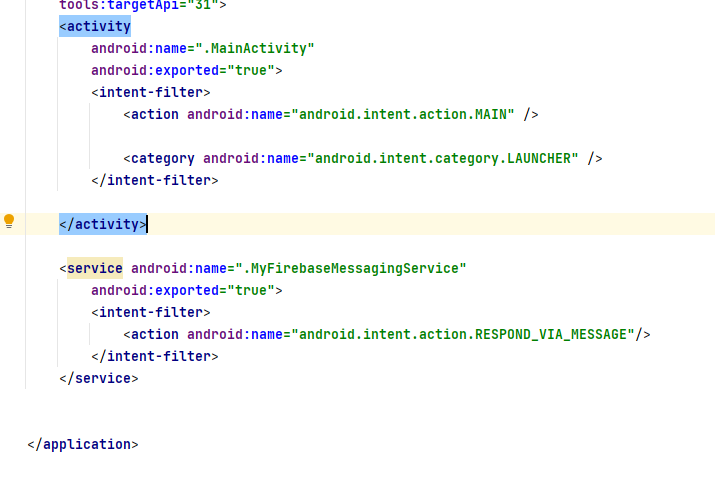
<service android:name=".MyFirebaseMessagingService"
            android:exported="true">
    <intent-filter>
        <action android:name="android.intent.action.RESPOND_VIA_MESSAGE"/>
    </intent-filter>
</service>
2. 푸시 테스트
1. 안드로이드 스튜디오에서 FCM token 얻기
package com.jjgate.fcmtest

import android.os.Bundle
import android.util.Log
import androidx.appcompat.app.AppCompatActivity
import com.google.android.gms.tasks.Task
import com.google.firebase.FirebaseApp
import com.google.firebase.messaging.FirebaseMessaging


class MainActivity : AppCompatActivity() {
    override fun onCreate(savedInstanceState: Bundle?) {
        super.onCreate(savedInstanceState)
        setContentView(R.layout.activity_main)

        // FCM SDK 초기화
        FirebaseApp.initializeApp(this);

        FirebaseMessaging.getInstance().token
            .addOnCompleteListener { task: Task<String> ->
                if (!task.isSuccessful) {
                    Log.w("FCMLog", "Fetching FCM registration token failed", task.exception)
                    return@addOnCompleteListener
                }
                val token = task.result
                Log.d("FCMLog", "Current token: $token")
            }

    }
}
2. Firebase Cloud Messaging API(V1) 사용사용하기
1) 프로젝트 개요 옆 톱니 > 프로젝트 설정 > 일반 탭 > 프로젝트ID 확인
-> 나중에 통신할 주소값에 넣어주어야함
2) Authorization에 사용 할 Access token 얻기
Google Developers에 OAuth 2.0 Playground에 접속
https://developers.google.com/oauthplayground
- 2.1) Step 1(Select & authorize APIs) > Firebase Cloud Messaging API v1 클릭 > Authorize APIs 버튼 클릭

- 2.2) Google OAuth 2.0 Playground을 사용하기 위해 권한을 얻기위한 과정 진행 (허용)
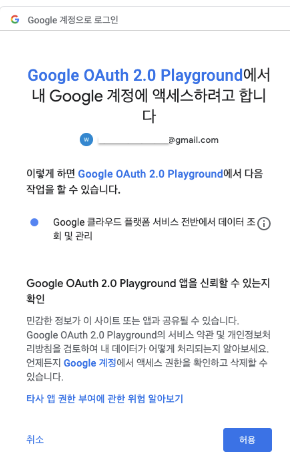
- 2.3) Step 2 (Exchange authorization code for tokens) > Exchange authorization code for tokens 버튼 클릭 > Refresh token과 Access token이 생성

3) 포스트맨에서 테스트
- 3.1) 통신은 POST 선택 후 아래 주소로 요청
https://fcm.googleapis.com/v1/projects/프로젝트ID/messages:send
※프로젝트 ID는 위 1번에서 확인 한 ID 넣어주면 됨
- 3.2) Header에 Content-Type과 Authorization 등록
Content-Type : application/json
Authorization : Bearer + 띄어쓰기 + OAuth 2.0 Playground에서 얻은 token

- 3.3) Body > taw 선택 후 아래 코드 붙여 넣기

{
    "message": {
        "token": "FCM_TOKEN", // 안드로이드 스튜디오에서 얻은 FCM token 넣기
        "notification": {
          "body": "Body of Your Notification in data",
          "title": "Title of Your Notification in data"
        }
    }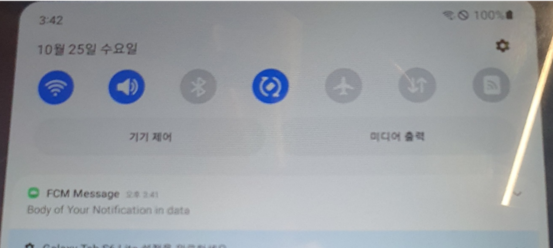
}- 3.4) send 클릭 후 알람 확인

보조기억장치