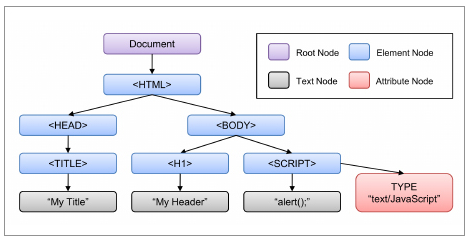
[1] DOM
HTML 문서의 계층적인 구조를 트리로 표현
도튜먼트 오브젝트 모델
-
DOM : html 웹문서안에 있는 것들을 객체로 바라보고 모델링
-
트리구조를 구성하는 것들을 노드 node 라고 부름
--> node 종류 : element node, attribute node, text node
1) DOM 제어
<!DOCTYPE html>
<html>
    <head>
        <meta charset="utf-8">
        <title>JS DOM</title>
    </head>
    <body>

        <!-- DOM : html 웹문서안에 있는 것들을 객체로 바라보고 모델링 -->
        <!-- 트리구조를 구성하는 것들을 노드 node 라고 부름 -->
        <!-- node 종류 : element node, attribute node, text node -->

        <!-- node 타입 확인하기 -->
        <p id="p1"><a href="" target="">Google</a></p>
        <script>

            // id값이 p1 인 요소 찾기
            var e= document.getElementById('p1');
            //alert( e.nodeType +" : " + e.nodeName ); // nodeType 1 : element

            //p요소의 속성
            var attrs = e.attributes;
            // alert( attrs[0].nodeType  +" : "+ attrs[0].nodeName) //2 : id
            // alert('속성값 : ' + attrs[0].value); //속성값 : p1

            // p요소의 첫번째 자식 노드 : a 요소노드
            var e= e.firstChild;
            // alert(e.nodeType +":"+e.nodeName);

            // a요소의 속성값들
            var attrs= e.attributes;
            // alert( attrs[0].nodeType+":"+attrs[0].nodeName);
            // alert( attrs[1].nodeType+":"+attrs[1].nodeName);

            // a요소의 첫번째 자식노드 : 텍스트노드
            var t= e.firstChild;
            alert(t.nodeType+":"+t.nodeName); //node type 3 : text node
            alert('텍스트 값 :' + t.data); //텍스트 값 :Google


        </script>

    </body>
</html>
2) DOM으로 요소 제어
<!DOCTYPE html>
<html>
    <head>
        <meta charset="utf-8">
        <title>JS DOM Control</title>
    </head>
    <body>

        <!-- 요소의 속성 변경 -->

        <!-- 1. img요소의 src속성변경 -->
        <img src="./image/ms18.png" alt="ms18" width="120" id="aa">

        <button onclick="changeImg()">chang img</button>

        <script>
            function changeImg(){
                document.getElementById('aa').src = "./image/ms19.png";
            }
        </script>

        <hr>

        <!-- 요소의 스타일 변경 : DOM tree 구조를 이용한 요소접근법 -->
        <p id="p1">this is paragraph</p>
        <button onclick="clickBtn(this)">스타일 변경</button>

        <script>
            function clickBtn(e){
                //클릭된 버튼의 앞 형제 요소(previousElementSibling) 찾기
                var p = e.previousElementSibling;
                p.style.color = "red"
                p.style.fontWeight= "bold";
            }
        </script>

        <!-- class속성을 이용하여 다중스타일 한방에 적용 -->
        <style>
            .kk{
                color: blue;
                font-weight: bold;
                font-style: italic;
            }
        </style>

        <button onclick="clickBtn2()">클래스 속성으로 다중 스타일 변경</button>

        <script>
            function clickBtn2() {
                document.getElementById('p1').style=""; //기존 인라인 스타일 해제
                document.getElementById('p1').className = 'kk'
            }
        </script>

        <hr>

        <!-- DOM 노드의 동적 추가 삭제 -->
        <button onclick="addText()">텍스트 추가</button>
        <button onclick="addElement()">요소 추가</button>
        <button onclick="removeNode()">자식 노드 삭제</button>

        <p id="pp"></p>

        <script>

            function addText(){
                // var node = document.createTextNode('this is text  ');
                // var node = document.createTextNode('<a href="">this is text</a>');

                // var pp = document.getElementById('pp');
                // pp.appendChild(node);

                //위 작업(텍스트 노드  추가) 간략하게하는 속성

                document.getElementById('pp').textContent += "<a href=''>this is text</a>"

            }

            function addElement(){
                //var node = document.createElement('a');

                //속성노드 추가
                // var attr = document.createAttribute('href');
                // attr.value = "https://www.google.com";
                // node.setAttributeNode(attr);

                // //텍스트 노드 생성, 추가
                // var text = document.createTextNode('Google');
                // node.appendChild(text);

                // document.getElementById('pp').appendChild(node);

                //한방에 쓰기
                document.getElementById('pp').innerHTML = "<a href=''>this is text</a>"

            }

            function removeNode(){
                var pp = document.getElementById('pp');
                pp.removeChild(pp.firstChild);
            }

        </script>

        <hr>

        <h3 id="aaa">aaa</h3>

        <button onclick="aaa()">button</button>

        <!-- JS에서 요소를 찾을 때 css 선택자 -->
        <script>

            function aaa(){
                var e = document.querySelector('#aaa'); //css 문법의 아이디 선택자 사용
                e.innerHTML = "nice"
            }

        </script>

        <hr>
        <h4>aaa</h4>
        <h4>bbb</h4>
        <h4>ccc</h4>

        <button onclick="bbb()">button</button>

        <script>
            function bbb(){
                //css선택자 중에서 여러요소가 찾아지는 선택자들.
                var es= document.querySelectorAll('h4'); //타입 선택자로 여러요소 참조-리턴은 배열
                es[0].innerHTML= "Good";
            }

            var es= document.querySelectorAll('h4');
            es[1].onclick= function(){
                alert('bbb');
            }
        </script>

    </body>
</html>
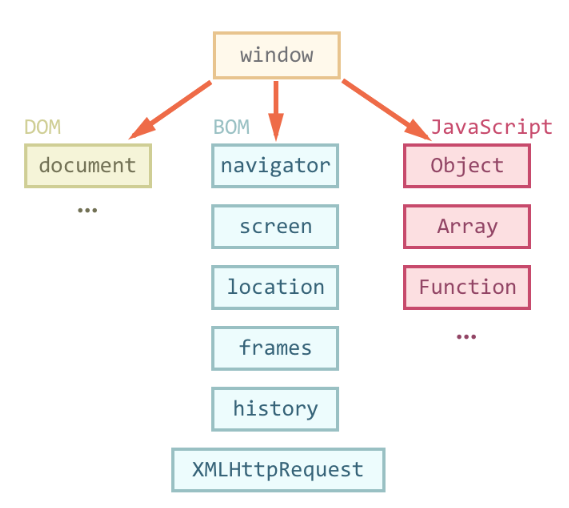
[2] BOM : 브라우저 오브젝트 모델(DOM 보다 더 큰 영역)
<!DOCTYPE html>
<html>
    <head>
        <meta charset="utf-8">
        <title>JS BOM</title>
    </head>
    <body>

        <!-- BOM - 웹 브라우저 제어 객체들을 모델링 -->
        <!-- 1. window -->
        <!-- 주요 메소드 -->

        <!-- 1) open, close : 새로운 웹문서 열기/닫기 -->
        <button onclick="aaa()">naver</button>

        <script>
            function aaa(){
                // window.open('https://www.naver.com'); //기본, _blank , 새 탭
                // window.open('https://www.naver.com','_self'); //현재 페이지 바꿀때

                // 새 창으로 열기
                window.open('https://www.naver.com', '_blank', 'width=500, height=200, left=200, top=50');
            }
        </script>

        <!-- 빈 윈도우 띄우기 -->
        <button onclick="bbb()">message window</button>
        <script>
            function bbb(){
                win= open('','','width=500, height=200, top=200'); //전역변수
                win.document.write("<h4>Hello world</h4>");
            }
        </script>

        <!-- 윈도우 닫기 -->
        <button onclick="ccc()">window close</button>
        <script>
            function ccc(){
                win.close();
            }
        </script>

        <!-- 2) moveTo, moveBy : 윈도우 창 이동 -->
        <button onclick="mmm()">move to window</button>
        <button onclick="mmm2()">move by window</button>
        <script>
            function mmm(){
                win.moveTo(300, 100); //트정 위치로 이동
                win.focus();
            }

            function mmm2(){
                win.moveBy(10, 10); //현재위치에서 10,10 만큼 이동
                win.focus();
            }

        </script>

        <hr>
        <!-- 3) setTimeout, setInterval, clearInterval -->
        <!-- 3.1) setTimeout : 한번만 동작함 -->
        <button onclick="ddd()">3초후에 경고창 띄우기</button>
        <script>
            function ddd(){
                setTimeout( function(){
                    alert('경고!!');
                },3000);
            }
        </script>

        <br>

        <!-- 3.2) setInterval : 계속해서 동작, 인터벌은 끝까지 가기 때문에  clear 필수  -->
        <input type="text" name="" id="in1" value="0" readonly>
        <button onclick="eee()">1초마다 카운트 증가</button>
        <button onclick="eee2()">카운트 종료</button>

        <script>

            var show= function(){
                var e= document.getElementById('in1');
                e.value= parseInt(e.value) + 1;
            }

            function eee(){
                id= setInterval(show,1000);
            }

            function eee2(){
                clearInterval(id);
            }

        </script>

        <br><br>

        <!-- 3) 그 밖에 유용한 메소드들 -->
        <script>
            //인터넷 주소 URL에는 특수문자나 한글은 사용불가
            //이런 문자를 URL에 넣고 싶을 때는 인코딩을 수행함
            //인코딩 함수
            var a = encodeURI('http://www.test.com/가.html');
            document.write(a + '<br>');

            var a2 = decodeURI(a);
            document.write(a2 + '<br>');

            //eval() 함수
            var x = "10+2*6";
            document.write(x + '<br>');
            document.write(eval(x) + '<br>'); //문자열을 JS의 명령어로 인식하여 해독

            //NaN : 숫자로 parseInt 가능한 것 확인
            document.write(isNaN(10) + '<br>'); //숫자이므로 false
            document.write(isNaN('10') + '<br>'); //숫자로 변환 가능해서 false
            document.write(isNaN('ㅁ1ㅁ') + '<br>'); //숫자 변경 불가 true

            //유한한 숫자인지
            document.write( isFinite(10) +"<br>" ); //true
            document.write( isFinite(10/0) +"<br>" ); //false


        </script>

        <hr>

        <!-- 2. document -->
        <!-- 원래는 window.document 로 써야하지만 window는 생략가능 -->

        <!-- 3. screen -->
        <!-- 모니터 해상도 관리 객체 -->

        <script>

            document.write(window.screen.width + " , " + window.screen.height + "<br>");
            document.write(screen.availWidth + " , " + screen.availHeight + "<br>"); //작업 표시줄 영역 제외한 사이즈

            //브라우저 창 사이즈를 알고싶다면 window 객체에게..
            document.write(innerWidth + " , " + innerHeight + "<br>"); //브라우저의 document영역 사이즈
            document.write(outerWidth + " , " + outerHeight + "<br>"); //브라우저의 전체 영역

        </script>

        <hr>

        <!-- 4. location : URL 정보 -->

        <script>

            document.write(location.href + "<br>");
            document.write(location.protocol + "<br>");
            document.write(location.pathname + "<br>");

        </script>
        <br>
        <button onclick="xxx()">location 객체 이용 새로운 문서 열기</button><br>
        <button onclick="zzz()">location 객체 이용 현재 문서 대체하여 열기</button><br>
        <button onclick="yyy()">location 객체 이용 현재 문서 다시 열기(새로고침)</button><br>

        <script>
            function xxx() {
                //location.assign('https://www.naver.com');
                location.href = "https://www.naver.com"; //이걸 더 선호
            }

            function zzz() {
                location.replace('https://www.naver.com');
            }

            function zzz() {
                location.reload()
            }
        </script>

        <hr>

        <!-- 5. histoy -->
        <script>
            document.write("방문한 페이지 수 : " + history.length+"<br>");
        </script>

        <button onclick="back()">뒤로가기</button>
        <button onclick="hhh2()">앞으로</button>
        <button onclick="hhh3()">뒤로 두칸</button>

        <script>

            function back(){
                history.back();
            }

            function hhh2(){
                history.forward();
            }

            function hhh3(){
                history.go(-2);
            }

        </script>

        <hr>

        <!-- 6. navigator : 브라우저 정보 [추후 내 위치 검색할 때 사용]-->

        <script>

            document.write( navigator.appCodeName+"<br>");
            document.write( navigator.appName+"<br>");
            document.write( navigator.appVersion+"<br>");
            document.write( navigator.platform+"<br>");
            document.write( navigator.userAgent+"<br>");

        </script>


    </body>
</html>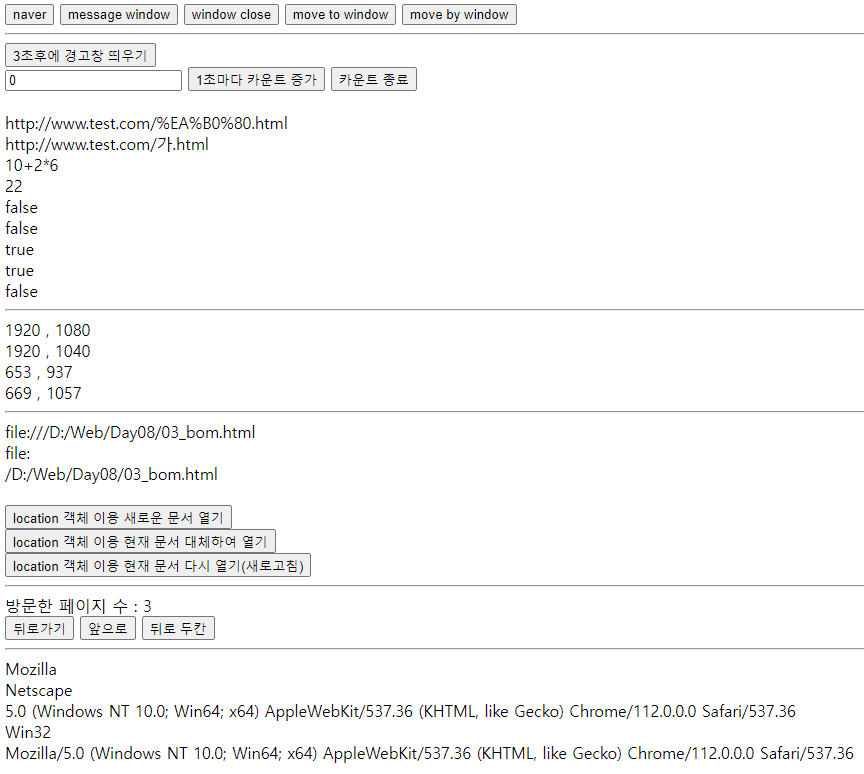
[3] 이벤트 처리
<!DOCTYPE html>
<html>
    <head>
        <meta charset="utf-8">
        <title>JS Event 처리</title>

        <script>

            //body 요소 안에 있는 h2요소 제어해보기
            document.getElementById('aa').innerHTML="Hello";

            //요소의 load가 완료되는 이벤트에 콜백함수를 지정
            //JS는 이벤트를 처리하는 방법을 3가지 제공

            //1. html에서 요소에 속성으로 이벤트 함수를 지정
            function loaded(){
                document.getElementById('aa').innerHTML="Hello";

                //2. 요소 속성을 변경했던 것처럼 이벤트 속성을 JS로 지정
                document.getElementById('aa').onclick = function(){
                    document.getElementById('aa').innerHTML += "GOOD";
                }

                //3. (권장) 요소에 이벤트리스너 추가 메소드 이용 - 다중이벤트 처리 가능
                document.getElementById('aa').addEventListener('dblclick',function(){ // 괄호안 => (어떤이벤트인지, 함수)
                    alert('더블클릭')
                });
            }


        </script>

    </head>
    <body onload="loaded()">

        <!-- 1. 이벤트 처리 연습용 [ onload 이벤트 ] -->
        <h2 id="aa"></h2>

        <hr>
        <!-- 2. 다른 이벤트들의 종류들 -->
        <!-- 2.1 input 요소의 이벤트 -->
        <input type="text" id="in1" onfocus="aaa()">
        <input type="text" id="in2" onblur="bbb()" onchange="ccc()">
        <script>
            function aaa(){
                document.getElementById('in1').value= "aa";
            }

            function bbb(){
                alert("blur"); //포커스 잃었을 때 이벤트 발생 - 그냥 눌렀다 나옴 무조건
            }

            function ccc(){
                alert("onchange"); //포커스 잃었을 때 이벤트 발생 - 글자가 바뀌었을 때 바뀜
            }
        </script>

        <br><br>

        <!-- 사용자가 값을 입력하고 필드를 벗어나면 자동으로 대문자로 변경해주는 코드 -->
        <input type="text" id="in3" onchange="changeUp()">
        <script>
            function changeUp(){
                var e= document.getElementById('in3');

                var s= e.value;
                e.value= s.toUpperCase();
            }
        </script>

        <hr>
        <!-- 2.2 mouse 이벤트 -->

        <div
            style="width:200px; height:100px; background-color: yellow;"
            onmouseover="over(this)"
            onmouseout="out(this)"
            onmousemove="move(this)"></div>

        <script>
            function over(e){
                e.style.backgroundColor="lightgreen";
                e.style.border="2px solid red";
            }

            function out(e){
                e.style.backgroundColor = "yellow";
                e.style.border="";
            }

            var n= 0;
            function move(e){
                n++;
                e.innerHTML = "move : "+ n;
            }
        </script>

        <br><br>

        <div style="width:400px; height:100px; background-color: coral;" id="kk"></div>
        <script>

            document.getElementById("kk").addEventListener('mousemove', function(event){
                //마우스 이벤트 객체가 기본 파라미터로 전달되어옴
                var s="";

                s+= "브라우저 문서안에서의 좌표 : " + event.clientX+" , " + event.clientY +"<br>";
                s+= "모니터 기준 좌표 : " + event.screenX+" , " + event.screenY +"<br>";
                s+= "요소 영역 기준 좌표 : " + event.offsetX+" , " + event.offsetY +"<br>";

                document.getElementById('kk').innerHTML= s;
            });

        </script>

        <hr>
        <!-- 2.3 keyboard 이벤트 : 별도 예제로 -->

        <hr>
    </body>
</html>
키보드 이벤트
<!DOCTYPE html>
<html>
    <head>
        <meta charset="utf-8">
        <title>JS Keyboard Event</title>

        <script>
            function keypress(){
                //키보드 이벤트는 window객체안에 event관리객체가 정보를 가지고 있음.
                var code= window.event.keyCode;

                document.getElementById('in1').value= code;
                document.getElementById('in2').value= String.fromCharCode(code);
            }
        </script>
    </head>
    <body onkeypress="keypress()">

        <input type="text" id="in1">
        <input type="text" id="in2">


    </body>
</html>

보조기억장치