웹브라우저와 멀티미디어
https://www.online-convert.com/
1. audio
사용 방법
< audio src="소스파일 경로" autoplay controls>
- Mp3 / Wav / Ogg 오디오 파일 형식
2. 비디오
사용 방법
< video src="소스파일 경로" autoplay controls>
3. iframe
다른 문서를 내 문서로 가져오는 것
앵커요소와 결합되어 자주 쓰여짐
4. div
섹션으로 분리하는 태그
<!DOCTYPE html>

<html>
    <head>
        <meta charset="utf-8">
        <title>EX</title>
    </head>

    <body>

        <!-- 오디오 -->
        <audio src="./audio/old_pop.mp3" controls="controls"></audio>

        <!-- 브라우저마자 호황되는 음원의 파일 형식이 다를 수 있음 -->
        <!-- src를 따로 줄땐 type 필수속성!!!! -->
        <audio controls>
            <source src="./audio/old_pop.mp3" type="audio/mp3">
            <source src="./audio/old_pop.ogg" type="audio/ogg">
            <source src="./audio/old_pop.wav" type="audio/wav">
        </audio>

        <hr>

        <!-- video -->
        <video src="./video/movie.ogv" controls></video>

        <!--
            poster : 썸네일 이미지
            preload : 미리 로딩 해두는 거
        -->
        <video controls width="640" height="480" poster="./img/seolak.jpg" preload="auto">
            <source src="./video/trailer.mp4" type="video/mp4">
            <source src="./video/trailer.ogv" type="video/ogg">
            <source src="./video/trailer.webm" type="video/webm">
        </video>

        <hr>

        <!-- Inline Frame 요소 -->
        <!-- 다른 html 문서 가져오는 것 -->
        <iframe src="../Day01/02_text.html" frameborder="1"></iframe>

        <!-- 다른 서버의 웹 문서도 포함 가능함 -->
        <iframe src="http://mrhisj23.dothome.co.kr/index.html" frameborder="1"></iframe>

        <!-- 하이퍼링크 요소 <a>와 <iframe>을 함꼐 사용 -->
        <!-- anchor 요소에 의해 열리는 웹문서 target을 iframe으로 지정 -->
        <!-- 아이프레임에 name을 주고 a 태그 에서 target에 아이프레임의 name을 쓴다 -->
        <iframe src="" frameborder="1" name="aaa"></iframe>
        <a href="http://www.w3c.org" target="aaa">월드 와이드 웹 공식 사이트</a>

        <hr>

        <!-- 영역 그룹 요소 : div(블럭요소) , span(인라인 요소) -->
        <div style="background-color: coral; border: 2px solid red; padding-left: 10px;">
            <h2>title</h2>
            <p>this is message</p>
        </div>

        <!-- div의 블럭요소 특징 -->
        <p>
            안녕하세요 난 <div style="color: blueviolet;">홍길동</div> 입니다
        </p>

        <!-- span 인라인요소 특징 -->
        <p>
            안녕하세요 난 <span style="color: blueviolet;">홍길동</span> 입니다
        </p>

    </body>
</html>
5. input
- 사용자의 입력을 받는 것
<!DOCTYPE html>
<html>
    <head>
        <meta charset="utf-8">
        <title>input element</title>
    </head>

    <body>

        <!-- 1. input 요소
        -한줄 입력만 가능
        -너비 넘어가면 자동 스크롤
        -->
        <input type="text" size="40"><br>
        <input type="password"><br>

        <hr>

        <!-- 2.라디오 버튼 : 하나의 그룹이 되어야만 싱글초이스가 된다 -->
        <!-- 라디오 버튼의 name 속상값을 같은 값으로 지정하면 그룹이 된다 -->
        라디오 버튼 :
        <input type="radio" name="rg"> aaa
        <input type="radio" name="rg"> bbb

        <br>

        <!-- 라벨 요소를 이용하면 글씨를 눌렀을 때도 선택이 된다 -->
        <label for="rd1">여자</label>
        <input type="radio" name="rg2" id="rd1" checked>
        <label for="rd2">남자</label>
        <input type="radio" name="rg2" id="rd2">

        <hr>

        <!-- 체크박스 - 멀티 초이스 -->
        <label><input type="checkbox">사과</label>
        <label><input type="checkbox">바나나</label>
        <label><input type="checkbox">오렌지</label>

        <hr>

        <!-- 제출 초기화 버튼 : form 요소 안에서만 기능한다-->
        <input type="submit" value="전송">
        <input type="reset">

        <hr>

        <!-- 버튼 만들기 -->
        <!-- 1. input 요소네 타입이 버튼 -->
        <input type="button" value="중복체크" onclick="alert('메세지')">
        <!-- 2. 버튼 요소 사용 -->
        <button onclick="alert('중복된 아이디 입니다')">중복체크</button>

        <hr>

        <!-- 이미지 버튼 만들기 -->
        <!-- 1. <button> 요소안에 img 요소 배치 -->
        <button><img src="./img/ms20.png" alt="ms20" width="26px" onclick="alert('클릭1')"></button>

        <!-- 2. <input>요소의 타입이 image
            원래 목적은 form 요소의 제출용
        -->
        <input type="image" src="./img/ms20.png" alt="ms20" onclick="alert('클릭2')" width="26px">

        <hr>

        <!-- 여러줄 입력 -->
        <textarea name="" id="" cols="30" rows="10"></textarea>

        <hr>

        <select name="" id="">
            <option value="">aaaa</option>
            <option value="">bbbb</option>
            <option value="">ccc</option>
        </select>

        <!-- 콤보박스 옵션 그룹 -->
        <select name="" id="">
            <optgroup label="알파벳">
                <option value="">aaaa</option>
                <option value="">bbbb</option>
                <option value="">ccc</option>
            </optgroup>

            <optgroup label="한글">
                <option value="">ㄱ</option>
                <option value="">ㄴ</option>
                <option value="">ㄷ</option>
            </optgroup>
        </select>

        <hr>

        <!-- 입력 박스 영역을 시각적으로 보여주는 요소 -->
        <fieldset>
            <legend>범례표시</legend>
            <label>이름 : <input type="text"></label>
            <label>주소 : <input type="text"></label>
        </fieldset>

    </body>
</html>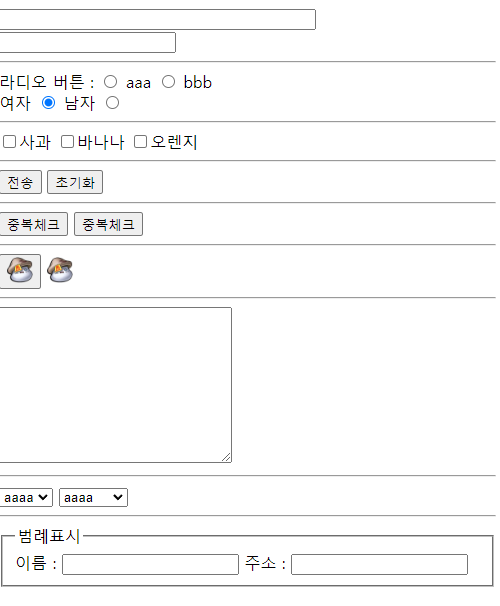
새로 생긴 input 요소들
<!DOCTYPE html>
<html>
    <head>
        <meta charset="utf-8">
        <title>새로추가된 input 속성</title>
    </head>
    <body>

        <!-- 새로이 추가된 type 들 -->
        <input type="date"> <br>
        <input type="datetime-local"> <br>
        <!-- datetime-local 써야 국가별로 맞게 나옴 -->

        <input type="month"> <br>
        <input type="week"> <br>
        <input type="time"> <br>

        <input type="color"> <br>

        <!-- email과 tel은 모바일에서 소프트 키보드 모양이 바뀜 -->
        <input type="email"> <br>
        <input type="tel"> <br>

        <input type="search"> <br>

        <input type="range" min="1" max="10" value="2" step="2"> <br>

        <input type="number" min="-1" max="10" value="-1"> <br>

        <hr>

        <!-- 새로 추가된 속성 -->

        <form>

            <!-- 힌트 -->
            <input type="text" placeholder="힌트"> <br>

            <!-- 반드시 입력해야하는 요소 [필수 입력] -->
            <input type="text" required> <br>

            <!-- 읽기 전용 -->
            <input type="text" readonly value="아이디"> <br>

            <!-- 자동 포커싱 : 페이지 로드하면 자동 포커스 -->
            <input type="text" autofocus> <br>

            <!-- 글자수 제한 -->
            <input type="text" maxlength="5"> <br>

            <!-- 자동완성 기능 : <datalist> 와 함께 써야함 -->
            <input type="text" autocomplete list="datas"> <br>

            <datalist id="datas">
                <option value="canada"></option>
                <option value="china"></option>
                <option value="korea"></option>
            </datalist>

        </form>

    </body>
</html>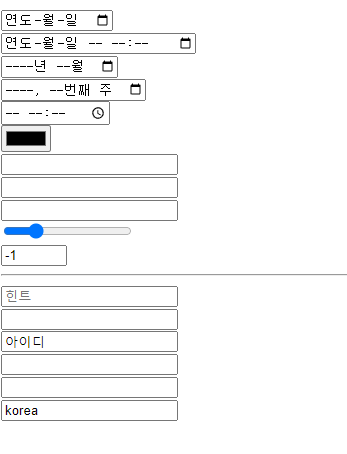
6. form
- 양식을 서버로 보내주는 것
<!DOCTYPE html>
<html>
    <head>
        <meta charset="utf-8">
        <title>폼</title>
    </head>

    <body>
        <!-- form요소
        anchor 처럼 다른 문서를 실행하지만 데이터를 전달 할 수 있고
        이동을 위한 별도의 input요소가 필요함
        -->

        <!-- HTTP Request 프로토콜의 2가지 요청 방식 [GET, POST]  PUT, DELETE 까지 하면 RestFull-->

        <!-- 1. GET방식
            특수문자 한글 못 감

            action : 실행할 것
            name : 서버에 보낼 데이터를 구별하는 식별자 키값
        -->
        <form action="./getTest.php" method="get">
            <input type="text" name="title" placeholder="제목">
            <input type="text" name="msg" placeholder="메세지">

            <input type="submit" >
        </form>

        <br>

        <!-- 2. post Method -->
        <form action="./postTest.php" method="post">
            <fieldset>
                <legend>POST 방식 HTTP</legend>

                <label for="in1">이름 : </label>
                <input type="text" name="name" id="in1"><br>

                <label>password : <input type="password" name="pw"></label><br>

                <p>
                    gender :
                    <label><input type="radio" name="rg" value="female" checked>여자</label>
                    <label><input type="radio" name="rg" value="male">남자</label>
                    <!-- 라디오는 value 속성값이 서버에 보내질 값임 -->
                </p>

                <p>
                    fruits :
                    <label><input type="checkbox" name="fruits[]" value="apple" checked> 사과</label>
                    <label><input type="checkbox" name="fruits[]" value="banana" checked> 바나나</label>
                    <label><input type="checkbox" name="fruits[]" value="orange"> 오렌지</label>
                    <!-- 멀티플은 배열 보내야 해야함-->
                </p>

                <p>
                    message :
                    <textarea name="msg" cols="40" rows="5"></textarea>
                </p>

                <p>
                    <select name="brand">
                        <optgroup label="자동차 브랜드">
                            <option value="현대">현대</option>
                            <option value="기아">기아</option>
                            <option value="쌍용">쌍용</option>
                        </optgroup>
                    </select>
                </p>

                <!-- 화면에 보이지는 않지만 서버에 데이터 보내고 싶을 때 사용하는 것 -->
                <input type="hidden" name="id" value="13">

                <div>
                    <input type="submit">
                    <input type="reset">
                </div>

            </fieldset>
        </form>

    </body>

</html>
<?php
header("Content-Type:text/html; charset=utf-8"); //응답에 대한 설정
//1. 사용자로부터(form요소) POST방식으로 전달된 데이터 받기
$name = $_POST['name'];
$password = $_POST['pw'];
$gender = $_POST['rg'];
$msg = $_POST['msg'] ;
$brand = $_POST['brand'];
$id = $_POST['id'];
//메세지가 여러줄 일 때 줄바꿈 문자 \n을 브라우저에서는 <br> 태그로 변경하는 함수 있음
// nl2br() : line to br 이라는 뜻
// str_replace("a","b") : replace 도 있음
$msg = nl2br($msg);
//php에서는 멤버접근법은 ' -> ' 로 한다
//잘 받았는지 확인 - 사용자에게 응답(Response)
echo "<h2>$name</h2>";
echo "<p>$password</p>";
echo "<p>$gender</p>";
echo "<p>$msg</p>";
echo "<p>$brand</p>";
echo "<p>$id</p>";
//멀티 초이스로 선택한 값들을 배열로 전달받기에 반복문으로 값 에코
$fruits = $_POST['fruits'];
//개수 찾기 - php에는 size 이딴 거 없음 count함수로 찾아줘야함
$count = count($fruits);
for($i=0; $i<$count; $i++){
echo "$fruits[$i], ";
}
?>7. 파일 보내기
파일 하나 보내기와 여러개 보내기 방법
<!DOCTYPE html>
<html>
    <head>
        <meta charset="utf-8">
        <title>폼2</title>
    </head>
    <body>

        <!-- 파일전송 -->
        <form action="./file.php" method="post" enctype="multipart/form-data">
            <input type="file" name="aaa" accept="image/png">
            <input type="submit" value="전송">
        </form>

        <hr>

        <!-- 여러개 파일 전송 -->
        <!-- 배열로 보냄 -->
        <form action="./file2.php" method="post" enctype="multipart/form-data">
            <input type="file" name="bbb[]" accept="image/png" multiple>
            <input type="image" src="./img/ms20.png" width="26">
        </form>

    </body>
</html>
php에서 파일 받는 방법
1. 파일 하나 전송
<?php
header('Content-Type:text/html; charset=utf-8');
//파일은 5개의 정보가 저장되어 있음
//1.파일명 2.타입 3.사이즈
//4.임시저장소 위치정보(이미지 실체가 담겨져 있는 곳)
//5.혹시 전송중 에러 있다면 에러정보
//사용자로부터 전달받은 파일의 실제 데이터는 임시저장소에 두고
//이 php에는 파일 정보만 전달됨
//1.파일정보 배열 받기
$file = $_FILES['aaa'];
//2. 값 정보 - 파일 5개 정보 식별자 이름은 정해져 있음
$srcName = $file['name']; //원본 파일명
$type = $file['type']; //파일 타입
$size = $file['size']; //크기
$tmpName = $file['tmp_name']; //임시 정장소 위치
$error = $file['error']; //에러정보
//2. 5개 정보 잘 받았는지 응답
echo $srcName . "<br>";
echo $type . "<br>";
echo $size . "<br>";
echo $tmpName . "<br>";
echo $error . "<br>";
//임시정장소에 있는 파일을 영구 저장소로 이동
$dstName = "./img/" . date('YmdHis').$srcName;
move_uploaded_file($tmpName, $dstName); //임시저장소에서 목적지로 이동
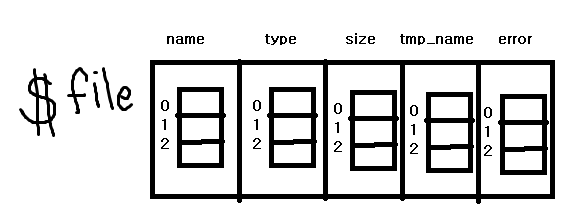
?>2.파일 다중 전송
php 에서 다중파일은 아래 그림같이 담긴다
요소안에 배열로 담김!
따리서 0번째 거 꺼낼 때 $srcName= $file['name'][0]; 이렇게 접근
<?php
    header('Content-Type:text/html; charset=utf-8');

    //파일은 5개의 정보가 저장되어 있음
    //1.파일명 2.타입 3.사이즈
    //4.임시저장소 위치정보(이미지 실체가 담겨져 있는 곳)
    //5.혹시 전송중 에러 있다면 에러정보


    //사용자로부터 전달받은 파일의 실제 데이터는 임시저장소에 두고
    //이 php에는 파일 정보만 전달됨

    //1.여러개 파일정보 배열 받기
    $file = $_FILES['bbb'];

    //2. 전송된 파일 개수 알아내기
    //$fileNum = count($file); //이렇게 하면 file요소 5개인 5가 나옴
    $fileNum = count($file['name']); //file 요소 중 하나라도 잡아서 실제 파일 개수 알아내기

    //3.반복문
    for($i=0; $i<$fileNum; $i++){
        $srcName= $file['name'][$i];
        $size   = $file['size'][$i];
        $tmpName= $file['tmp_name'][$i];

        //잘 받았는지 echo
        echo "$srcName <br>";
        echo "$size <br>";
        echo "$tmpName <br>";

        //임시저장소 파일들 이동
        $dstName= "./img/" . date('YmdHis') . $srcName;
        $result= move_uploaded_file($tmpName, $dstName);
        if($result) echo "upload success";
        else echo "upload fail";

        echo "=========================<br>";
    }

?>
보조기억장치
잘 보고 갑니다!