
Spring의 @Value Annotation이 작성된 값이 처리되는 방식과 시기에 대해서 알아보자.
포스트를 작성하게된 계기는...
springboot-basic 데브코스 과제를 진행하면서 @Value Annotation을 활용해서 프로퍼티에서 파일 이름을 전달받아 파일 읽기, 쓰기를 구현하고자 해서 아래와 같이 코드를 작성했다.
@Slf4j
@Profile("default")
@Repository
public class VoucherFileRepository implements VoucherRepository {

    private final String FOLDER_PATH = System.getProperty("user.dir") + File.separator + "data";
    private final String filePath;

    @Value("${repository.voucher.fileName}")
    private String fileName;

    public VoucherFileRepository() {
        this.filePath = FOLDER_PATH + File.separator + fileName + ".ser";
    }
    ...
}
위와 같이 생성자를 작성한 이후 파일 읽기를 수행하니 FileNotFoundException이 발생했다. 왜?

로그를 살펴보니 fileName이 null이다. 어라? 난 분명 @Value로 프로퍼티 경로를 정확하게 넣어줬는데??
이를 해결하고자 @Value Annotation의 동작방식에 대해서 자세히 알아보고자 한다.
@Value
기본적으로 Spring 에서 제공하는 @Value에 대한 doc는 다음과 같다.
Annotation used at the field or method/constructor parameter level that indicates a default value expression for the annotated element.
Typically used for expression-driven or property-driven dependency injection. Also supported for dynamic resolution of handler method arguments — for example, in Spring MVC.
A common use case is to inject values using #{systemProperties.myProp} style SpEL (Spring Expression Language) expressions. Alternatively, values may be injected using ${my.app.myProp} style property placeholders.
Note that actual processing of the @Value annotation is performed by a BeanPostProcessor which in turn means that you cannot use @Value within BeanPostProcessor or BeanFactoryPostProcessor types. Please consult the javadoc for the AutowiredAnnotationBeanPostProcessor class (which, by default, checks for the presence of this annotation).
정리해보자면 @Value Annotation은 클래스의 필드나, 메소드/생성자의 파라미터 단계에서 요소의 기본값을 나타내주는데. 실제 처리는 BeanPostProcessor에 의해 수행된다.
당연하게 Bean을 생성하는 단계에서 자동으로 처리가 될것이라고 생각했는데 갑자기 BeanPostProcessor라는 클래스에 의해서 @Value Annotation이 처리된다고 한다.
그렇다면 BeanPostProcessor가 @Value를 어떻게 처리하길래 null이 반환됬던 것일까?
BeanPostProcessor의 @Value 처리방식
Spring Docs의 Customizing Beans by Using a BeanPostProcessor 문서를 살펴보면 아래와 같은 노트를 볼 수 있다.
BeanPostProcessorinstances operate on bean (or object) instances. That is, the Spring IoC container instantiates a bean instance and thenBeanPostProcessorinstances do their work.
BeanPostProcessorinstances are scoped per-container. This is relevant only if you use container hierarchies. If you define aBeanPostProcessorin one container, it post-processes only the beans in that container. In other words, beans that are defined in one container are not post-processed by aBeanPostProcessordefined in another container, even if both containers are part of the same hierarchy.
To change the actual bean definition (that is, the blueprint that defines the bean), you instead need to use aBeanFactoryPostProcessor, as described in Customizing Configuration Metadata with aBeanFactoryPostProcessor.
첫 문장을 보면 Spring IoC 컨테이너는 Bean 인스턴스를 인스턴스화한 다음 BeanPostProcessor 인스턴스가 동작한다고 설명하고있다.
왜 @Value Annotation을 활용했음에도 null이 반환되었는지에 대한 해답이 적혀있었다.
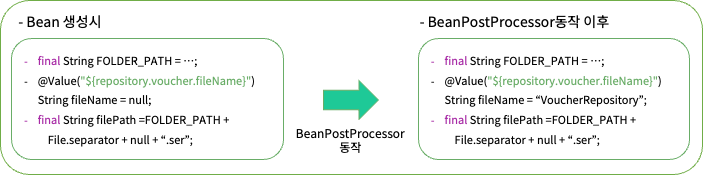
그림과 같이 Bean이 이미 인스턴스화 된 이후 BeanPostProcessor가 작동이 되기에 null이 반환되었던 것이다!
@Value 올바르게 사용하기
원인을 파악했으니 올바르게 코드를 수정해보자.
- 생성자에 파라미터에
@Value활용하기
생성자의 파라미터에@ValueAnnotation을 활용해서 값을 주입할 수 있다.
@Slf4j
@Profile("default")
@Repository
public class VoucherFileRepository implements VoucherRepository {
	private final String FOLDER_PATH = System.getProperty("user.dir") + File.separator + "data";
    private final String filePath;
    private String fileName;

    public VoucherFileRepository(@Value("${repository.voucher.fileName}") String fileName) {
    	this.fileName = fileName;
        this.filePath = FOLDER_PATH + File.separator + fileName + ".ser";
    }
	...
}@PostConstruct활용하기
@PostConstruct를 활용한 메소드 작성하여BeanPostProcessor동작 이후filePath에 값이 저장되도록 할 수 있다.
@Slf4j
@Profile("default")
@Repository
public class VoucherFileRepository implements VoucherRepository {

    private final String FOLDER_PATH = System.getProperty("user.dir") + File.separator + "data";
    private String filePath;

    @Value("${repository.voucher.fileName}")
    private String fileName;

    @PostConstruct
    private void init() {
        this.filePath = FOLDER_PATH + File.separator + fileName + ".ser";
        File file = new File(FOLDER_PATH);
        if (!file.exists()) {
            file.mkdir();
        }
    }
    ...
}
두가지 방법중 두번째 방법을 사용하여 코드를 수정했다. @Value사용을 위해서 fileName을 파라미터로 받는 생성자를 따로 만드는 것은 불필요한 생성자를 만드는 과정이라고 생각했기 때문이다. 혹시 나중에 테스트용도로 fileName을 받게 된다면 첫번째 방법으로 수정해야하지 않을까?
결론
Spring은 Bean을 생성하는 과정에서 필드의 @Value 값을 처리하지 않는다.
생성자의 파라미터로 @Value가 사용된 경우 값을 처리 후 인스턴스화 되지만 필드의 경우는 BeanPostProcessor가 인스턴스화 된 Bean에서 @Value를 처리한다.
Spring의 Bean 생성방식이나 관리방식에 대해서 공부를 더 해보자!