
이제 실제로 Spring 프로젝트에서 분산락을 구현하는 방법에 대해 스터디한 내용을 정리해보겠습니다.
프로젝트 내 사용할 의존성
MAVEN
<!-- pom.xml -->
<dependencies>
    <!-- Spring Data Redis -->
    <dependency>
        <groupId>org.springframework.boot</groupId>
        <artifactId>spring-boot-starter-data-redis</artifactId>
    </dependency>

    <!-- Redisson (분산락 라이브러리) -->
    <dependency>
        <groupId>org.redisson</groupId>
        <artifactId>redisson-spring-boot-starter</artifactId>
        <version>3.25.0</version>
    </dependency>
</dependencies>
GRADLE
// build.gradle
dependencies {
    implementation 'org.springframework.boot:spring-boot-starter-data-redis'
    implementation 'org.redisson:redisson-spring-boot-starter:3.25.0'
}
프로젝트에서 필요한 의존성은 총 두 가지입니다.
하나는 Spring Data Redis이고 다른 하나는 Redisson입니다.
그리고 기본적으로 Redis를 설정해야겠지요. 다음은 Redis 설정 환경입니다.
# application.yml
spring:
    redis:
        host: localhost # Redis 서버 주소 (로컬 개발 시 localhost)
        port: 6379 # Redis 기본 포트
        # password: your-password  # 운영 환경에서는 비밀번호 설정 권장
        timeout: 3000 # 연결 타임아웃 (3초) - 3초 안에 연결 안되면 실패
        lettuce: # Lettuce: Spring에서 Redis 연결에 사용하는 클라이언트
            pool:
                max-active: 10 # 최대 동시 연결 수 (10개 요청까지 동시 처리)
                max-idle: 5 # 유휴 상태로 유지할 최대 연결 수
                min-idle: 1 # 항상 유지할 최소 연결 수
분산락 구현(Spring Data Redis)
이번에는 Spring Data Redis를 활용하여 분산락 관리 클래스를 직접 만들어보겠습니다.
이 클래스에선 락 획득, 락 해제, 재시도 로직을 모두 포함하고있습니다.
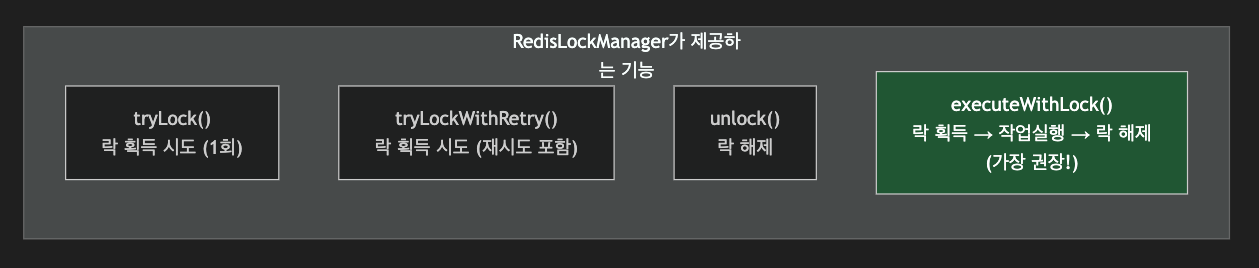
이제 RedisLockManager 클래스를 만들어보도록 하겠습니다.
package com.example.lock;

import lombok.RequiredArgsConstructor;
import lombok.extern.slf4j.Slf4j;
import org.springframework.data.redis.core.StringRedisTemplate;
import org.springframework.data.redis.core.script.DefaultRedisScript;
import org.springframework.stereotype.Component;

import java.time.Duration;
import java.util.Collections;
import java.util.UUID;
import java.util.concurrent.TimeUnit;
import java.util.function.Supplier;

/**
 * Redis를 이용한 분산락 관리 클래스
 *
 * 이 클래스는 여러 서버에서 동시에 같은 자원에 접근하는 것을 방지합니다.
 */
@Slf4j
@Component
@RequiredArgsConstructor
public class RedisLockManager {

    private final StringRedisTemplate redisTemplate;

    // 락 해제를 위한 Lua 스크립트
    // 자신이 설정한 값과 일치할 때만 삭제 (원자적 연산)
    private static final String UNLOCK_SCRIPT =
        "if redis.call('get', KEYS[1]) == ARGV[1] then " +
        "    return redis.call('del', KEYS[1]) " +
        "else " +
        "    return 0 " +
        "end";

    /**
     * 락을 획득합니다.
     *
     * @param lockKey   락을 식별하는 키
     * @param ttlSeconds 락의 유효 시간(초)
     * @return 락 획득 성공 시 락 값(UUID), 실패 시 null
     */
    public String tryLock(String lockKey, long ttlSeconds) {
        // 각 락 시도마다 고유한 UUID 생성
        String lockValue = UUID.randomUUID().toString();

        // SET NX EX 명령 실행
        Boolean success = redisTemplate.opsForValue()
            .setIfAbsent(lockKey, lockValue, Duration.ofSeconds(ttlSeconds));

        if (Boolean.TRUE.equals(success)) {
            log.debug("락 획득 성공: key={}, value={}", lockKey, lockValue);
            return lockValue;
        }

        log.debug("락 획득 실패: key={} (이미 사용 중)", lockKey);
        return null;
    }

    /**
     * 재시도를 포함한 락 획득
     *
     * @param lockKey      락을 식별하는 키
     * @param ttlSeconds   락의 유효 시간(초)
     * @param waitSeconds  락 획득을 위해 대기하는 최대 시간(초)
     * @param retryIntervalMs 재시도 간격(밀리초)
     * @return 락 획득 성공 시 락 값(UUID), 실패 시 null
     */
    public String tryLockWithRetry(
            String lockKey,
            long ttlSeconds,
            long waitSeconds,
            long retryIntervalMs) {

        long startTime = System.currentTimeMillis();
        long waitMillis = waitSeconds * 1000;

        while (System.currentTimeMillis() - startTime < waitMillis) {
            String lockValue = tryLock(lockKey, ttlSeconds);

            if (lockValue != null) {
                return lockValue;  // 락 획득 성공
            }

            try {
                // 재시도 전 대기
                Thread.sleep(retryIntervalMs);
            } catch (InterruptedException e) {
                Thread.currentThread().interrupt();
                return null;
            }
        }

        log.warn("락 획득 타임아웃: key={}, waitSeconds={}", lockKey, waitSeconds);
        return null;  // 대기 시간 초과
    }

    /**
     * 락을 해제합니다.
     *
     * @param lockKey   락을 식별하는 키
     * @param lockValue 락 획득 시 받은 값 (UUID)
     * @return 해제 성공 여부
     */
    public boolean unlock(String lockKey, String lockValue) {
        DefaultRedisScript<Long> script = new DefaultRedisScript<>();
        script.setScriptText(UNLOCK_SCRIPT);
        script.setResultType(Long.class);

        Long result = redisTemplate.execute(
            script,
            Collections.singletonList(lockKey),
            lockValue
        );

        boolean success = result != null && result == 1L;

        if (success) {
            log.debug("락 해제 성공: key={}", lockKey);
        } else {
            log.warn("락 해제 실패: key={} (이미 만료되었거나 다른 소유자)", lockKey);
        }

        return success;
    }

    /**
     * 락을 획득하고, 작업 실행 후, 자동으로 락을 해제합니다.
     * 가장 권장되는 사용 방법입니다!
     *
     * @param lockKey    락을 식별하는 키
     * @param ttlSeconds 락의 유효 시간(초)
     * @param task       락 획득 후 실행할 작업
     * @return 작업 결과
     * @throws LockAcquisitionException 락 획득 실패 시
     */
    public <T> T executeWithLock(
            String lockKey,
            long ttlSeconds,
            Supplier<T> task) {

        String lockValue = tryLock(lockKey, ttlSeconds);

        if (lockValue == null) {
            throw new LockAcquisitionException(
                "락 획득에 실패했습니다: " + lockKey
            );
        }

        try {
            return task.get();  // 비즈니스 로직 실행
        } finally {
            unlock(lockKey, lockValue);  // 항상 락 해제
        }
    }

    /**
     * 재시도를 포함하여 락을 획득하고, 작업 실행 후, 자동으로 락을 해제합니다.
     */
    public <T> T executeWithLockAndRetry(
            String lockKey,
            long ttlSeconds,
            long waitSeconds,
            long retryIntervalMs,
            Supplier<T> task) {

        String lockValue = tryLockWithRetry(
            lockKey, ttlSeconds, waitSeconds, retryIntervalMs
        );

        if (lockValue == null) {
            throw new LockAcquisitionException(
                "락 획득 타임아웃: " + lockKey
            );
        }

        try {
            return task.get();
        } finally {
            unlock(lockKey, lockValue);
        }
    }
}
그 다음은 락 획득 실패에서 발생할 수 있는 예외들을 정의합니다.
package com.example.lock;
/**
* 분산락 획득 실패 시 발생하는 예외
*/
public class LockAcquisitionException extends RuntimeException {
public LockAcquisitionException(String message) {
super(message);
}
public LockAcquisitionException(String message, Throwable cause) {
super(message, cause);
}
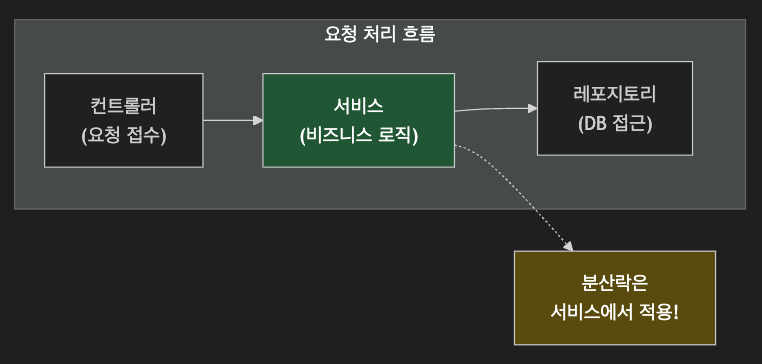
}그럼 위에 구현한 RedisLockManager를 실제 활용하는 서비스 레이어 샘플 코드를 보도록 하겠습니다.
여기에서 분산락을 사용하는 방법은 2가지가 있습니다.
하나는 executeWithLock() 메소드를 활용하여 락을 획득, 사용, 해제하거니, try-finally 블록을 활용해 직접 컨트롤 할 수도 있습니다.
package com.example.service;

import com.example.lock.RedisLockManager;
import lombok.RequiredArgsConstructor;
import lombok.extern.slf4j.Slf4j;
import org.springframework.stereotype.Service;
import org.springframework.transaction.annotation.Transactional;

@Slf4j
@Service
@RequiredArgsConstructor
public class PointService {

    private final RedisLockManager lockManager;
    private final PointRepository pointRepository;

    private static final long LOCK_TTL_SECONDS = 10;
    private static final long LOCK_WAIT_SECONDS = 5;
    private static final long RETRY_INTERVAL_MS = 100;

    /**
     * 포인트 차감 (분산락 적용)
     */
    public void deductPoints(Long userId, int amount) {
        String lockKey = "user:" + userId + ":point:lock";

        // 방법 1: executeWithLock 사용 (권장)
        lockManager.executeWithLockAndRetry(
            lockKey,
            LOCK_TTL_SECONDS,
            LOCK_WAIT_SECONDS,
            RETRY_INTERVAL_MS,
            () -> {
                deductPointsInternal(userId, amount);
                return null;
            }
        );
    }

    /**
     * 포인트 차감 - 내부 로직
     * 이 메서드는 락이 보장된 상태에서만 호출되어야 합니다.
     */
    @Transactional
    protected void deductPointsInternal(Long userId, int amount) {
        // 1. 현재 포인트 조회
        Point point = pointRepository.findByUserId(userId)
            .orElseThrow(() -> new PointNotFoundException(userId));

        // 2. 잔액 확인
        if (point.getAmount() < amount) {
            throw new InsufficientBalanceException(
                "잔액 부족: 현재 " + point.getAmount() + ", 필요 " + amount
            );
        }

        // 3. 포인트 차감
        point.deduct(amount);
        pointRepository.save(point);

        log.info("포인트 차감 완료: userId={}, amount={}, 잔액={}",
            userId, amount, point.getAmount());
    }

    /**
     * 방법 2: try-finally를 직접 사용하는 방식
     */
    public void deductPointsManual(Long userId, int amount) {
        String lockKey = "user:" + userId + ":point:lock";
        String lockValue = null;

        try {
            // 락 획득
            lockValue = lockManager.tryLockWithRetry(
                lockKey,
                LOCK_TTL_SECONDS,
                LOCK_WAIT_SECONDS,
                RETRY_INTERVAL_MS
            );

            if (lockValue == null) {
                throw new RuntimeException("락 획득 실패");
            }

            // 비즈니스 로직 실행
            deductPointsInternal(userId, amount);

        } finally {
            // 반드시 락 해제
            if (lockValue != null) {
                lockManager.unlock(lockKey, lockValue);
            }
        }
    }
}
공부하고 기록하고 공유하는 개발자 팀(Tim) 입니다. 늘끄적입니다.