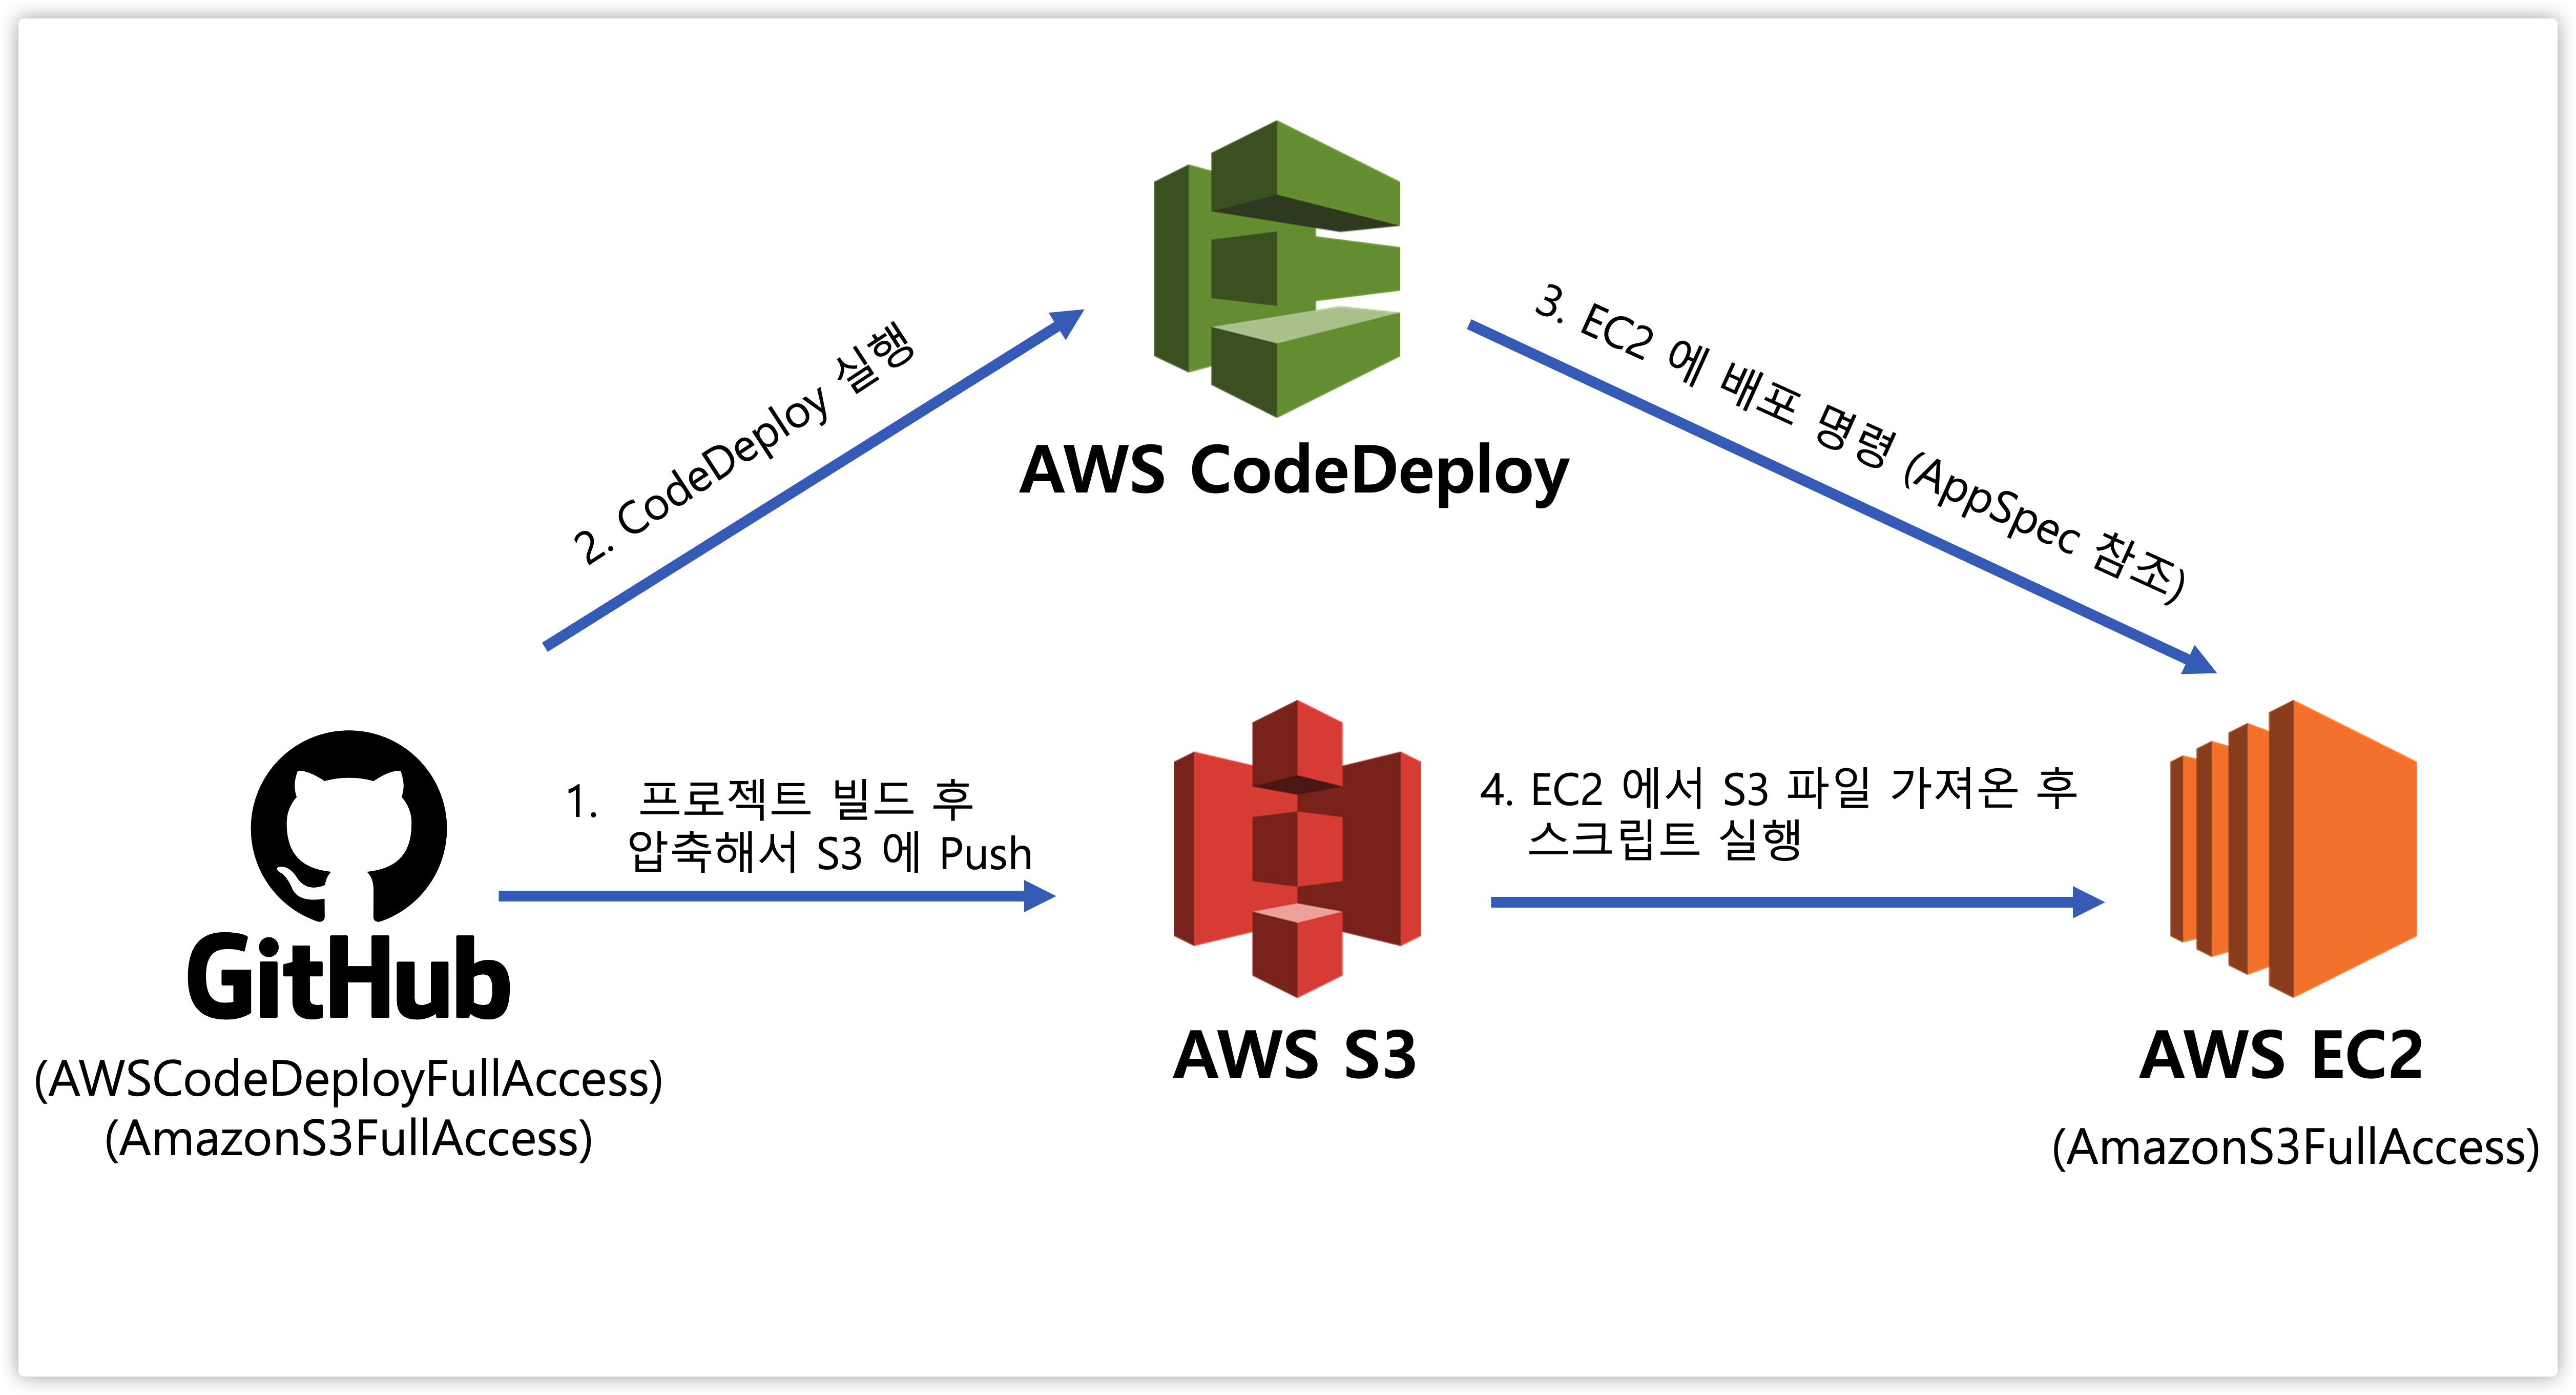
여러 블로그들을 참고하면서, 막혔던 부분들에 대해 정리를 하고자 한다.
전체적인 설정방식은 아래 블로그를 참고하였다.
https://bcp0109.tistory.com/363
https://be-developer.tistory.com/51
CodeDeploy Agent 설치에러
먼저 Ubuntu버전에 따라 사용되는 명령어가 다르다 이는 https://docs.aws.amazon.com/ko_kr/codedeploy/latest/userguide/codedeploy-agent-operations-install-ubuntu.html를 참고하면 된다.
Ubuntu22.04버전에 설치를 하고자 하는데
$ sudo apt update
$ sudo apt install ruby-full
$ sudo apt install wget
$ cd /home/ubuntu
$ wget https://aws-codedeploy-ap-northeast-2.s3.ap-northeast-2.amazonaws.com/latest/install
$ chmod +x ./install
$ sudo ./install auto > /tmp/logfile
$ sudo service codedeploy-agent status
위 설정대로 설치를 하게되면 sudo apt install ruby-full에서 ruby 최신버전인 3.0x가 설치가 된다. 그 후 진행을 하게 되면 현재 설치된 Ruby 3.0x버전은 호환되지 않는 버전이다. Ruby 2.xx대로 설치를 해줘야 한다 라는 경고가 뜨면서 설치가 되지 않는다.
이럴 경우 1) Ruby 버전을 2점대로 설치하거나 2) 루비 3.0에 맞춰서 직접 CodeDeploy를 설치를 해줘야 하는데 난 2번을 선택했다.
# Ubuntu 22.04에서의 CodeDeploy 설치

sudo apt-get update
sudo apt-get install ruby-full ruby-webrick wget -y
cd /tmp

wget wget https://aws-codedeploy-ap-northeast-2.s3.amazonaws.com/releases/codedeploy-agent_1.3.2-1902_all.deb
#가장 최신버전의 CodeDeploy를 찾아서 설치했으나, 원하는 버전이 있다면 해당 버전으로 설치해도 무방함

mkdir codedeploy-agent_1.3.2-1902_ubuntu22 #폴더명은 자율
dpkg-deb -R codedeploy-agent_1.3.2-1902_all.deb codedeploy-agent_1.3.2-1902_ubuntu22
sed 's/Depends:.*/Depends:ruby3.0/' -i ./codedeploy-agent_1.3.2-1902_ubuntu22/DEBIAN/control
dpkg-deb -b codedeploy-agent_1.3.2-1902_ubuntu22/
sudo dpkg -i codedeploy-agent_1.3.2-1902_ubuntu22.deb
systemctl list-units --type=service | grep codedeploy

sudo service codedeploy-agent status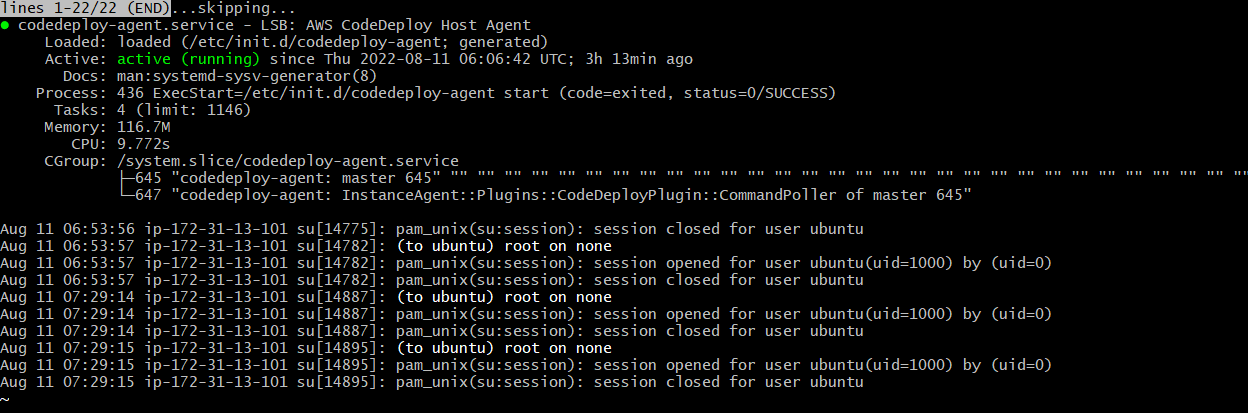
이런식으로 상태가 잘 뜬다.
참고 : https://ssue95.tistory.com/31
S3 에러
배포 외에 이미지 저장도 같이 S3를 활용 했는데 그럴 때마다 아래와 같은 에러가 떴다.
com.amazonaws.services.s3.model.AmazonS3Exception: Access Denied (Service: Amazon S3; Status Code: 403; Error Code: AccessDenied; Request ID: 4KZWCNR14D8SQM30; S3 Extended Request ID: Gn0N0WR2kPHLKq5wejD9HlJkvoVXtSj7UUr3FrV/HYNBek+XKJnQFrTuc8pv+ls7ZhWlE5MG29czckRdf/rSWQ==; Proxy: null)
해결 :

기본 설정은 ACL비활성화를 함으로써 다른 접근도 허용으로 바꿔준다.
IAM 계정 설정
IAM의 사용자 정보를 Github에 올리게 될 떄 .properties같은 설정 파일에 그대로 올리면 AWS 보안정책떄문에 경고메일 + 계정이 삭제가 된다. 그래서 Github Repository->Settings->Secrets->Actions에 키값을 등록하고 아래와 같이 yml파일에 설정해두어야한다.
 - name: Configure AWS credentials
      uses: aws-actions/configure-aws-credentials@v1
      with:
        aws-access-key-id: ${{ secrets.AWS_ACCESS_KEY_ID }}
        aws-secret-access-key: ${{ secrets.AWS_SECRET_ACCESS_KEY }}
        aws-region: ap-northeast-2
      }}
그 외 다른 변수 설정들은 .yml 안에 아래와 같이 추가해주면 된다.
env: 를 선언하고 원하는 key-value를 선언하면 된다. 아래는 예시.
name: Deploy to Amazon EC2

on:
  push:
    branches:
      - main

# 본인이 설정한 값을 여기서 채워넣습니다.
# 리전, 버킷 이름, CodeDeploy 앱 이름, CodeDeploy 배포 그룹 이름
env:
  AWS_REGION: ap-northeast-2
  S3_BUCKET_NAME: my-github-actions-s3-bucket
  CODE_DEPLOY_APPLICATION_NAME: my-codedeploy-app
  CODE_DEPLOY_DEPLOYMENT_GROUP_NAME: my-codedeploy-deployment-group

permissions:
  contents: read
배포 실패
https://docs.aws.amazon.com/ko_kr/codedeploy/latest/userguide/troubleshooting-deployments.html 공식문서에서 에러문구를 검색해서 해결하였다.
나는 actions도 잘되고 s3에 압축파일도 잘들어갔는데 배포에서 실패가 됐다.
그 이유는 "The overall deployment failed because too many individual instances failed deployment, too few healthy instances are available for deployment, or some instances in your deployment group are experiencing problems."
라는 문구였는데, CodeDeploy가 안켜져있었다..
sudo service CodeDeploy-agent status 로 검색해서 확인한 후 꺼져 있으면
sudo service CodeDeploy-agent start로 다시 실행한 뒤에 배포해보자.
(만약 안되면 다른문제니까 공식문서 참고하기.)
파일 경로를 찾을 수 없는 경우
action을 위한 파일들은 되도록 루트 디렉토리에 위치하자
ex) gradle파일들, 스크립트 파일, yml